Home   /  

System Setup > Scan Document Category

The scanned document category helps organize and classify documents based on their content or purpose.
The following are the steps to manage the Scan Document Category:
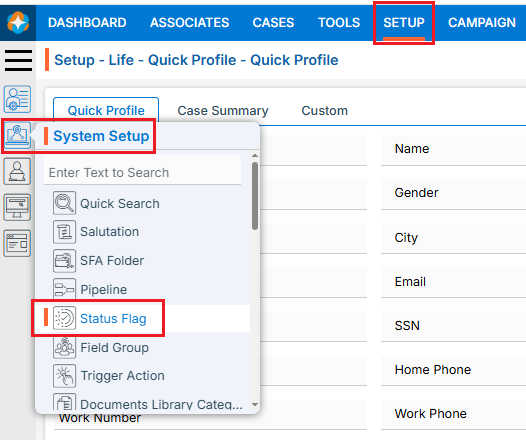
1. Navigate to the ‘SETUP’ tab and click on ‘System Setup’ in the left-side panel.
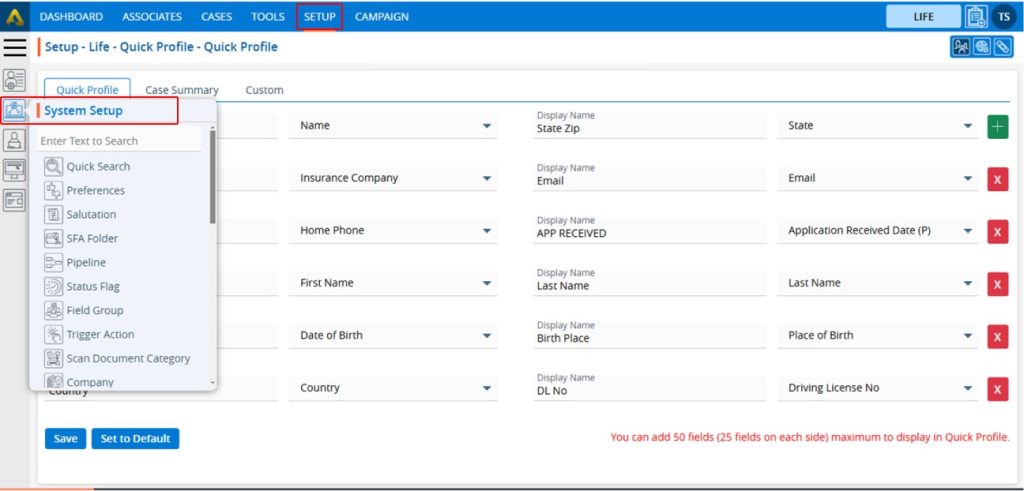
2. Click on the ‘Scan Document Category’ option in the System Setup menu.
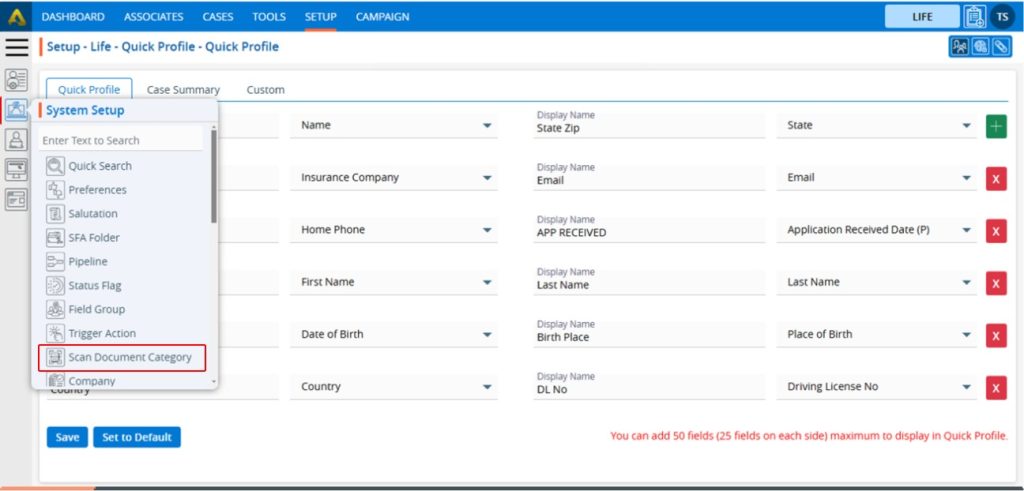
3. Users can search for the Scan Document Category option by typing in the search area.
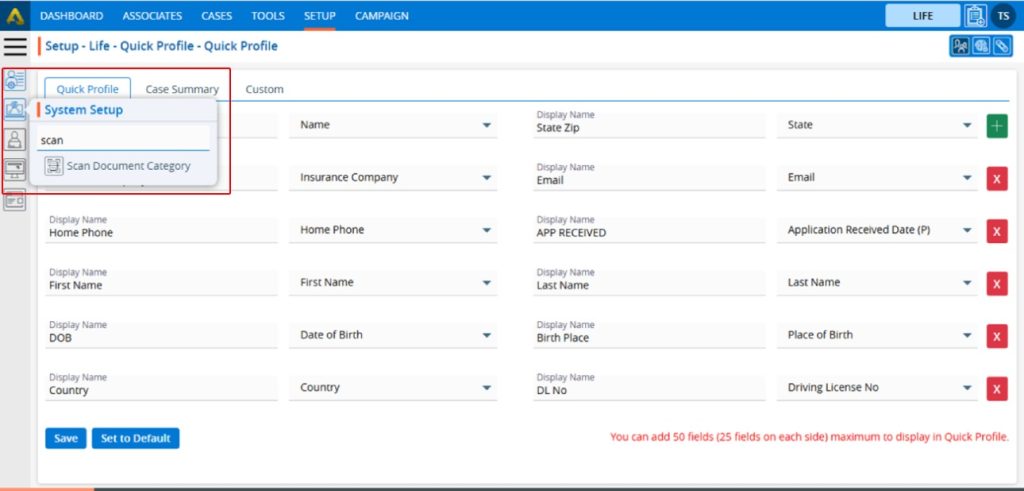
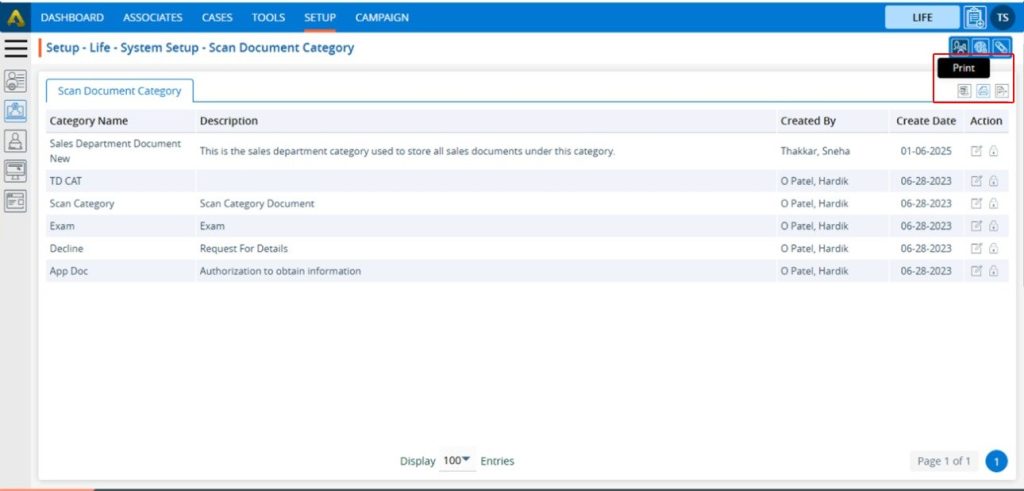
4. A new page titled ‘Setup – Life – System Setup – Scan Document Category’ will be opened, displaying the existing Scan Document Categories along with details of fields such as Category name, Description, Created By, Create Date and Action under the ‘Scan Document Category’ tab.
There are three available options: Add, Print, and Export.
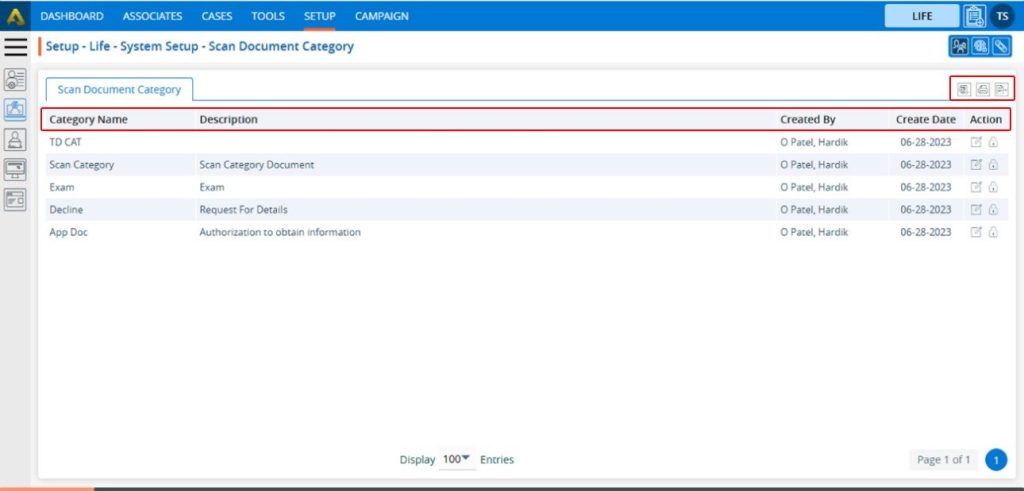
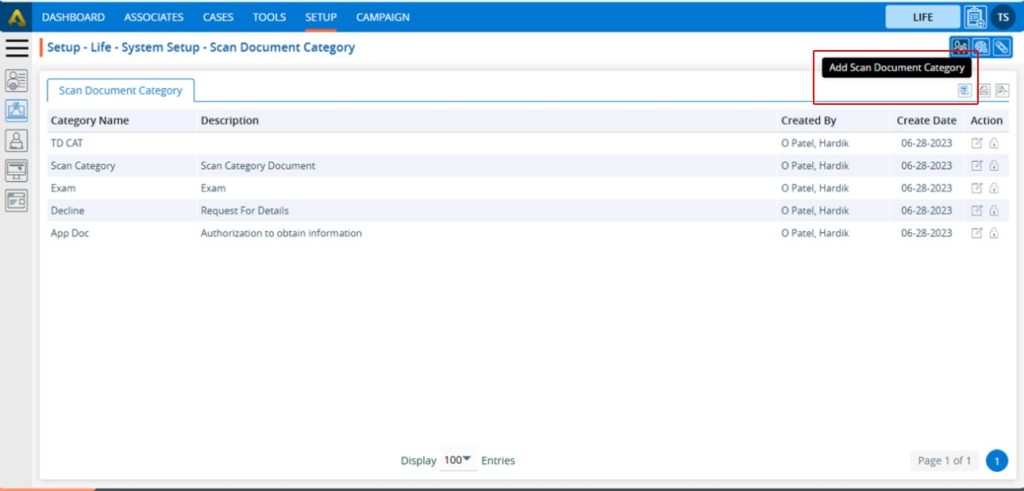
5. Click the ‘Add Scan Document Category’ icon to add a new Scan Document Category.
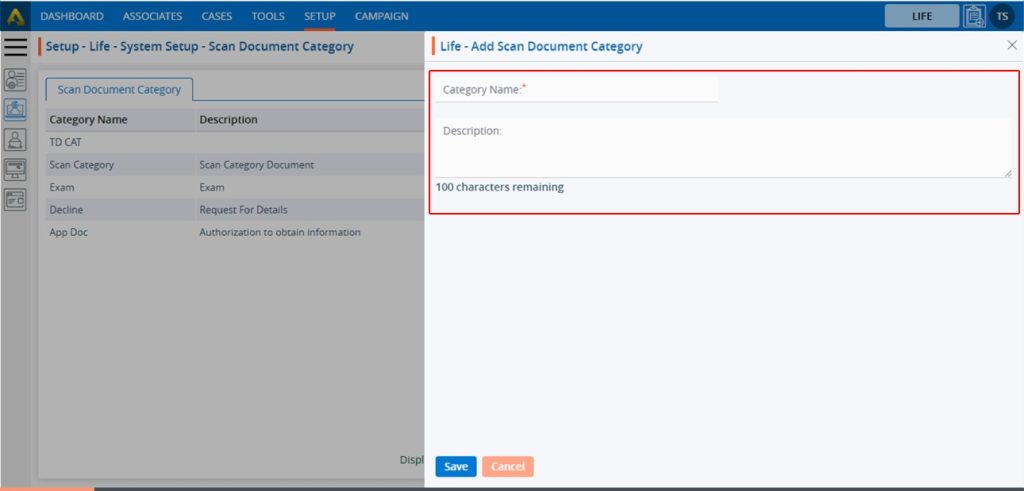
6. A new pop-up window titled ‘Life – Add Scan Document Category’ will be opened, containing fields for ‘Category Name’ and ‘Description’, additionally ‘Save’ and ‘Cancel’ options available at the bottom.

Fields with an ‘*’ sign are mandatory. In this case, Category Name is mandatory field.
– Category Name: Enter the desired Category Name. (Limit is a maximum of 100 characters) (This field allows to enter alphabet, space and single quote only).
– Description: A description for the Scan Document Category needs to be added in accordance with the Category name. (Limit is a maximum of 100 characters).
7. Fill in the details and click the ‘Save’ button to continue.
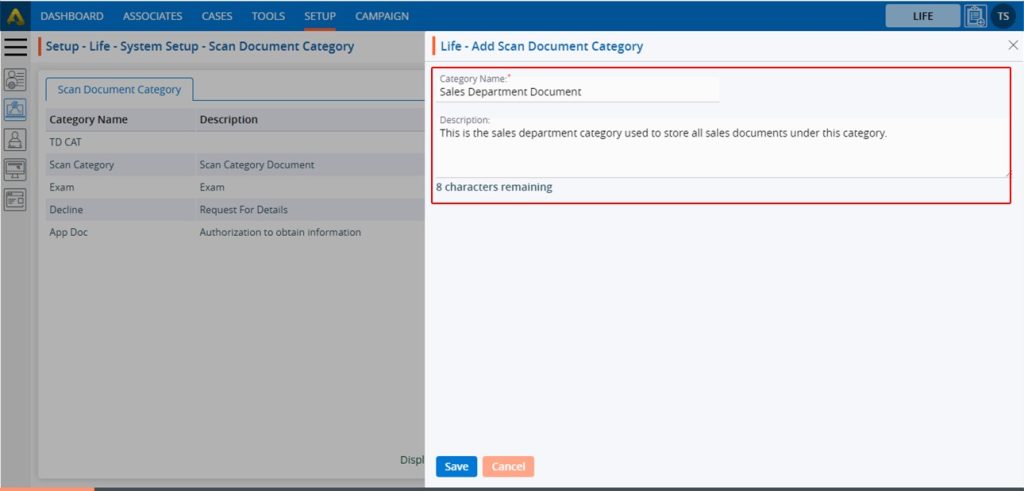
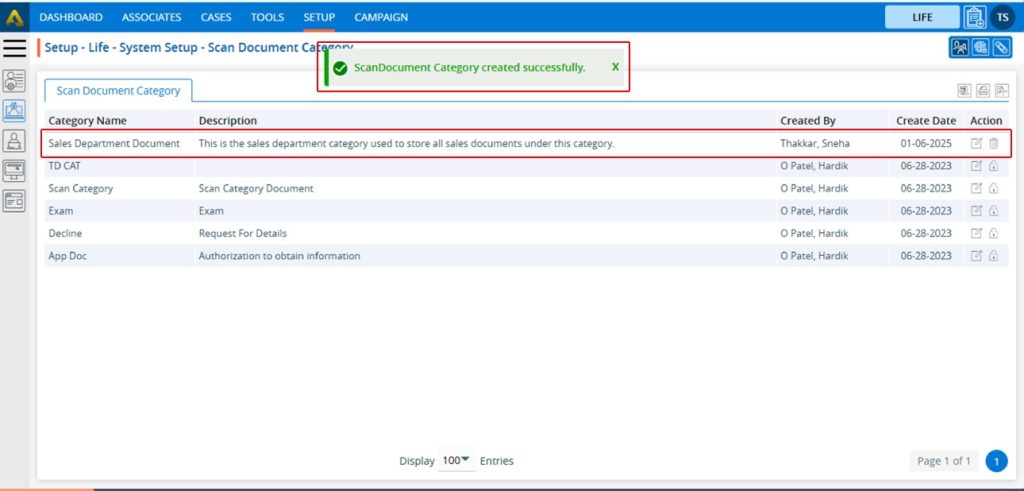
8. The system will generate a confirmation message saying, that ‘Scan Document Category created Successfully’ and the newly added Scan Document Category will now be available on the list.

9. There are two options available for each Category under the Action heading: Edit and Delete or Lock.
For newly created categories, the Edit and Delete options will be available by default.
– Edit: By clicking on the Edit icon, the user can edit the details of the selected Category.
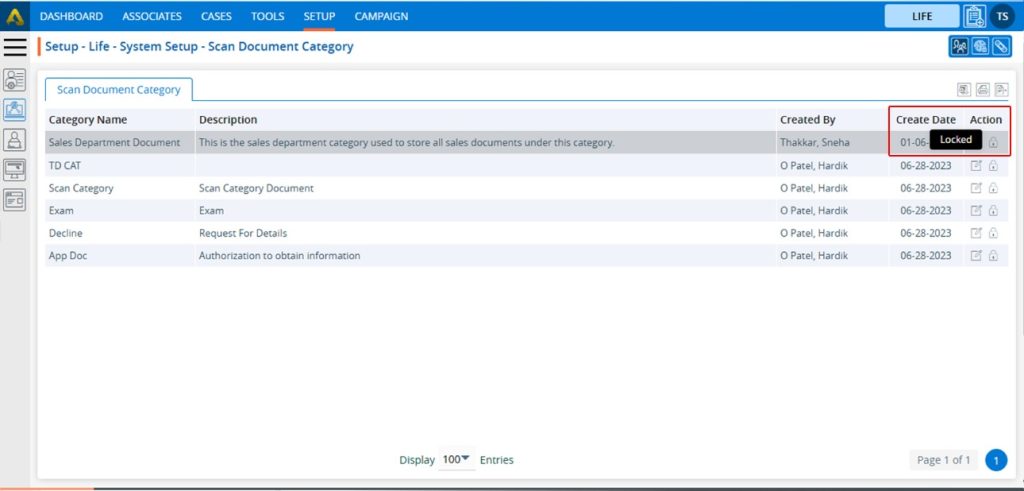
– Delete or Lock: By clicking on Delete, the user can remove the selected category. However, once the category is assigned to any document, the option will change from Delete to Lock. The Delete option will remain available until the category is assigned to any document.
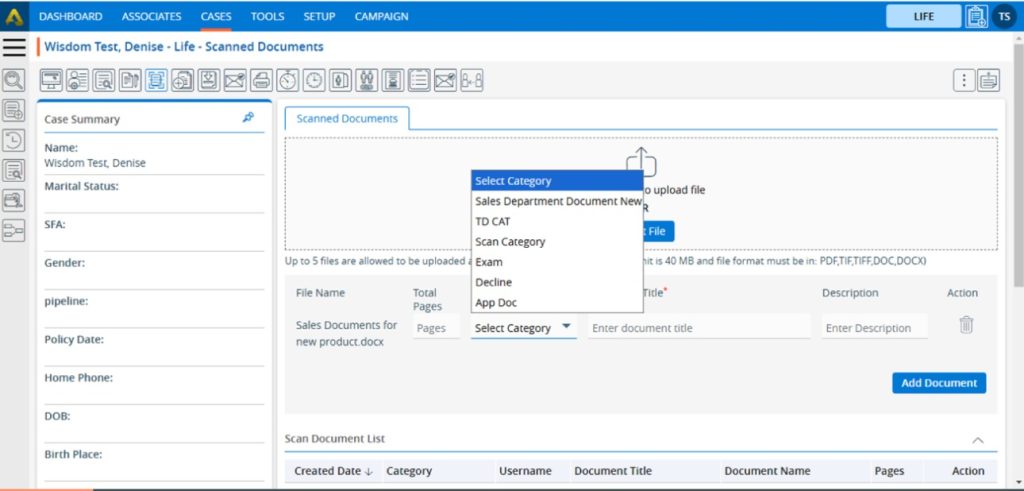
10. This newly added Category will be available on the CASES tab > Case > Scanned Documents > Category Drop down.
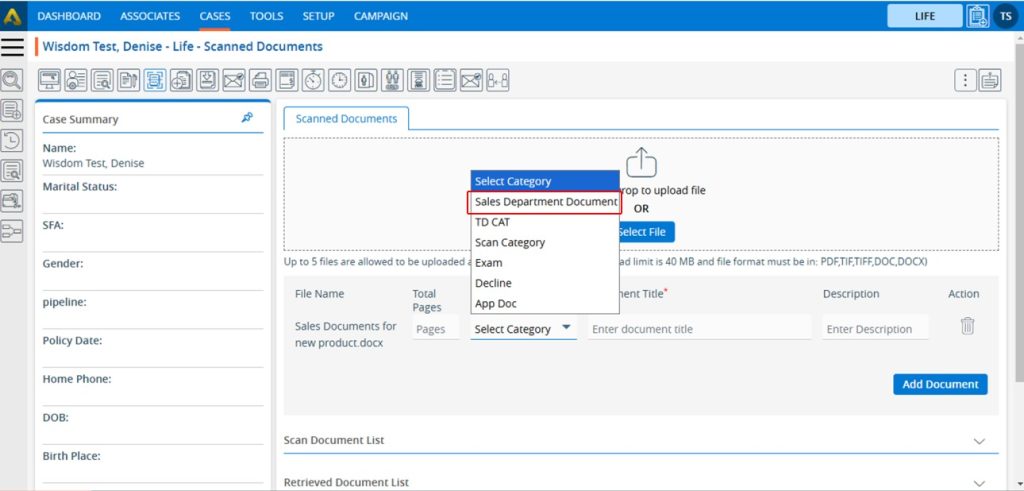
11. The user can save a scan document under this newly added scanned document category.
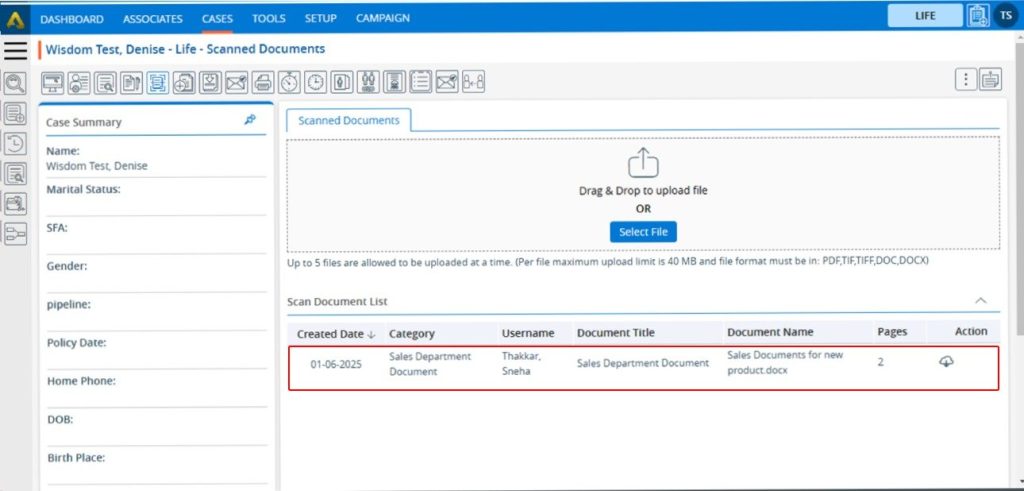
12. Once the category is assigned to any document, the option will change from Delete to Lock, and it can no longer be deleted.
13. Users can update the values for created Category by clicking on edit icon for the selected Category.
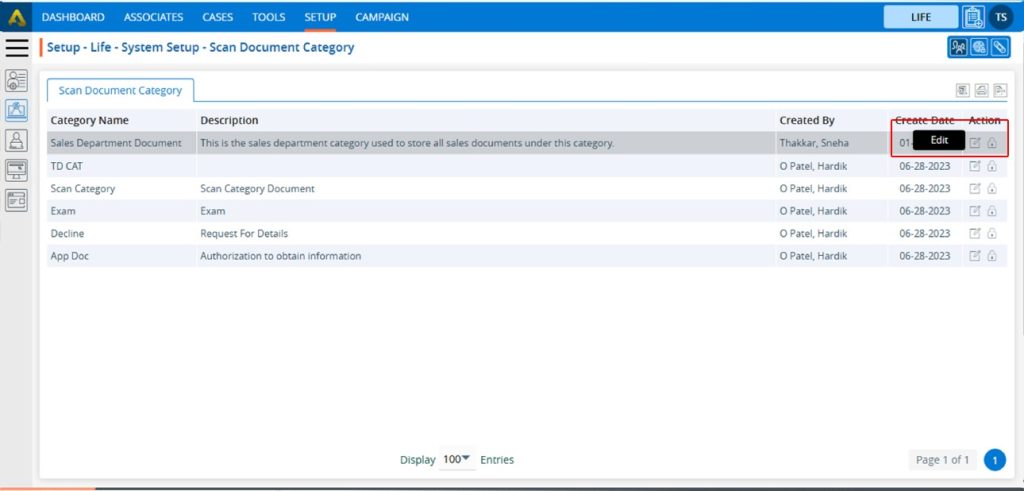
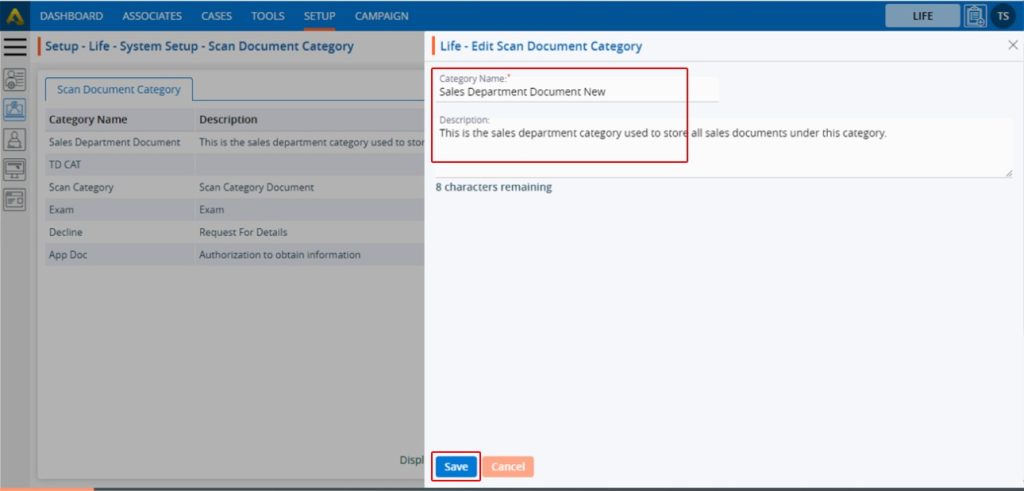
14. A new pop-up window titled ‘ Life – Edit Scan Document Category’ will be opened with the existing fields value. Update the values for the Category as needed.
For example, in this case, we are updating the category name. Once the category name is updated, click on Save.
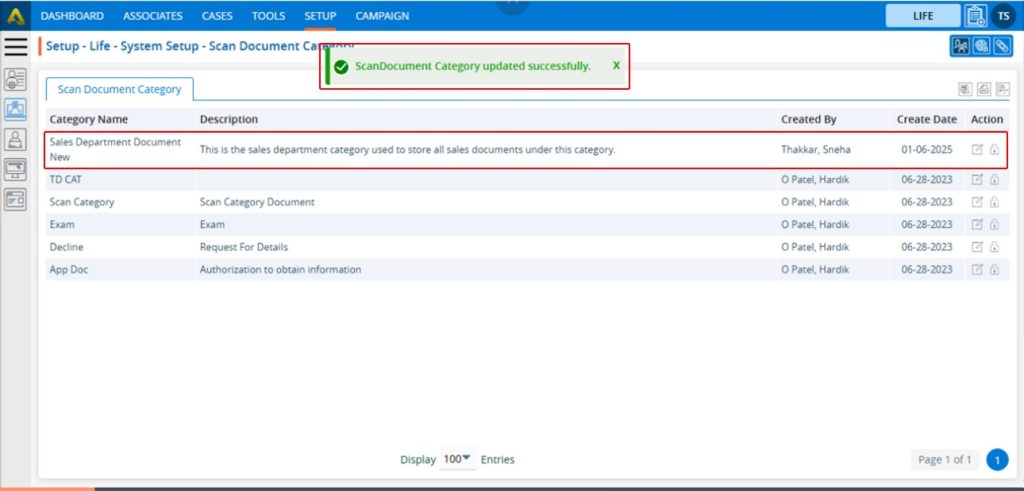
15. The system will generate a confirmation message saying, that ‘Scan Document Category updated Successfully’. The updated name will be displayed in the listing.
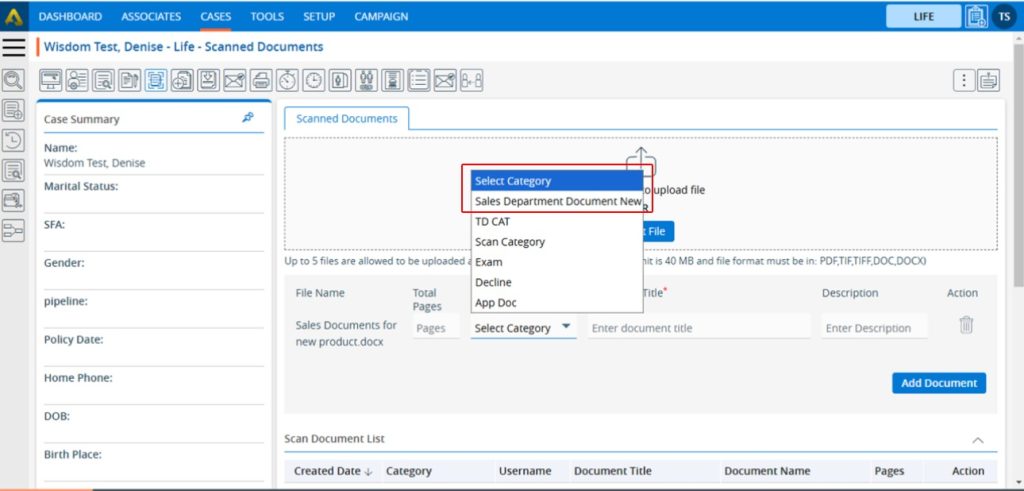
16. Category names will be updated in the CASES Tab > Case > Scanned Documents > Category Drop down.
17. Category names will also be updated in the existing document listings under CASES Tab > Case > Scanned Documents > Scan Document List, where this category has already been assigned.
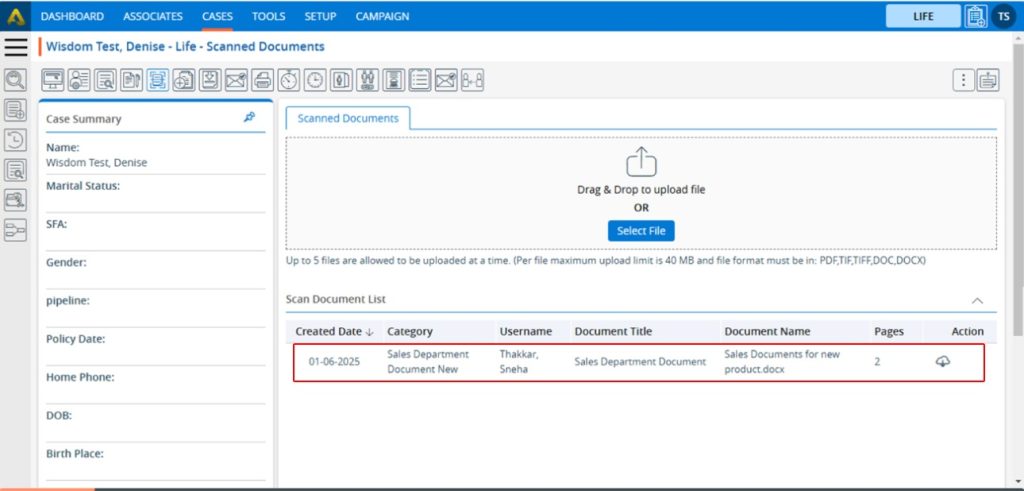
18. To remove the existing Category, click on the Delete icon. (If a category is assigned to any document, it cannot be deleted.) (To explain the delete function here another category is created which is HR Document Category and not assigned to any document).
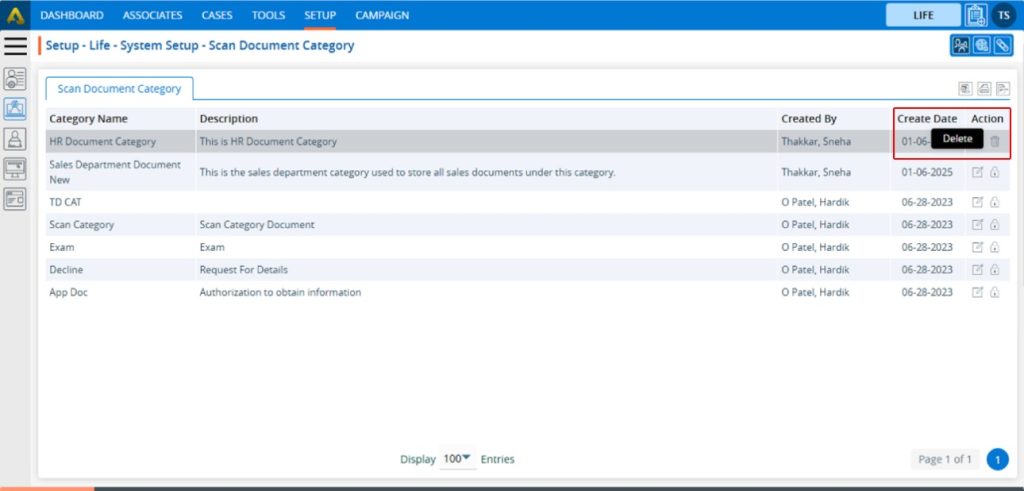
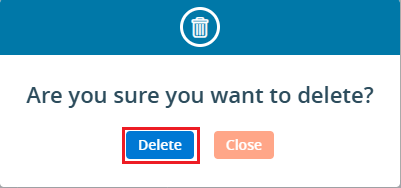
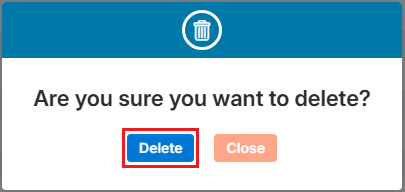
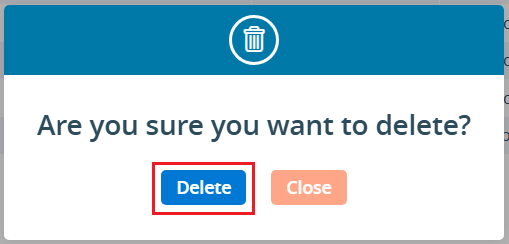
19. After Clicking on Delete, the system will prompt confirmation before deleting.
20. Click on delete to remove this Category.
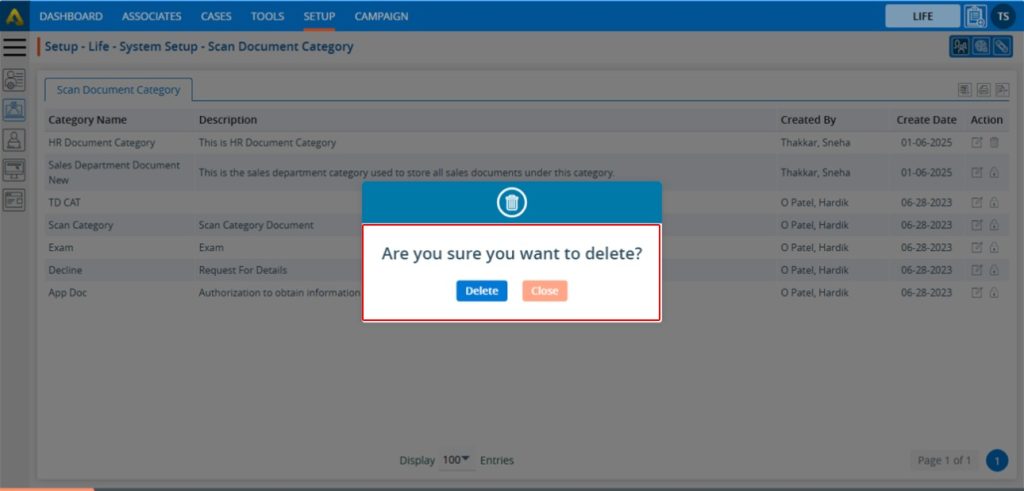
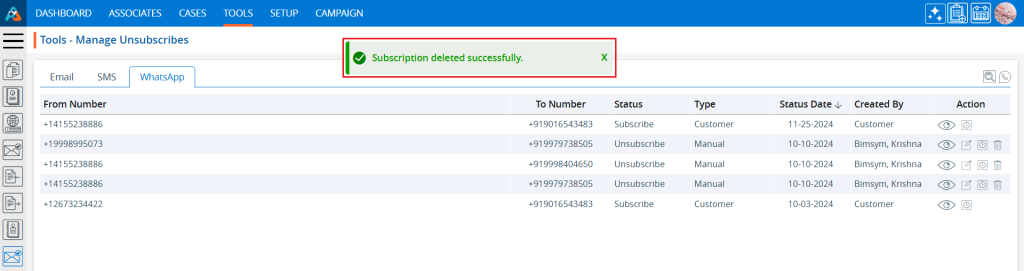
21. The system will generate a confirmation message saying, “Scan Document Category deleted successfully,” and the Category will be removed from the list.
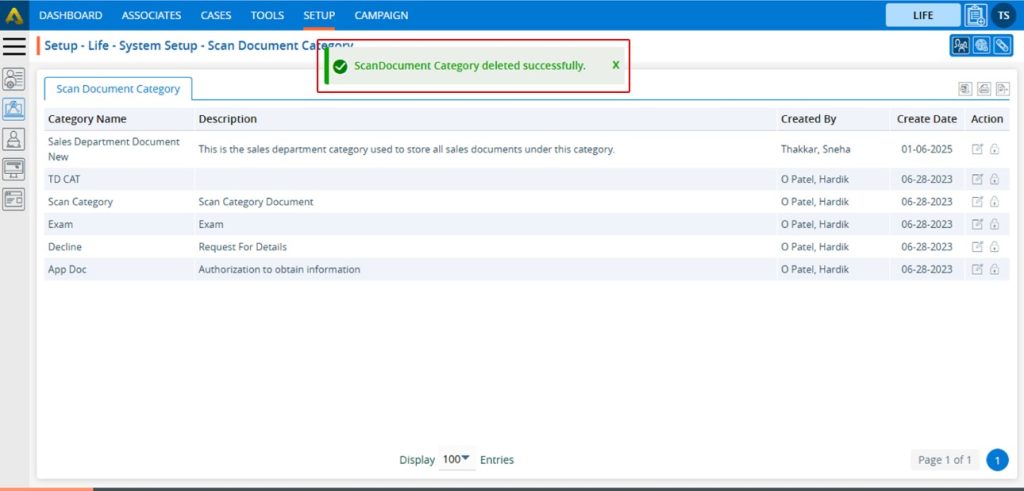
22. This Category will no longer be displayed in the CASES Tab > Case > Scanned Documents > Category Drop down.
23. To print the list of available categories, click on the Print icon.
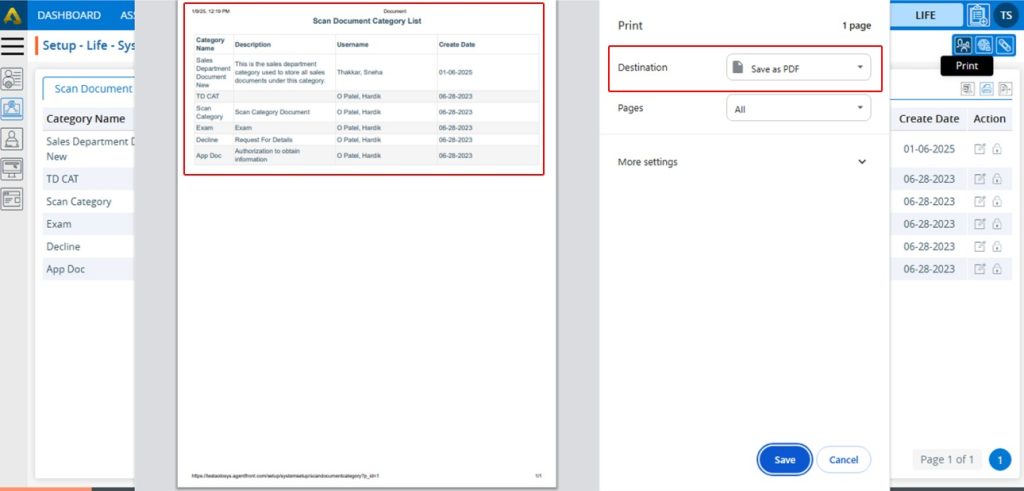
24. By clicking on the Print icon, a new page will be displayed with the print window containing the list of available categories. The user can print the data using the desired options.
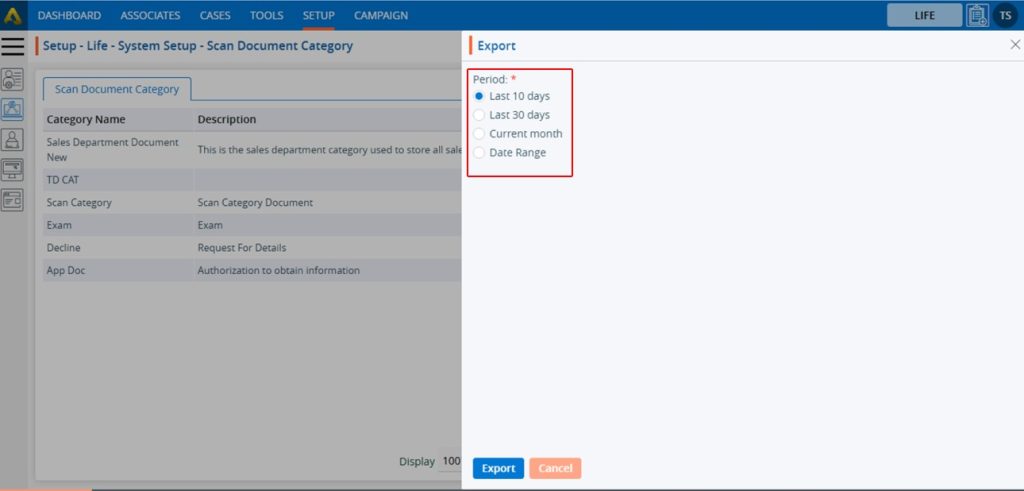
25. To export the list of available categories, click on the Export icon.
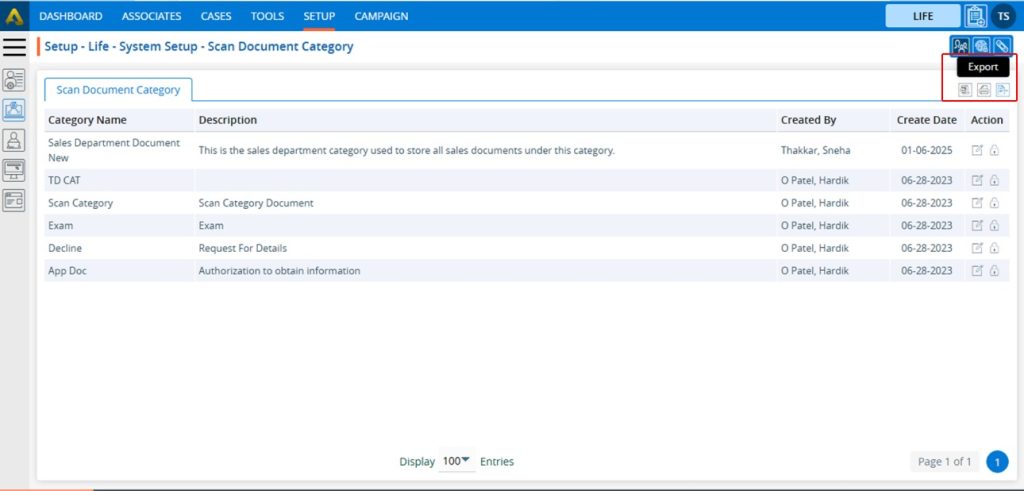
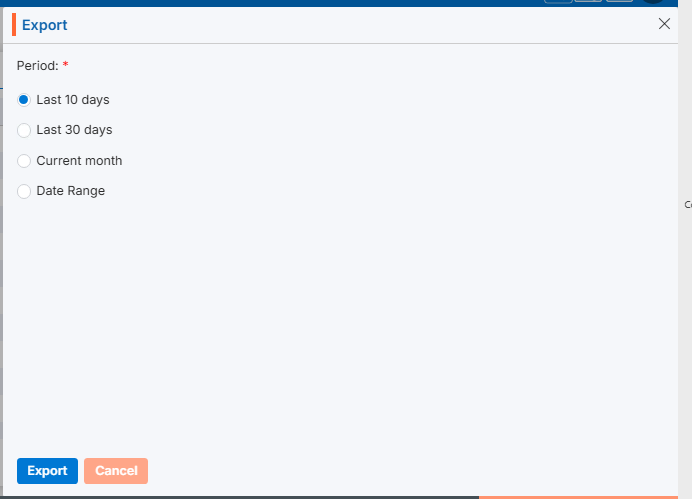
26. By clicking on the Export icon, a new pop-up window will open with different period options. The user can export the data using the desired options.
0
0

System Setup > Salutation Setup

Salutation is a field within the CRM where administrators can configure and store standard prefixes like “Mr.”, “Ms.”, “Dr.”, “Mrs.”, “Prof.”, etc., that are applied to contacts or leads based on their title. This ensures that automated communications are personalized and respectful, using the appropriate formal address for everyone.

  1. Sign in to AgentFront CRM
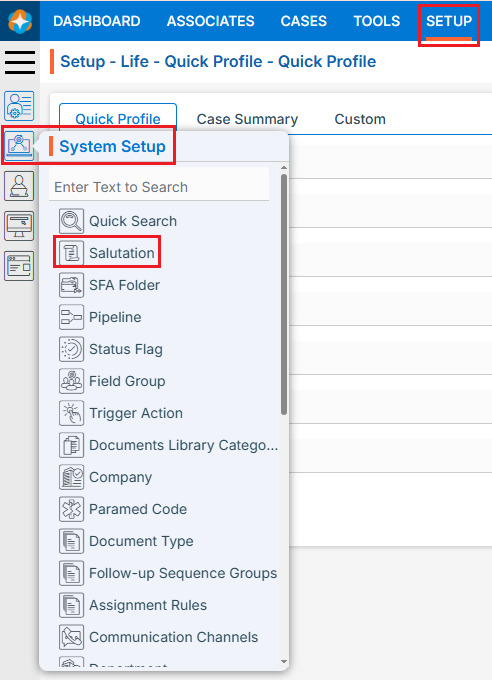
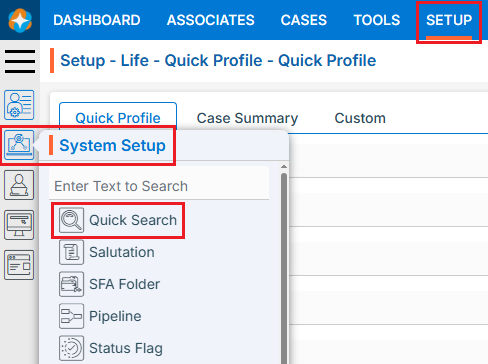
  2. From the top menu, choose Setup
  3. In the left-side panel, select System Setup
  4. Under System Setup, click Salutation
    • Note: The user can also access this page by typing Salutation in the “Enter Text to Search” bar
  5. The Salutation page opens with a list of available existing salutations
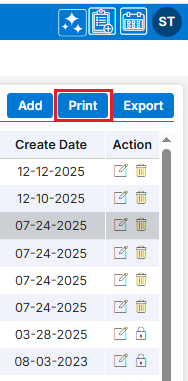
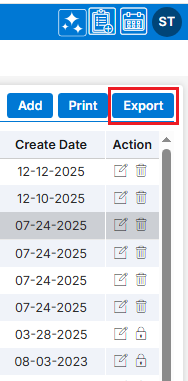
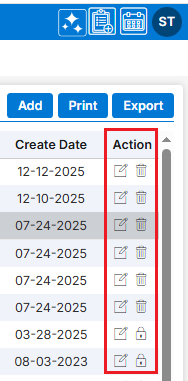
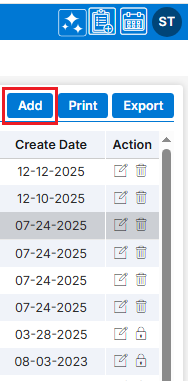
  6. There is an Add, Print and Export buttons above the Action Column on the right pane to add new Salutation
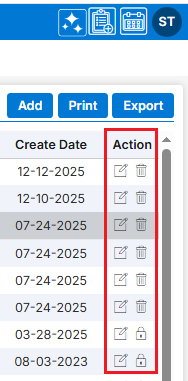
  7. Also, there are options to Edit () and Delete ( ) the existing Salutation under the Action Column on the right pane
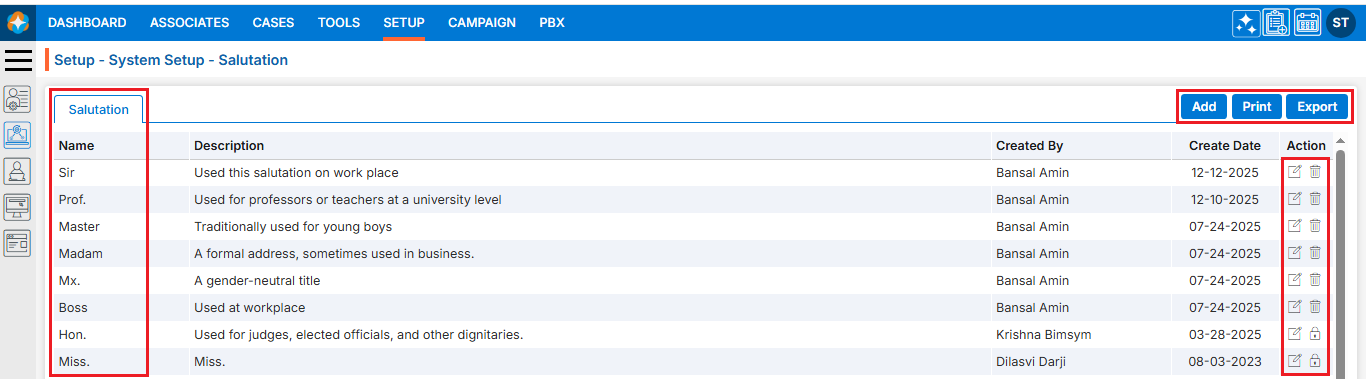
    Note: If any salutation is used or implemented, the deleting options will be locked for that salutation, meaning it cannot be deleted

Add New Salutation:

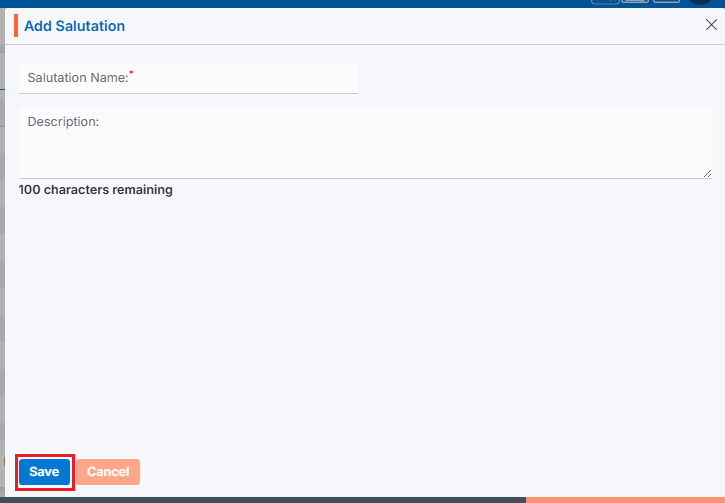
  1. Click the ‘Add’ button at the top right of the list to add new Salutation
  2. It will open page to add new Salutation with title Add Salutation
  3. Click on Save. The Salutation is now listed and ready for use

Print Salutation

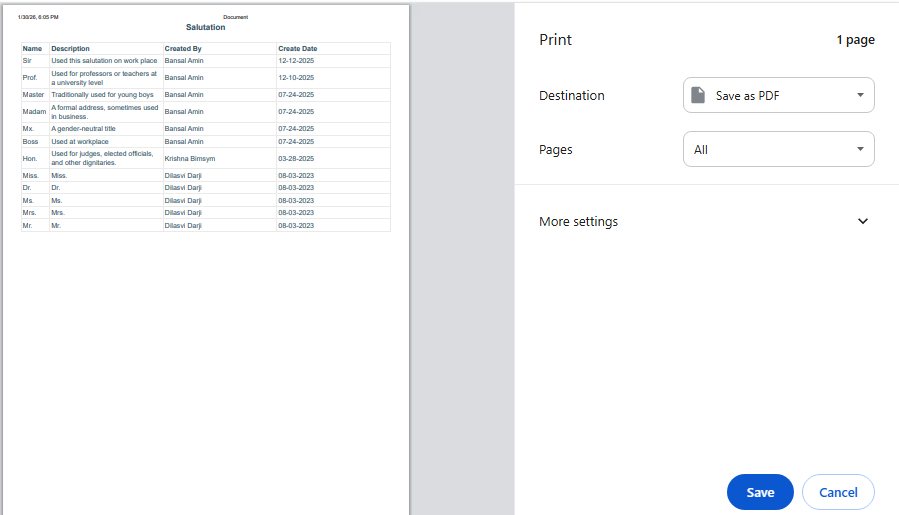
  1. Click the ‘Print’ button at the top right of the list to print the Salutation list
  2. Clicking on ‘Print’ will open a new page and allow the user to print the Salutation listing

Export Salutation

  1. Click the ‘Export’ button at the top right of the list to export the Salutation listing
  2. Clicking on ‘Export‘ will open a new page and allow users to export the Salutation listing for the selected period

View Salutation in Cases tab

  1. Navigate to the Cases tab from the top menu
  2. Cases List – All Cases page will open by default
  3. Open any case from all cases lists
  4. The dashboard for the selected case will open by default
  5. Click the ‘Information’ tab from the dashboard
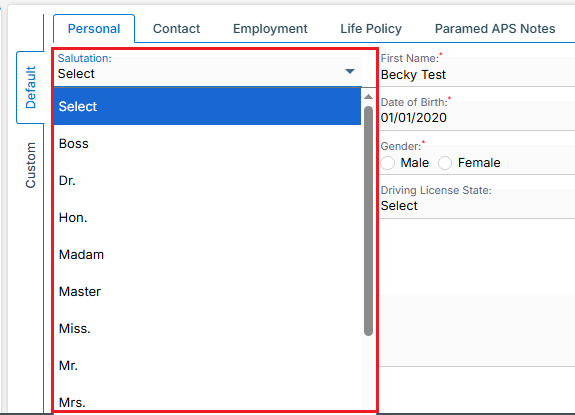
  6. Navigate to the ‘Default’ tab under the ‘Personal’ tab to view the drop-down of available Salutations

Update Salutation:

  1. To update the existing Salutation from the available list, click on Edit() icon from the Action Column for the salutation you want to edit/change
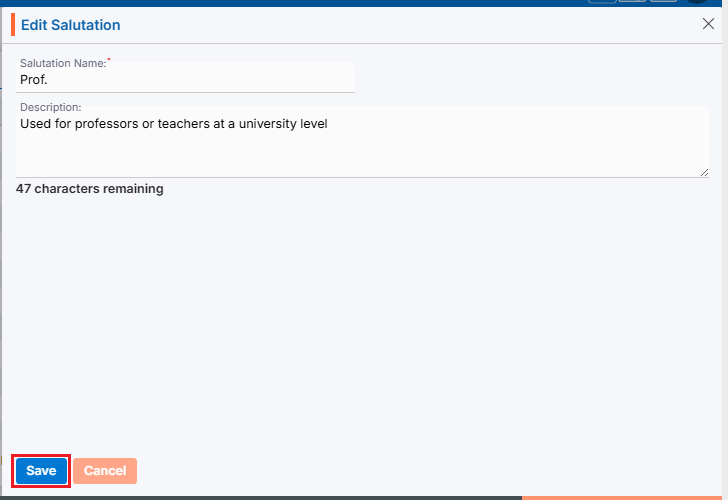
  2. Clicking the Edit () icon will open the selected Salutation in edit mode with title Edit Salutation
  3. Update the required details and click Save

Delete Salutation

  1. To delete the existing Salutation from the available list, click on Delete () icon from the Action Column for the Salutation you want to delete
    Note: Deletion is restricted if the salutation is referenced elsewhere, until those references are removed
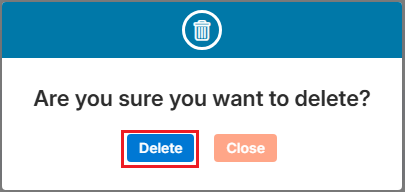
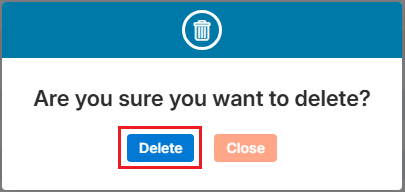
  2. It will ask for confirmation popup, click on Deleted button to delete Salutation otherwise click on Close button

0
0

Associate Quick Search Setup

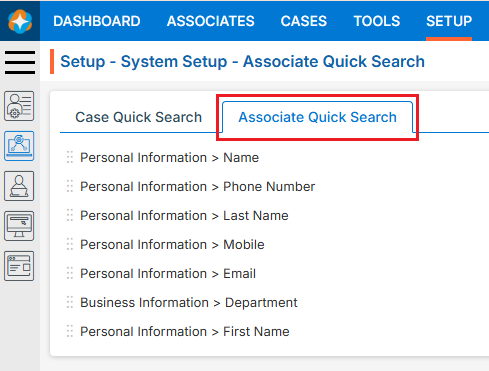
The Associate Quick Search Setup feature allows users to configure which Associate fields are searched when specific characters are entered in the Quick Search bar. Users can select up to 10 fields and prioritize them to improve search efficiency.

Setup Associate Quick Search

  1. Sign in to AgentFront CRM.
  2. From the top menu, choose Setup.
  3. In the left-side panel, select System Setup.
  4. Under System Setup, click Quick Search.
    • Note: The user can also access this page by typing Quick Search in the Enter Text to Search bar.
  5. Click on Associate Quick Search. (By default, Case Quick Search page will open.)

Configure Quick Search Fields:

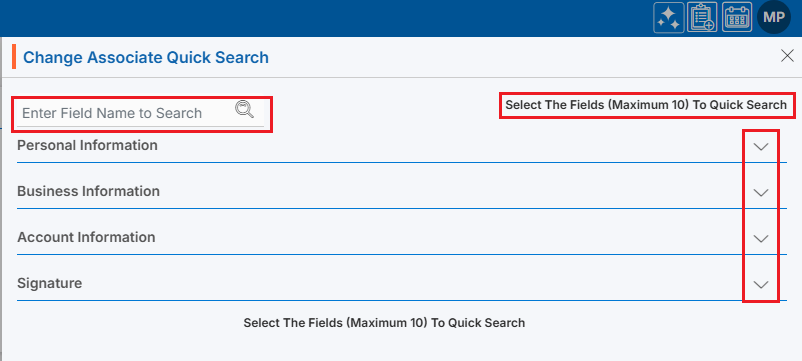
  1. Click the Quick Search option to open the configuration window.
  2. When clicking on Quick Search, Change Associate Quick Search window will open.
  3. Click the drop-down arrow to view the available fields or use Enter Field Name to Search to quickly find a specific field.
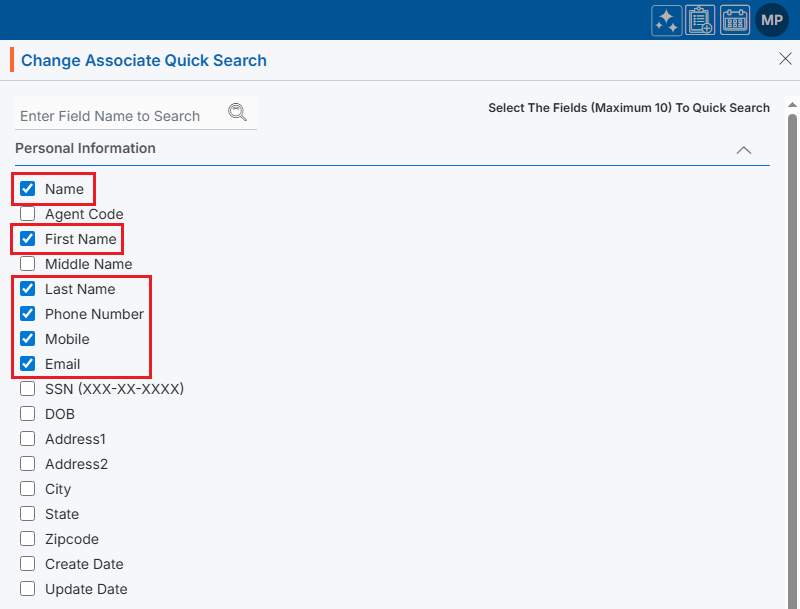
  4. Click the drop-down arrow next to Personal Information to expand the list.
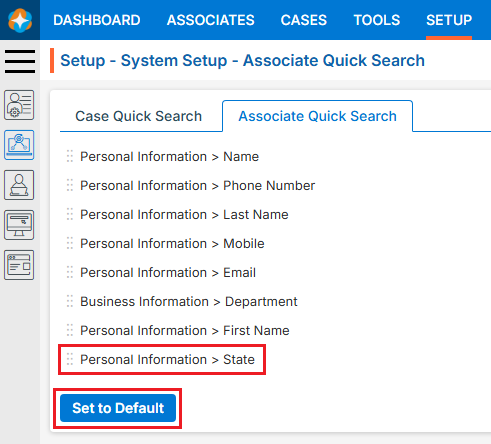
  5. Fields displayed in the list are selected by default.
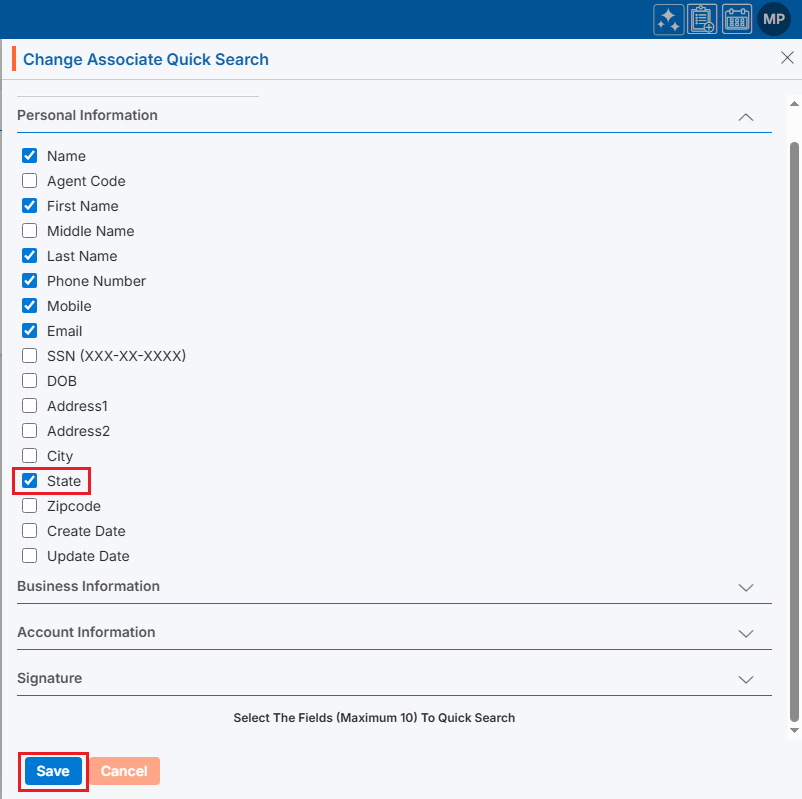
  6. Select or deselect fields to configure which Personal Information fields are included in Associate Quick Search.
  7. Repeat the same process to select fields from other information categories, if required.
  8. The system allows the selection of a maximum of 10 fields.
  9. After selecting the required fields, click Save.
  10. Updated fields will now be displayed in the Associate Quick Search list.
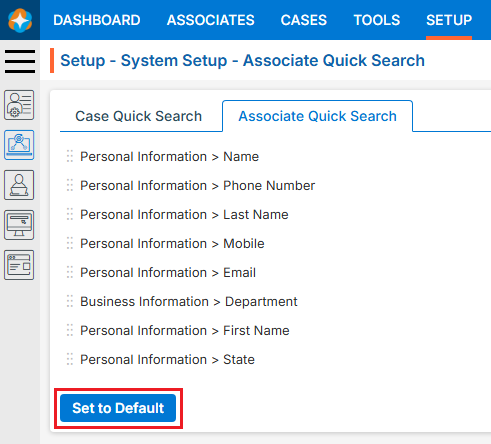
  11. The ‘Set to Default’ button will now appear, allowing users to restore default settings if needed.

Use Associate Quick Search

  1. Navigate to the ASSOCIATE tab.
  2. Click the Quick Search option.
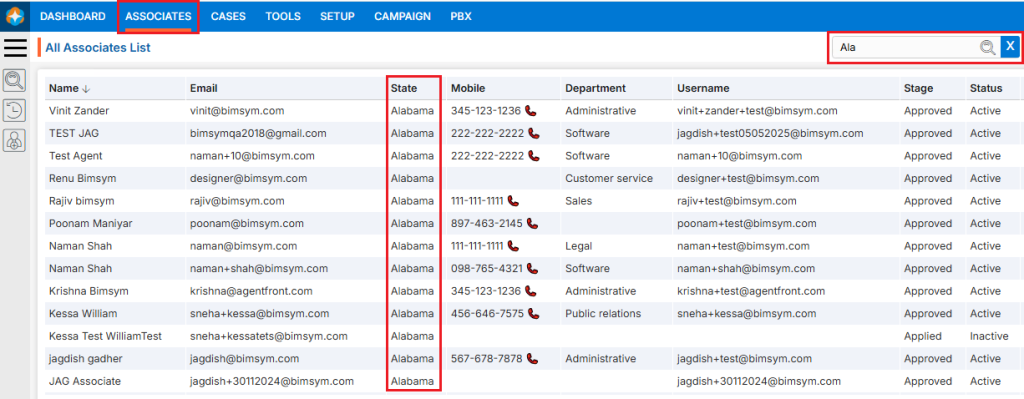
  3. Enter at least 3 characters in the search box. Here, we have entered ‘Ala’ in the quick search box.
  4. Click the Search icon to view results.
  5. The search results will display a list of associates whose state starts with ‘Ala’.

Reset to Default Settings

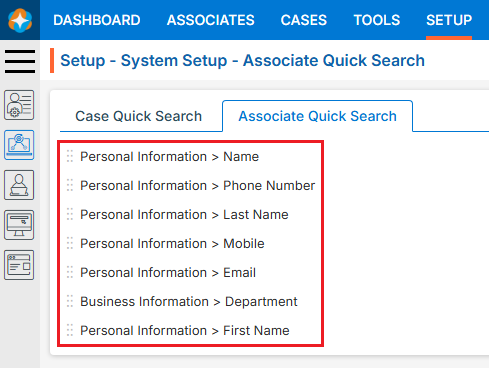
  1. By clicking Set to Default, the settings will be restored to their default values.
  2. Once the Associate Quick Search settings are reset, the search will operate using the default field preferences defined in System Setup.

Re-arrange Field Priority

  1. Fields can be rearranged () to set their priority in the search results.
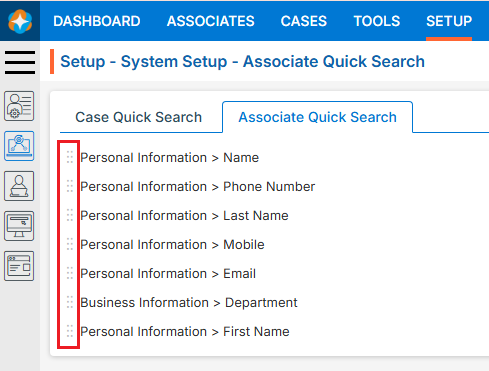
  2. Hover over the Re-arrange () icon at the beginning of a field name.
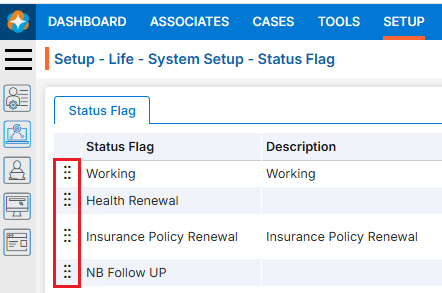
  3. Select and drag the Re-arrange () iconto move up or down the field to the desired position, then drop it to save the new order.
0
0

Case Summary

A Case Summary Fields under a quick profile typically refers to the key fields or sections in a case summary that capture important information about a case. These fields serve the purpose of providing a quick, organized summary of the case for easy reference.

Case Summary Setup

  1. Sign in to AgentFront CRM
  2. From the top menu, choose SETUP
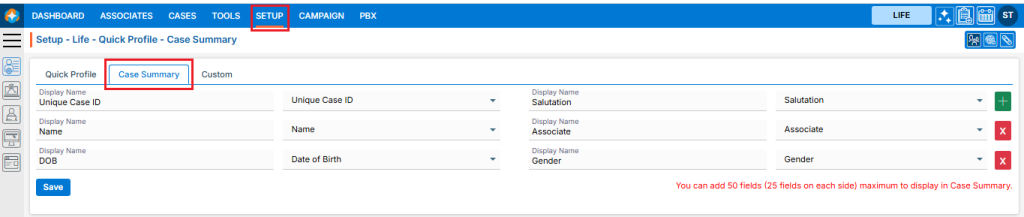
  3. Setup > Quick Profile > Cases Quick Profile setup page will open by default
  4. Click on Case Summary
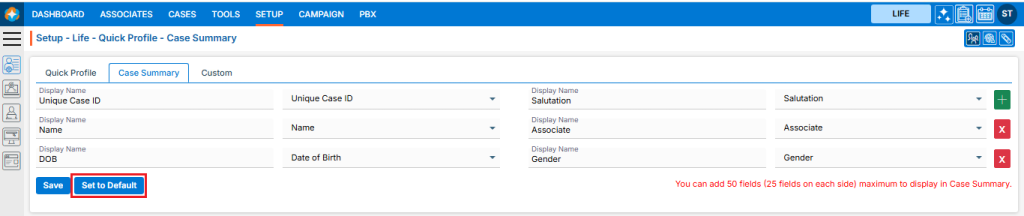
  5. This page will display the default Case’s Case Summary setup, including the field display name and the selected field from the dropdown
  6. This Case Summary setup will be reflected in CASES > Individual Case > Left Side of the page
  7. Users can add a new field by using the (+) sign, which is displayed in green
  8. Users can remove the existing field by using the (x) sign, which is displayed in red color
  9. Users can also edit the existing field(s) that have already been set up
  10. Once the add/edit action has been taken, click on ‘Save
  11. This updated case summary setup will be reflected in CASES > Individual Case > Case Summary

Restore Case Summary Setup

  1. The ‘Set to Default‘ option will restore the default case summary setup and will be reflected in CASES > Individual Case > Case Summary

0
0

Quick Profile > Associate Summary

An associate summary typically refers to the key fields or sections in an associate summary that capture essential information about the associate. These fields provide a concise, organized overview for quick and easy reference.

Associate Summary Setup

  1. Sign in to AgentFront CRM
  2. From the top menu, choose SETUP
  3. Setup > Quick Profile > Cases Quick Profile setup page will open by default
  4. Click on Quick Profile > Associate Summary
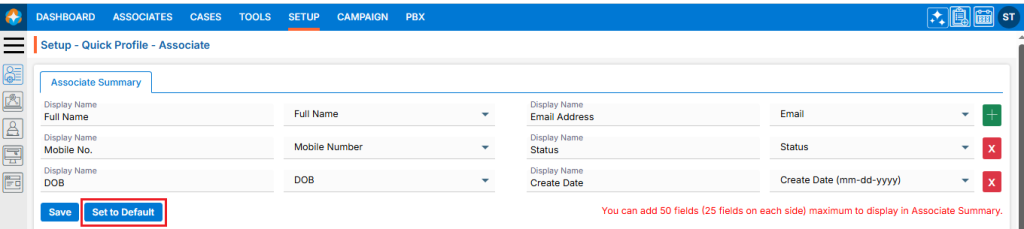
  5. This page will display the default Associate’s Summary setup
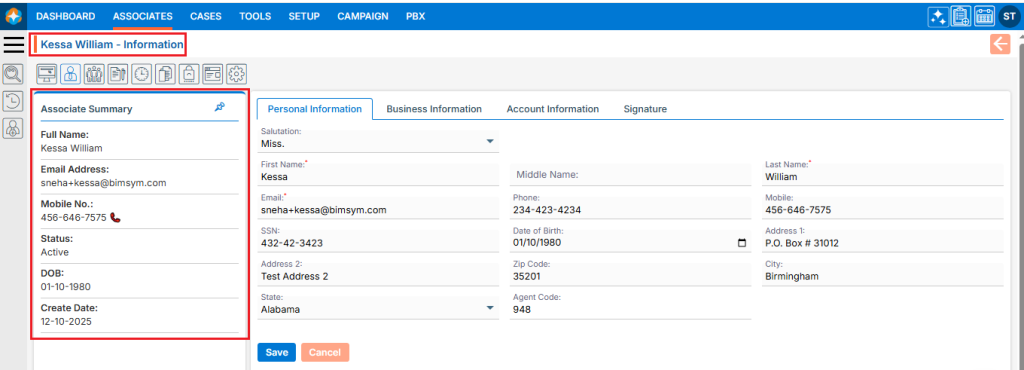
  6. This Associate Summary setup will be reflected under Associate > Individual Associate Window > Associate Summary, located on the left side of the page
  7. Users can add the new field by using the (+) sign, which is displayed in green color
  8. Users can remove the existing field by using the (x) sign, which is displayed in red color
  9. Users can also edit the existing field(s) that have already been set up
  10. Once the add/edit action has been taken, click on ‘Save
  11. This updated Associate summary setup will be reflected in ASSOCIATE > Individual Associate Window > Associate Summary

Restore Associate Summary Setup

  1. To restore the default Associate Summary setup, click on ‘Set to Default‘. The system will reset the setup, and the changes will be reflected in Associate > Individual Associate Window > Associate Summary
0
0

Cases Archive

The Archive feature is used to temporarily move cases to Archive folder that are not currently needed.

The following are the steps to move Cases to the Archive:
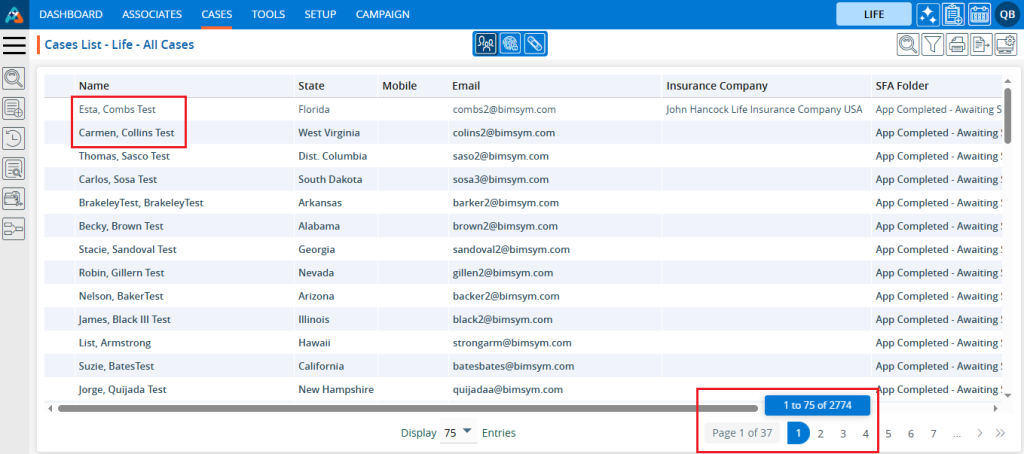
1. Navigate to the ‘CASES’ tab where you’ll find the Cases List – All Cases.

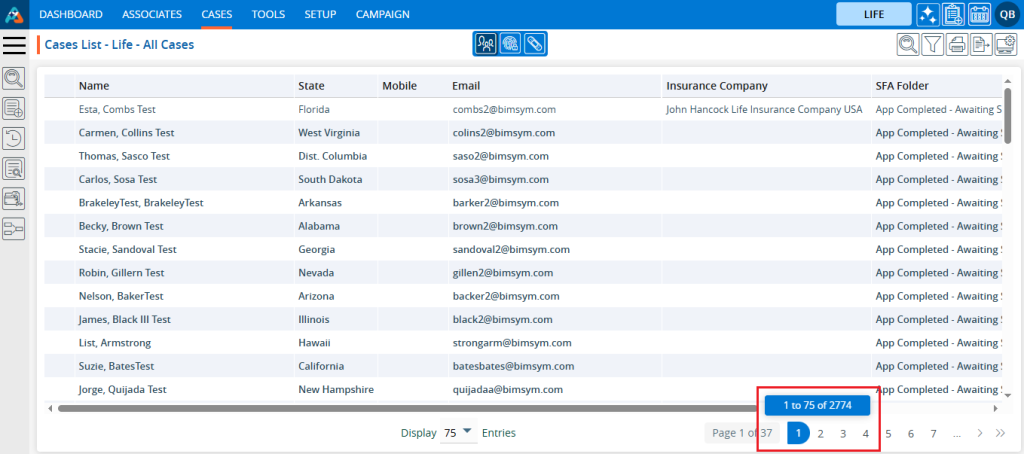
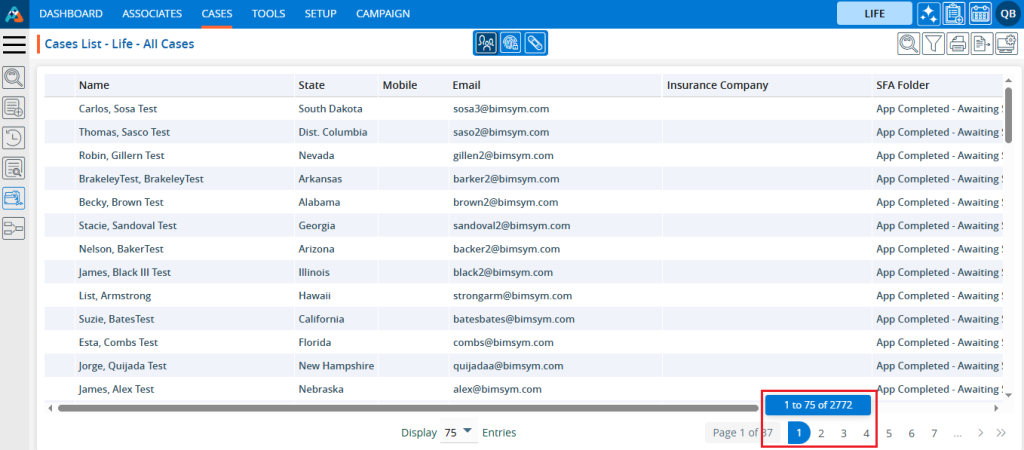
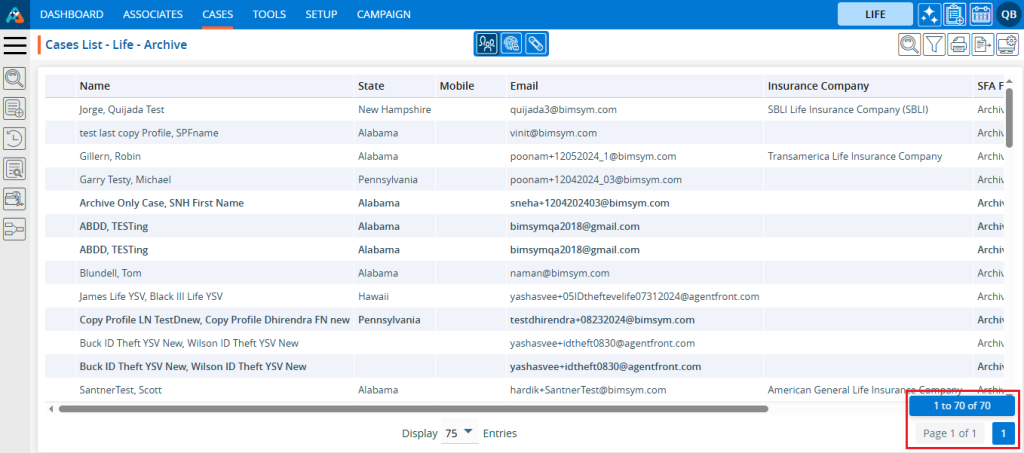
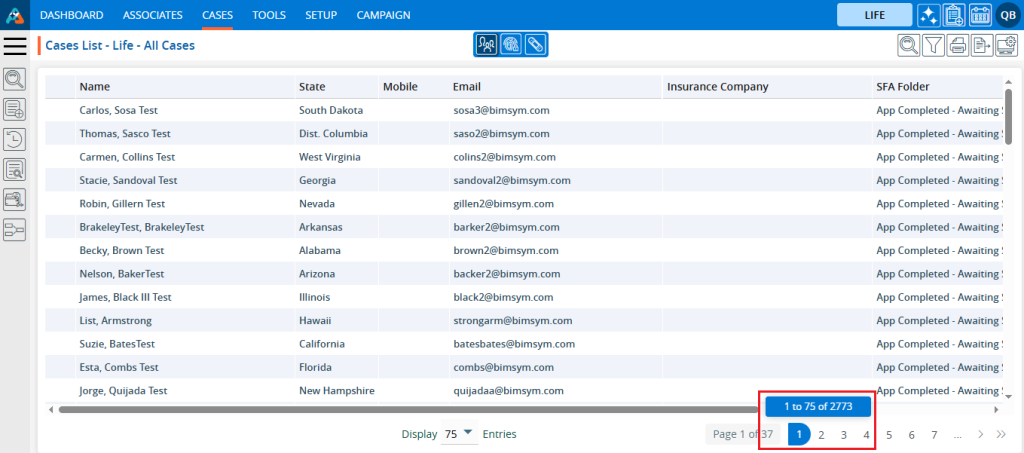
2. Check the total number of cases in the All-Cases List; it shows 2774 cases available.

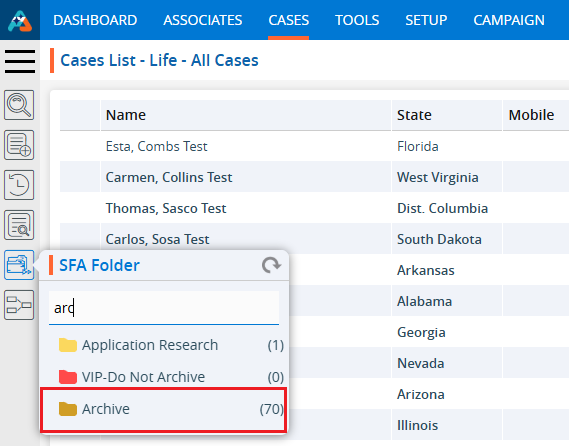
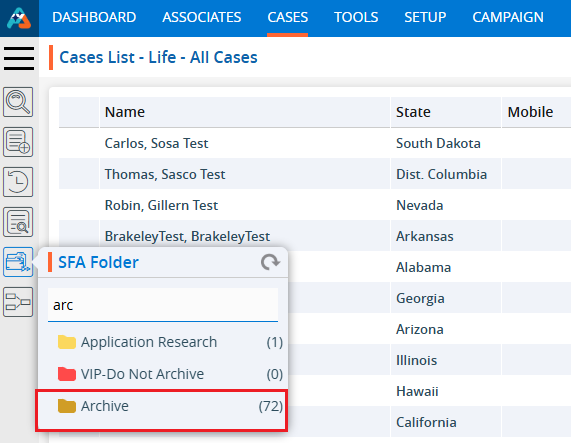
3. Before moving a case to the ‘Archive’ check the number of cases in the ‘Archive’ folder (located within the SFA folder). There are currently 70 cases in the Archive.

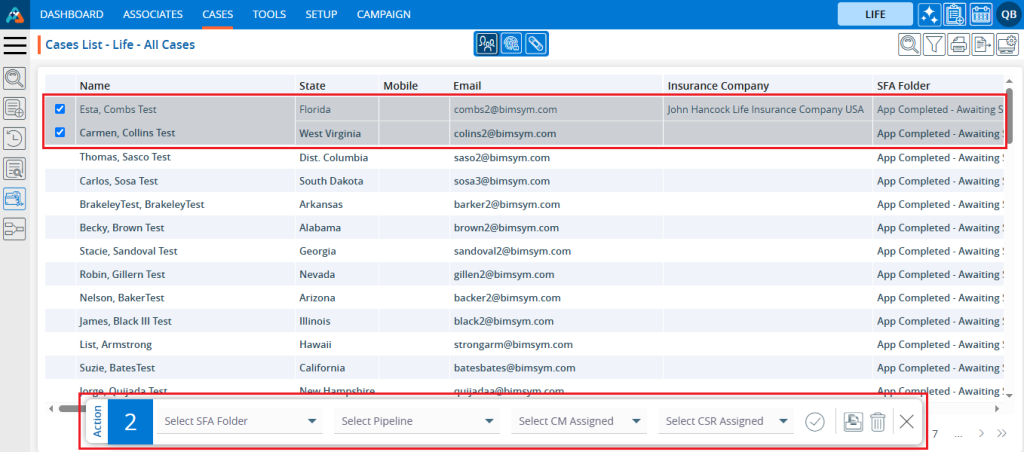
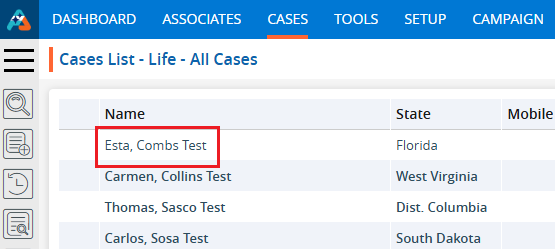
4. Select the cases from the ‘Cases List – All Cases’ list that is currently not needed. After clicking the check-box  the Quick Action pop-up menu will be enabled.

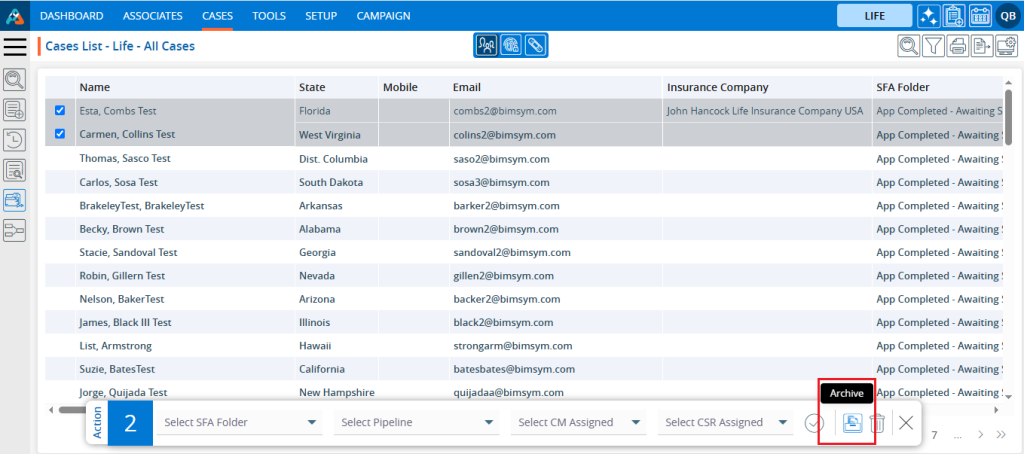
5. Click on the ‘Archive’ option.

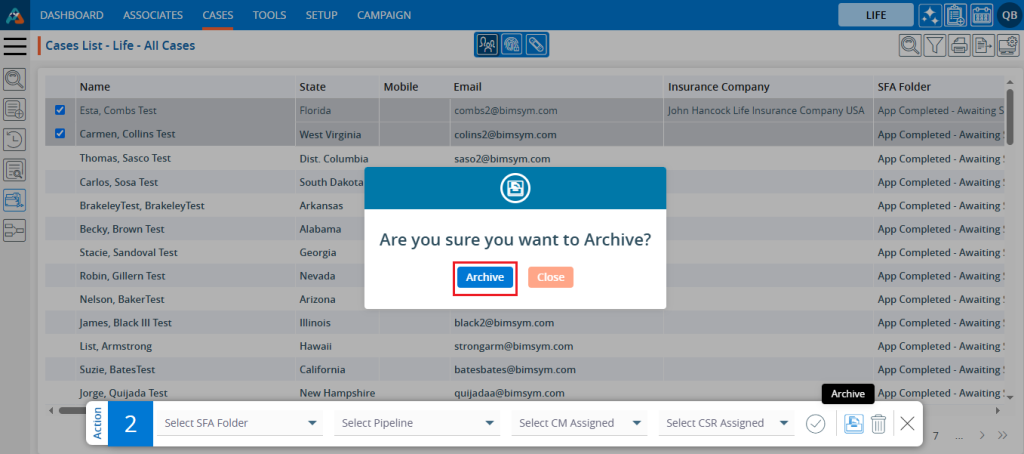
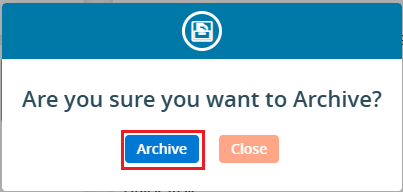
6. A validation message pop-up will appear to confirm your action to move the cases to the archive. Click on the ‘Archive’ button.

7. The selected cases will be removed from the ‘Cases List – All Cases’ list and moved to the ‘Archive’ folder. A confirmation message will be generated by the system.

8. Check the total number of cases available in the All-Cases list. It should have decreased by 2.

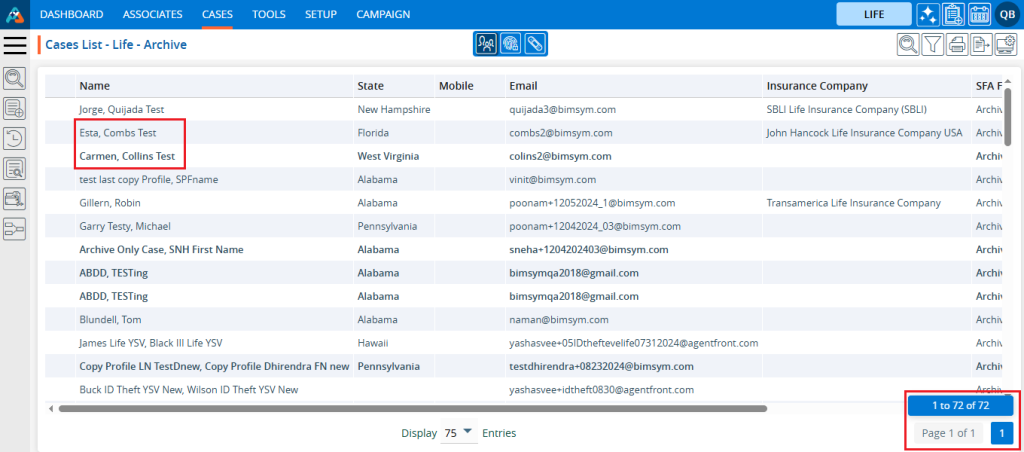
9. Check the total number of cases available in the Archive folder. It should have increased by 2.

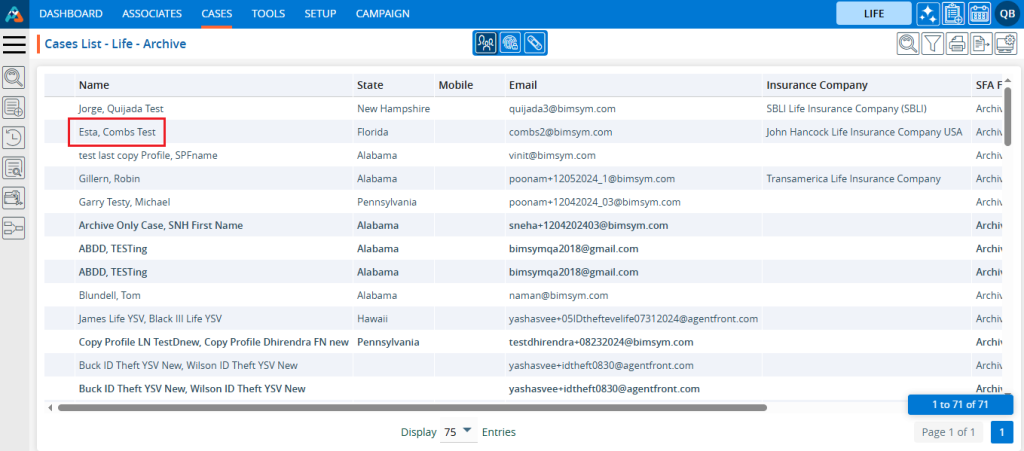
10. Navigate to the ‘Archive’ folder, and you will find the cases moved there. You can also verify the total number of available cases here.

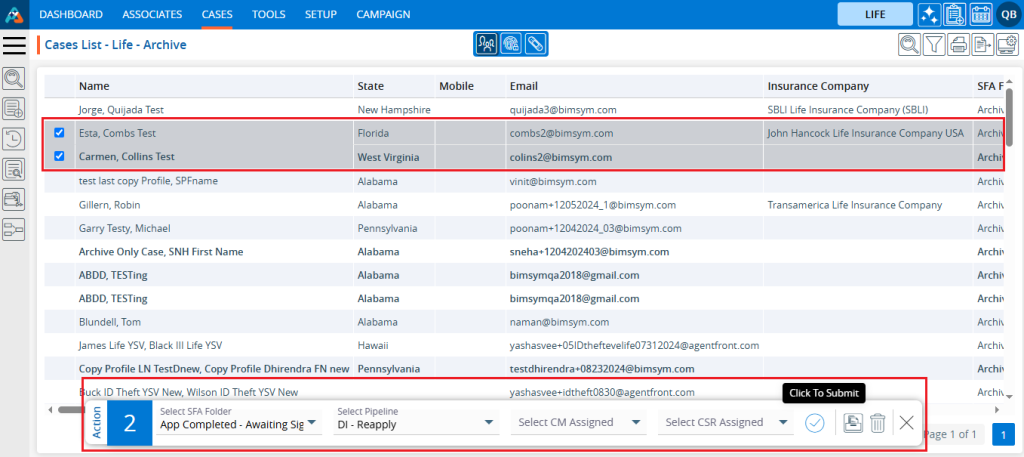
11. Any case from ‘Archive’ can be moved back to ‘Cases List – All Cases’. To move a case from the ‘Archive’ back, select the cases check box and the Quick Action pop-up menu will open.
12. Choose the SFA Folder or Pipeline or both, then click on the ‘Click To Submit’ option.

13. The selected cases will move from the ‘Archive’ folder, and a confirmation message will be generated by the system. The cases will disappear from the ‘Cases List – Archive’.

14. Check the total number of cases available in the ‘Cases List – Archive’. It should have decreased by 2

15. Navigate to the ‘CASES’ tab, and you will find the cases moved. Verify the total number of available cases in ‘Cases List – All Cases’. It should have increased by 2.

16. There is another way to move the case to the ‘Archive’. Open the case profile by clicking on it.

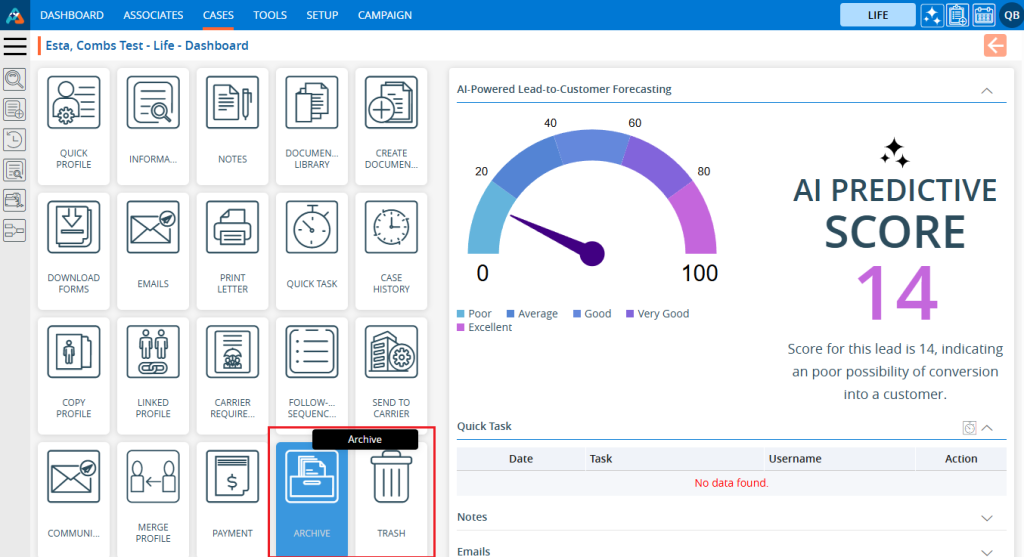
17. The profile’s ‘DASHBOARD’ will open. Click on the ‘ARCHIVE’ option.

18. A validation message pop-up will appear to confirm your action to move the case to the archive. Click on the ‘Archive’ button.

19. The case is moved to the Archive folder, and a confirmation message will be generated by the system. The case will disappear from the ‘Cases List – All Cases’ list.

20. Navigate to the ‘Archive’ folder, and you will find the case moved there. Verify the total number of available cases.

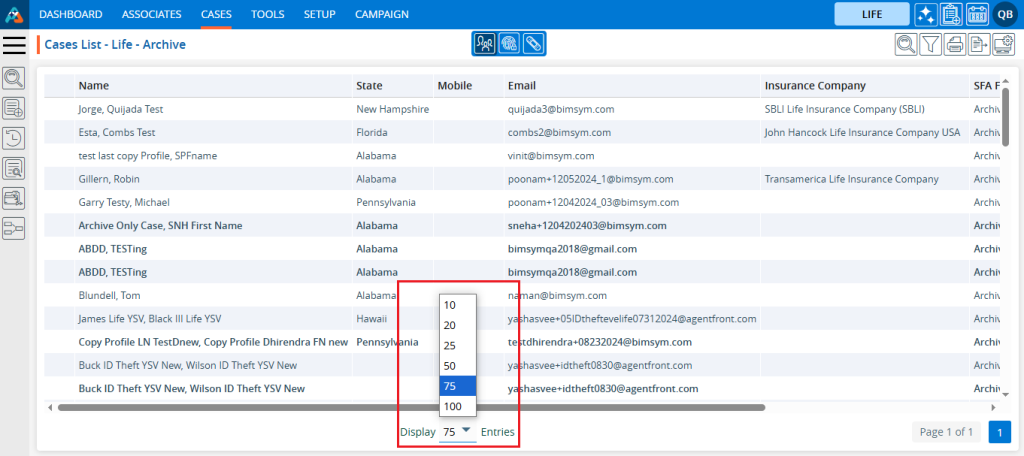
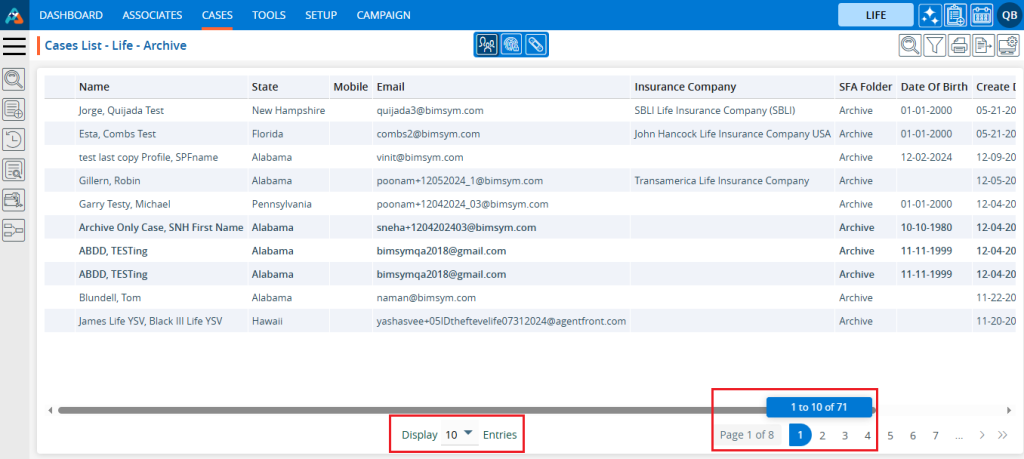
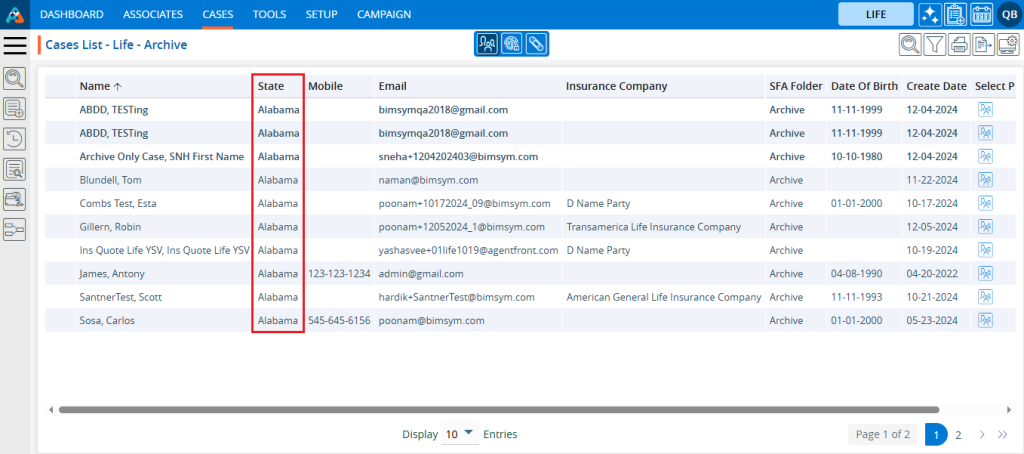
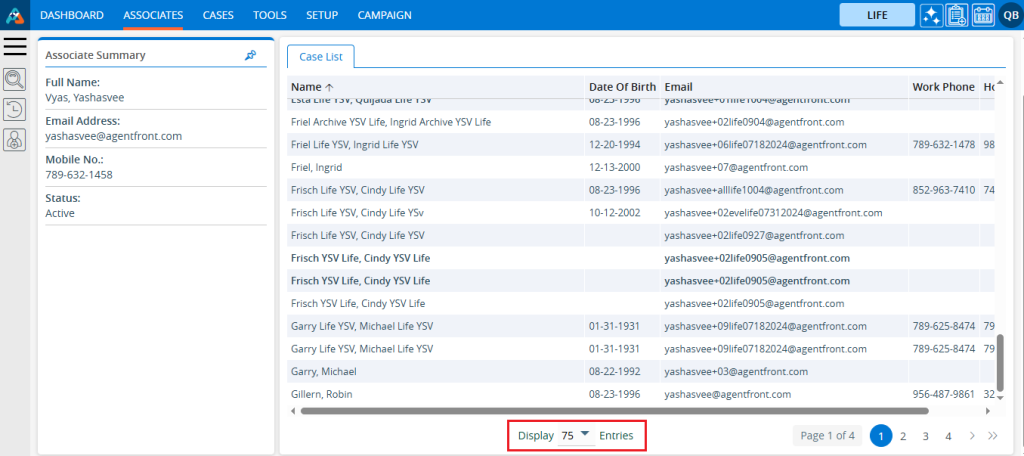
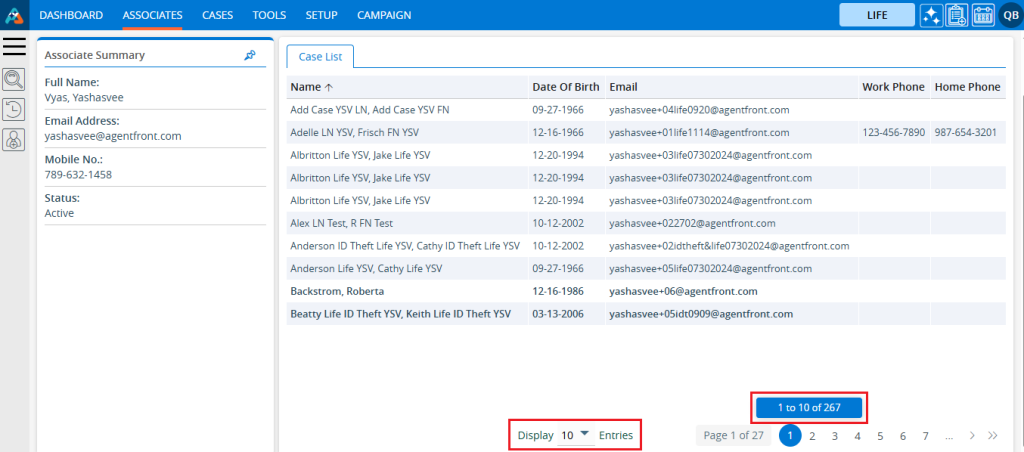
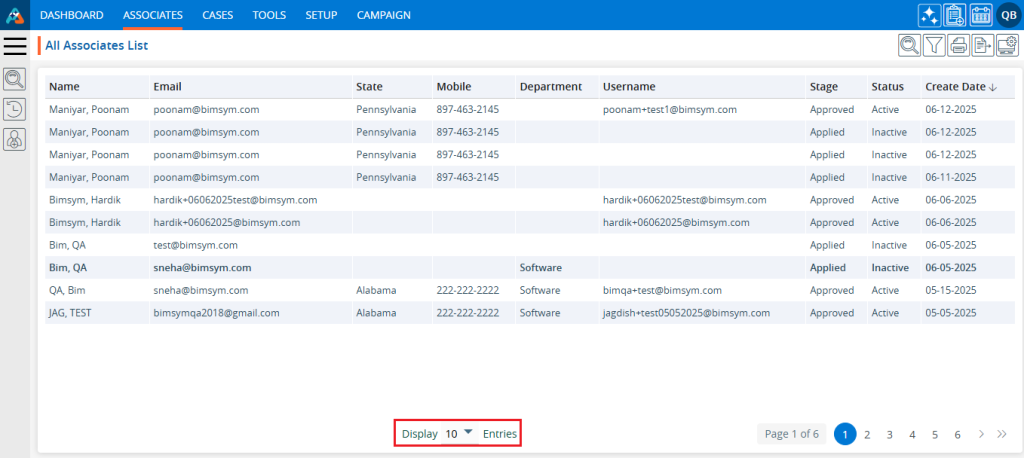
21. Update the number of records to display from the drop-down to specify the number of cases per page based on the total number of cases available in the Archive.

22. After updating the Display, the system will present cases and pagination based on the chosen setting. For example, if the user selects 10 cases per page, the system will display 10 cases per page, with the data distributed accordingly.

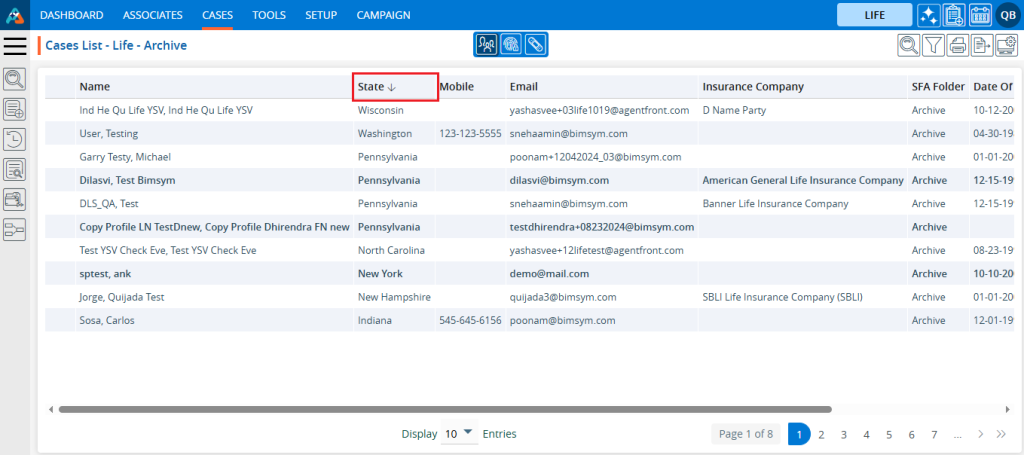
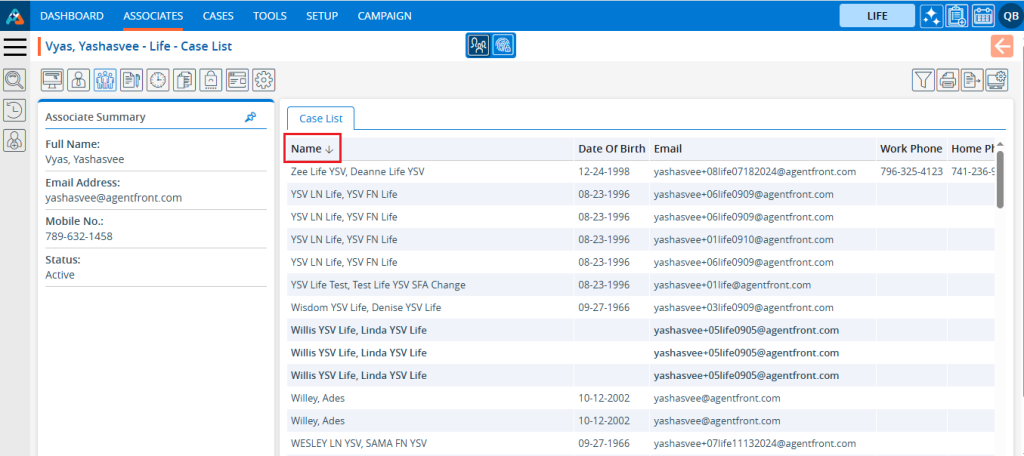
23. To view the cases in ascending or descending order, click on the field title. When the user clicks on the title, a downward arrow will appear next to it, indicating that the cases are arranged in descending order.

  • For example, this list displays State in descending order for the Archive List.

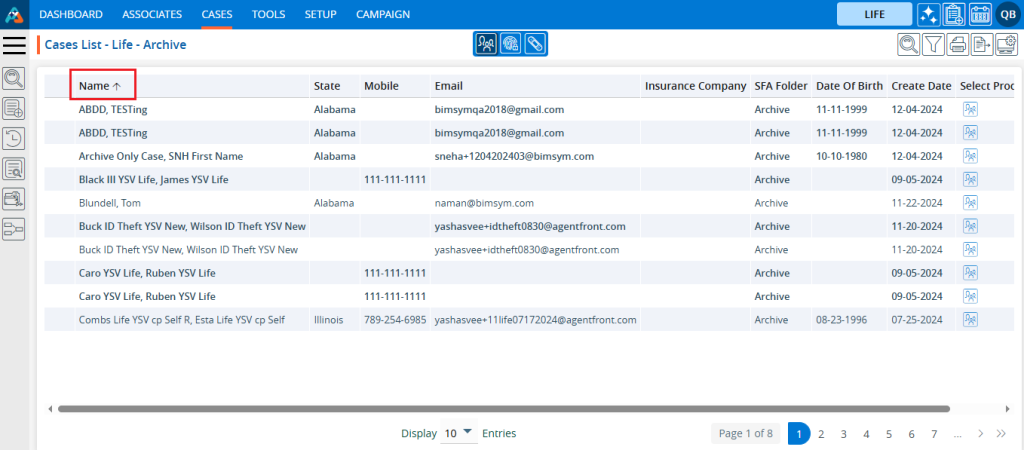
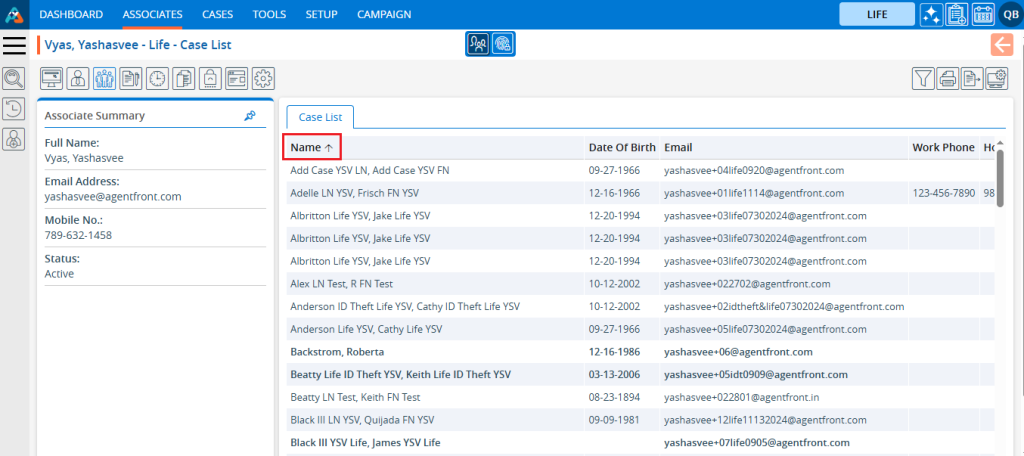
24. When the user clicks on the title again, an upward arrow will appear beside the title, indicating that the cases are now arranged in ascending order.

  • For example, this list displays Name in ascending order for the Archive List.

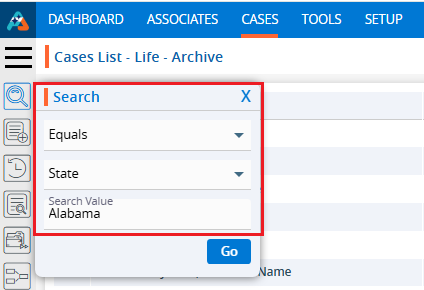
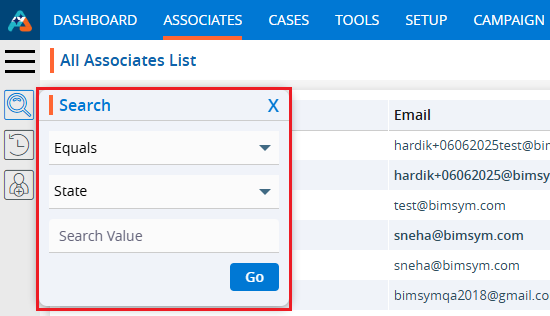
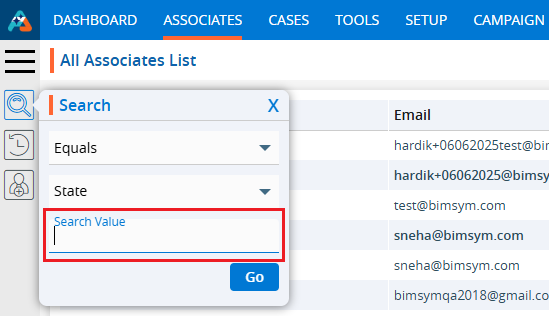
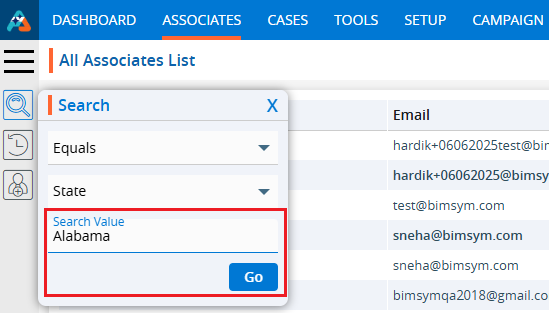
25. Click on the left search bar and enter the data you wish to search for from the Archive List. For example, select the option ‘Equals’, select the field as ‘State’ and keep the value as ‘Alabama,’ which will display the cases associated with cases from Alabama.

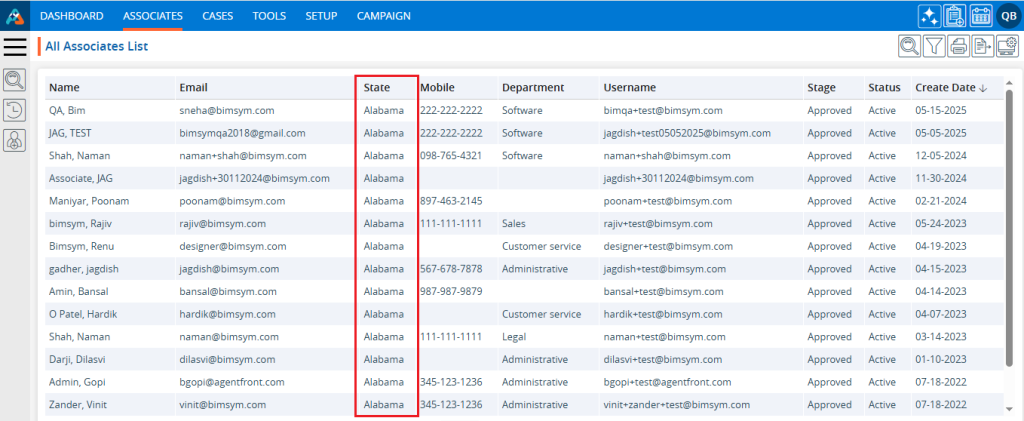
26. The result displays the list of cases in the Archive Folder where the cases are belongs to ‘Alabama’ state.

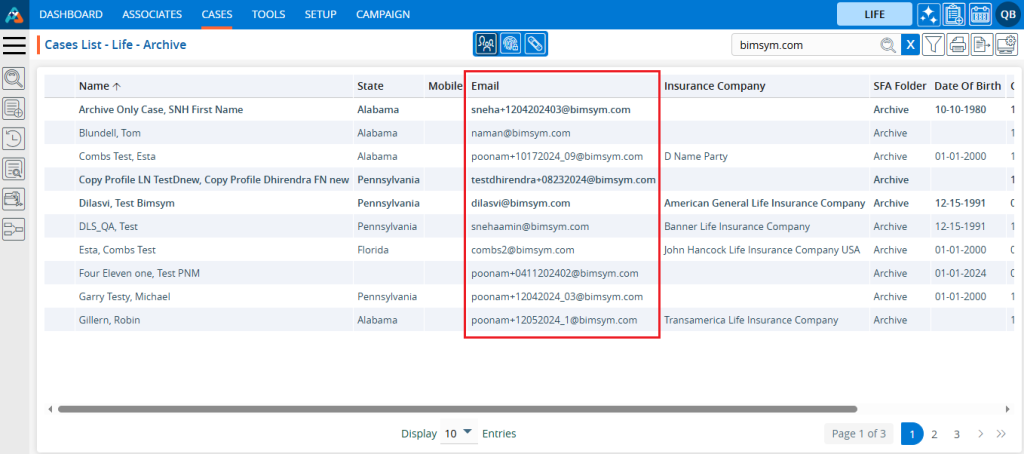
27. Click on the Quick Search and enter the data you want to search for from the Archive List. For example, entering ‘bimsym.com’ will display the cases with the email available with ‘bimsym.com’ domain.

28. Therefore, the result displays the list of cases in the Archive Folder where the email domain is available with ‘bimsym.com’.

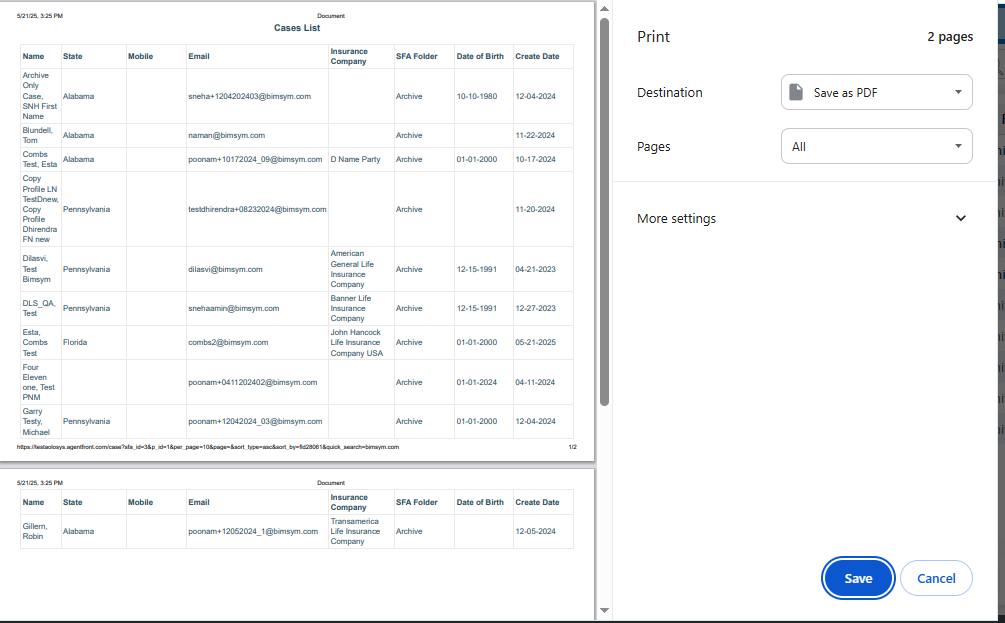
29. Click on the ‘Print’ option to print the current page. The print feature will print the data based on the current display settings.

30. Filters, display options, and export functions will consistently operate on the entire Case List.

0
0

Cases Display

Display is used to create specific views of the Cases Listing. Users can set a maximum of 5 displays, choosing from the available fields and apply them to the listing as needed.

  1. Sign in to AgentFront CRM
  2. From the top menu, choose CASES
  3. Cases list will open by default
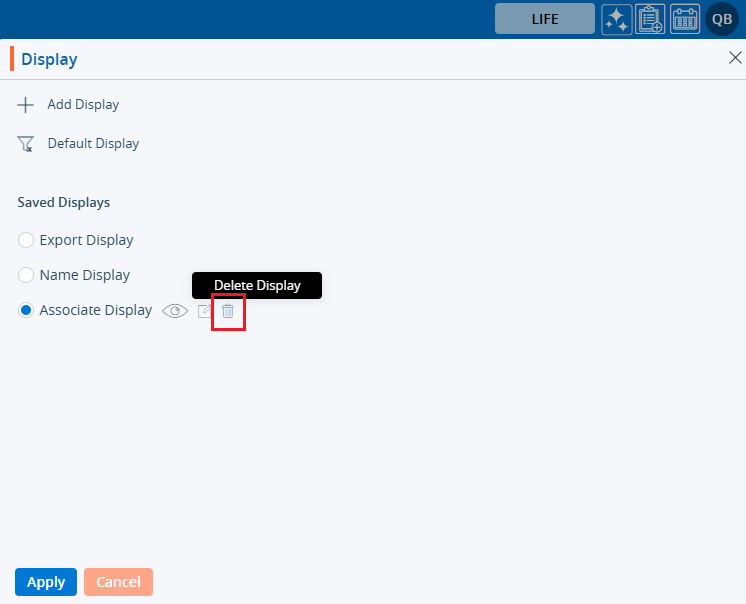
  4. Click the Display icon in the top right corner
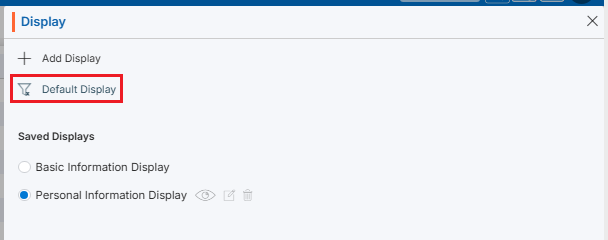
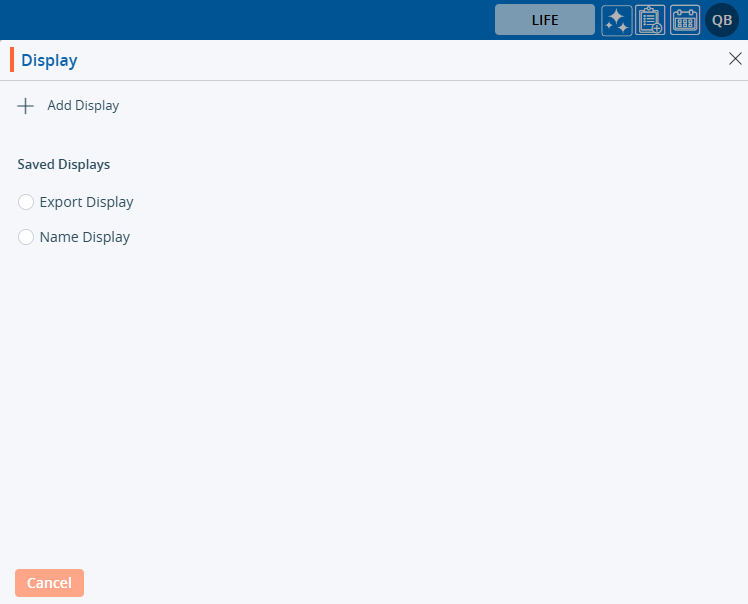
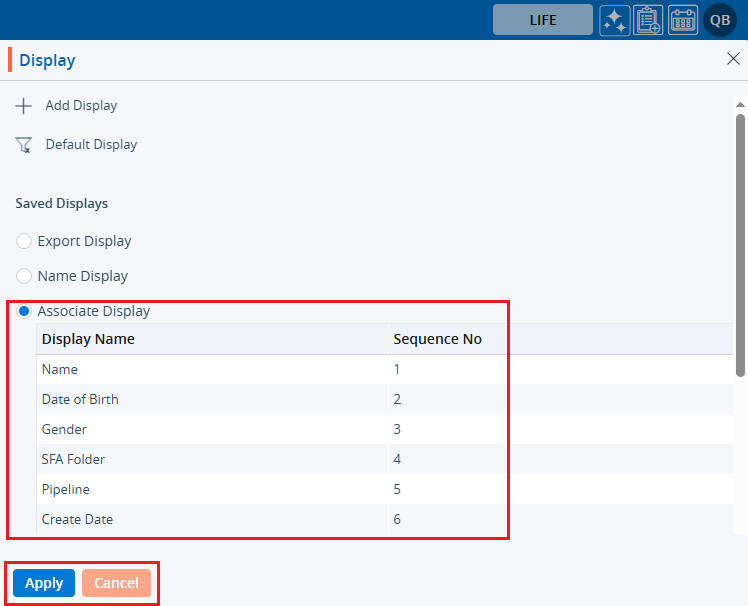
  5. A new pop-up window named ‘Display’ will open
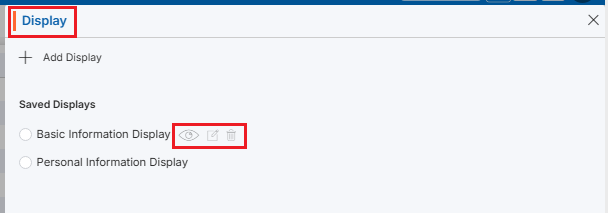
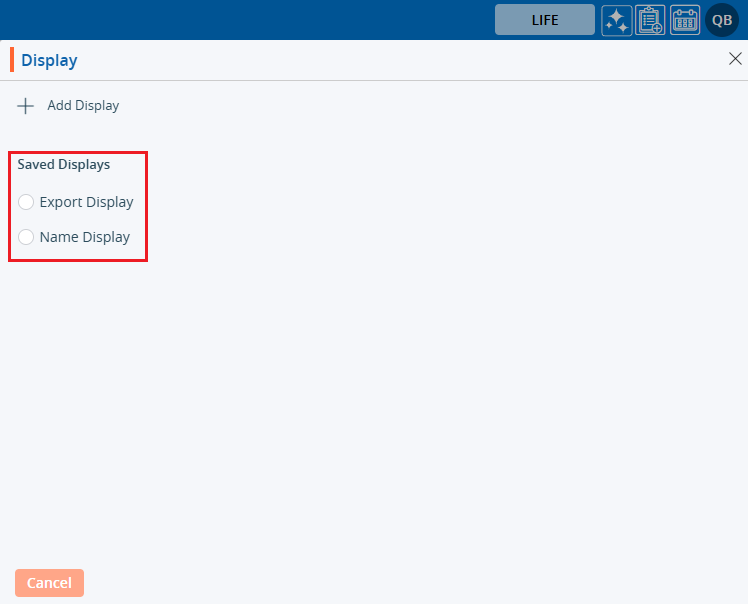
  6. Existing displays will be listed under Saved Displays
  7. There is an Add Display link with (+) icon on top of the page
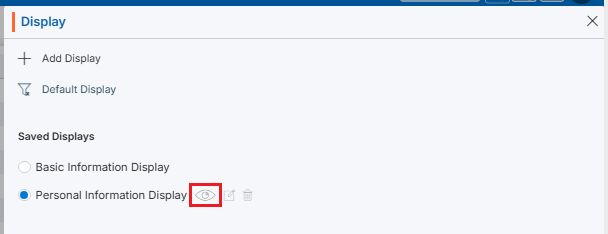
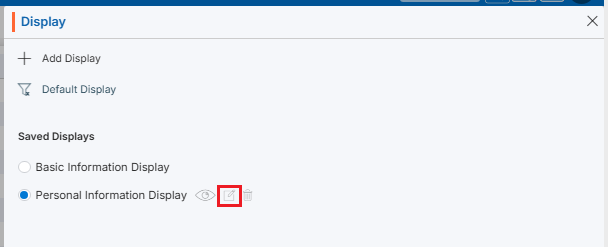
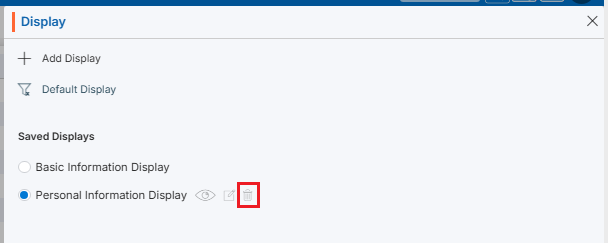
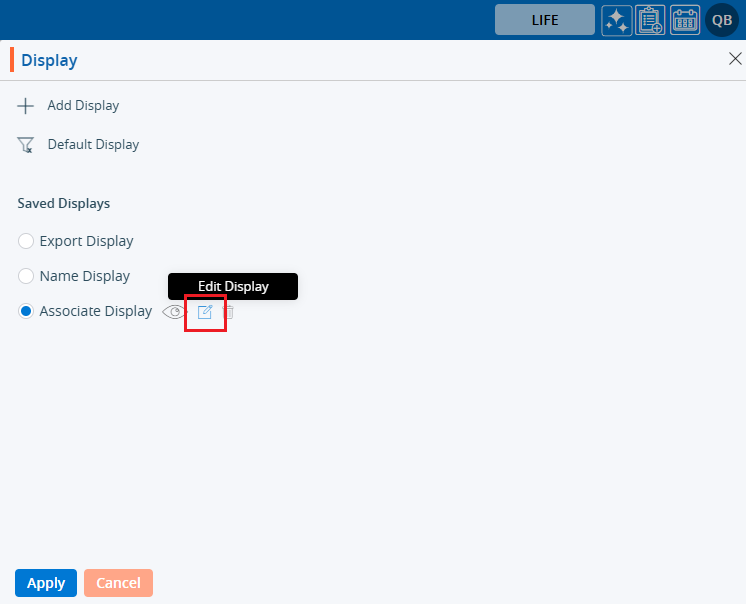
  8. Also, there are options to View (), Edit () and Delete () the existing display for each one, to view those options hover over the display name; the system will display the View (), Edit (), and Delete () options

Add Display

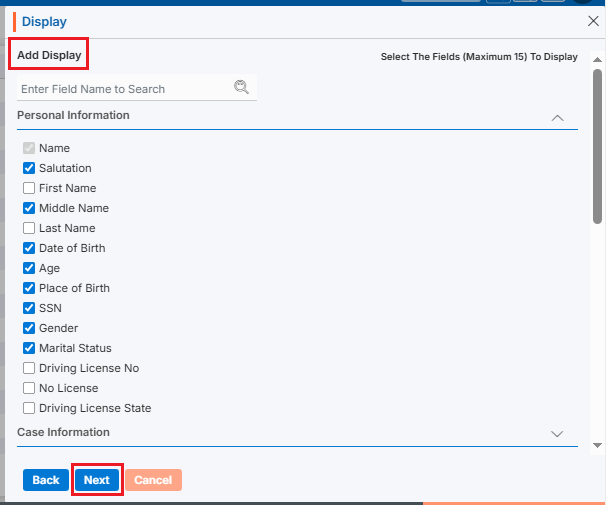
  1. Click on ‘Add Display‘ to add a new display to the system. (Maximum 5 displays can be created)
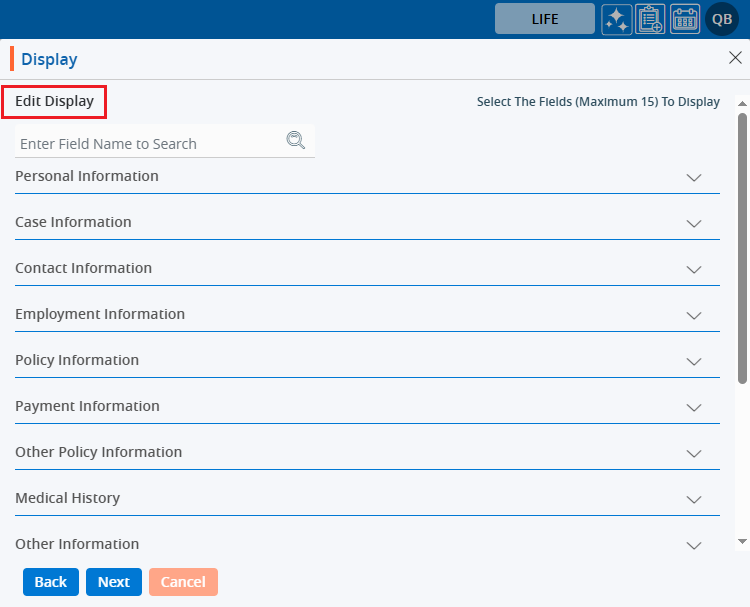
  2. A new page will open, select the fields from group according to the requirements and click on Next. (Maximum 15 fields can be selected)
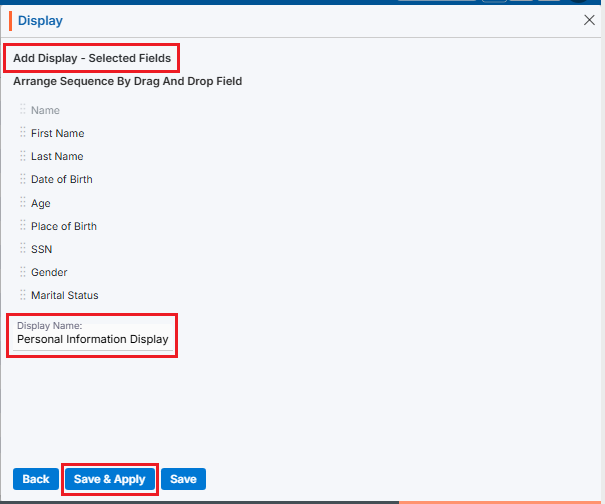
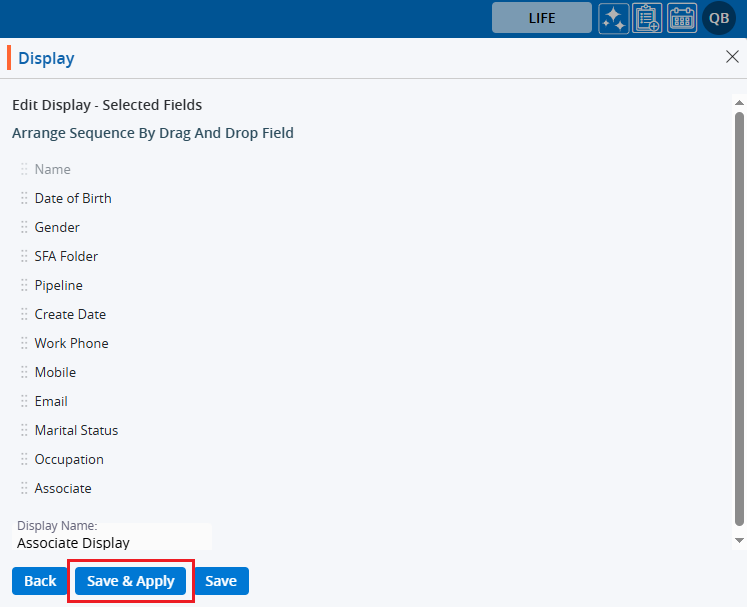
  3. Next Page: Add Display – Selected Fields
    • Arrange Sequence: Arrange the fields sequence for display
    • Enter Display Name: Enter the clear, descriptive name. This is what users can identify the purpose of the Display
    • Save & Apply’ and ‘Save’ options are available. The Save option creates the display only, while Save & Apply saves the display and will apply it to the list
    • Click the Save & Apply
  4. The new display will be saved in the system and applied to the listing

View Display

  1. To view the existing display, select the display and click ‘View Display’ () from the available options

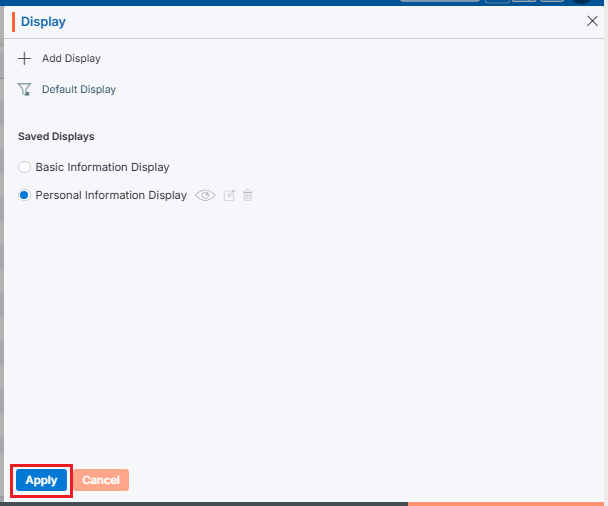
Apply Display

  1. To apply the display from existing display, select the display and click ‘Apply’ button

Reset Display

  1. If any display is already applied to the listing and user wants to reset the display (System Generated – Default Display) click the ‘Default Display’ link

Edit Display

  1. To update the existing display, select the display and click ‘Edit Display’ () from the available options

Delete Display

  1. To delete any existing display, select the display and click ‘Delete Display’ () from the available options
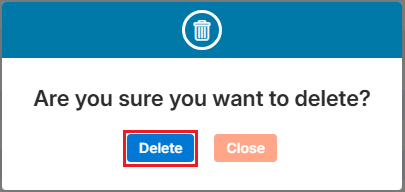
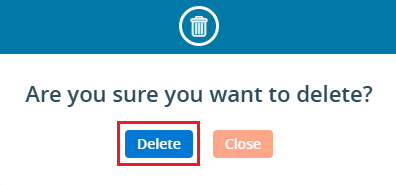
  2. The system will ask for confirmation. Click Delete to proceed
0
0

Associate Filter

Filters are used to create a listing with specific data. Users can set a maximum of 10 filters, selecting from available fields, and apply them to the listing as needed.

Add Filter:

  1. Sign in to AgentFront CRM.
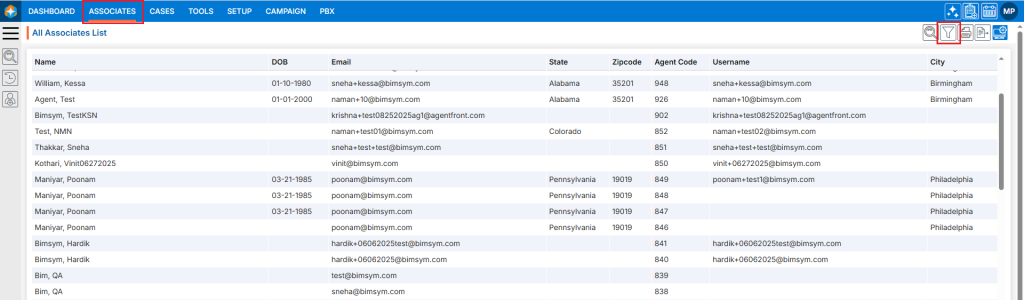
  2. From the top menu, choose Associates.
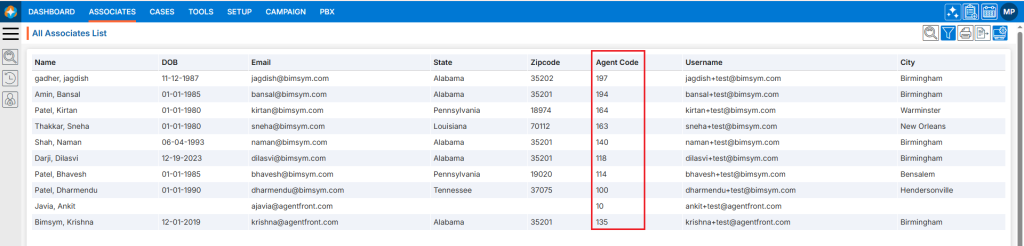
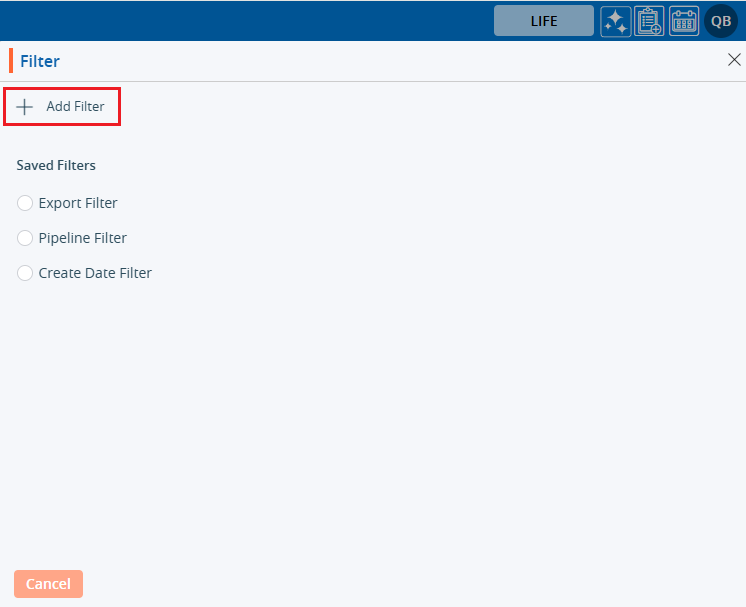
  3. Click the Filter icon in the top right corner.
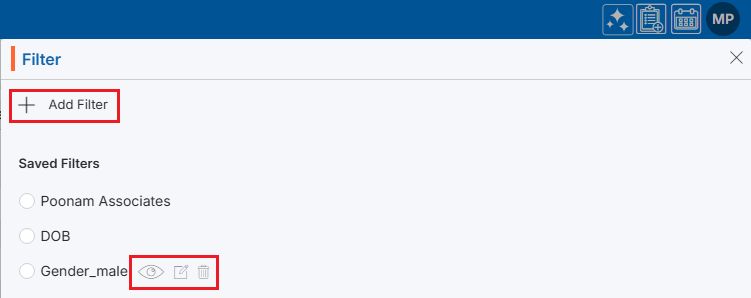
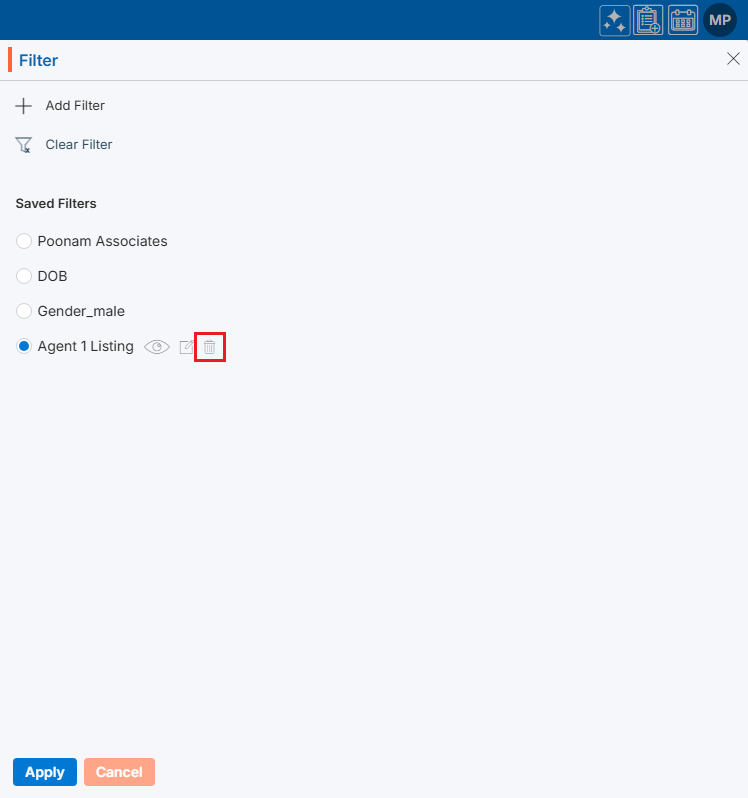
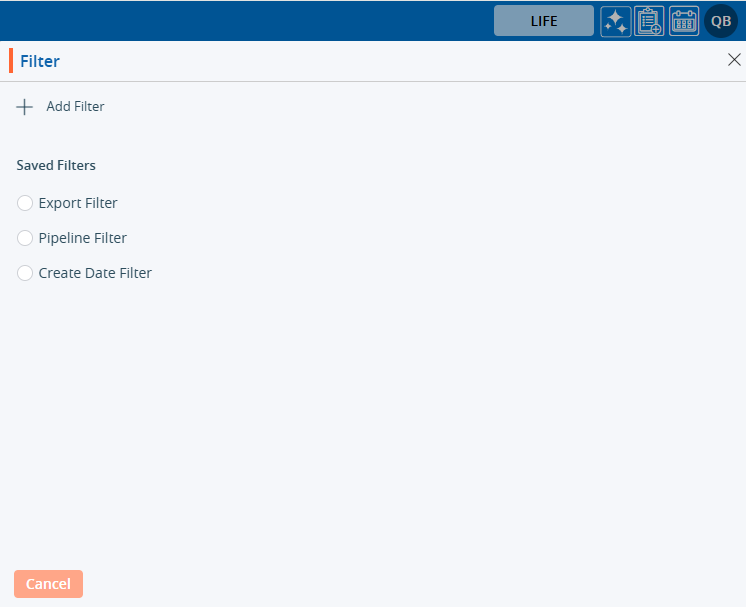
  4. A new pop-up window named ‘Filter’ will open.
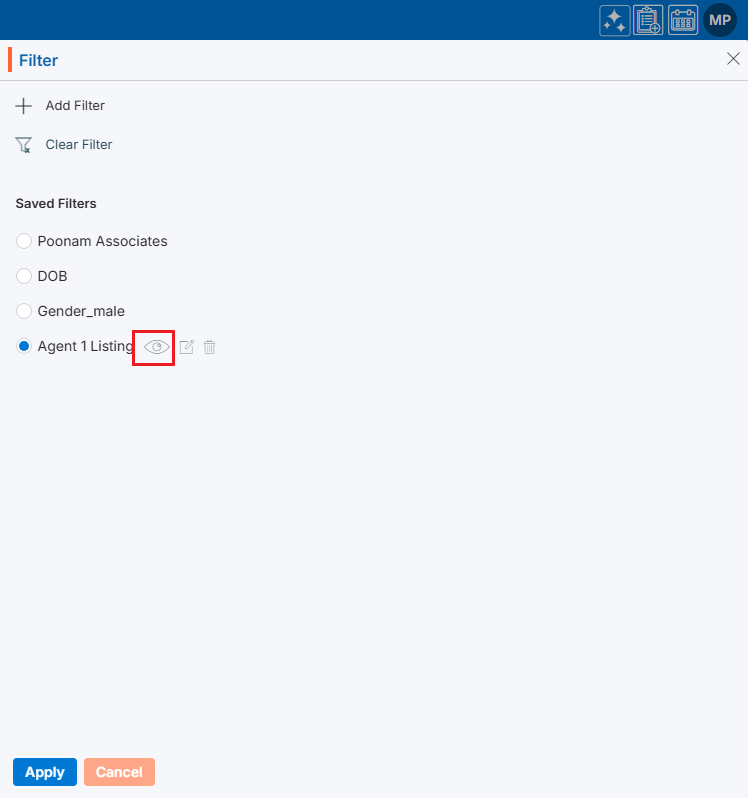
  5. Existing filters will be shown under Saved Filters.
  6. There is an Add Filter link with (+) icon on top of the page.
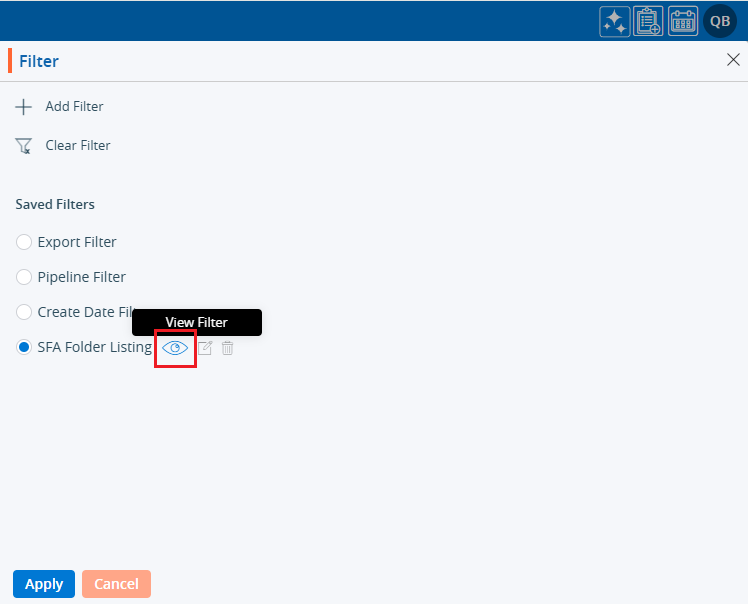
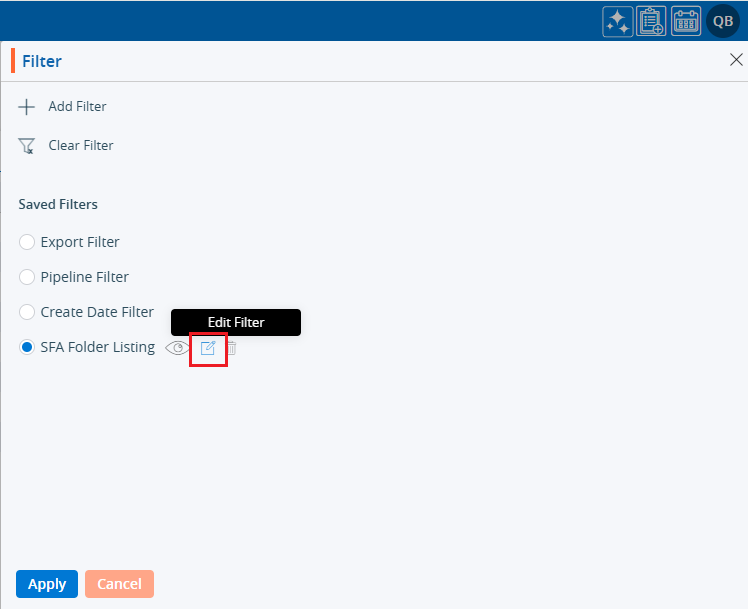
  7. Also, there are options to View (), Edit () andDelete () the existing filters for each one, to view those options hover over the filter name; the system will display the View (), Edit () andDelete () options.

Add Filter

  1. Click on ‘Add Filter’ to add a new filter to the system. (Maximum 10 filters can be created.)
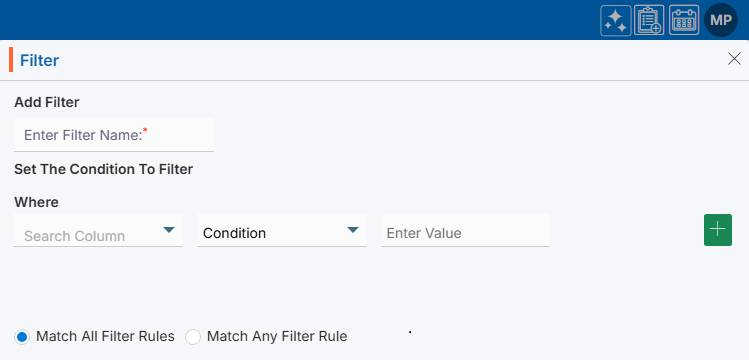
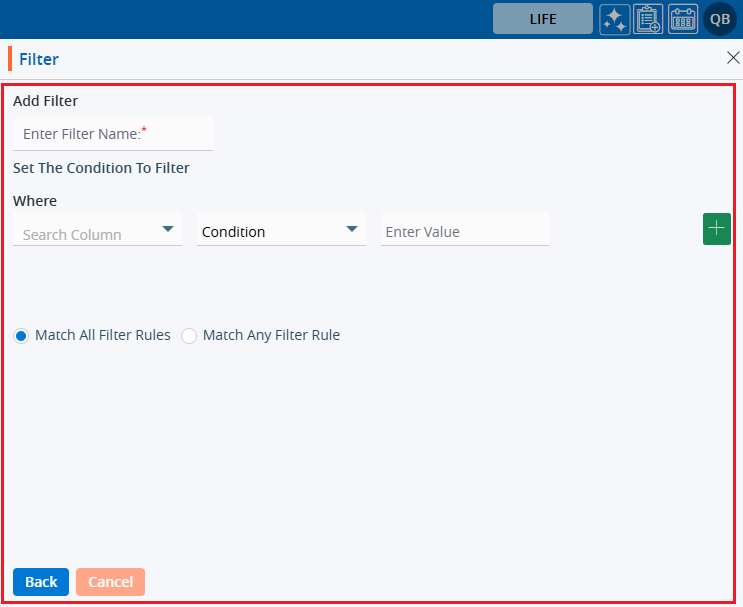
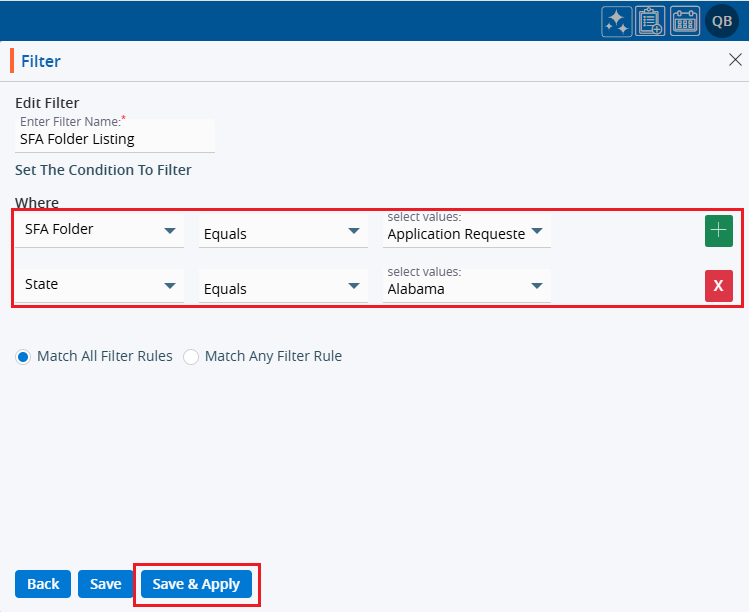
  2. Clicking ‘Add Filter’ will open a new page where the user can set the filter criteria according to the requirements.
  3. To Add Filter, enter the following details:
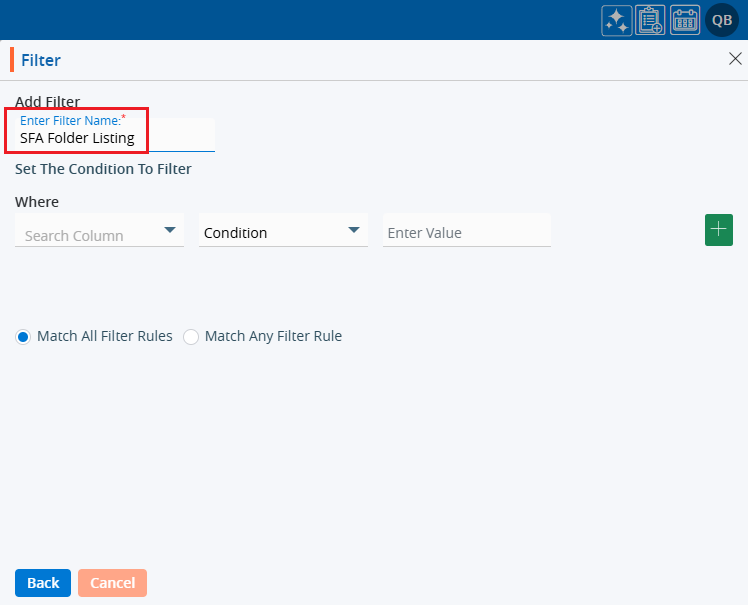
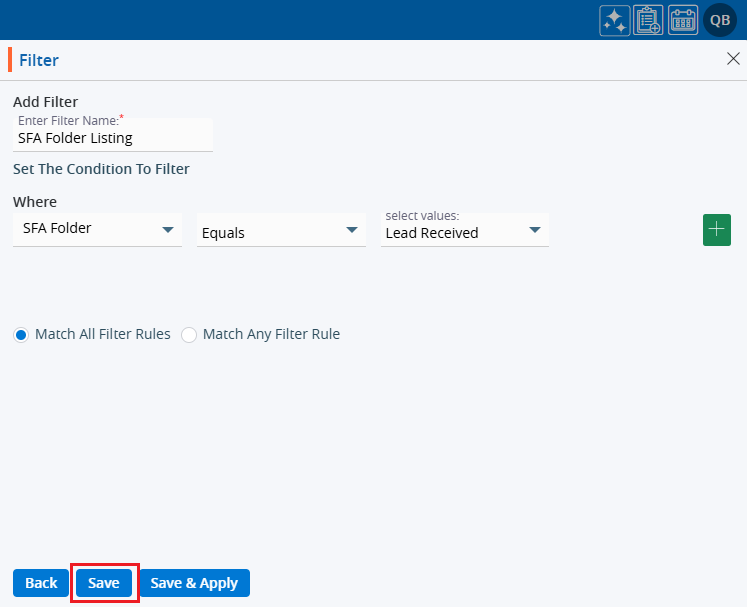
    • Enter Filter Name: Enter the clear, descriptive name. This is what users can identify the purpose of the Filter
    • Set The Condition To Filter: Set the condition by defining the specific criteria the data must meet using the following fields:
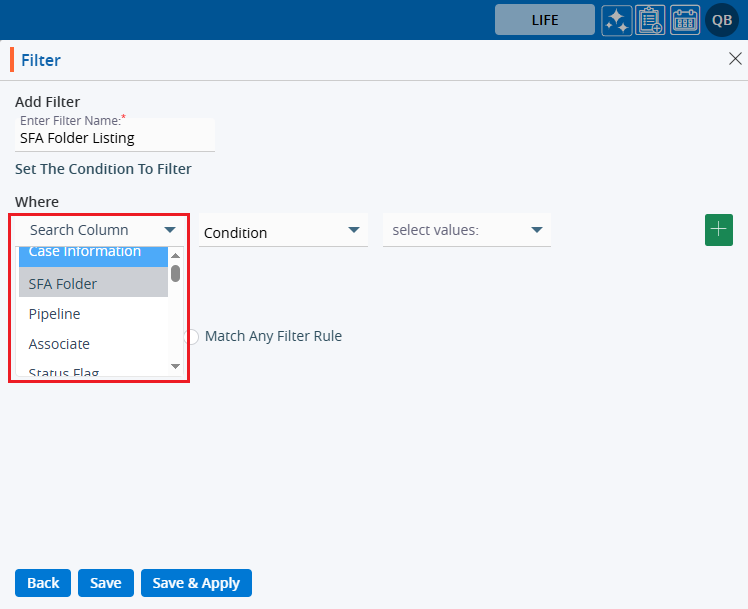
      • Search Column: Select the field for which the filter needs to be applied
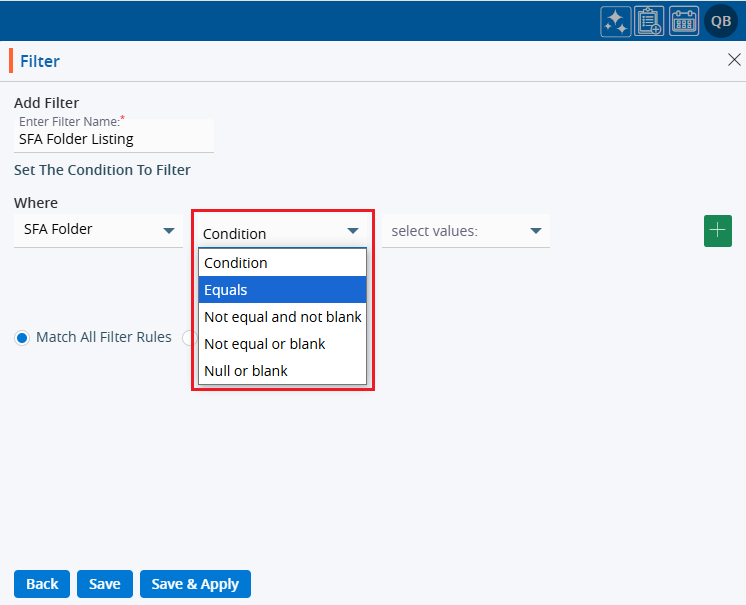
      • Condition: Set the appropriate condition for the selected column field
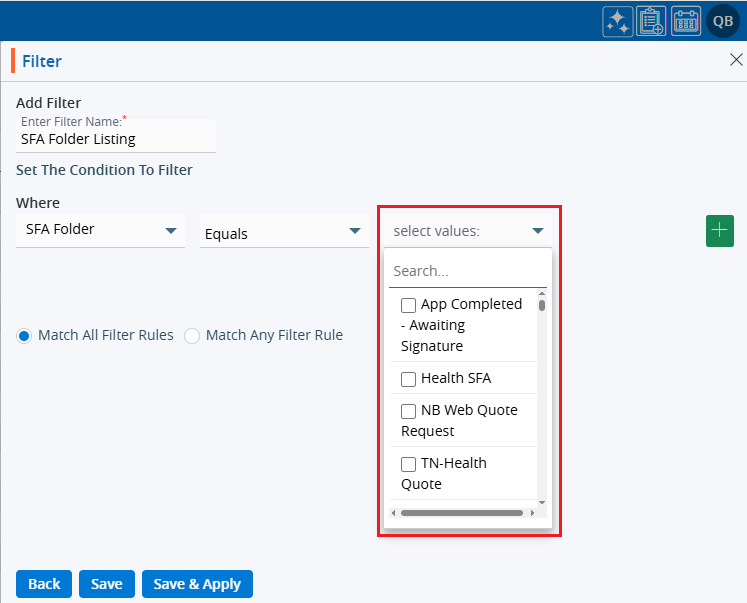
      • Enter Value: Enter or select the value according to the selected condition
    • Using plus sign (+) user can set multiple criteria simultaneously for a single filter
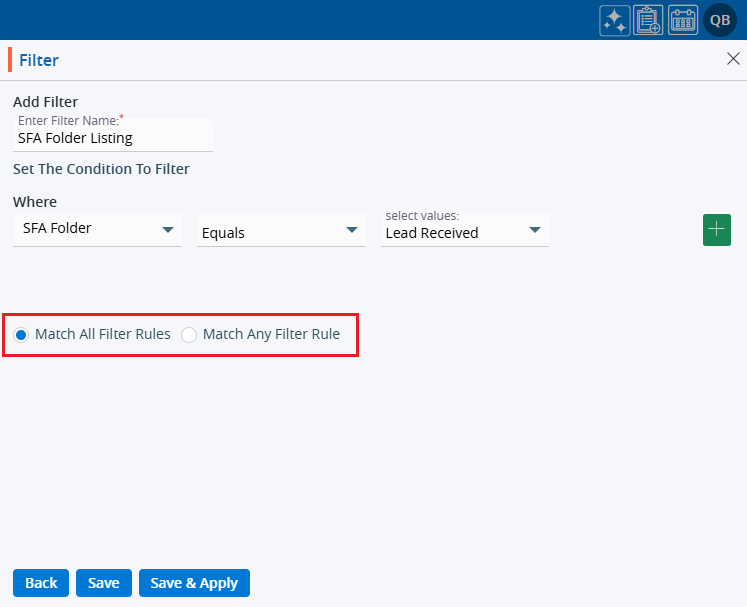
    • Match All Filter Rules or Match Any Filter Rule: Select any one of the given options
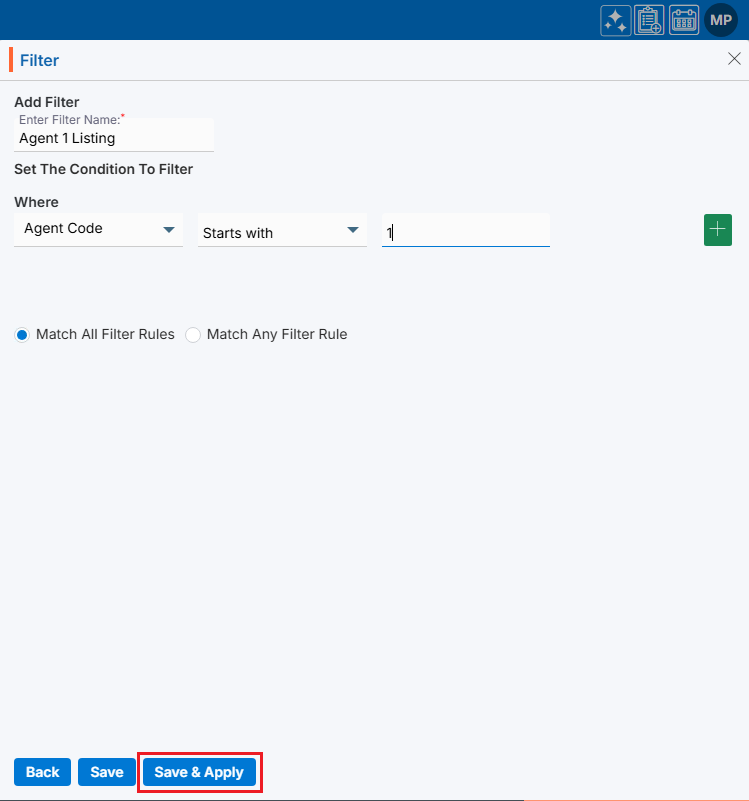
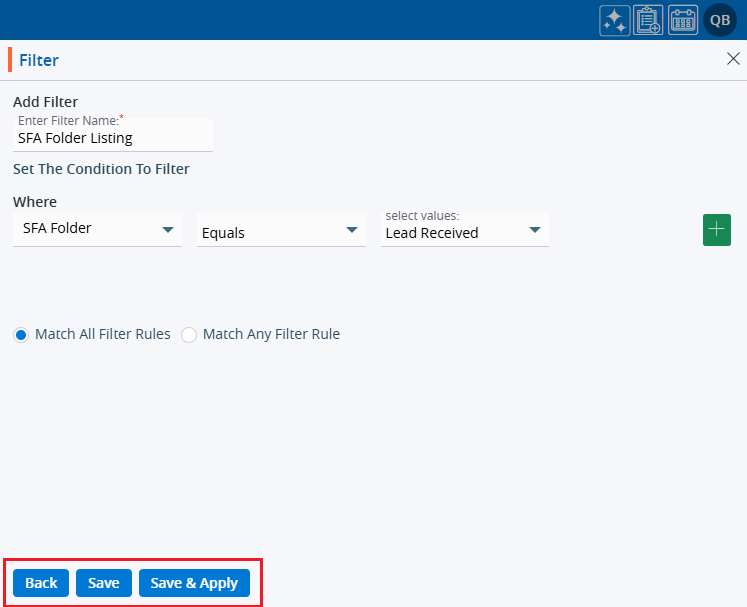
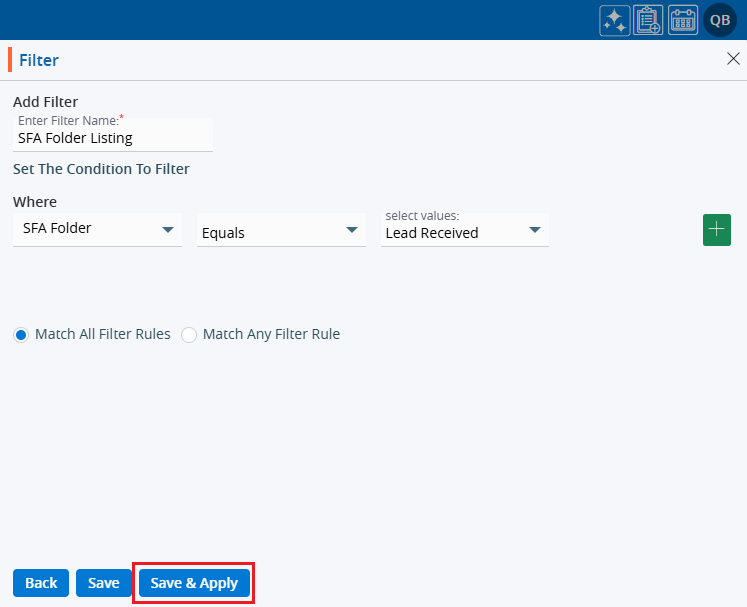
  4. Once all the fields are added, ‘Save’ and ‘Save & Apply’ options will appear. The Save option creates the filter only, while Save & Apply saves the filter and applies it to the list.
  5. After setting all the conditions, click the ‘Save & Apply’ button.
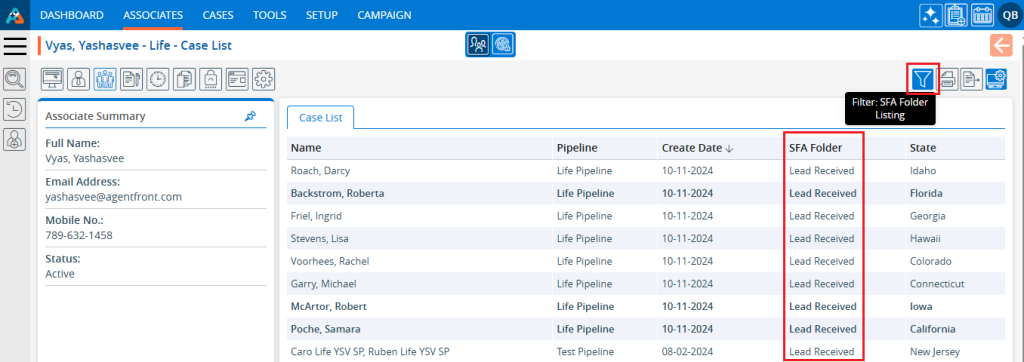
  6. The new Filter will be saved in the system and applied to the listing.

View Filter:

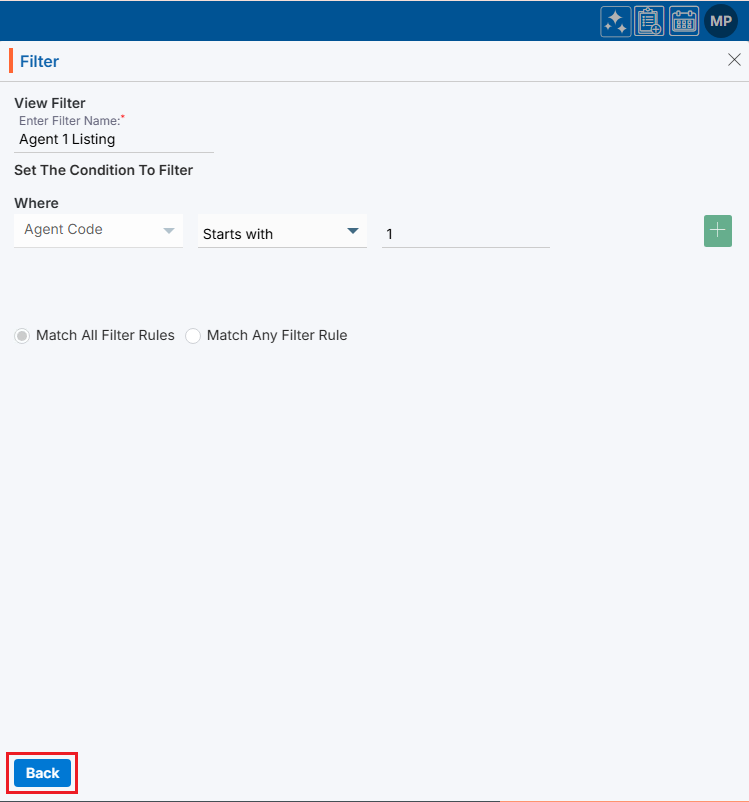
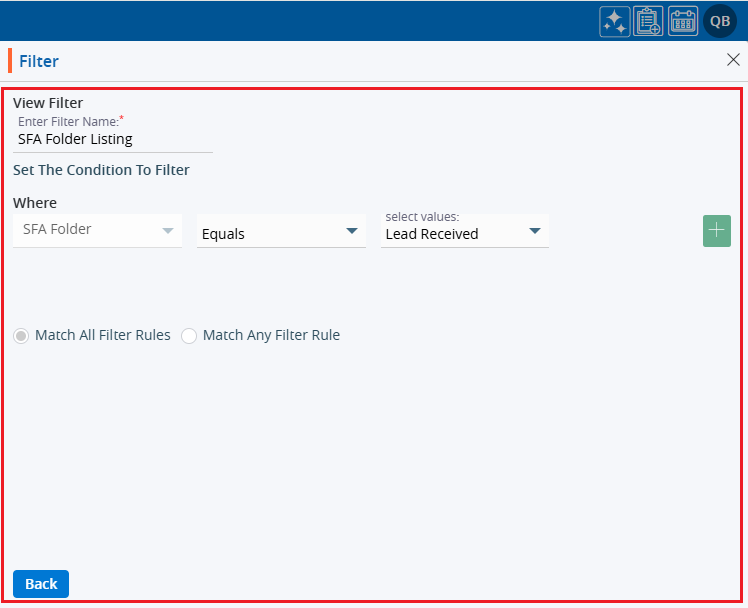
  1. To view the existing filter, select the filter and click ‘View Filter’ () from the available options.
  2. The filter criteria will be displayed. Only the ‘Back’ button will be shown. The selected fields and criteria will be greyed out and cannot be edited.

Edit Filter:

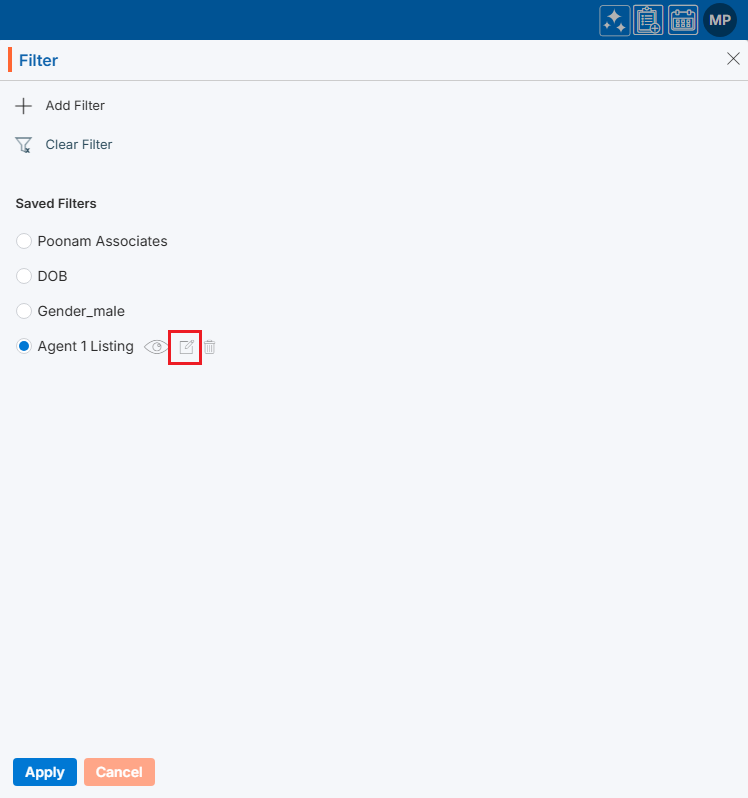
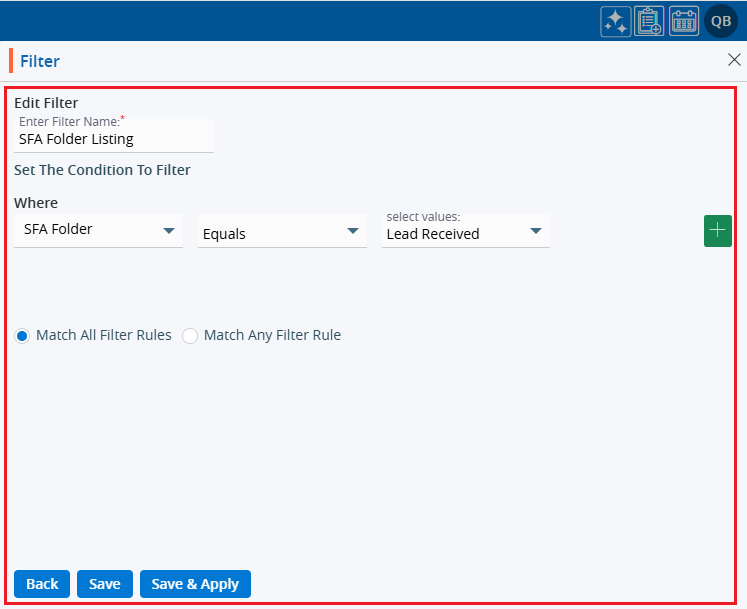
  1. To update the existing filter, select the filter click ‘Edit Filter’ () from the available options.
  2. The filter window will open with the existing criteria, allowing the user to modify the filter options.

Delete Filter:

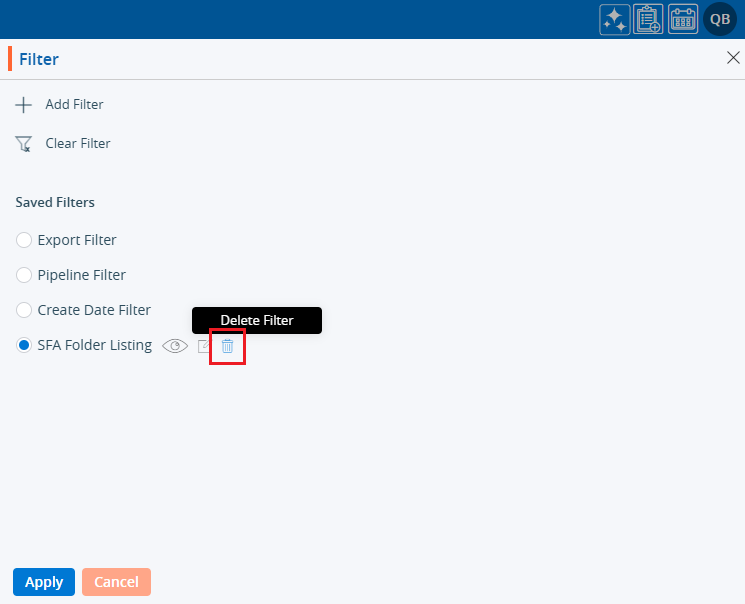
  1. To delete the existing filter, select the ‘Filter’ and click on the ‘Delete Filter’ ()  from available options.
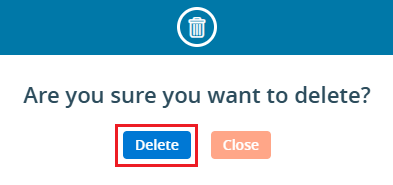
  2. The system will ask for confirmation. Click Delete to proceed.

Apply Filter:

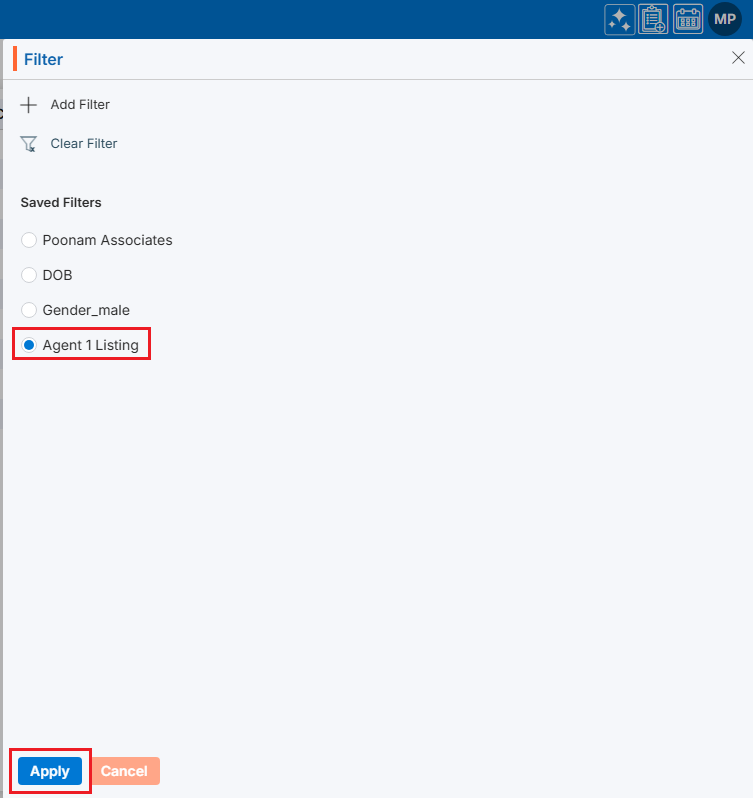
  1. To apply the filter from existing filters, select the filter and click ‘Apply’ button.
  2. Selected filter will be applied to the listing.

Clear Filter:

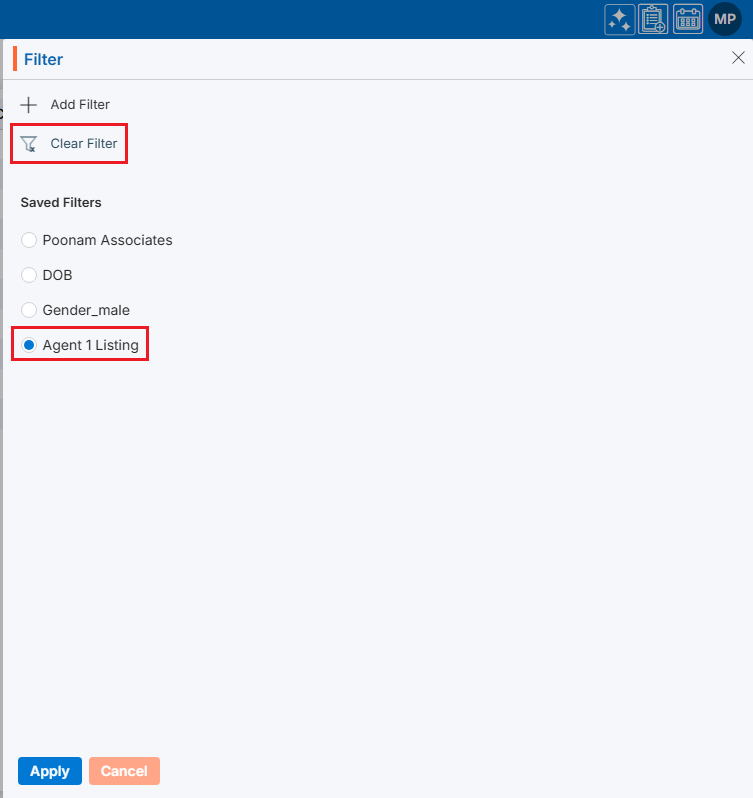
  1. If any filter is already applied to the listing and user wants to clear, click the ‘Clear Filter’ link.
  2. Applied filters will be removed from the listing and all data will be displayed as is.
1
0

Cases Custom Fields

An Information Custom Field is a feature designed for adding and updating specific case information within the system. It allows users to customize data entry fields according to their needs, enhancing the flexibility and efficiency of managing case-related details.

The following are the steps for setting up a Custom Group and Fields:

The user needs to create a ‘Field Group’ first.
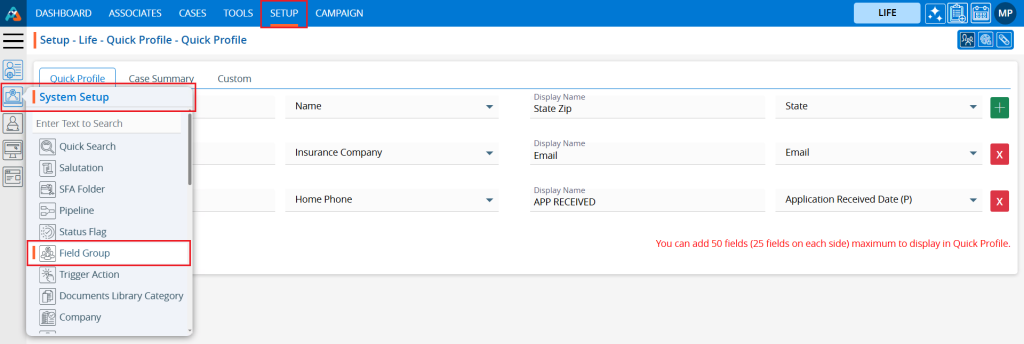
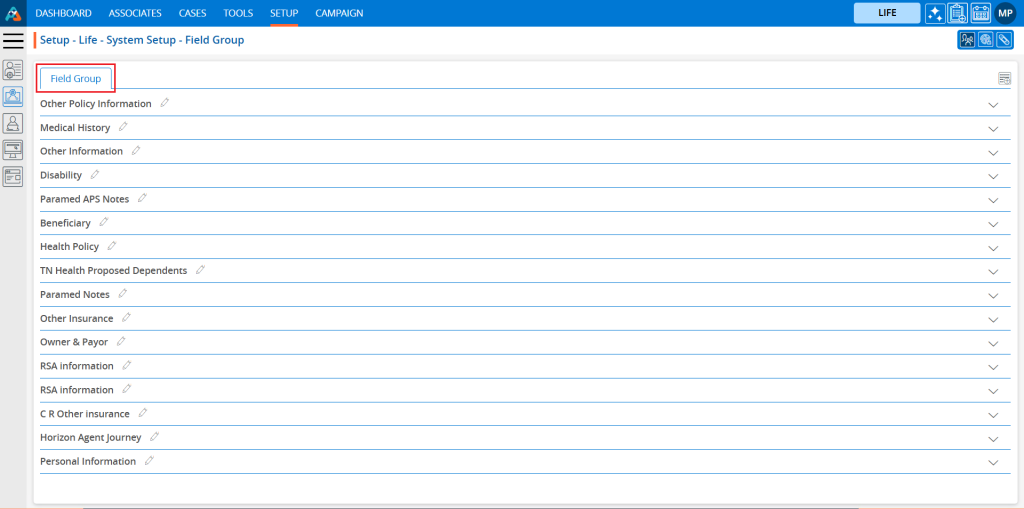
1. Navigate to the ‘SETUP’ tab. Open the ‘System Setup’ dropdown from the left menu. Select the ‘Field Group’ option.

2. The ‘Field Group’ tab is listed displaying all groups already created. After creating a ‘Field Group’, required fields can be set for the created group.

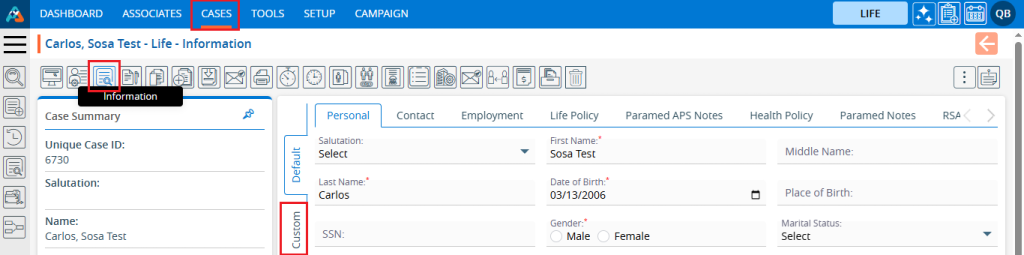
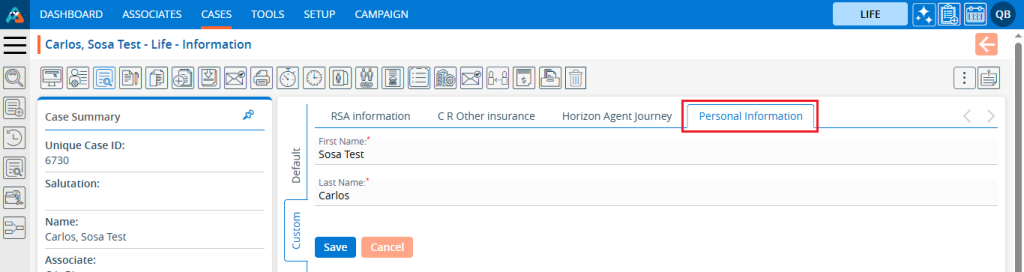
3. The created field groups are displayed in the ‘Custom’ tab under the ‘INFORMATION’ section of the CONTACTS’ tab. Users can add values to custom fields corresponding to the values added in the ‘Default’ tab.

4. Two types of Custom Groups can be created as follows:
a. With Single Entry (values are added or updated using a single-entry form)
b. With Multiple Entry (values can be added, and multiple entries can be saved)
5. Custom groups created with the single-entry option display the values added by users in the fields.

6. Custom groups created with the multiple-entry option, after values are added and saved, will be displayed in the list under the ‘Field Group’ title as separate sections.

0
0

Cases Full Profile

Full Profile displays key information on the case.

The following are the steps to access the Full Profile:
1. Navigate to the ‘CASES’ tab where you’ll find the Cases List – All Cases.
2. Click on a case to proceed.

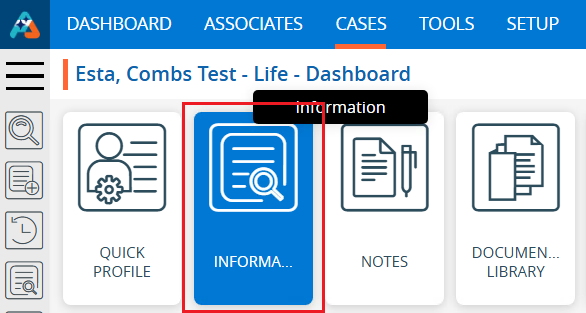
3. After clicking on a case, the profile’s ‘Dashboard’ will open. Click on the ‘INFORMATION’ option.

4. The Information page will open. Hover the cursor over the option icon located on the left side of Quick Notes, which has three dots.
5. There will be three options displayed:
a. Full Profile
b. Quote Sheet
c. Ins. Quote
6. Click on the ‘Full Profile’ option.

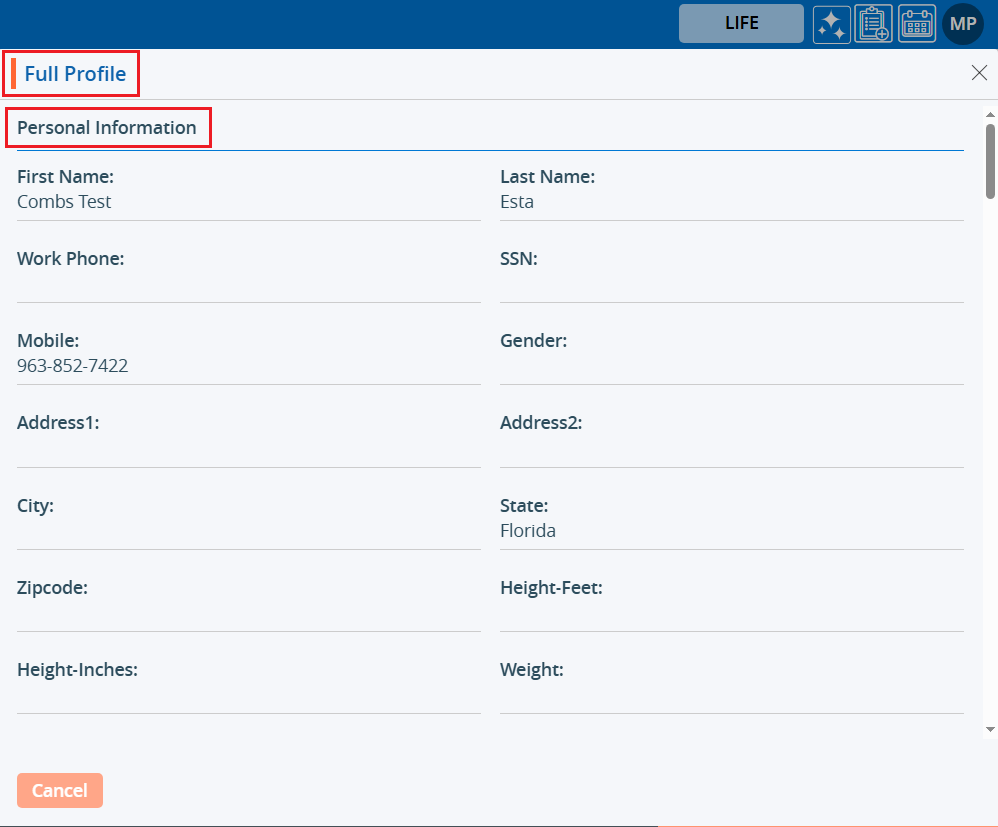
7. The Full Profile pop-up window will open, showing ‘Personal Information’ by default. The information on this page is read-only; users cannot update it from this page. This page will display the basic information of the user.

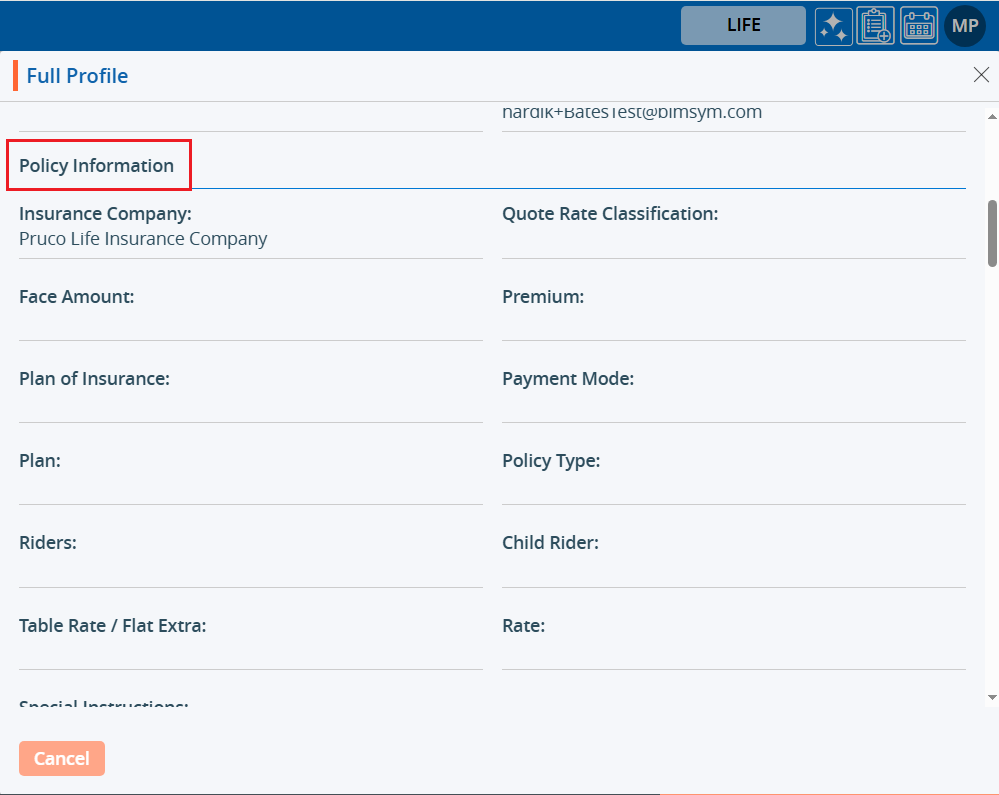
8. Scroll down to this page to view the ‘Policy Information’ section.

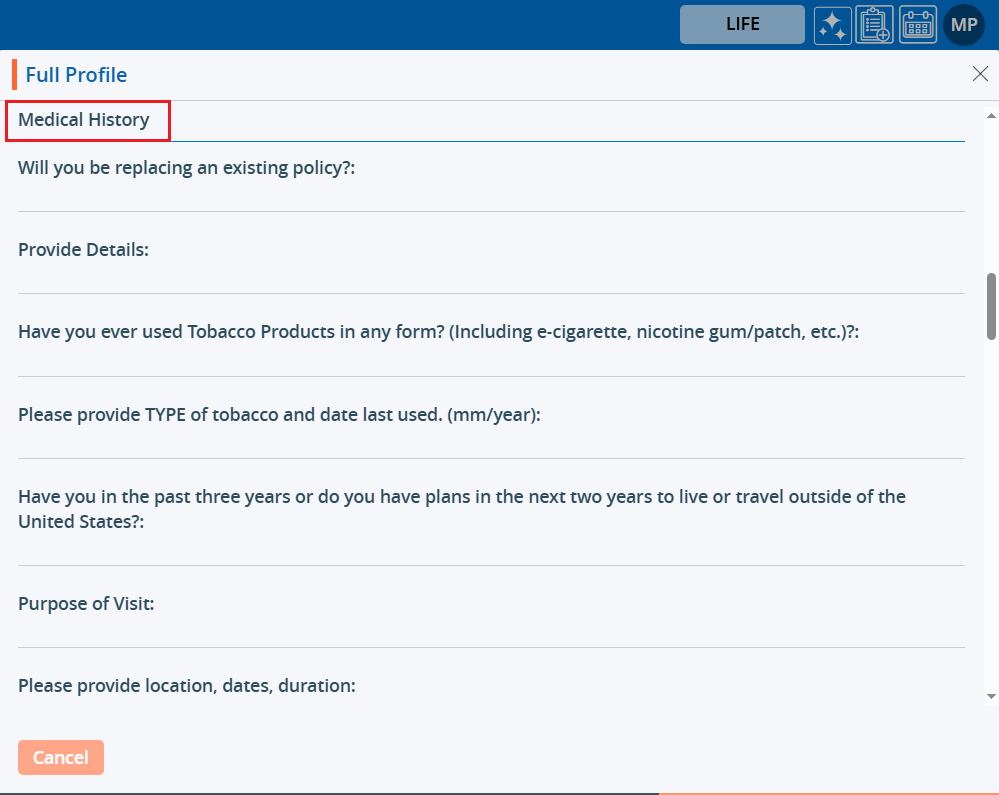
9. Scroll down to this page to view the ‘Medical History’ section.

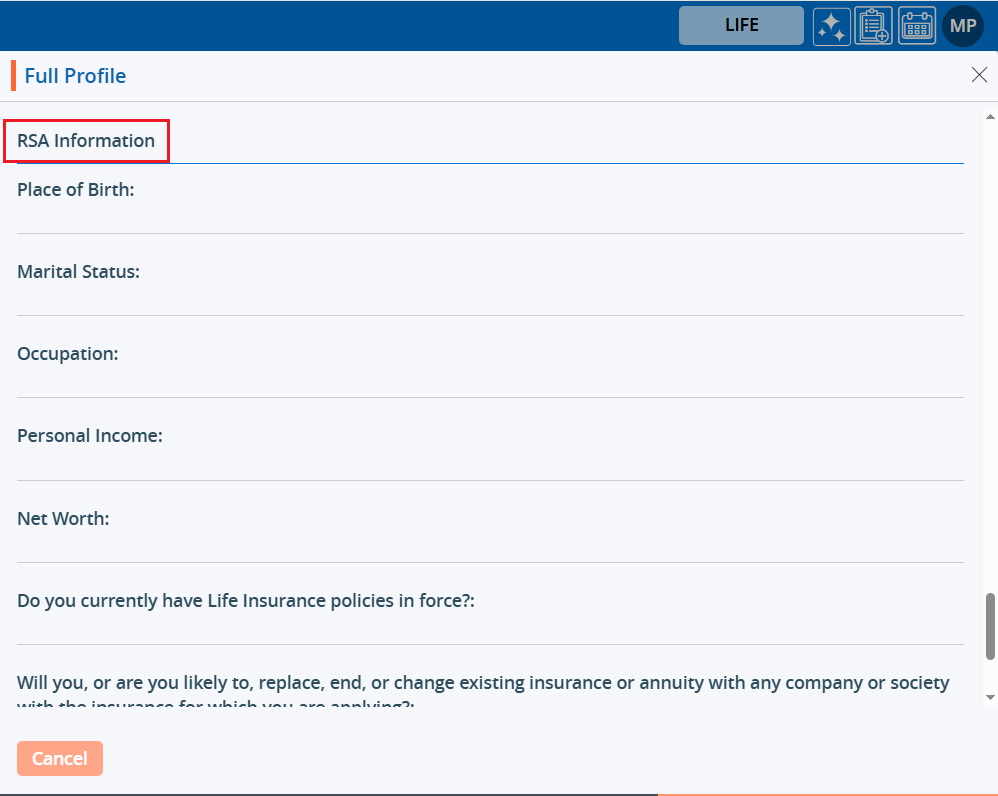
10. Scroll down to this page to view the ‘RSA Information’ section. Click on the ‘Cancel’ button to close this page.

0
0

Cases Notification Email

Notification Email – The Sent Email list is available under the Email option within the Notification Tab. The Sent Email feature is used to view and check emails sent regarding the case.

The following are the steps to check the sent email list:
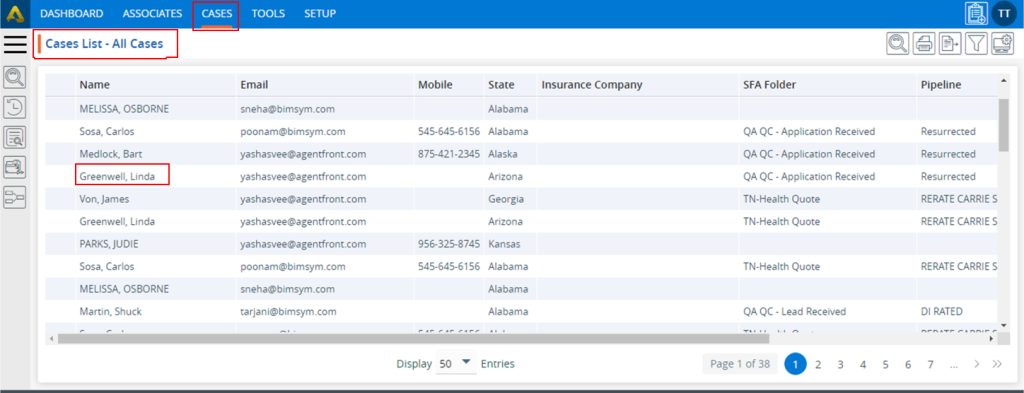
1. Navigate to the ‘CASES’ tab where you’ll find the Cases List – All Cases.
2. Click on a case to proceed.

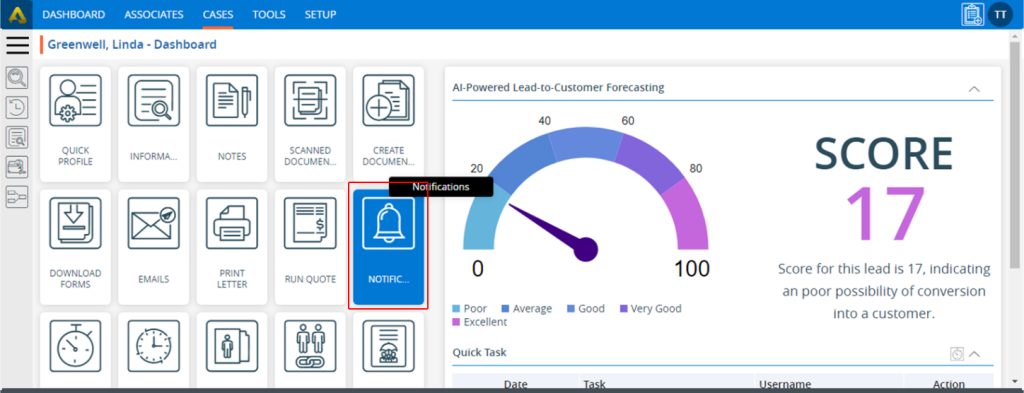
3. After clicking on a case, the profile’s ‘Dashboard’ will open. Then, select the ‘NOTIFICATIONS’ option.

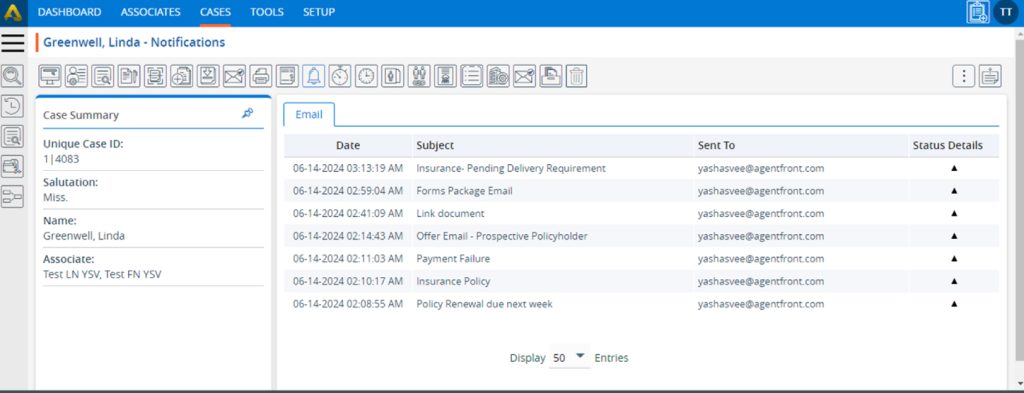
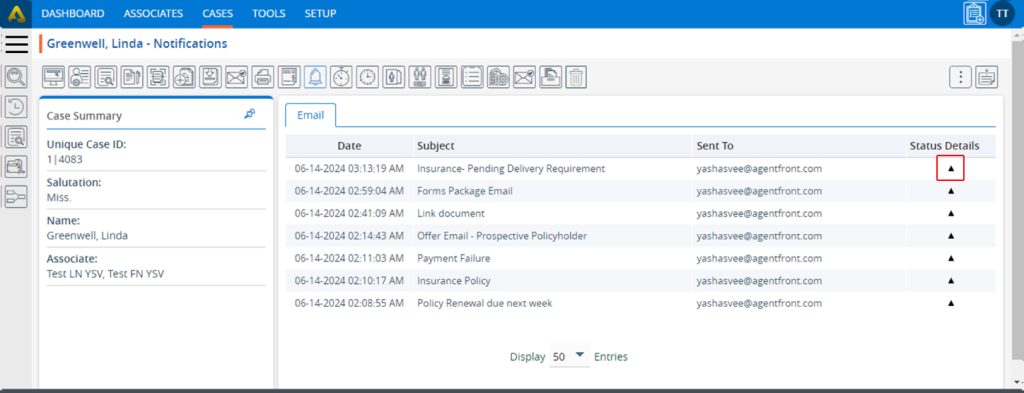
4. The Notifications page will open, and the system will display the list of emails that were sent.
5. Users can send emails from both the dashboard and the individual email page options.

6. Click on the arrow below ‘Status Details.

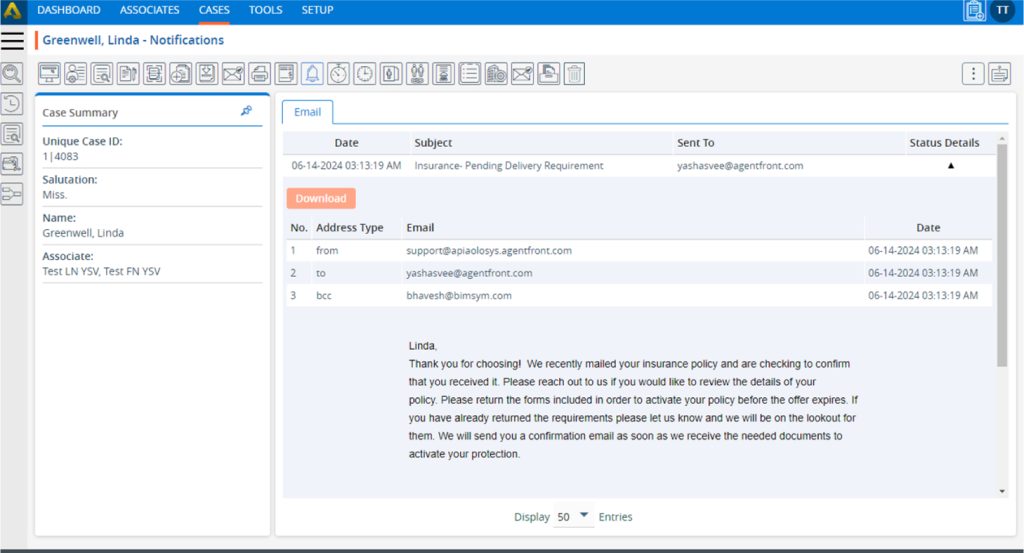
7. After clicking on the arrow, the system will display the details of the email.

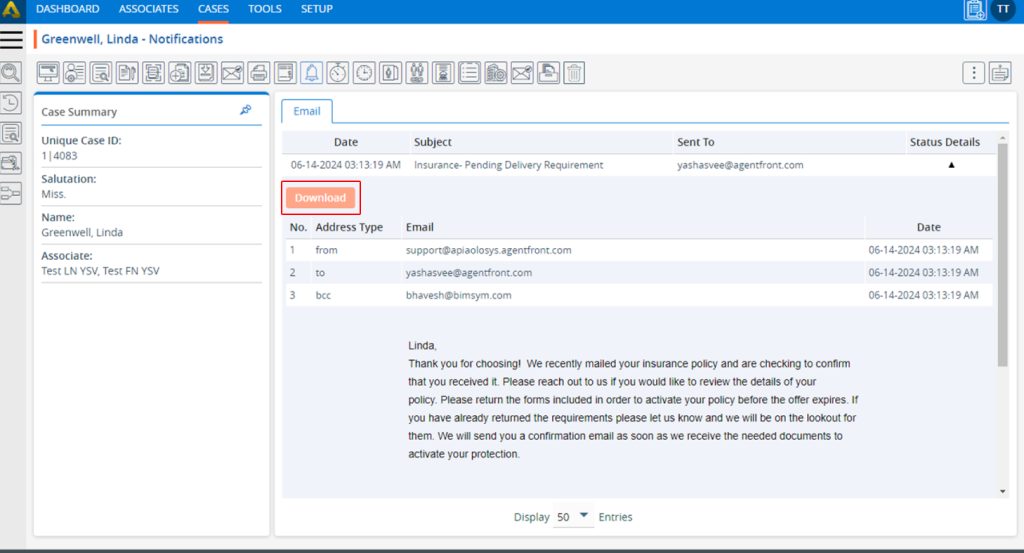
8. Users can download the details of the email by clicking on the ‘Download’ button.

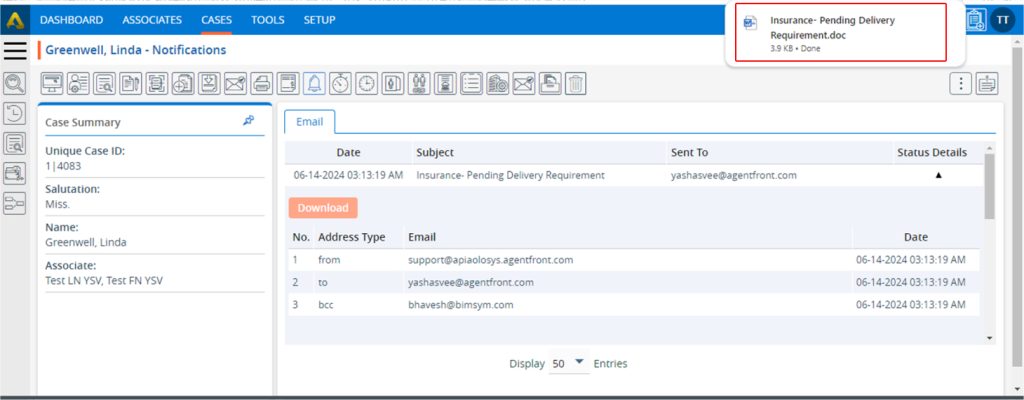
9. The ‘Email’ will be downloaded to the selected location.

10. Users can send emails from the ‘Dashboard’ using the ‘Send Email’ icon located within the ‘Email’ section.
11. The sent emails will be displayed under the ‘Email’ option within the Notifications page.

12. Users can also send emails from the ‘EMAILS’ option.

13. On the Emails page, users will be able to send an email using the ‘Send Email’ icon.
14. The sent emails will be displayed under the ‘Email’ option within the Notifications page.

0
0

Associate Cases > Associate Cases Display

Case Displays are used to create specific views of listings. Users can set a maximum of 5 saved displays, selecting from the available fields, and apply them to the Cases list as needed.

The following are the steps to use the Display feature:
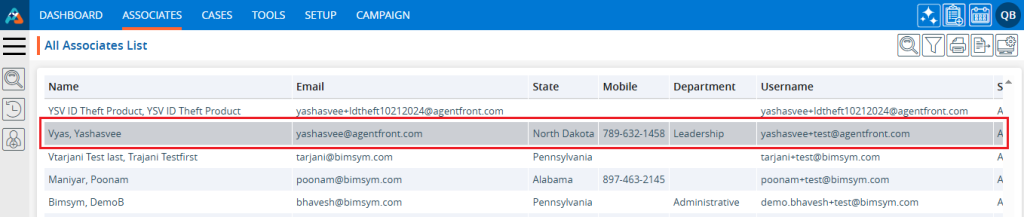
1. Navigate to the ‘ASSOCIATES’ tab where you will find the ‘All Associates List’.

2. Click on an Associate to proceed.

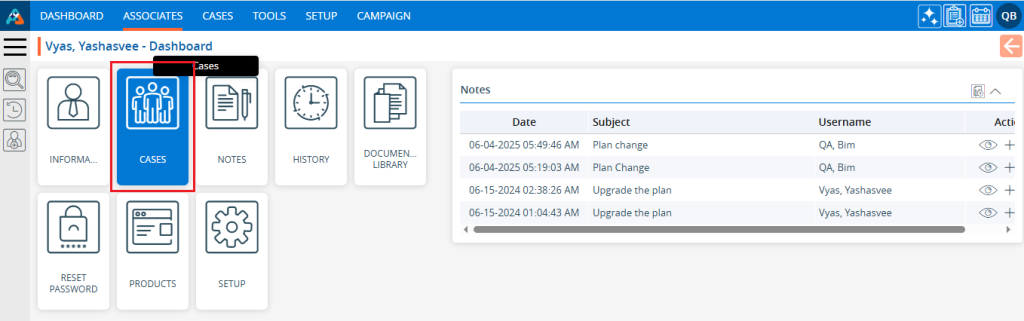
3. The ‘Dashboard’ will open. Click on the ‘CASES’ option.

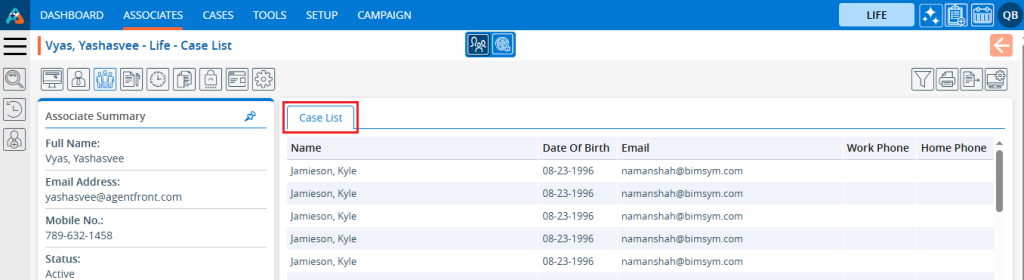
4. The ‘Cases’ page will open, showing a list of cases registered under the Associate.

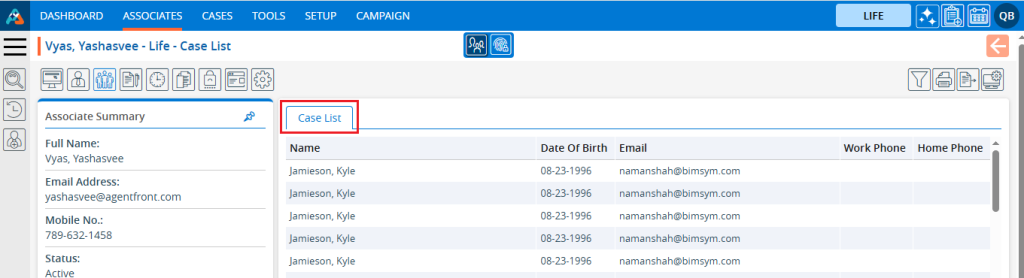
5. Click on the ‘Display’ icon to create a display.

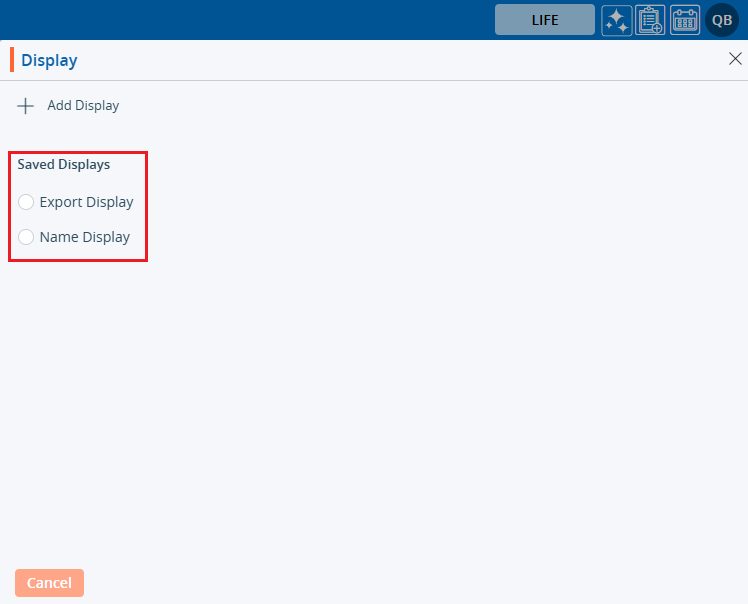
6. A popup page will open  Any existing ‘Displays’ will be listed under ‘Saved Displays’.

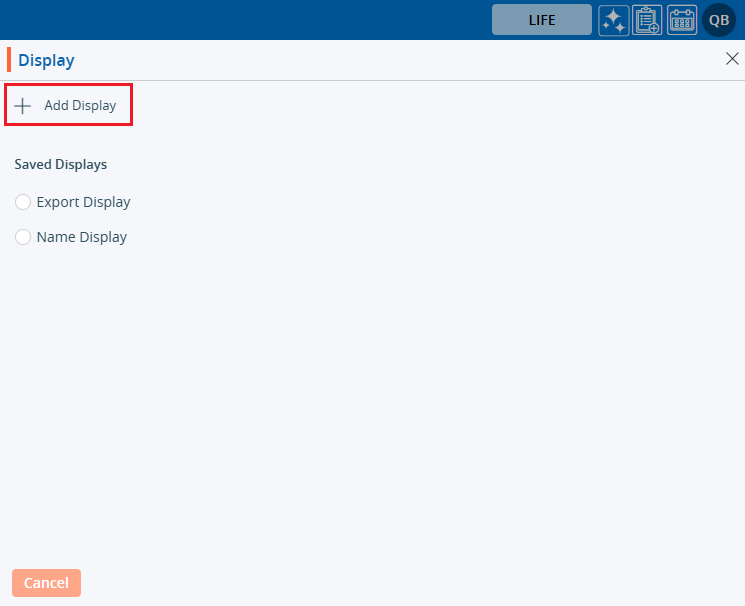
7. Click on ‘Add Display’ to create a new ‘Display’.

8. A window will open.

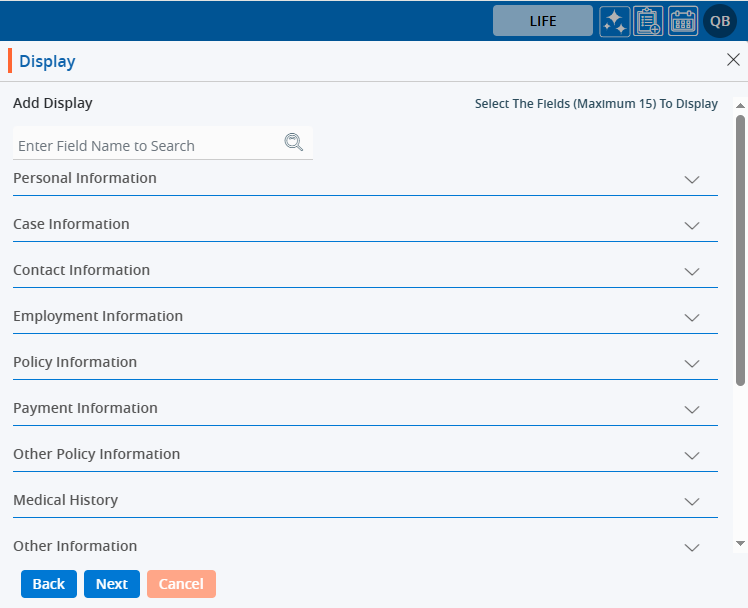
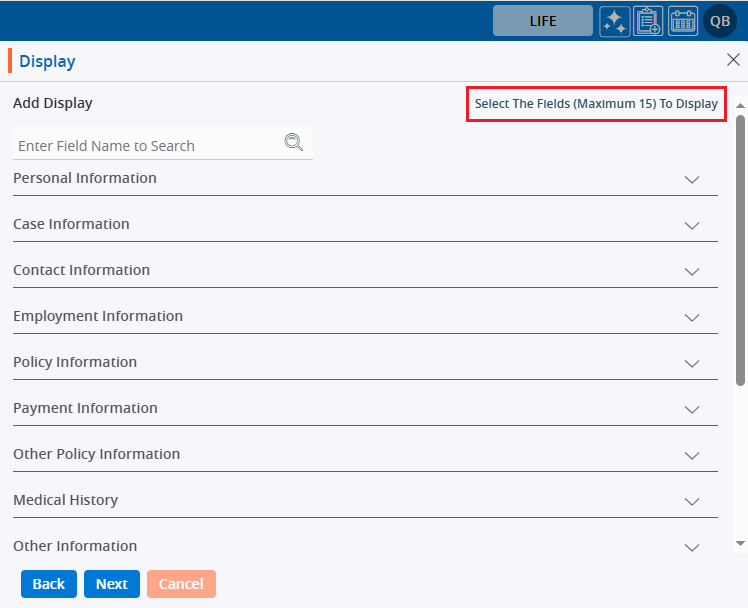
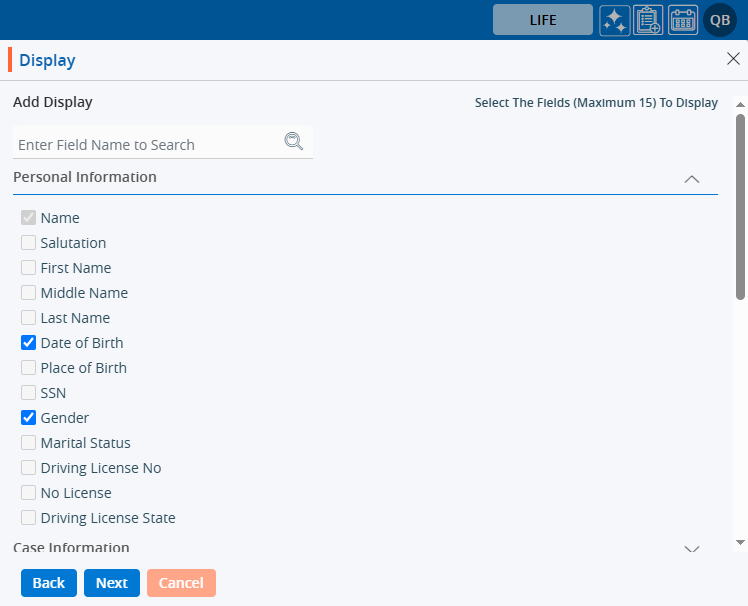
9. The system will allow the selection of a maximum of 15 fields.

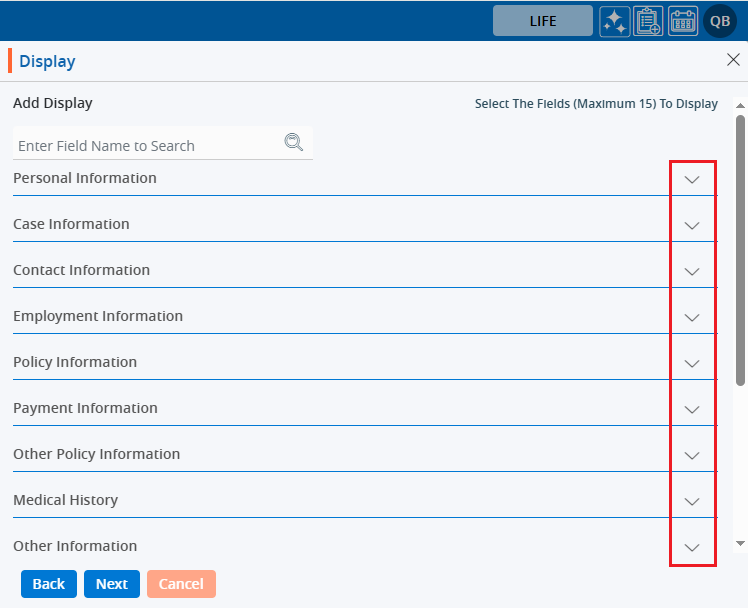
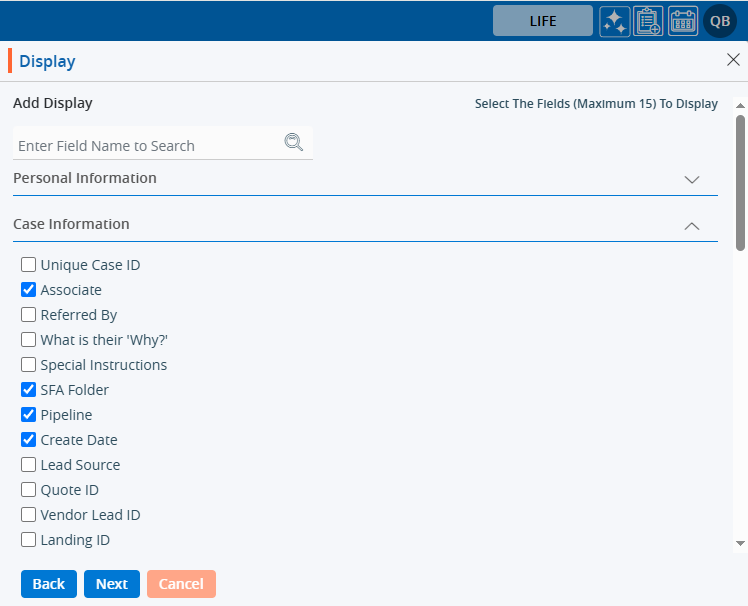
10. The user can view the list of fields by clicking on the down arrow for any field group.
11. Click on the down arrow to reveal the fields for selection.

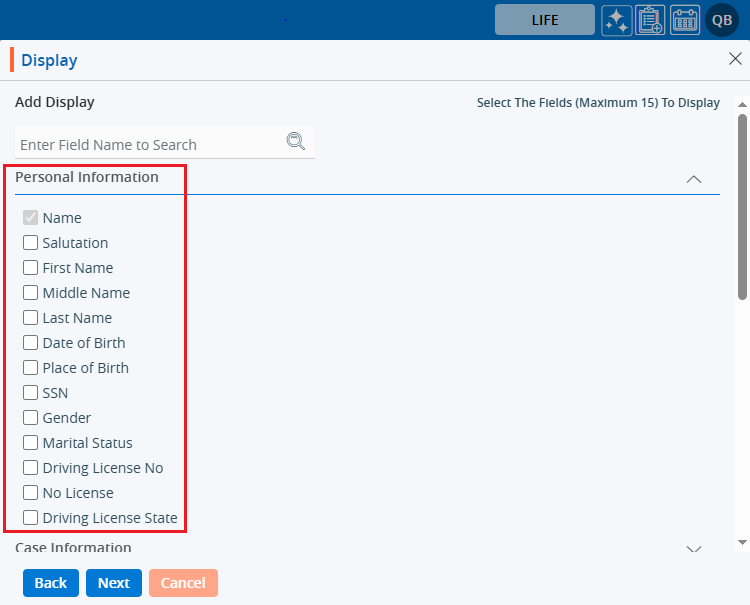
12. After clicking the down arrow next to ‘Personal Information’, the list of personal information fields will be opened.

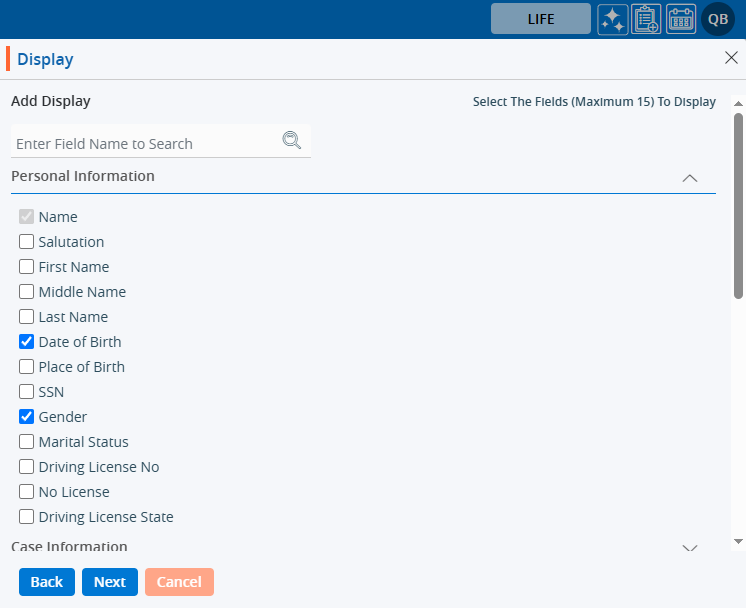
13. Select the necessary fields to configure the ‘Display’ view from the Personal Information fields.

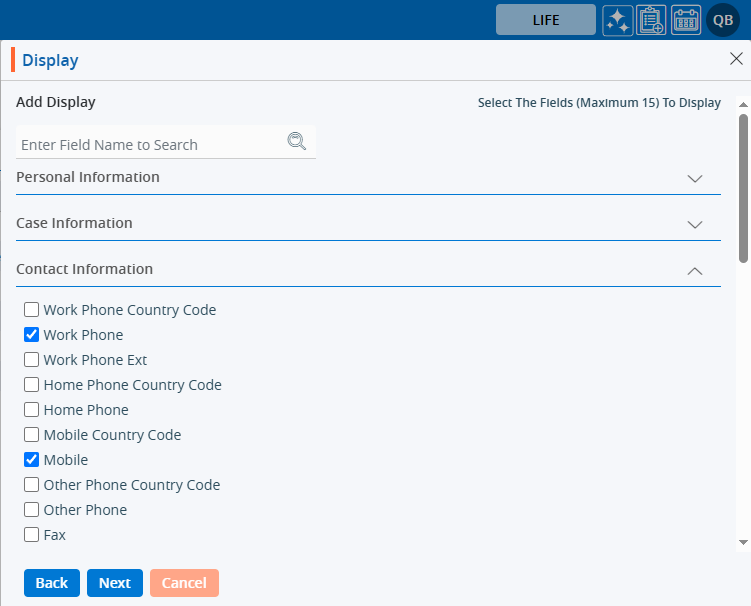
14. Similarly, you can select fields to configure the ‘Display’ view from the ‘Contact Information’ fields.

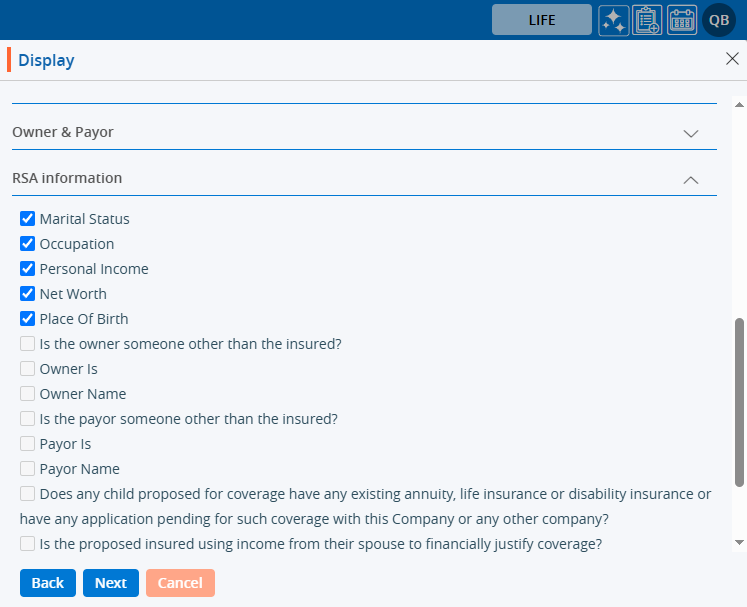
15. Similarly, you can select fields to configure the ‘Display’ view from the ‘RSA Information’ fields.

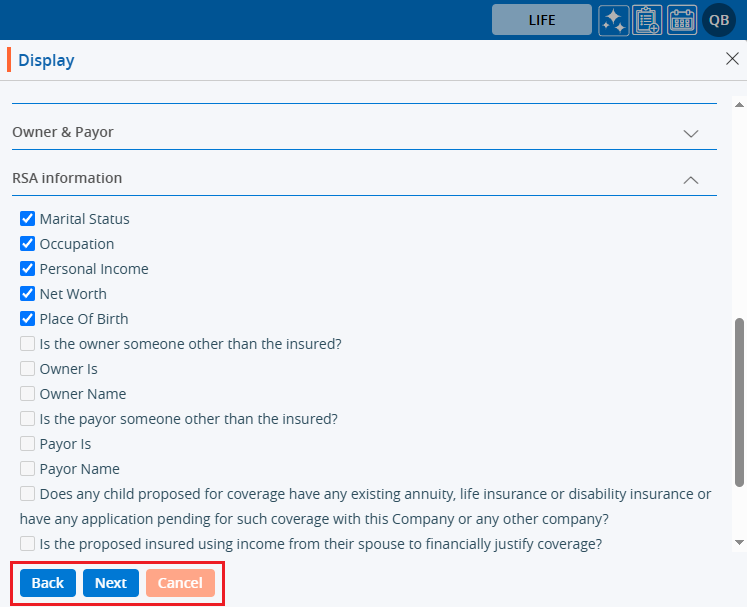
16. After field selection is complete there are three options: Back, Next, and Cancel.

17. Clicking on Cancel will close the window.
18. Clicking on ‘Back’ will redirect to the first page of the ‘Display’.

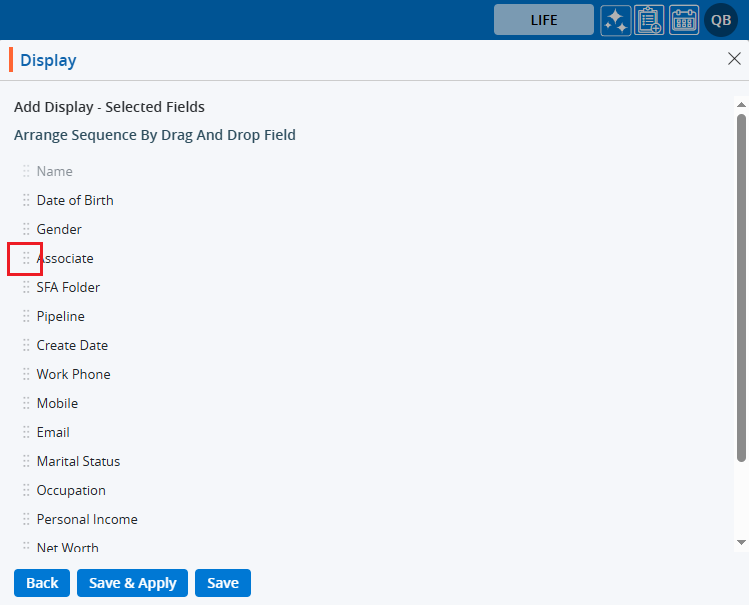
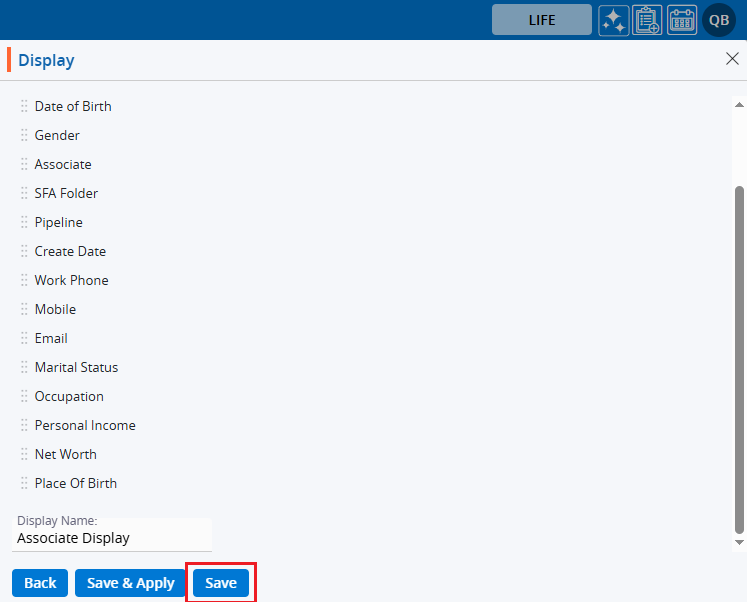
19. Clicking on ‘Next’ will open a new page listing the selected fields.
20. Users can change the sequence of the displayed fields using the six dots.

  • Apart from the ‘Name’ field, all other fields can be changed.

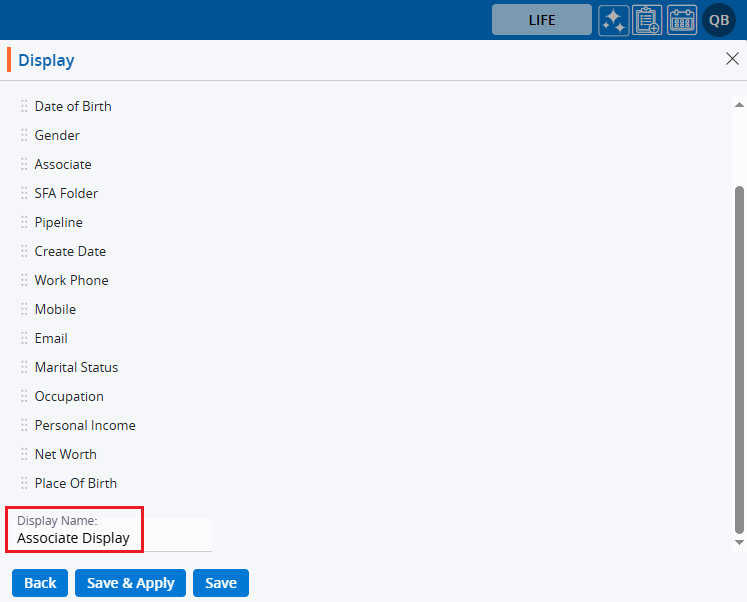
21. Add the ‘Display’ Name at the end.

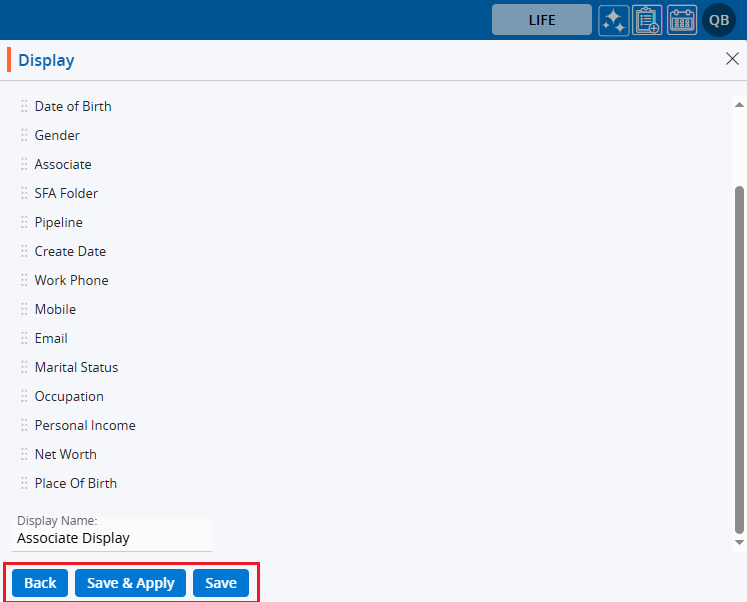
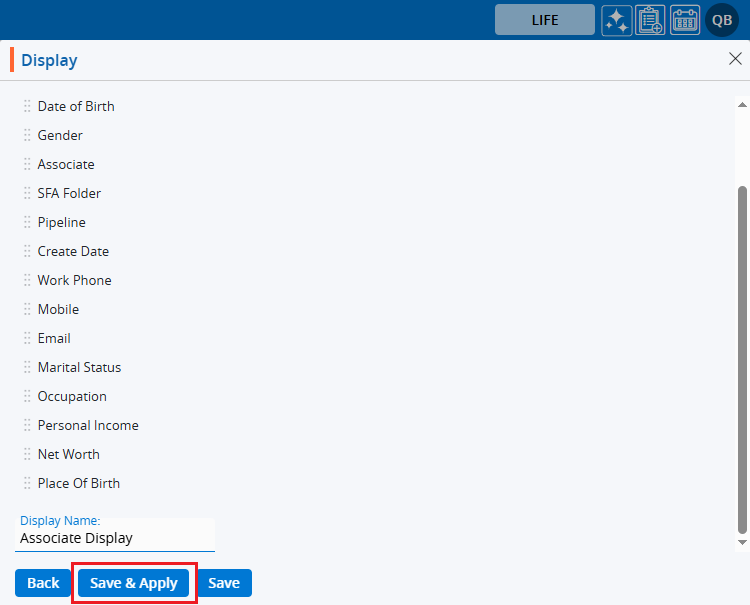
22. On the same page there are three options: Back, Save & Apply, and Save.

23. Clicking on ‘Back’ will return you to the ‘Add Display’ page.

24. Clicking ‘Save’ will save the ‘Display’, and it will be listed under Saved Displays (it will not be applied to the listing).

25. The system will generate a message that the ‘Display created successfully’.

26. Clicking on ‘Save & Apply’ will save the ‘Display’ under the ‘Saved Display’ listing and apply it to the ‘ASSOCIATES > Cases’ list.

27. The system will generate a confirmation message, and the ‘Display’ will be applied to the ‘Cases’ list.

28. The ‘Cases’ listing will display the list according to the criteria set in the ‘ASSOCIATES > CASES > Display’.
29. Hovering the mouse over the ‘Display’ icon will show the name of the applied display.

30.The user can apply any available Display by clicking on the Display option, selecting the desired display, and then clicking on Apply.
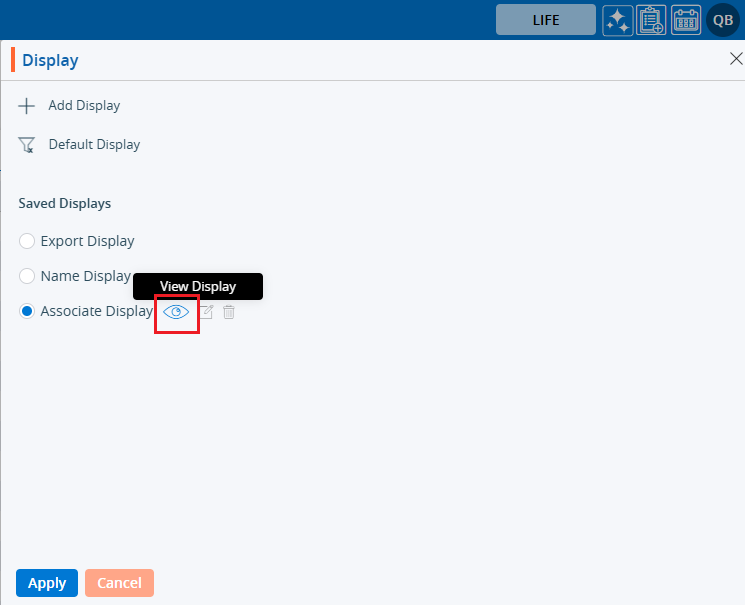
31. Users can view the ‘Display’ criteria by opening the Display popup and clicking on the ‘View Display’ icon.

32. The creation criteria will be displayed.
a. Apply and Cancel buttons will be available.
b. Users can apply the ‘Display’ by using the ‘Apply’ option.

33. The user can Edit any available Display by clicking on the Display option, selecting the desired display, and then clicking on the ‘Edit Display’ icon.

34. The ‘Display’ window will open with the existing criteria, and users can modify the ‘Display’.

35. Users can change the criteria of the ‘Display’ and click on ‘Save & Apply’.

36. An updated ‘Display’ will be applied to the ‘ASSOCIATES > Cases’ listing.

37. The user can delete any available Display by clicking on the Display option, selecting the desired display, and then clicking on the ‘Delete Display’ option.

38. The system will ask for confirmation. Click on ‘Delete’.

39. The system will generate a confirmation message and the ‘Display’ will be deleted.

40. Users can verify if the ‘Display’ is deleted or not by opening the Display option and checking the Saved Displays..

0
0

Cases Quick Action Menu

Quick Action Menu – The Quick Action Menu allows the user to mass perform the same action on single or multiple profiles. It enables the user to update the SFA Folder, change the Pipeline status, or move cases to Trash or Archive for specific profile(s).

The following are steps to manage Quick Action:
Steps to update the SFA Folder:
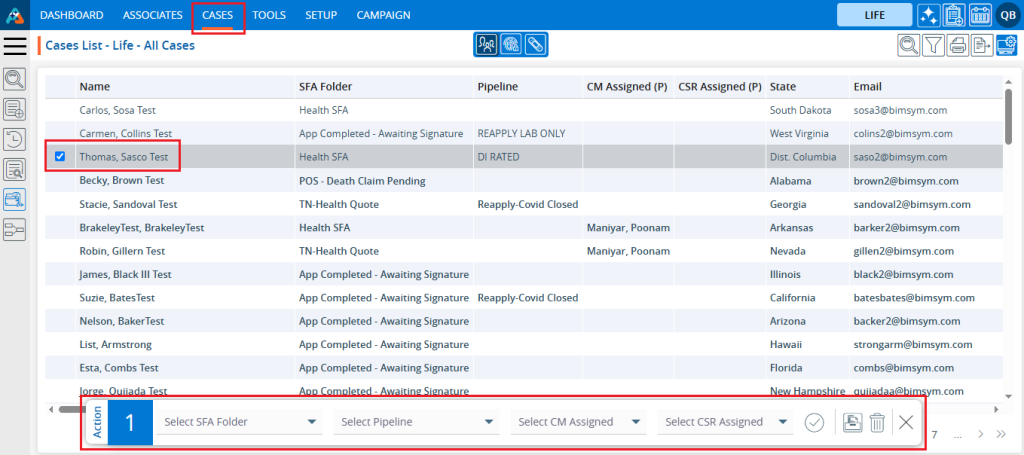
1. Navigate to the ‘CASES’ tab, where you will find the Cases List – All Cases.

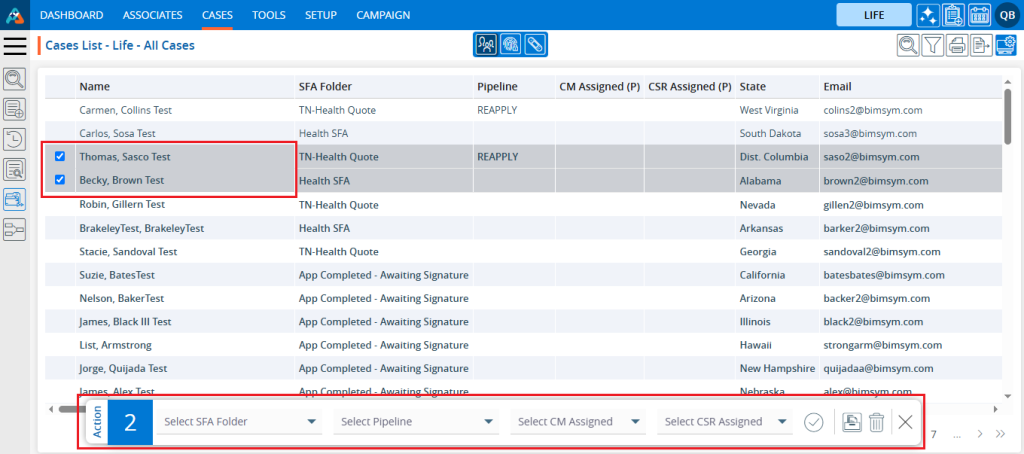
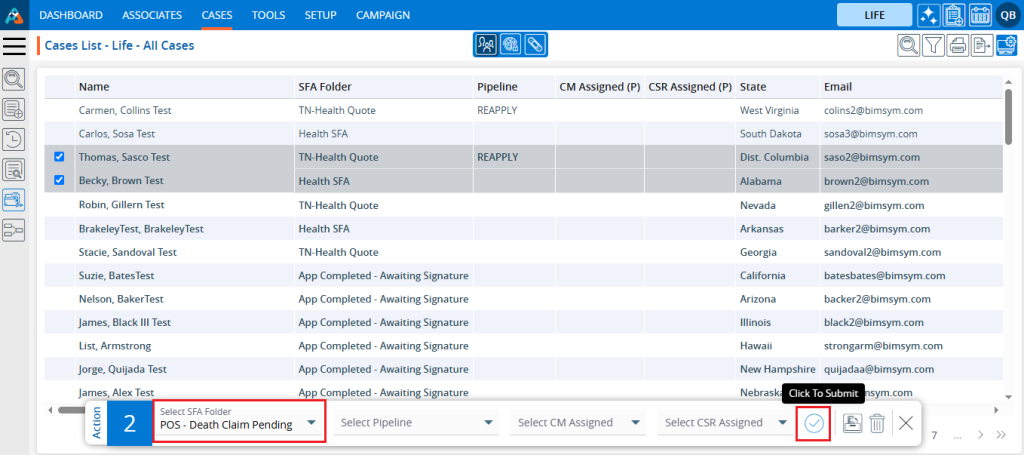
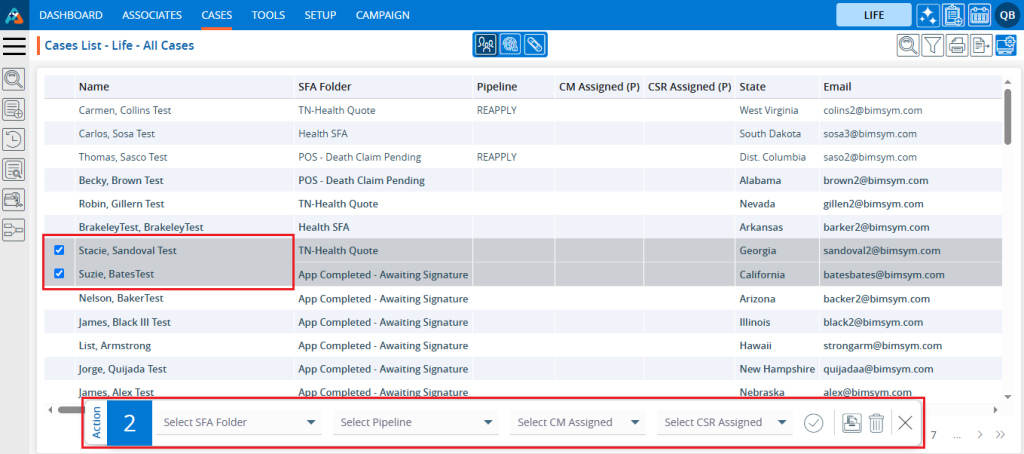
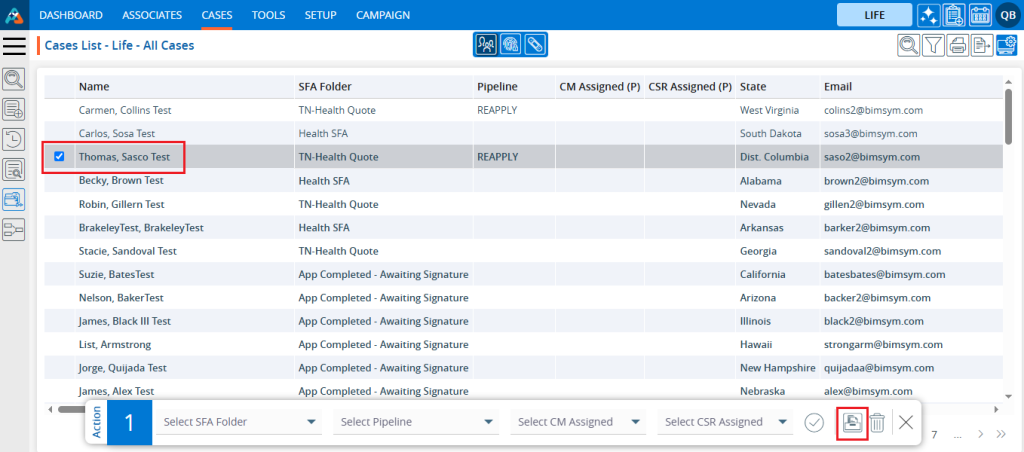
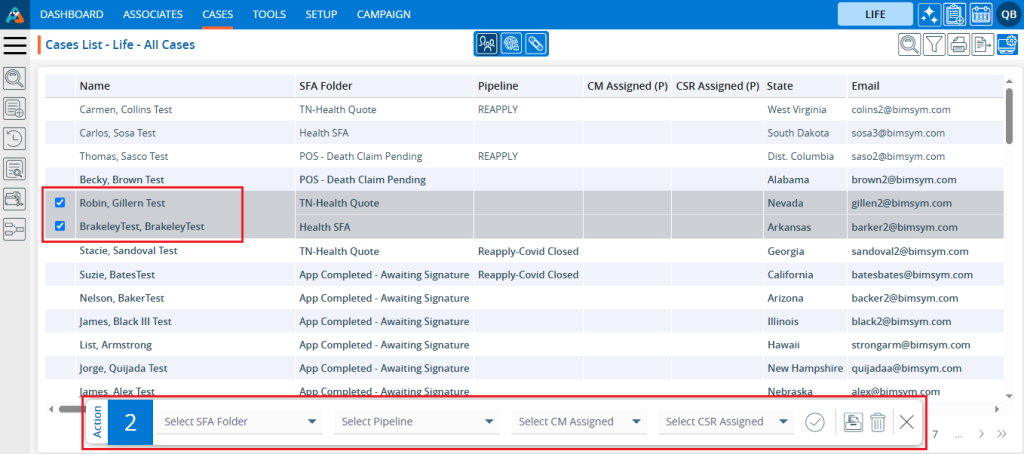
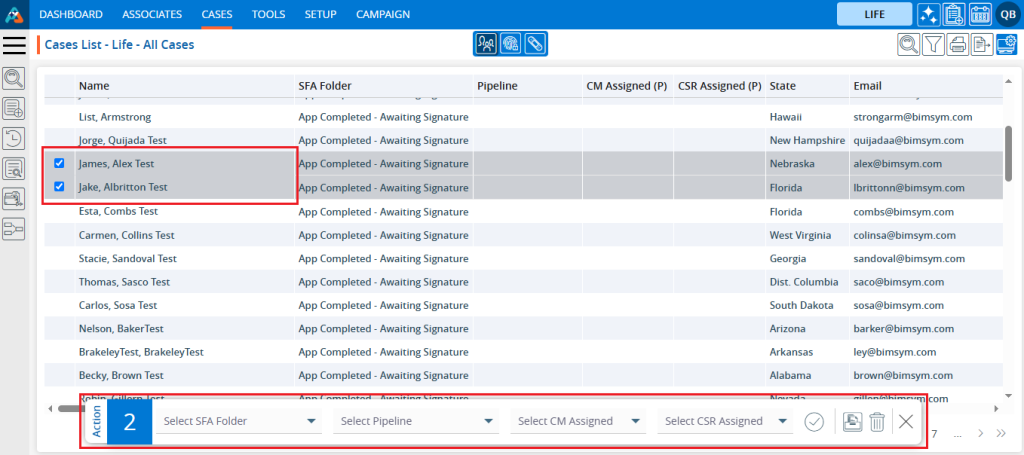
2.  Select a profile by checking the corresponding checkbox, and the ‘Quick Action Menu’ will be enabled.

3. Multiple profile(s) can be selected by checking the corresponding checkbox.
4. After selecting the profile(s), It will allow the user to change the ‘SFA Folder’, ‘Pipeline’, ‘CM Assigned’ and ‘CSR Assigned’ for the selected profiles. Additionally, users can move the selected profiles to ‘Archive’ or ‘Trash’.

Steps to update SFA Folder:
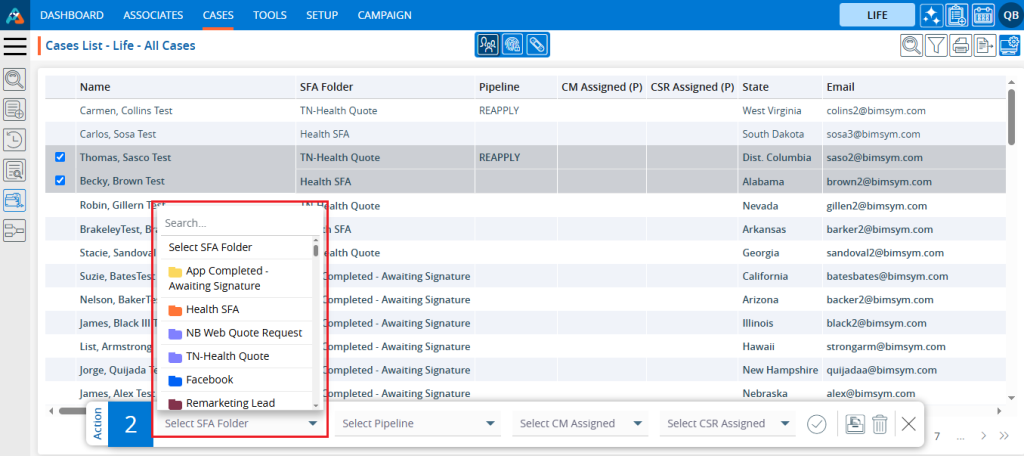
5. Select the desired ‘SFA Folder’ from the provided dropdown menu to move the selected profiles to that specific ‘SFA Folder’.

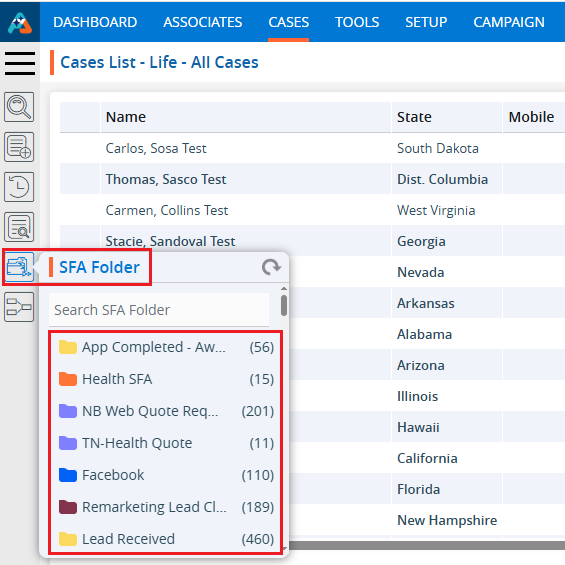
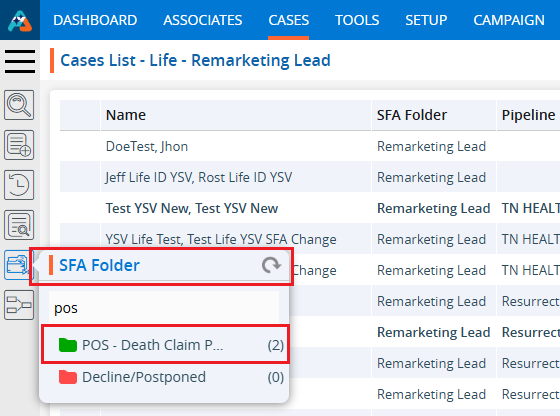
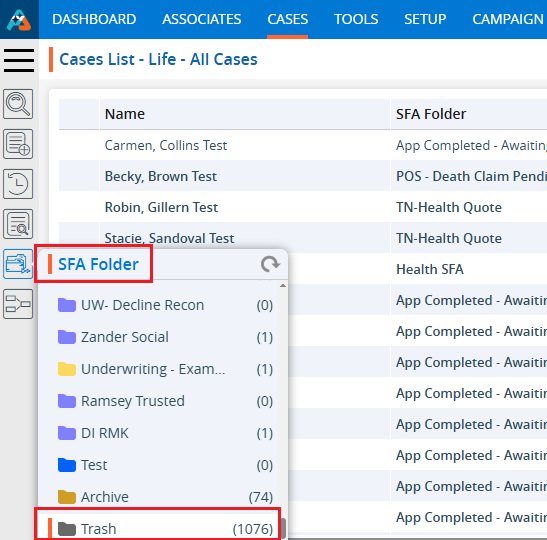
6. Navigate to the ‘SFA Folder’ section on the left side panel to view specific folders along with their respective counts.

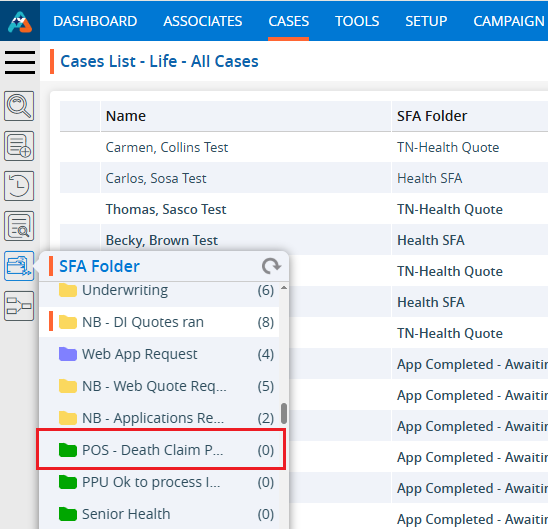
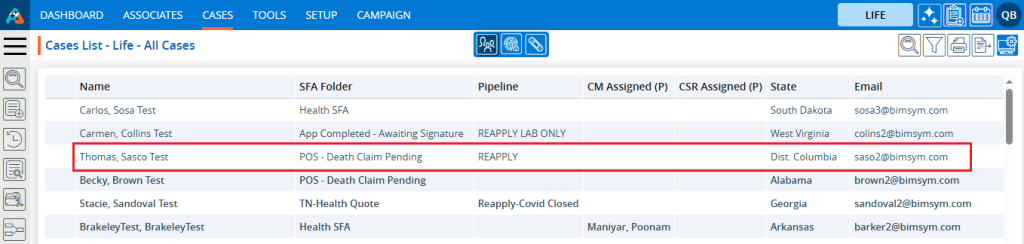
7. Here we are moving the cases to the ‘POS – Death Claim Pending’ SFA Folder, which currently has a count of 0.

8. Select the ‘ POS – Death Claim Pending’ SFA Folder from the dropdown menu and click the submit button icon.

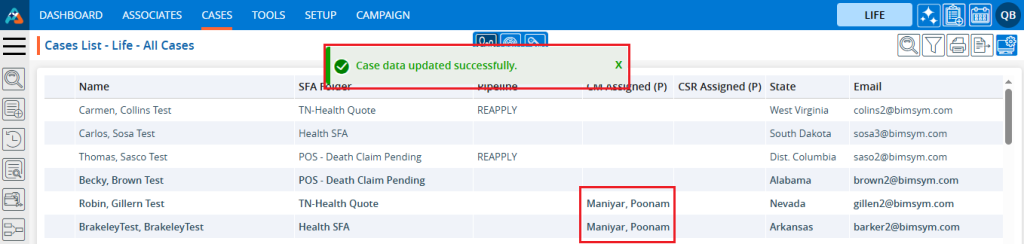
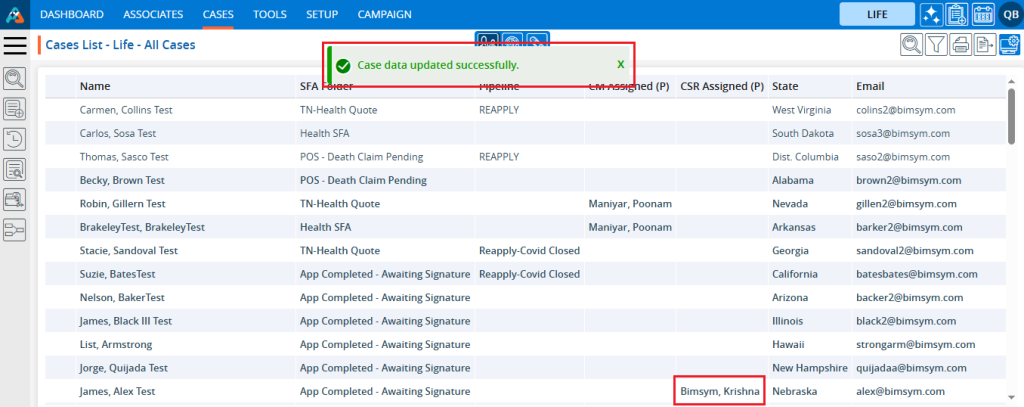
9. The system will display a confirmation message indicating that the cases have been updated successfully.
10. The selected profiles have been moved to the ‘ POS – Death Claim Pending’ SFA Folder. The updated ‘SFA Folder’ will be reflected in both the ‘Cases List – All Cases’ and ‘SFA Folder’ sections.

11. Click on ‘SFA Folder’ in the left side panel to check the counts of the updated ‘SFA Folders.’ The count will be updated from 0 to 2.

Steps to update Pipeline status:
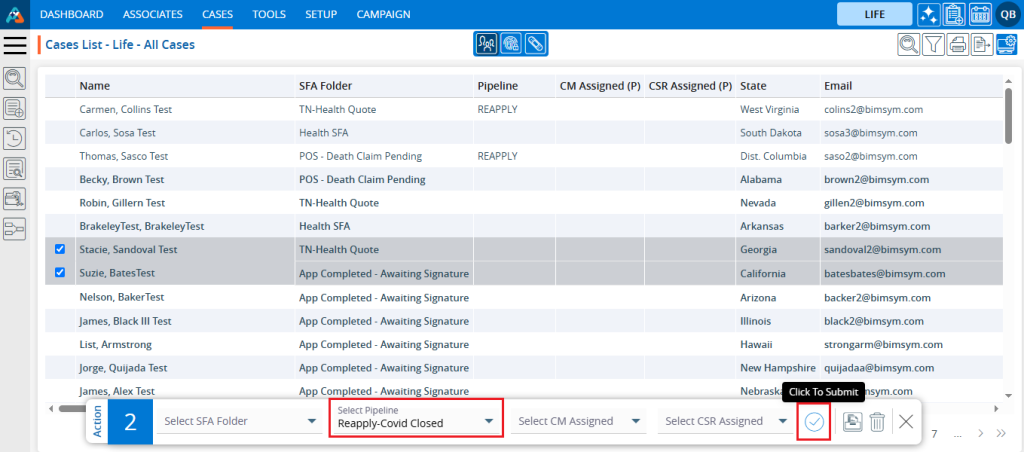
12. Navigate to the ‘CASES’ tab again and select the profile(s) by checking the corresponding checkbox, and the ‘Quick Action Menu’ will be enabled.

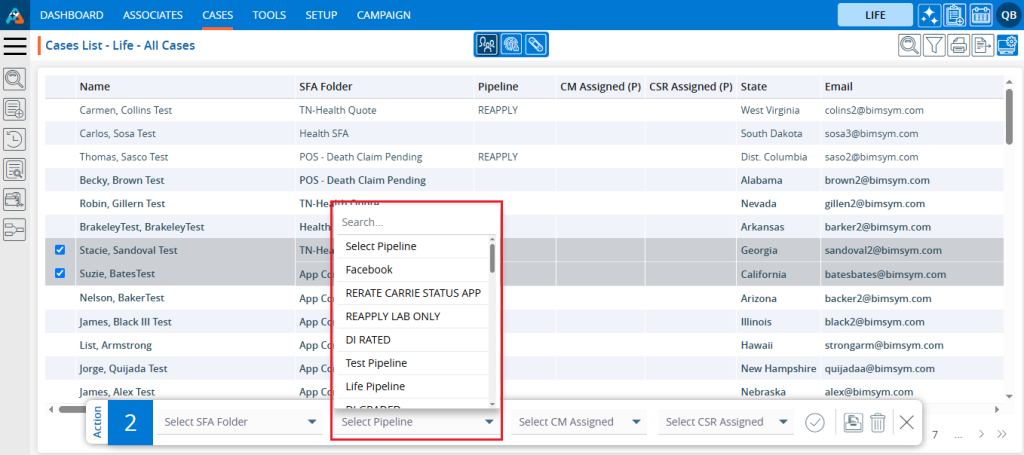
13. Select the desired ‘Pipeline’ from the provided dropdown menu to move the selected profiles to that specific ‘Pipeline’.

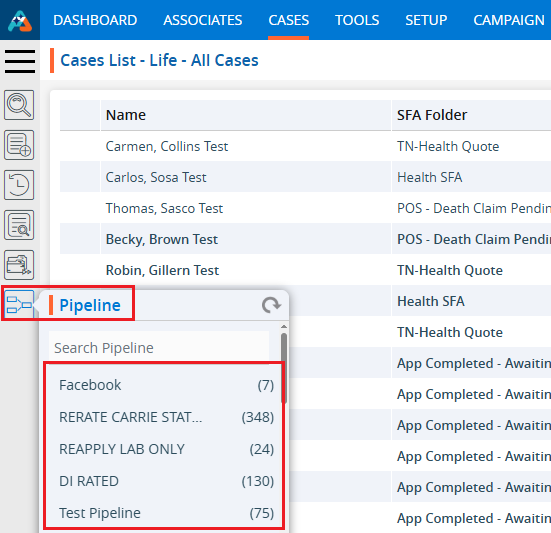
14. Navigate to the ‘Pipeline’ section on the left side panel to view the specific statuses along with their respective counts.

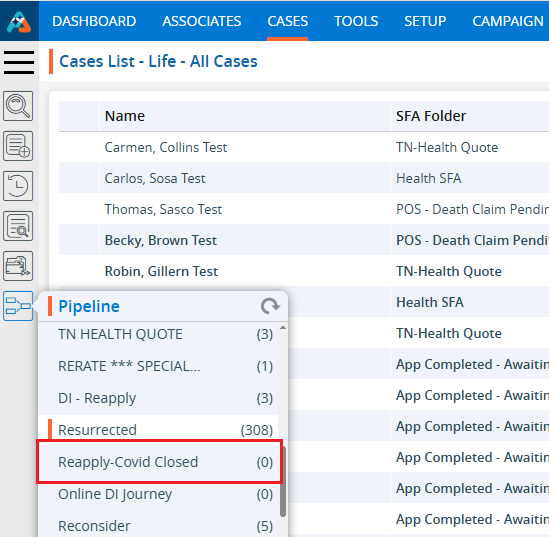
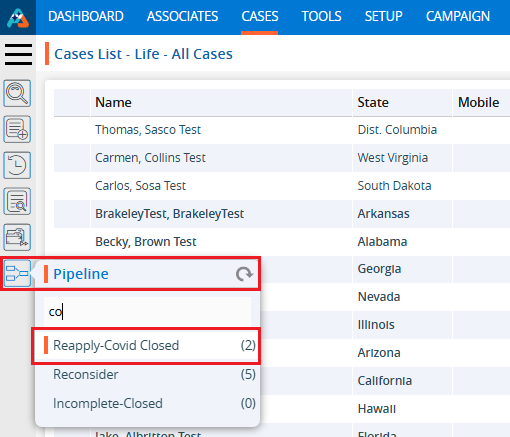
15. Here we are moving the cases to the ‘Reapply-Covid Closed’ Pipeline, which currently has a count of 0.

16. Select the profiles from the list and choose the ‘Reapply-Covid Closed’ Pipeline from the dropdown menu. Click the ‘Submit’ icon.

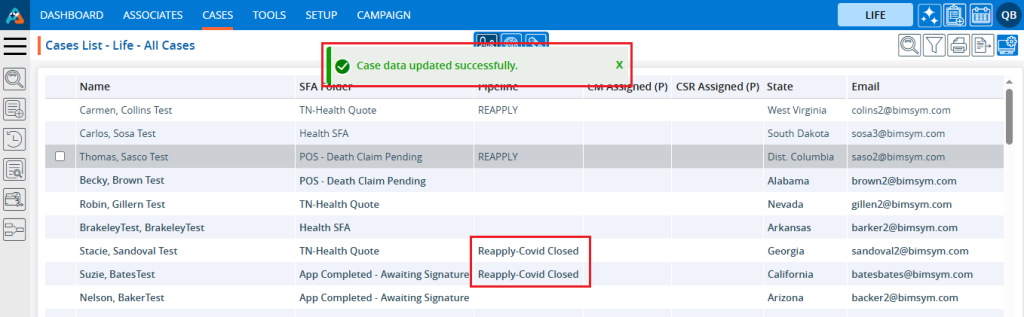
17. The system will display a confirmation message indicating that the case data has been updated.
18. The selected profiles have been moved to the ‘Reapply-Covid Closed’ Pipeline. The updated ‘Pipeline’ will be reflected in both the ‘Cases List – All Cases’ and ‘Pipeline’ sections.

19. Click on ‘Pipeline’ in the left side panel to check the count of the ‘Reapply-Covid Closed’ Pipeline. The count will be updated from 0 to 2.

Steps to move profile(s) to Archive Folder:
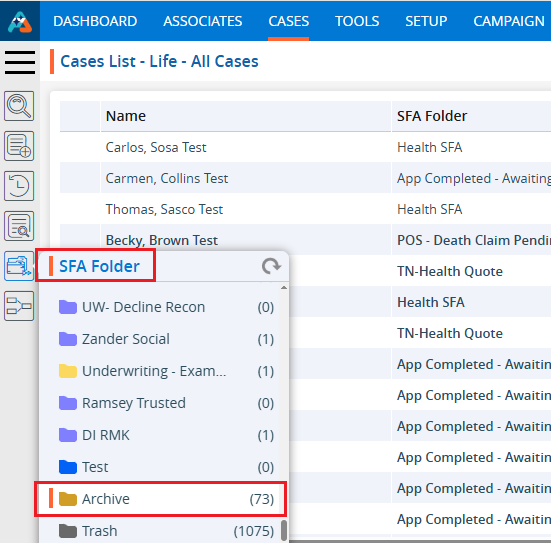
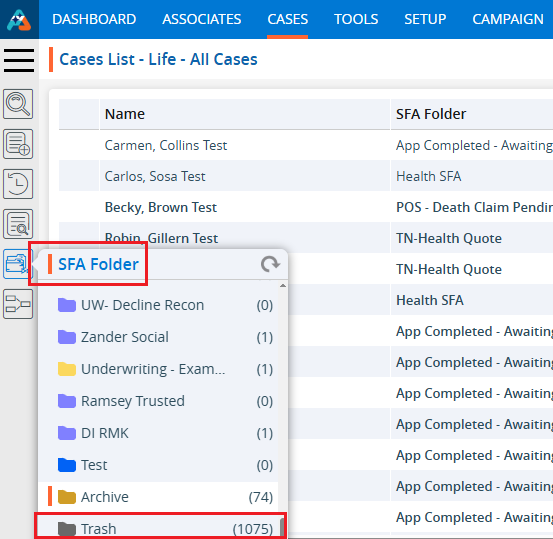
20. Navigate to the ‘SFA Folder’ section on the left side panel to view the count for the ‘Archive’ folder. The count is 73.

21. Select the profile(s) from the list and click the Archive button icon in the ‘Quick Action Menu’..

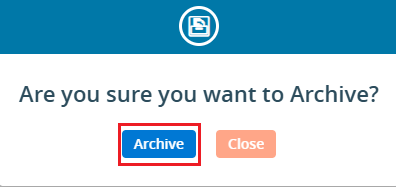
22. The system will generate a validation message and ask for confirmation. Click ‘Archive’ to proceed

23. After clicking ‘Archive,’ the system will display a confirmation message indicating that the case data has been updated, and the cases will be moved to the ‘Archive’ folder.
24. The selected profile(s) have been moved to the ‘Archive’ SFA Folder successfully. The profile(s) which moved to the Archive folder will not be visible in ‘Cases List – All Cases’.

25. Click on ‘SFA Folder’ in the left side panel to check the counts of the ‘Archive’ folder.’ The count will be updated from 73 to 74.

Steps to move profile(s) to Trash Folder:
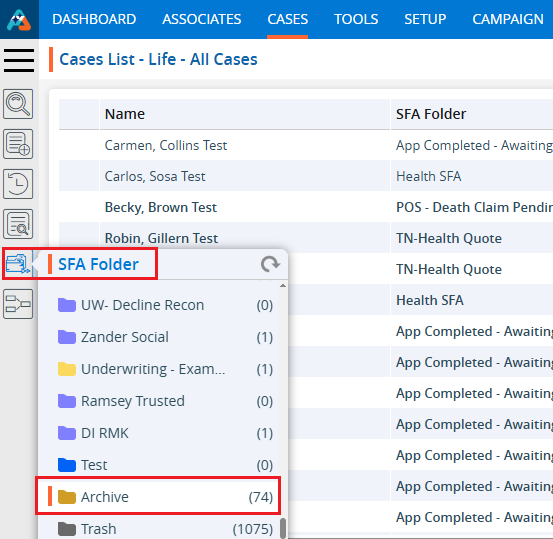
26. Navigate to the ‘SFA Folder’ section on the left side panel to view the count for the ‘Trash’ folder. The count is 1075.

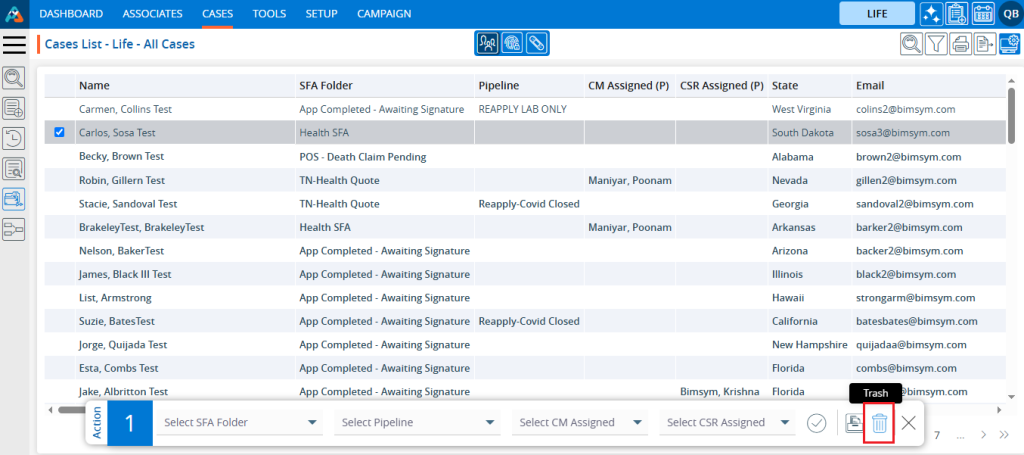
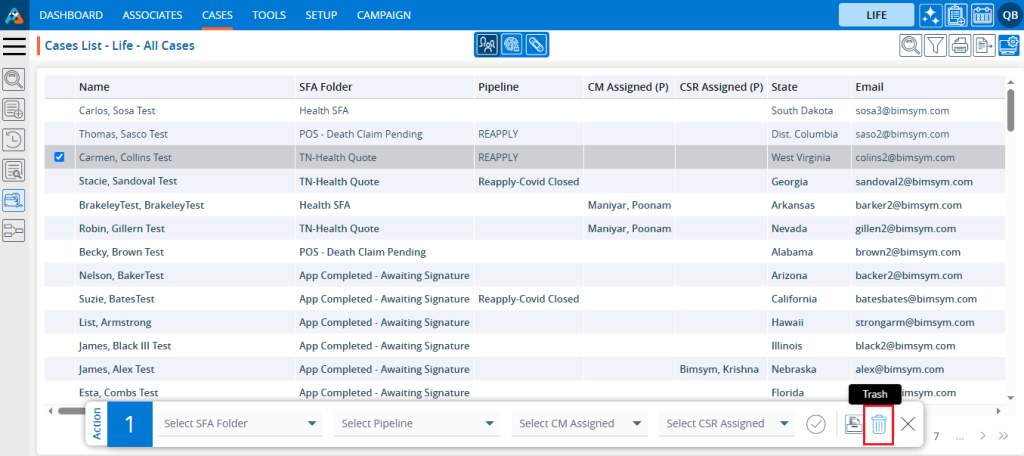
27. Select the profile(s) from the list, then click the Trash button icon in the ‘Quick Action Menu’.

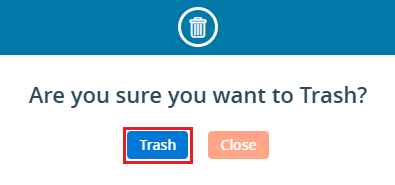
28. The system will generate a validation message and ask for confirmation. Click ‘Trash’ to proceed.

29. After clicking Trash,’ the system will display a confirmation message indicating that the case data has been updated successfully, and the profile(s) will be moved to the ‘Trash’ folder.
30. Selected profile(s) have been moved to ‘Trash’ SFA Folder successfully. The profile(s) which moved to Trash folder will not be displayed in the ‘Cases List – All Cases’.

31. Click on ‘SFA Folder’ in the left side panel to check the counts of the ‘Trash’ folder.’ The count will be updated from 1075 to 1076.

Steps to move profile(s) to CM Assigned:
32. Navigate to the ‘CASES’ tab again and select the profile(s) by checking the corresponding checkbox, and the ‘Quick Action Menu’ will be enabled.

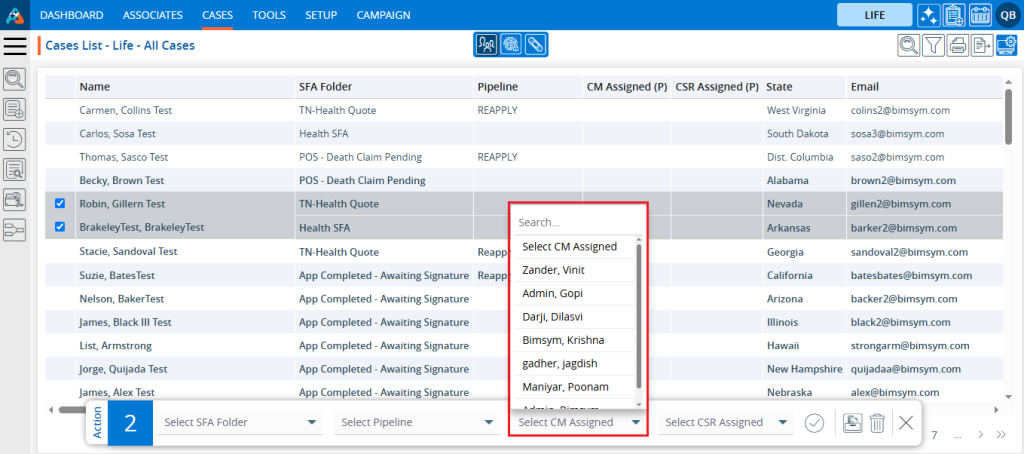
33. Select the desired ‘CM Assigned’ from the provided dropdown menu to move the selected profiles to that specific ‘CM Assigned’

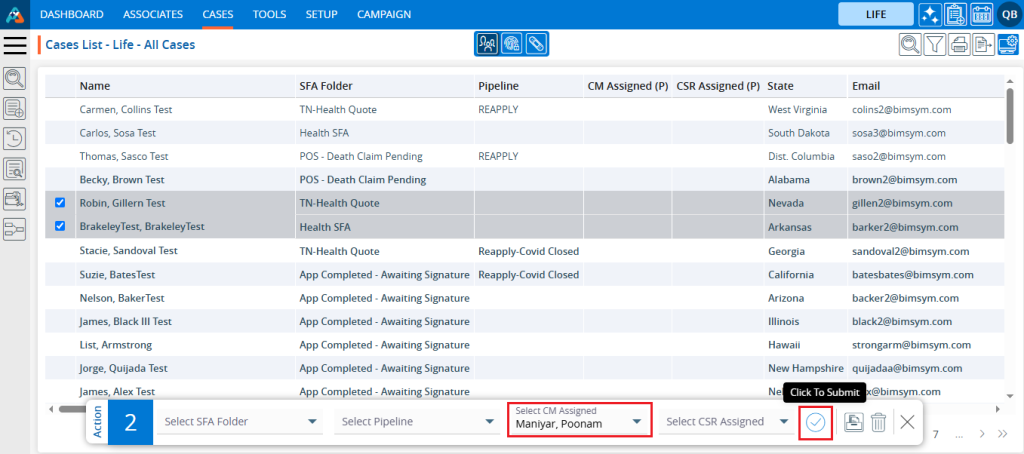
34. Select the profiles from the list and choose the ‘Maniyar, Poonam’ CM Assigned from the dropdown menu. Click the ‘Submit’ icon.

35. The system will display a confirmation message indicating that the case data has been updated.
36. The selected profiles have been moved to the ‘Maniyar Poonam’ CM Assigned. The updated ‘CM Assigned’ will be reflected in both the ‘Cases List – All Cases’ and ‘CM Assigned’ sections.

Steps to move profile(s) to CSR Assigned:
37. Navigate to the ‘CASES’ tab again and select the profile(s) by checking the corresponding checkbox, and the ‘Quick Action Menu’ will be enabled.

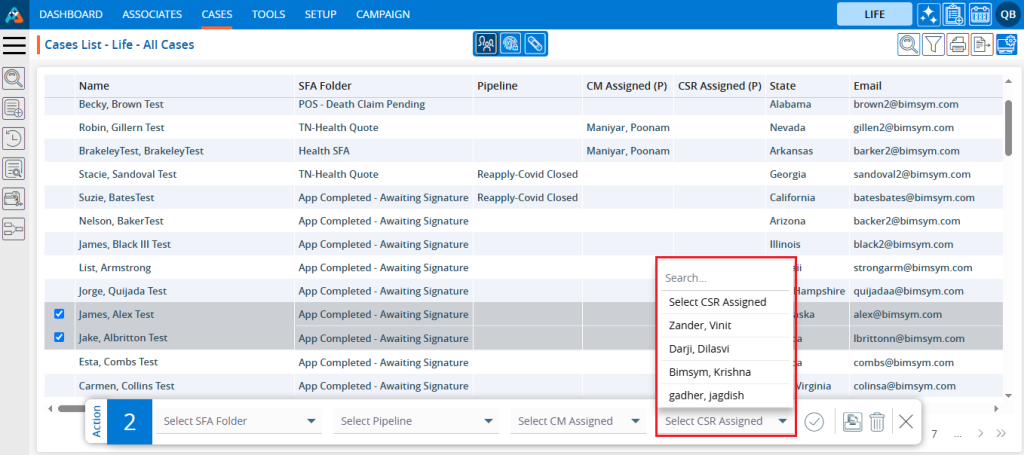
38. Select the desired ‘CSR Assigned’ from the dropdown menu provided to move the selected profiles to that specific ‘CSR Assigned’.

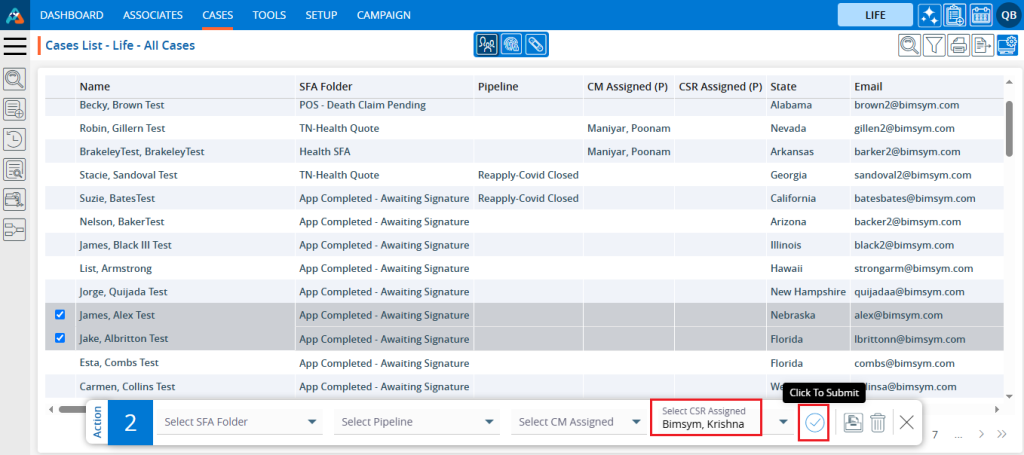
39. Select the profiles from the list and choose the ‘BimSym, Krishna’ CSR Assigned from the dropdown menu. Click the ‘Submit’ icon.

40. The system will display a confirmation message indicating that the case data has been updated.
41. The selected profiles have been moved to the ‘BimSym Krishna’ CSR Assigned. The updated ‘CM Assigned’ will be reflected in both the ‘Cases List – All Cases’ and ‘CSR Assigned’ sections.

0
0

Cases Pipeline

The pipeline is used to track sales for each case within the system. Here, the case is moved from one Pipeline to another.
Pipeline status can be created according to the requirement from the Setup > System Setup > Pipeline.

The following are the steps to move cases through the Pipelines:
1. Navigate to the ‘CASES’ tab where you’ll find the ‘Cases List – Life – All Cases’.

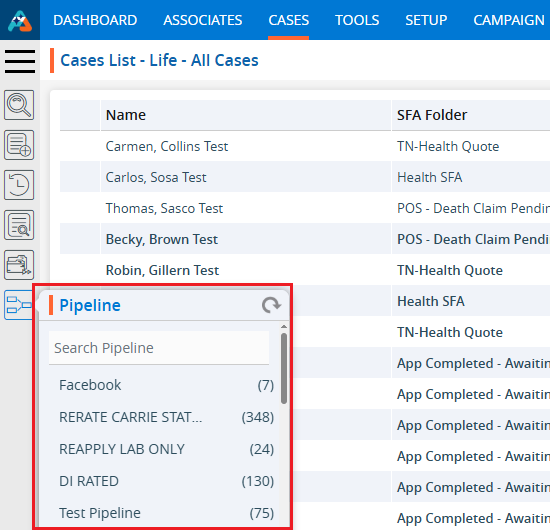
2. Click on the ‘Pipeline’ option from the left-side panel, and a list of available pipelines will be displayed.

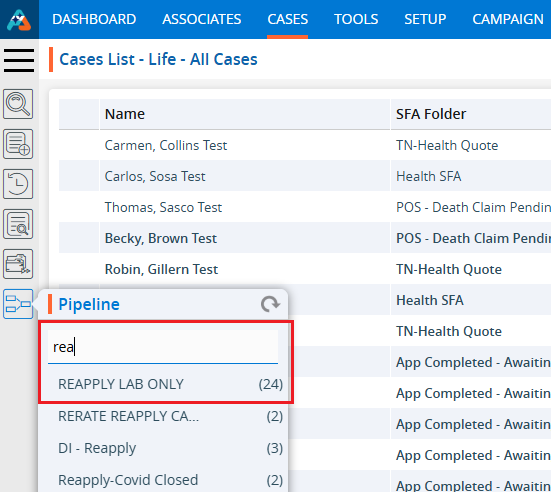
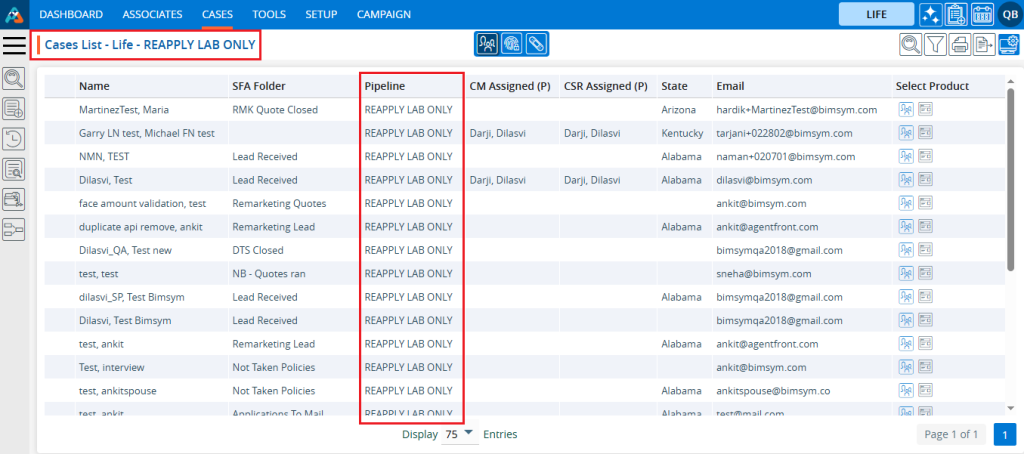
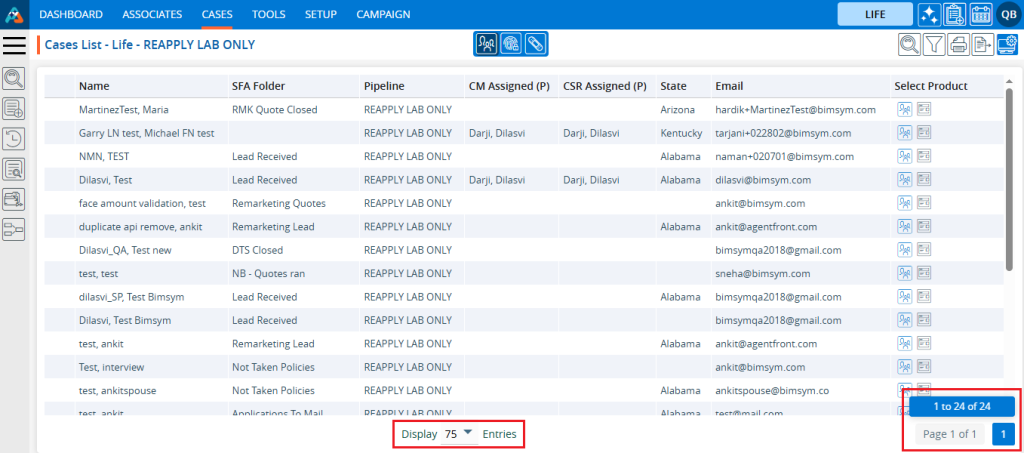
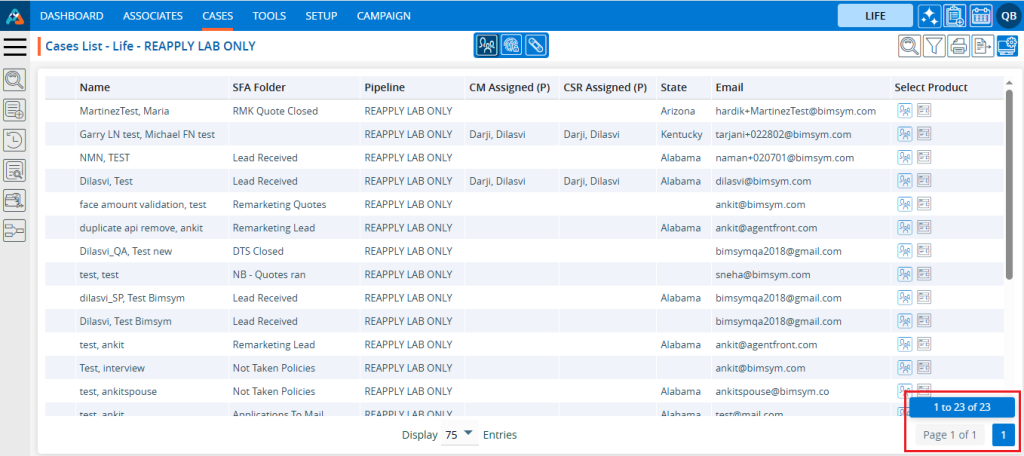
3. Search for the required Pipeline by entering its keyword in the search box. For example, if the user types ‘rea’, they will get a list that includes ‘REAPPLY LAB ONLY’. Check the total number of cases displayed (24) and click on it to open the list of cases.

4. In Pipeline cases are displayed below. The page will be named ‘Cases List – REAPPLY LAB ONLY’. In the Pipeline column, only ‘REAPPLY LAB ONLY’ pipeline cases will be shown.

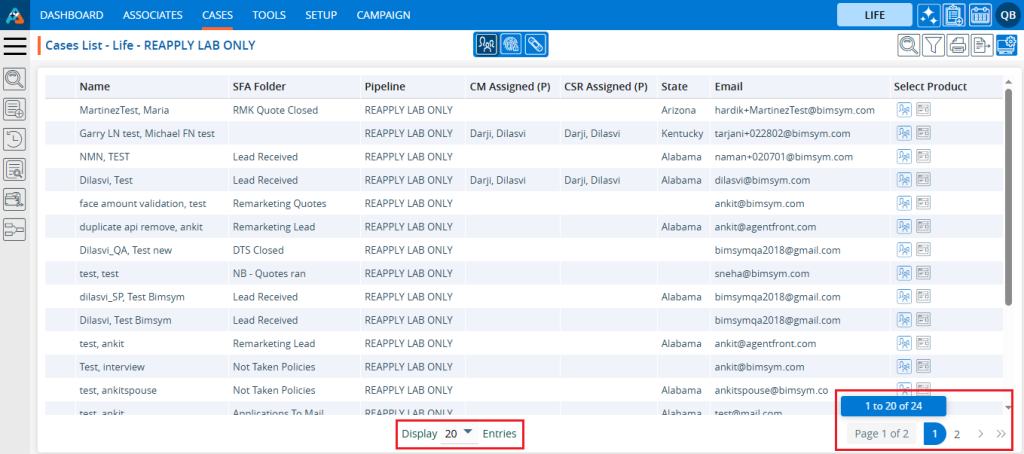
5. Select the option from the Display Options menu to set the number of cases displayed per page based on the total number of cases available in the ‘REAPPLY LAB ONLY’.

6. After selecting the Display option, the system will display cases and pagination according to the chosen option. If the user selects 20 cases per page, the system will display 20 cases per page, distributing the data accordingly.

7. Click on the Print option to print the current page. The printing feature will print the data based on the selected display settings.

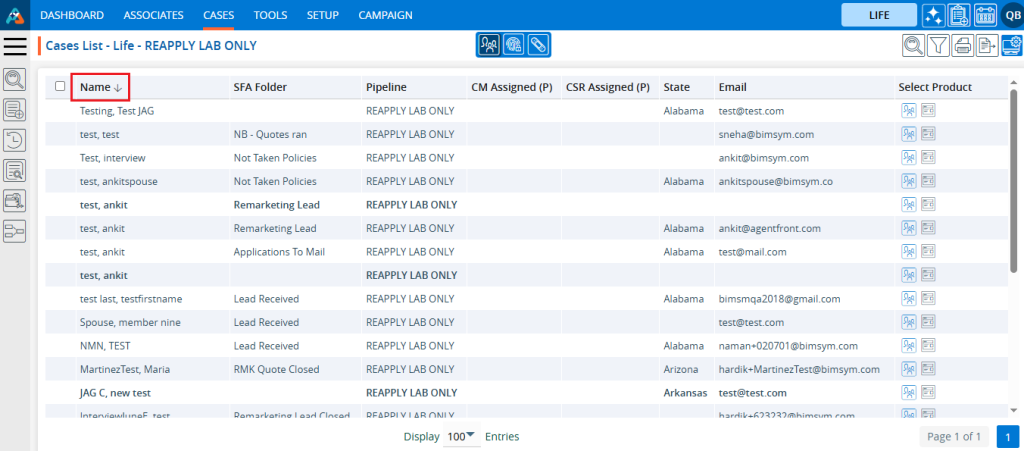
8. Click on the field title to view the cases in ascending or descending order. When the user clicks on the title, a downward arrow will be displayed next to it, and the cases will be arranged in descending order.

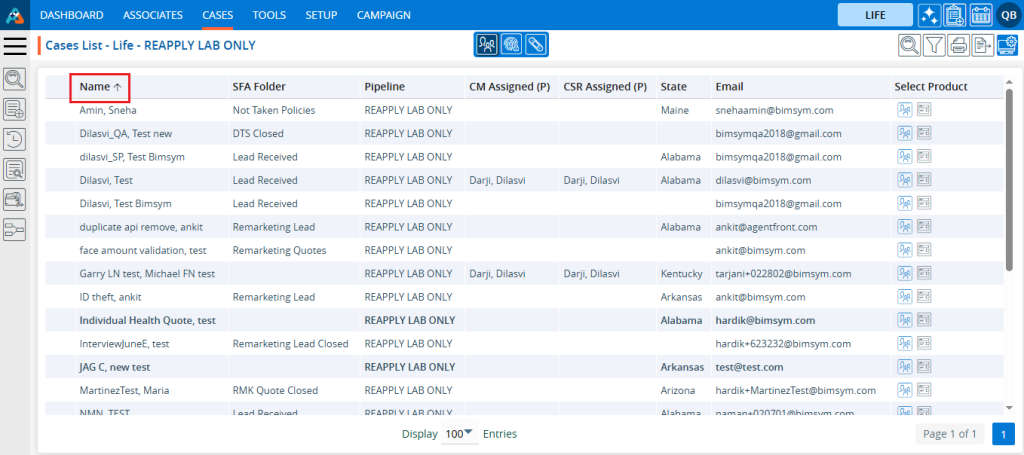
9. When the user clicks on the title again, an upward arrow will be displayed next to it, and the cases will be arranged in ascending order.

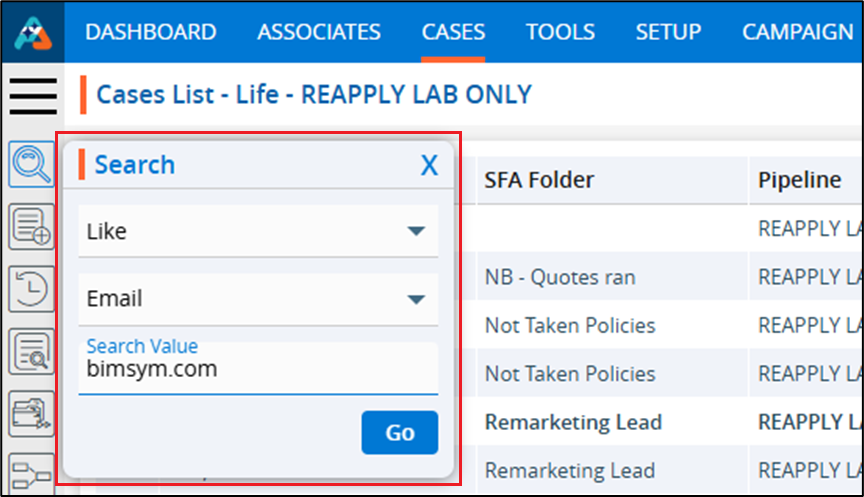
10. Click on the left search bar and enter the data you wish to search for within the ‘REAPPLY LAB ONLY’ list. For example, if you select ‘Like’ ‘Email’ ‘bimsym.com’, it will display all cases that have an email address like ‘bimsym.com’.

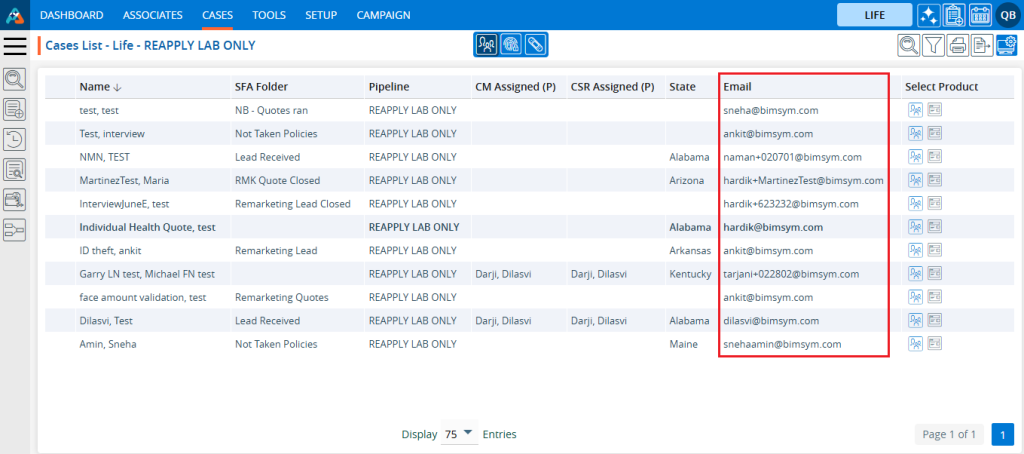
11. The resulting display is a list of cases in the ‘REAPPLY LAB ONLY’ Pipeline which have an email address like ‘bimsym.com’.

12. Click on Quick Search and enter the data the user wants to search for within the ‘REAPPLY LAB ONLY’ Pipeline. For example, if the user inputs ‘carmen’ and clicks on the search button.

13. The resulting display is a list of cases in the member with the name “CARMEN’ in ‘REAPPLY LAB ONLY’ Pipeline.

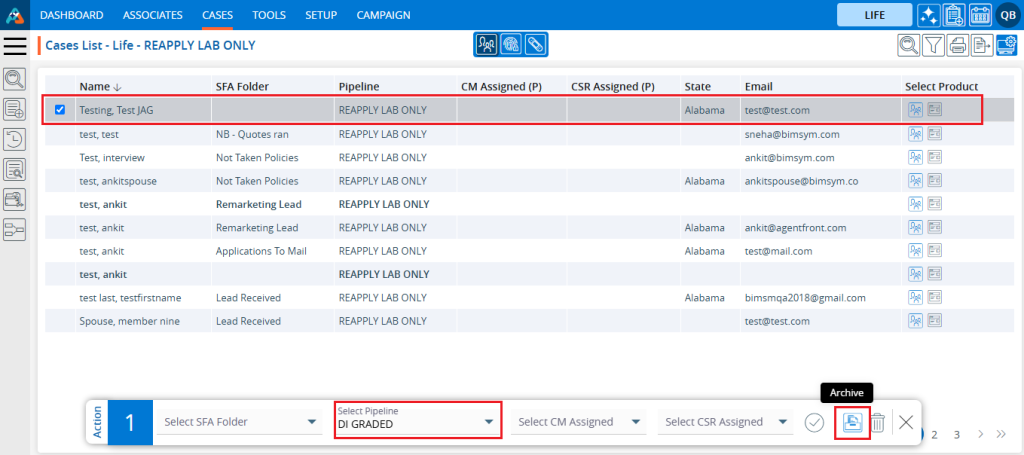
14. Users can move the case to another Pipeline by selecting the case and choosing an option from the Action Pop-up menu. For instance, if the user selects a case from the ‘REAPPLY LAB ONLY’ folder and moves it to ‘DI GRADED’.

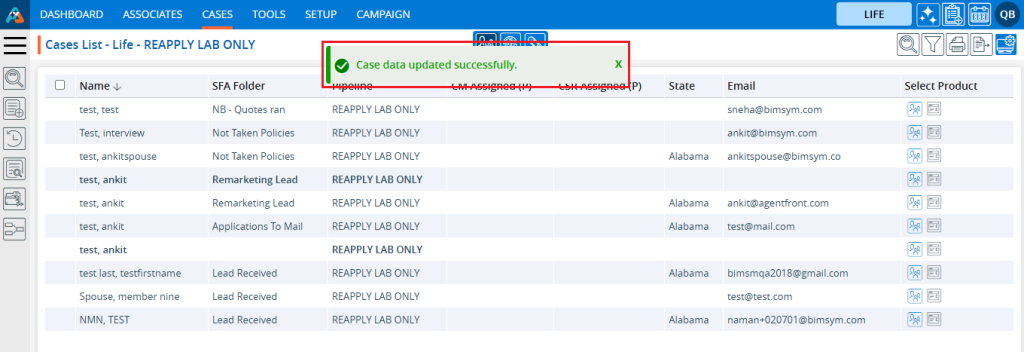
15. Once the selected case is moved from the ‘REAPPLY LAB ONLY’, a confirmation message will be displayed by the system, and the case will no longer appear in the listing in the ‘REAPPLY LAB ONLY’ Pipeline.

16. Check the total number of cases available in the ‘REAPPLY LAB ONLY’ Pipeline. It has decreased by 1.

0
0

Cases SFA Folder

The SFA Folders are used to track cases. SFA Folders can be created according to the requirement from the Setup > System Setup > SFA Folder.

The following are the steps to utilize the SFA Folders:
1. Navigate to the ‘CASES’ tab where you’ll find the ‘Cases List – All Cases’ list.

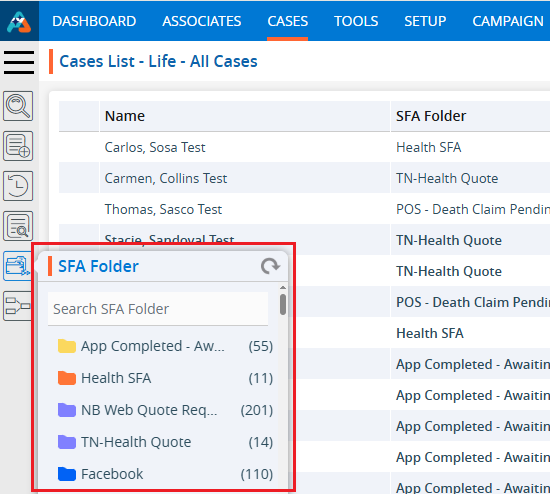
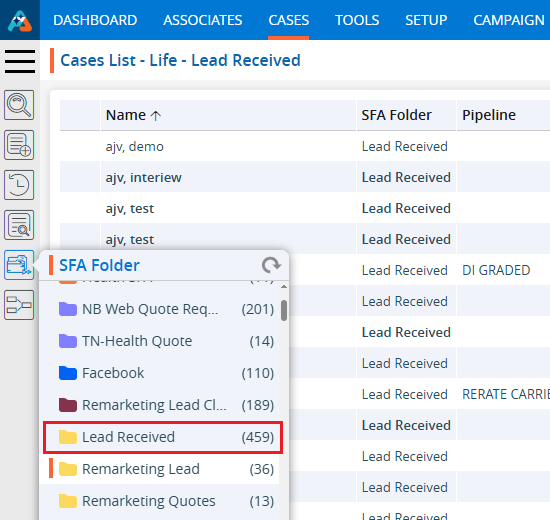
2. Click on the ‘SFA Folder’ option in the left-side panel to display all available SFA Folders.

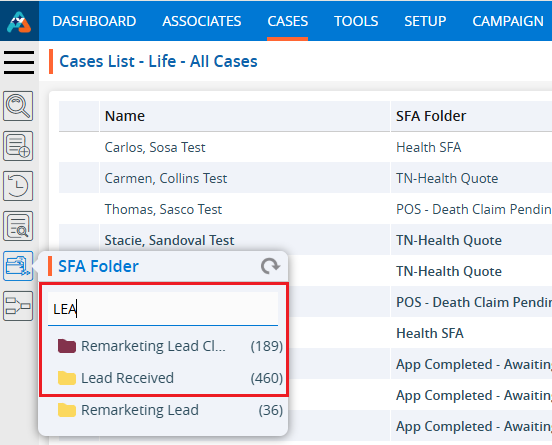
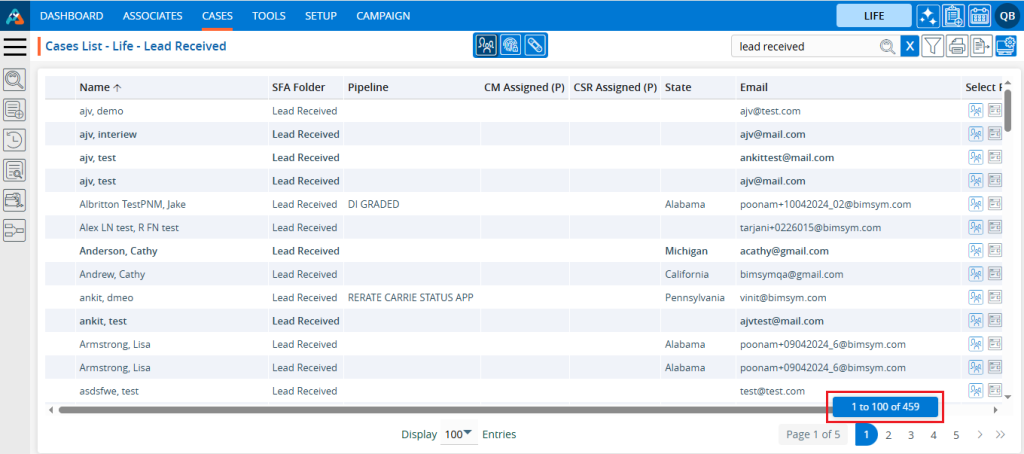
3. Search for the SFA Folder by entering the name in the search box. For example, if the user types ‘LEA’, they will get a list that includes the ‘Lead Received’ folder.

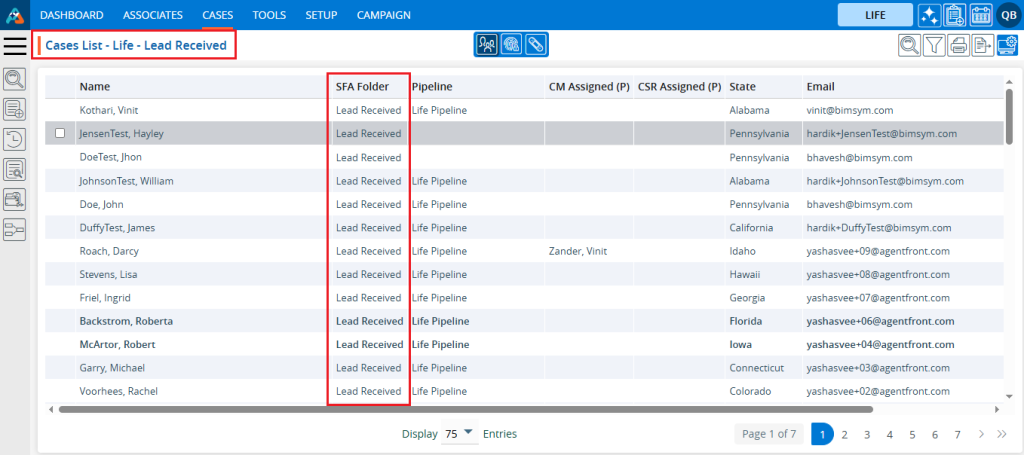
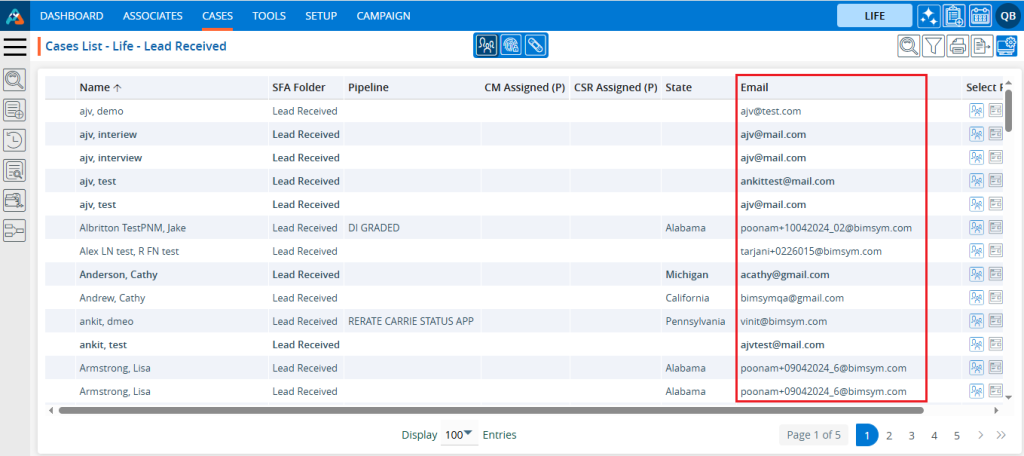
4. The selected SFA Folders cases are now displayed. The page will be named ‘Case List -Life – Lead Received’. In the ‘SFA Folder’ column, only cases labeled ‘Lead Received’ will be shown.

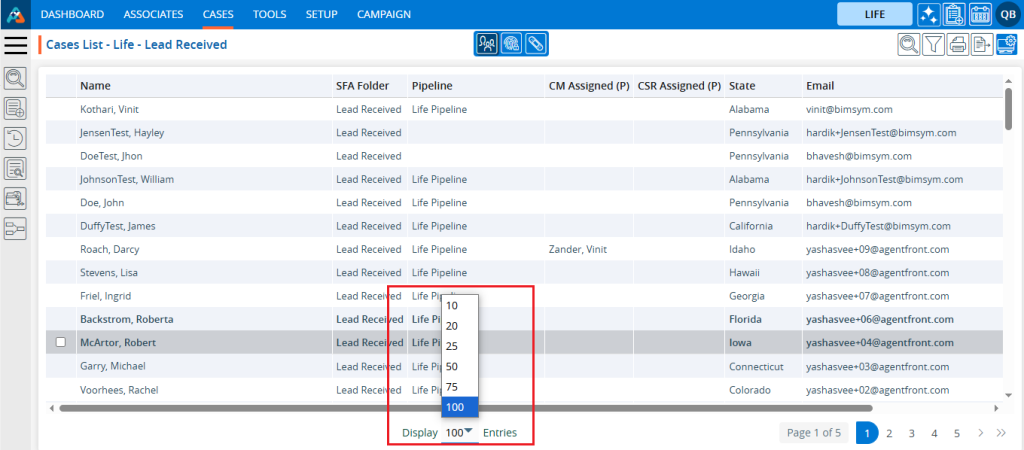
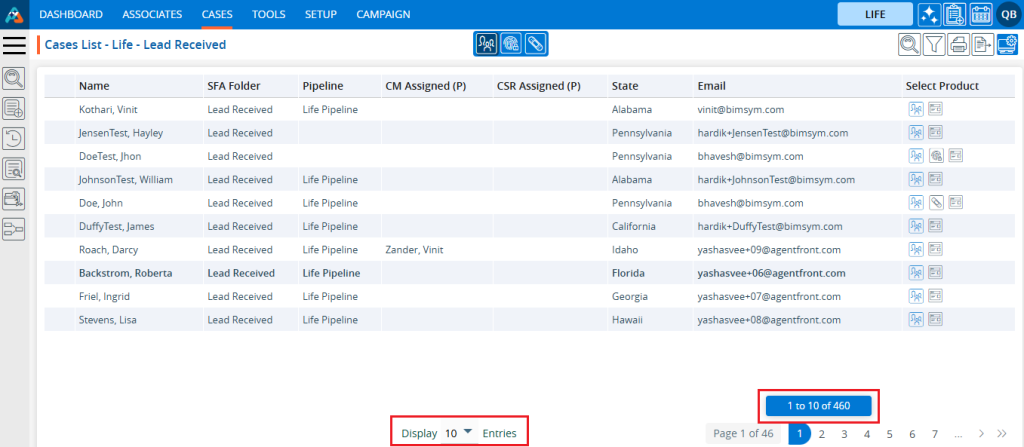
5. Select the option from the display settings to specify the number of cases to show per page, based on the total number of cases available in ‘Lead Received’.

6. After selecting the display option, the system will display cases and pagination based on the selected setting. For instance, if the user chooses 10 cases per page, the system will organize and display 10 cases per page.

7. Click on the ‘Print’ option to print the current page. The print feature will print the data according to the current display settings.

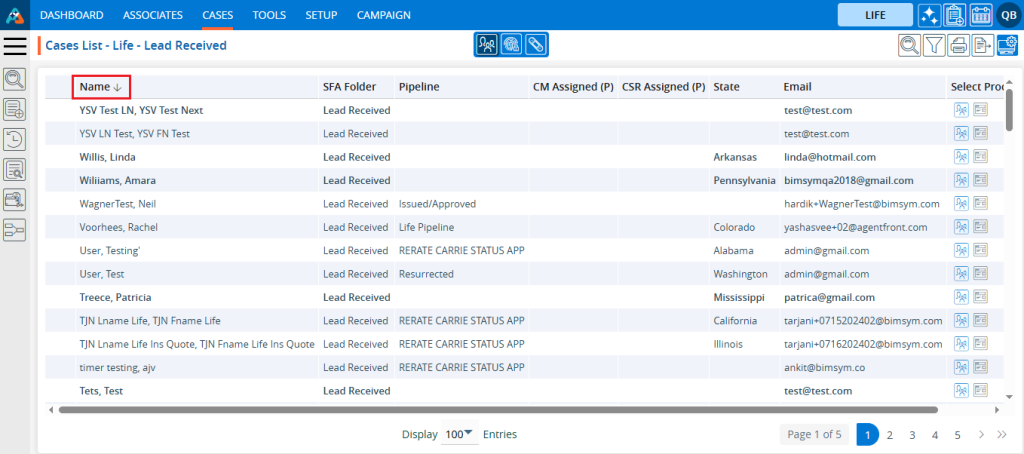
8. Click on the field title to view the cases in ascending or descending order. When the user clicks on the title, a downward arrow will appear beside it, indicating that the cases are arranged in descending order. For example, in the ‘Lead Received’ list, names will be displayed in descending order after clicking the title.

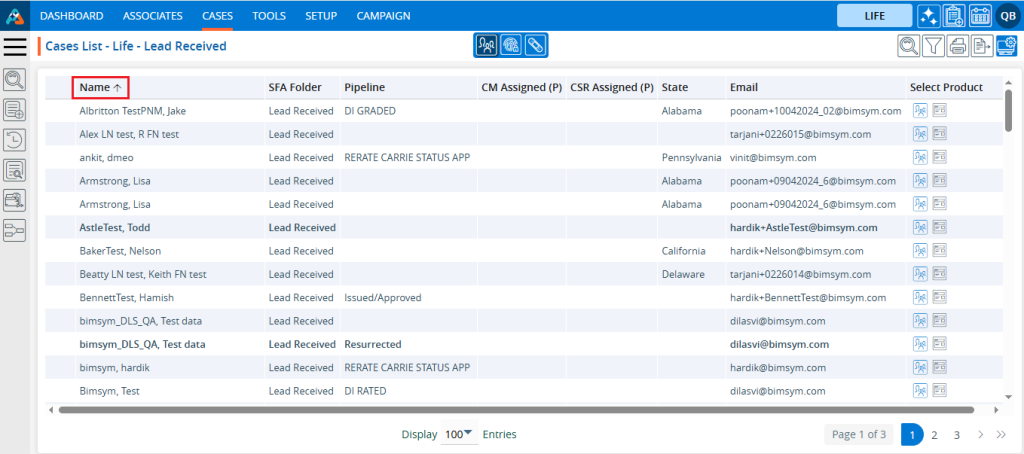
9. When the user clicks on the title again, an upward arrow will appear beside it, indicating that the cases are now arranged in ascending order. For example, in the ‘Lead Received’ list, names will be displayed in ascending order after clicking the title again.

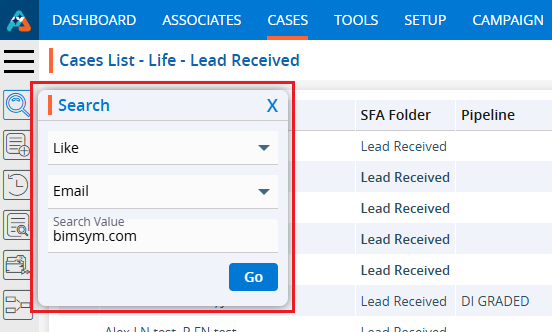
10. Click on the ‘Left Search’ and enter the data the user wants to search for in the Lead Received SFA Folder list. For example, if the user enters ‘Like’ ‘Email’ ‘bimsym.com’, it will display cases that have an email like ‘bimsym.com’.

11. The result is a list of cases in the ‘Lead Received’ SFA folder where the email like ‘bimsym.com’.

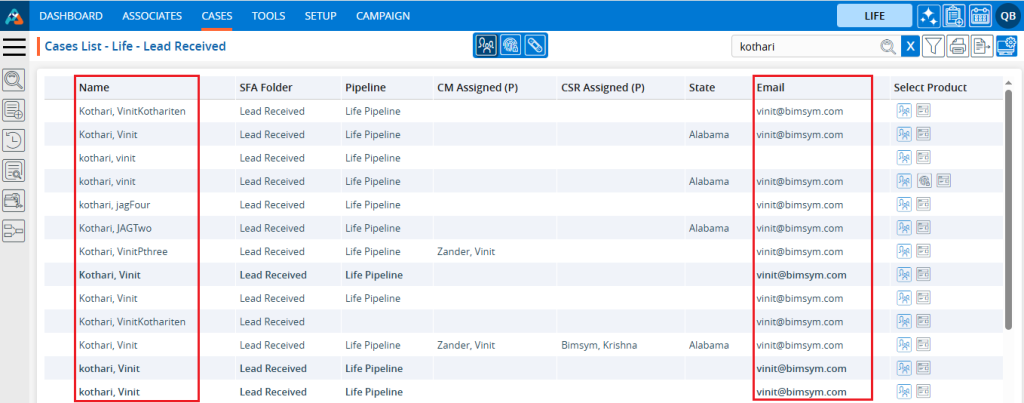
12. Click on the Quick Search and enter the data the user wants to search for in the ‘Lead Received’ SFA Folder list. For example, if you enter ‘Kothari’, it will display cases that have cases with this name in Lead Received SFA.

13. The resulting display is a list of cases in the ‘Lead Received’ SFA Folder where member name and email address contain word ‘kothari’.

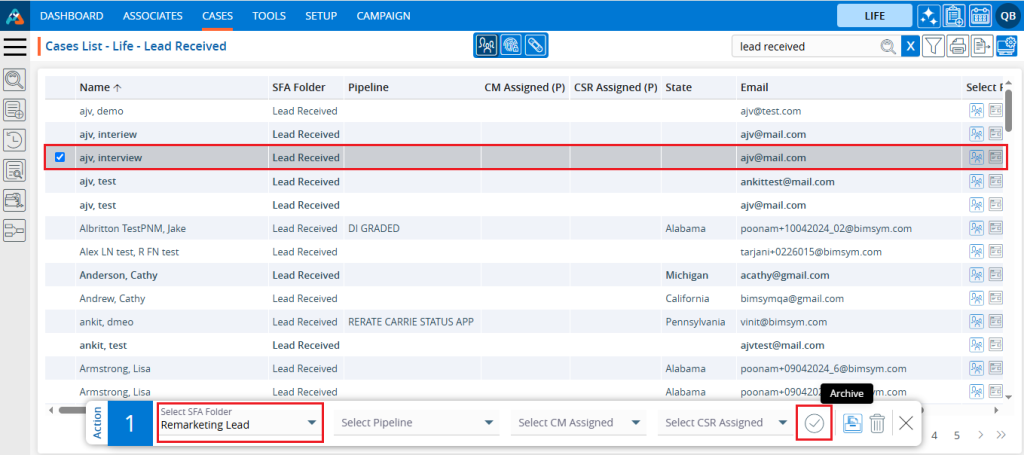
14. Users can move the case to another SFA Folder by selecting the case and choosing an option from the Action Pop-up menu. For example, if the user selects a case from the ‘Lead Received’ folder and moves it to ‘Remarketing Lead’.

15. Once the selected case is moved from ‘Lead Received’, the system will display a confirmation message, and the case will then be available in the ‘Remarketing Lead’ SFA Folder.

16. The total number of cases available in the ‘Lead Received’ list has decreased by 1.

0
0

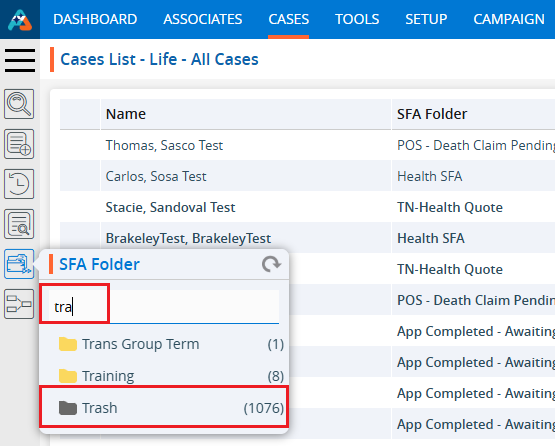
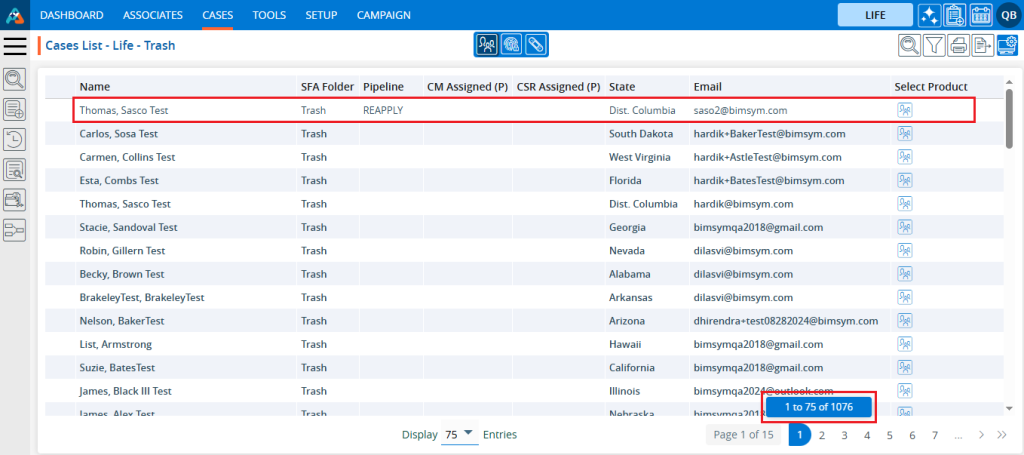
Cases Trash

The Trash folder is for unused cases with the intention of discarding or removing unnecessary items.

The following are the steps to manage the Trash folder:
1. Navigate to the ‘CASES’ tab where you’ll find the ‘Cases List -Life – All Cases’.

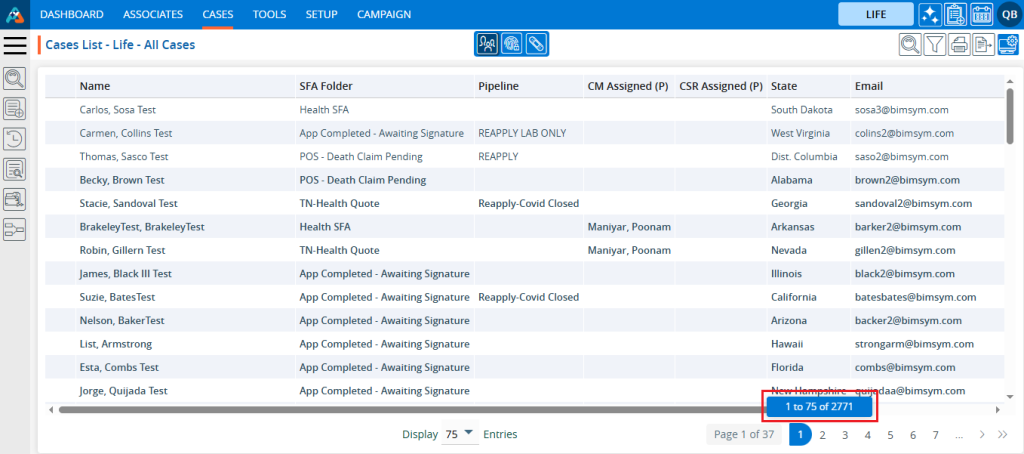
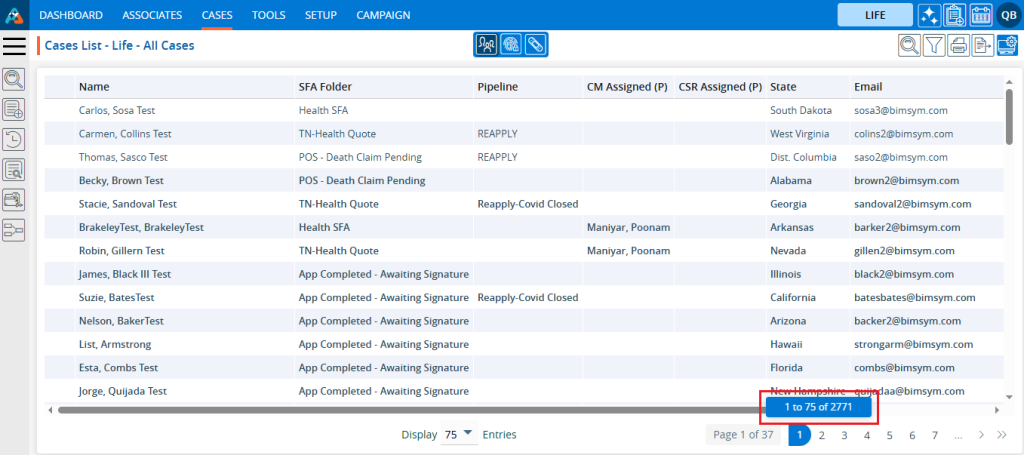
2. Check the total number of cases in the ‘All Cases’ list; it shows 2771 cases.

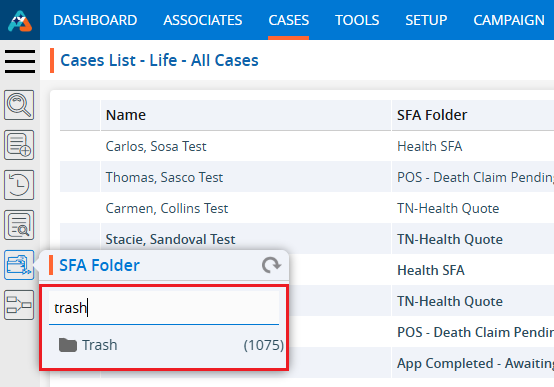
3. Before moving a case to ‘Trash’ verify the number of cases in the ‘Trash’ folder, located within the SFA folder options.

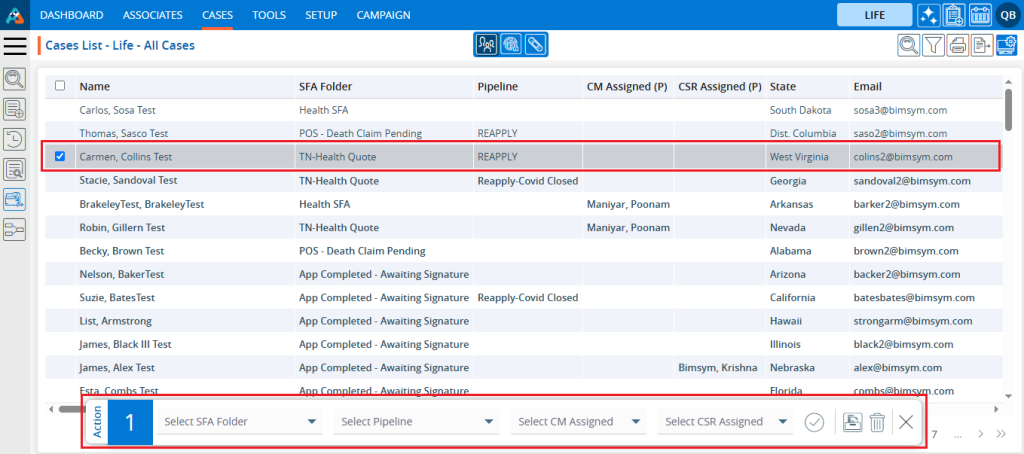
4. Select the case from the ‘Cases List – Life – All Cases’ list that is currently not needed. The Quick Action pop-up will be enabled.

5. Click on the ‘Trash’ option.

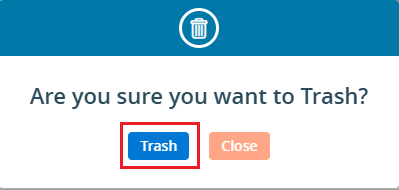
6. A pop-up will appear to confirm your action to move the case to the trash. Click on the ‘Trash’ option.

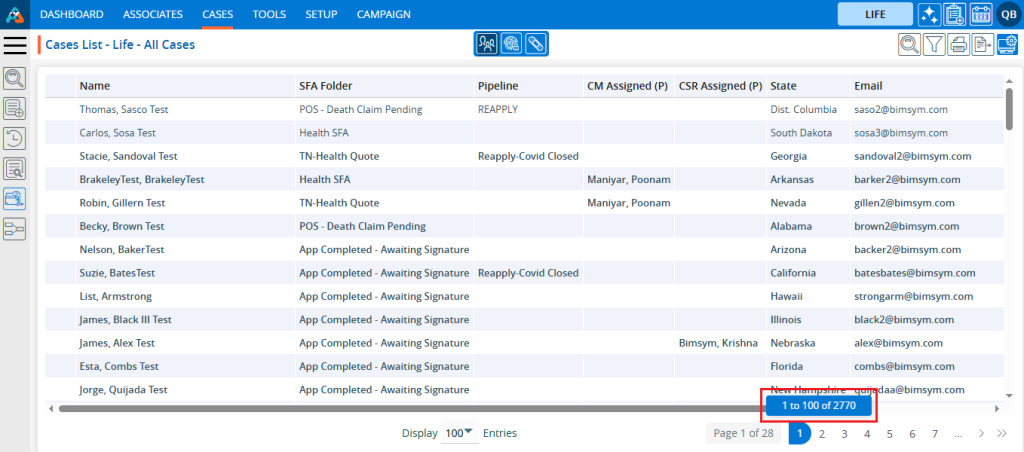
7. The case will disappear from the ‘Cases List – Life – All Cases’ and a confirmation message will be generated.

8. Check the total number of cases available in the Cases List – Life – All Cases. It should have decreased by 1.

9. Check the total number of cases available in the Trash folder. It should have increased by 1.

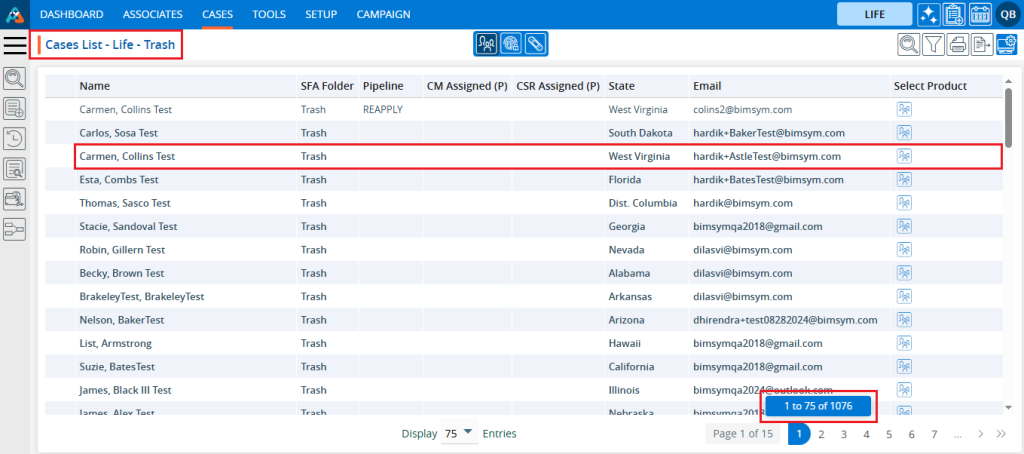
10. Navigate to the ‘Trash’ folder, and you will find the case has moved there.

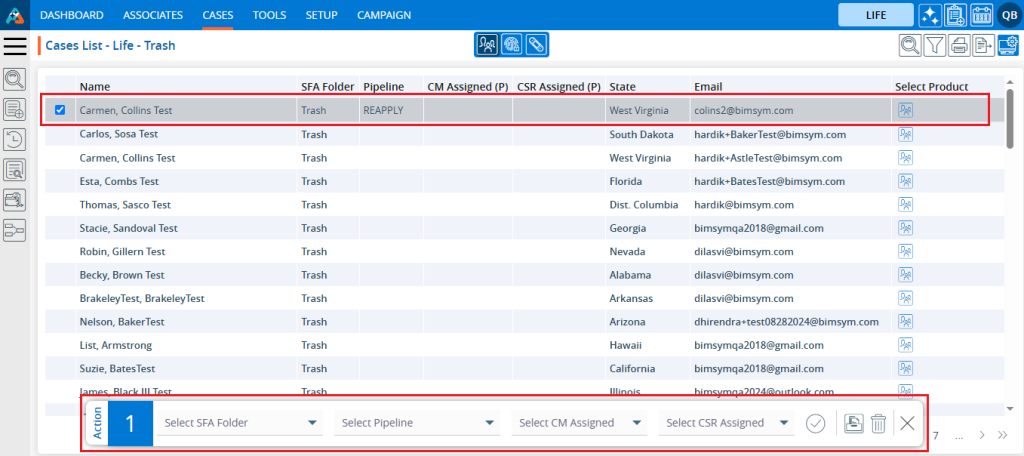
11. Any case can be moved back to ‘Cases List – Life – All Cases’. To move a case from the ‘Trash’ back select the case and the Quick Action pop-up will open.

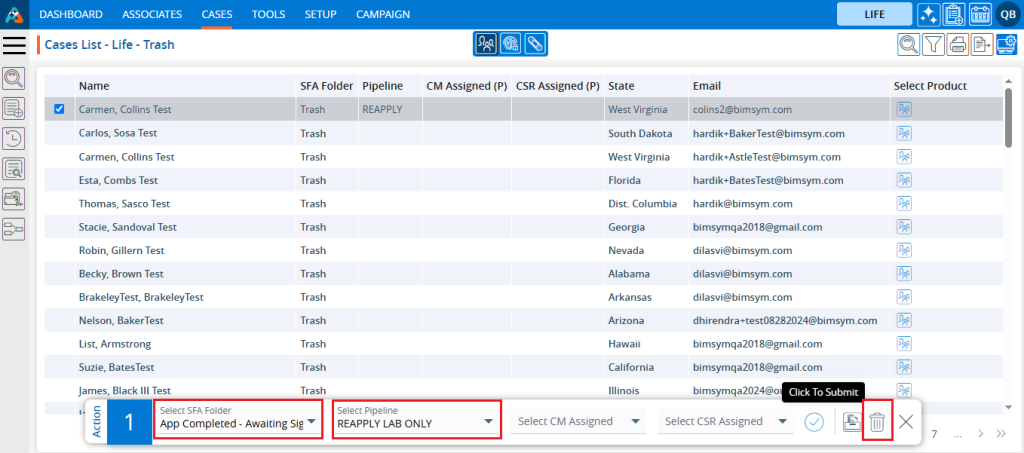
12. Choose the SFA Folder or Pipeline or both and click the ‘Click To Submit’ option.

13. The selected case will disappear from the ‘Cases List – Life – Trash’ and a confirmation message will be generated.

14. Now, check the total number of cases available in the ‘Cases list – Life – Trash’. It should have decreased by 1.

15. Navigate to the ‘CASES’ tab, and you will find the case moving. Example: the total number of cases available in ‘Cases List – Life – All Cases’ has increased by 1.

16. There is another way to move a case to the ‘Trash’. Navigate to the ‘CASES’ tab where you’ll find the ‘Cases List – Life – All Cases’. Open a case by clicking on it.

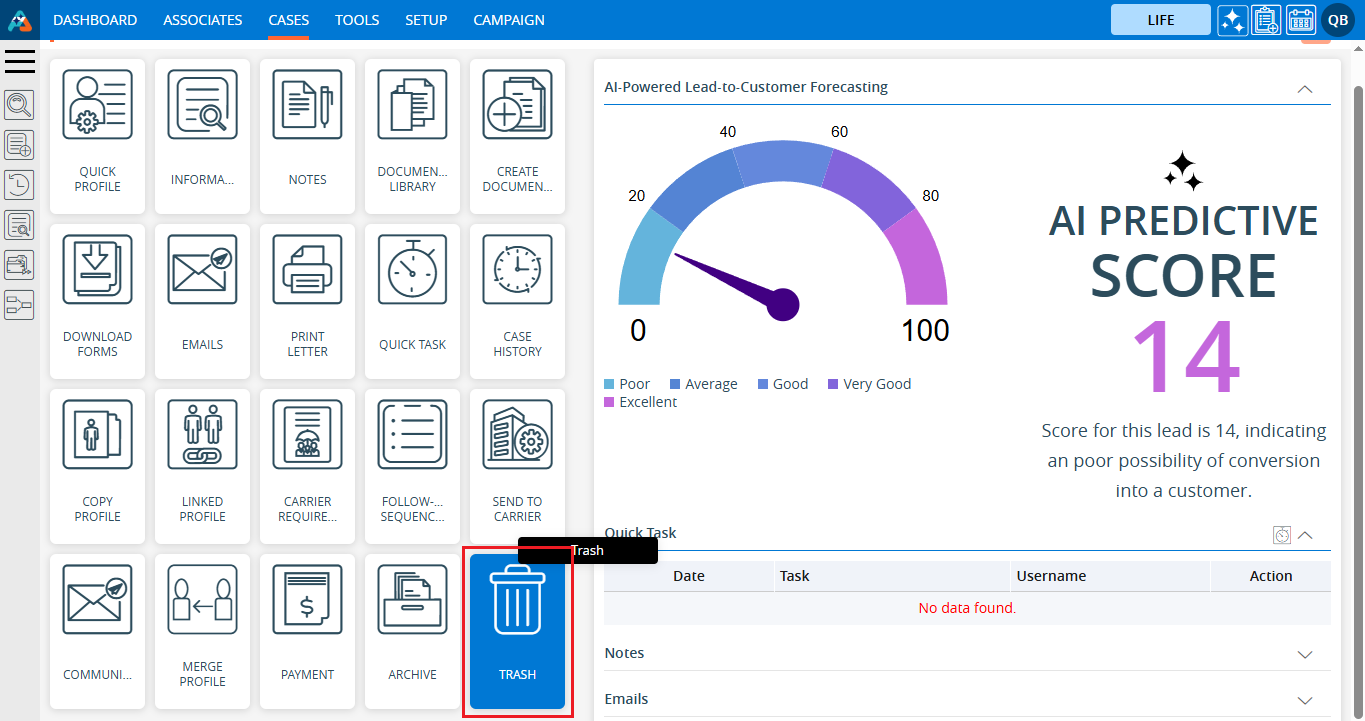
17. After clicking on the case, the ‘DASHBOARD’ will open. Click on the ‘TRASH’ option.

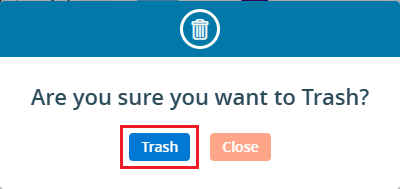
18. A pop-up will appear to confirm your action to move the case to the trash. Click on the ‘Trash’ option.

19. The case is moved to the Trash Folder, and a confirmation message will be generated. The case will disappear from the ‘Cases List – All Cases’ list.

20. Navigate to the ‘Trash’ folder, and you will find the case has moved there..

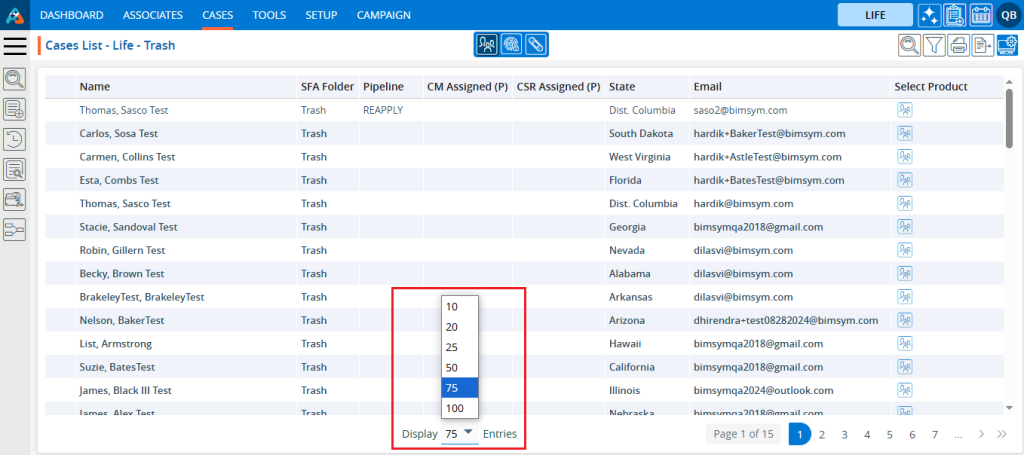
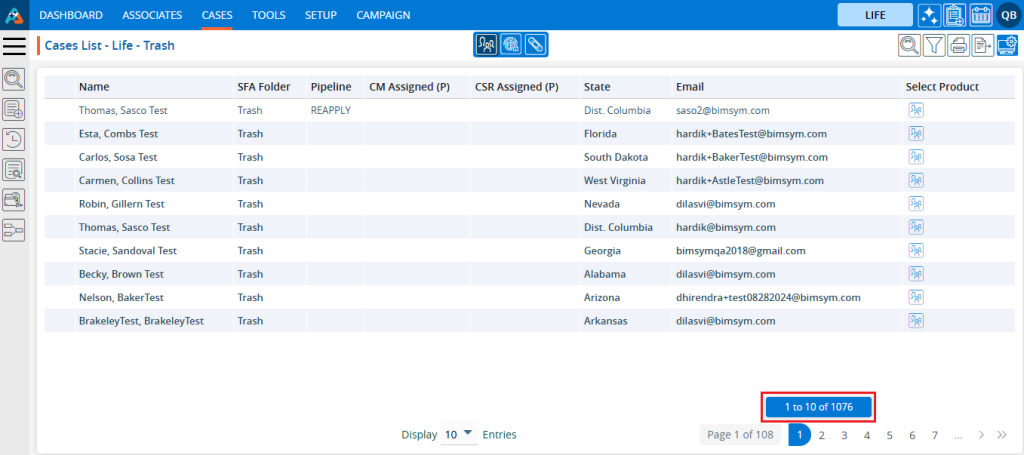
21. The user can update the number of entries through the Display drop-down..

22. After changing the Display, the system will update the cases and pagination based on the chosen setting. For example, if the user selects 10 cases per page, the system will display 10 cases with the data distributed accordingly.

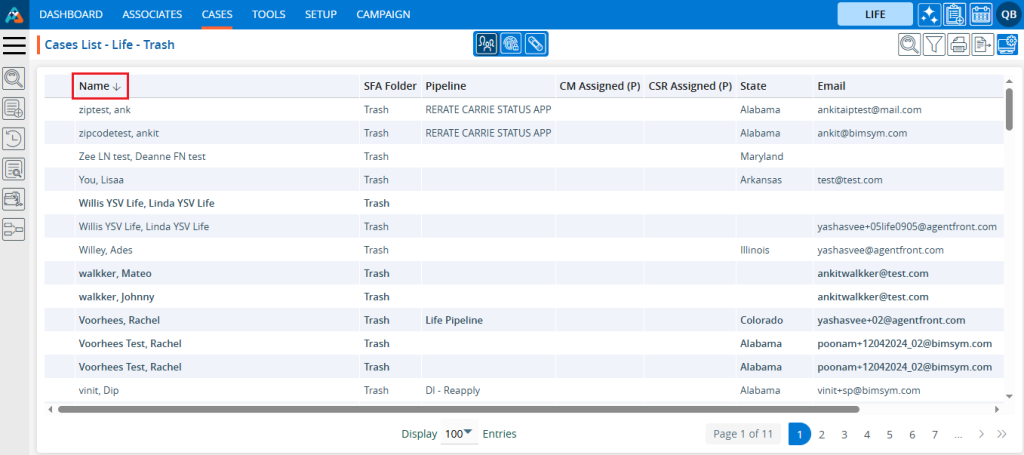
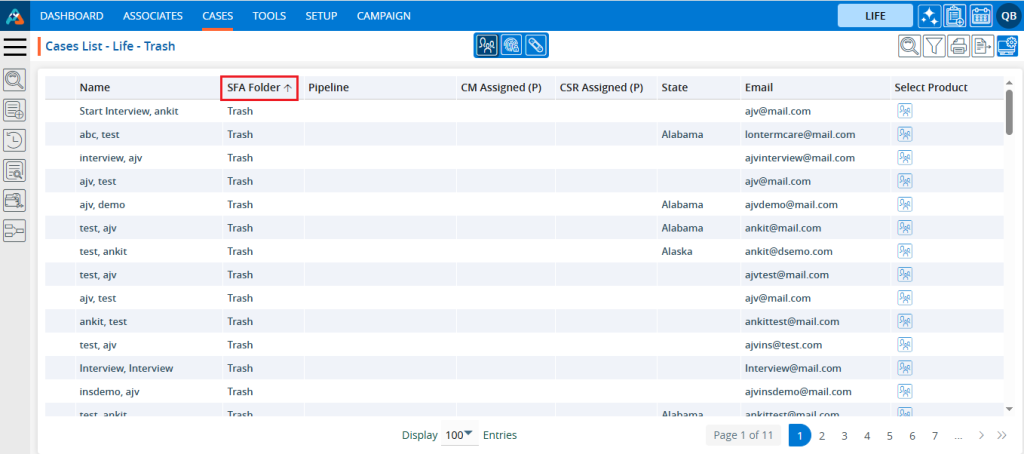
23. To view the cases in an ascending or descending order, click on the field title. When the user clicks on the title, a downward arrow will appear next to it, indicating that the cases are arranged in the descending order. For example, the list displays ‘Name’ in descending order for the Trash List.

24. When the user clicks on the title again, an upward arrow will appear beside the title, indicating that the cases are now arranged in an ascending order. For example, the list displays ‘SFA Folder’ in ascending order for the Trash List.

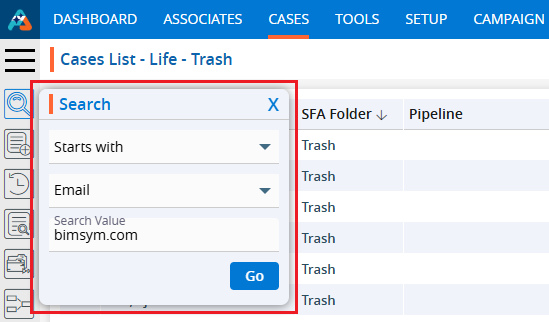
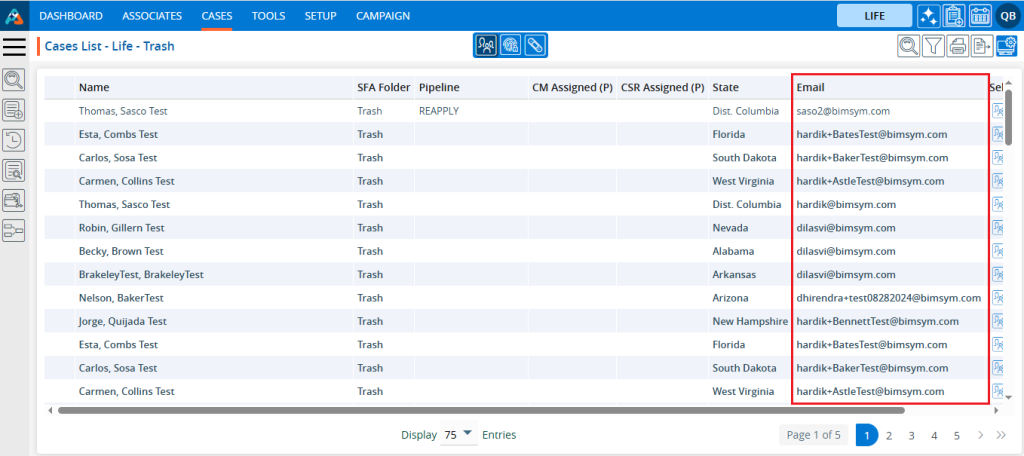
25. Click on the left search bar and enter the data you wish to search for from the Trash List. For example, select the option ‘Starts with’, select the field as ‘Email’ and keep the value as ‘bimsym.com’, which will display cases whose email starts with ‘bimsym.com’.

26. The resulting display is a list of cases in the Trash Folder where the case’s email starts ‘bimsym.com’.

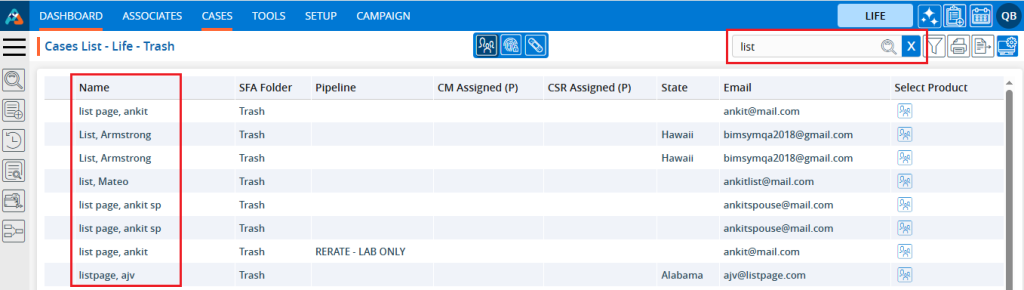
27. Click on the Quick Search and enter the data you want to search for from the Trash.

28. For example, entering word ‘List’ will display cases with the name containing the word ‘List’. The resulting display is the list of cases in the Trash Folder where the Name field contains the word ‘List’.

29. Click on the Print option to print the current page.

30. Filters, display options, and export functions will consistently operate on the entire list of cases.

0
0

Associate Cases > Associate Cases Filter

The Cases Filter feature allows users to create a customized listing by applying up to 5 filters. Users can choose from the available fields and apply them to refine the data as needed.

The following are the steps to create and apply a customized filter for ASSOCIATES Cases listing:
1. Navigate to the ‘ASSOCIATES’ tab where you’ll find the list of All Associates.

2. Click on an Associate to proceed.

3. After clicking on the Associate, the ‘Dashboard’ of their profile will open. Then, click on the ‘CASES’ option.

4. The ‘Cases’ page will open, showcasing a list of cases registered under this specific Associate.

5. Click on ‘Filter’ option.

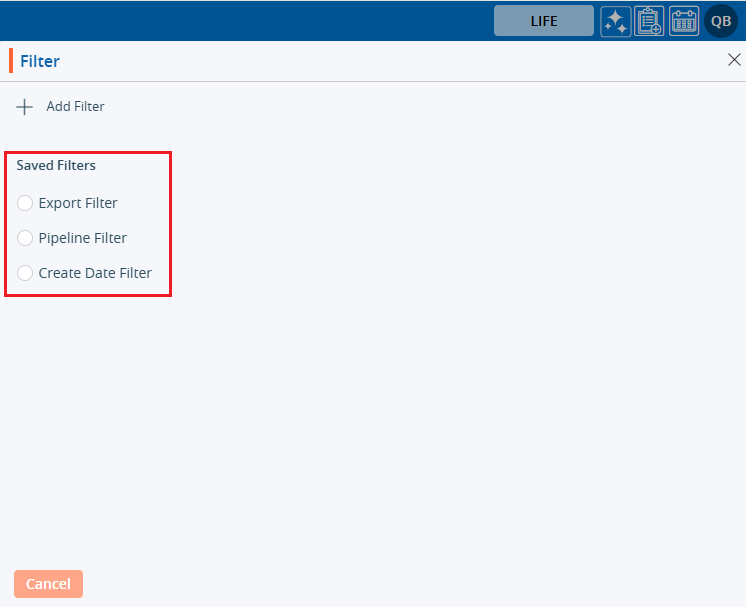
6. By clicking on ‘Filter’, will open a popup page to create a new filter.
a. Existing ‘Filters’ will be listed under ‘Saved Filters’, if available.

7. Click on the ‘Add Filter’ button within the popup window to create a new filter.

8. By clicking on ‘Add Filter’ will open a popup window where you can set the filter criteria according to your requirements.

9. Add filter name.

10. Select the field from the dropdown where the ‘Filter’ needs to be applied.

11. Apply the ‘Condition’ to set the ‘Filter’.

12. Select or enter the ‘Value’ to set the filter.

13. Select either the ‘Match All Filter Rules’ or ‘Match Any Filter Rule’ option as per the requirement.

14. There are three options: Back, Save and Save & Apply.

15. By clicking on ‘Back’, it redirects to the first page of the ‘Filter’.

16. By clicking on ‘Save’, only the ‘Filter’ will be saved and displayed in the filter listing. (It will not be applied to the listing.)

17. The system will generate a confirmation message only for the created filter.

18. Clicking on ‘Save & Apply’ will save the ‘Filter’ under the ‘Filter’ listing and apply it to the ‘ASSOCIATES > Cases List’.

19. The system will generate a message, and the ‘Filter’ will be applied to the ‘ASSOCIATES > Cases List’.

20. Now, the Associates listing will display the list according to the criteria set in the ‘Filter’.
21. Hovering the mouse over the filter icon will display the name of the applied ‘Filter’.

22. The user can apply any available filter by clicking on the filter option, selecting the desired filter, and then clicking on Apply.
23. By clicking on Apply, the selected filter will be applied to the listing.
24. Users can view the filter criteria by:
a. Clicking on the ‘Filter’ again and hovering over the ‘View’ icon.
b. Clicking on the ‘View Filter’ option.

25. The ‘Filter’ criteria will display:
a. Only the ‘Back’ button will be displayed.
b. The selection of fields and criteria will be greyed out and not editable.

26. Users can edit the ‘Filter’ by:
a. Clicking on the ‘Filter’ again and hovering over the ‘Edit’ icon.
b. Clicking on the ‘Edit Filter’ option.

27. The ‘Filter’ window will open with the existing criteria, and users can modify the ‘Filter’.

28. Users can apply multiple filter criteria simultaneously by:
a. Applying more filter criteria and then clicking on ‘Save & Apply’.

29. An updated ‘Filter’ will be applied to the ASSOCIATES > ‘Cases List’.

30. Users can ‘Delete’ the ‘Filter’:
a. Clicking on the ‘Filter’ again and mouse over on the ‘Delete’ icon.
b. Click on the ‘Delete Filter’ option.

31. The system will ask for confirmation. Click on ‘Delete’ to proceed.

32. The system will generate a message, and the ‘Filter’ will be ‘Deleted’.

33. Users can check if the filter is deleted by:
a. Clicking on the ‘Filter’ again.
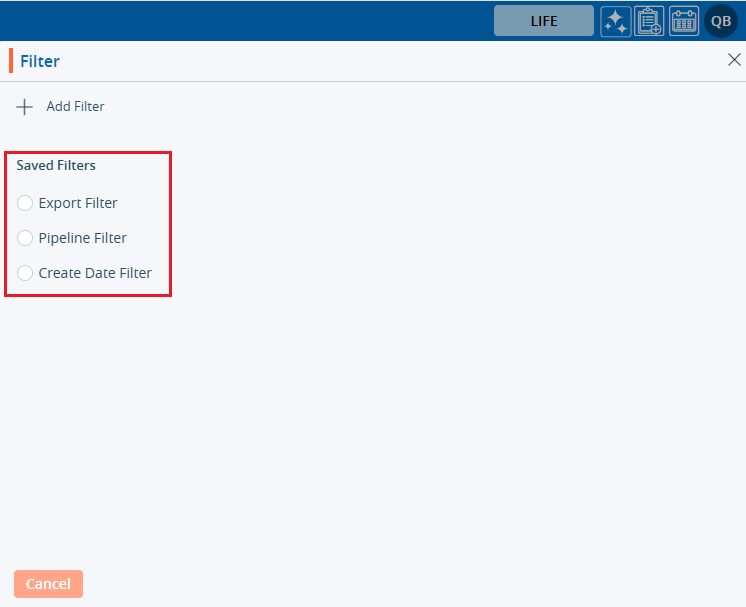
b. Checking the listing: A deleted filter will not be available in the ‘Saved Filters’ section.

0
0

Associate Reset Password

The Reset Password feature allows the user to change the password.

The following are the steps to Reset a Password:

1. Navigate to the ‘ASSOCIATES’ tab where you’ll find the list of All Associates.

2. Click on the Associate whose password needs to change.

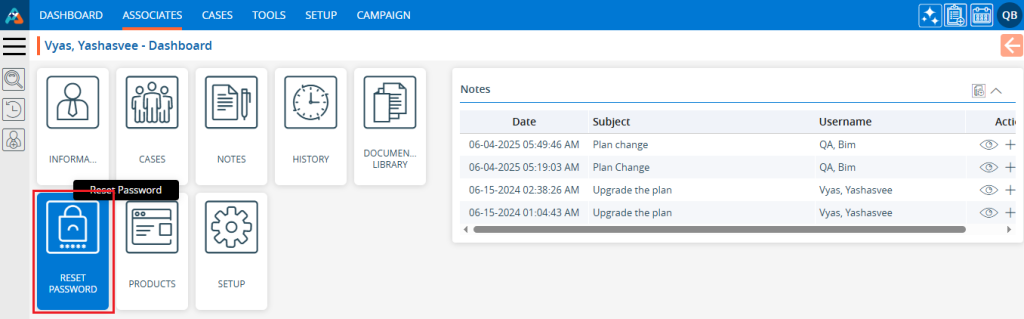
3. After clicking on the associate, the ‘Dashboard’ will open. Click on the ‘RESET PASSWORD’ option.

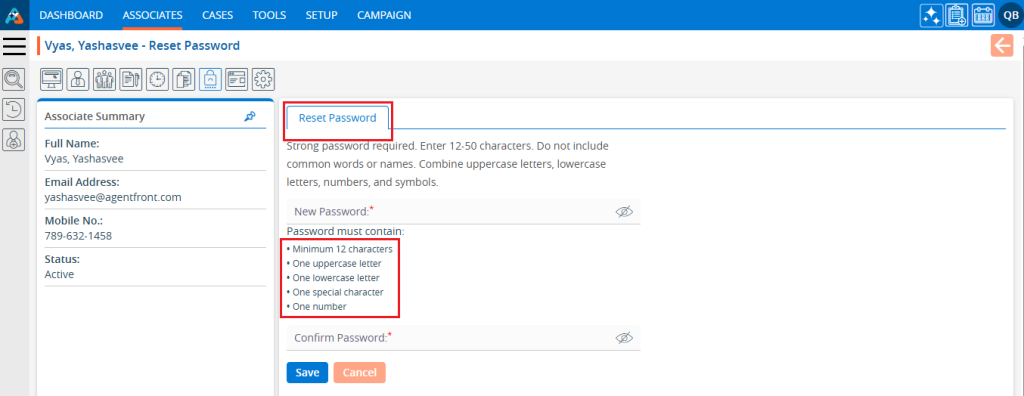
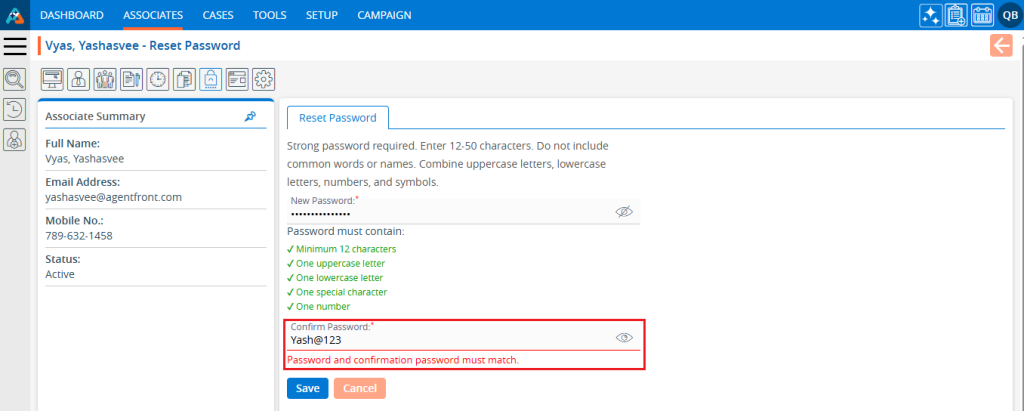
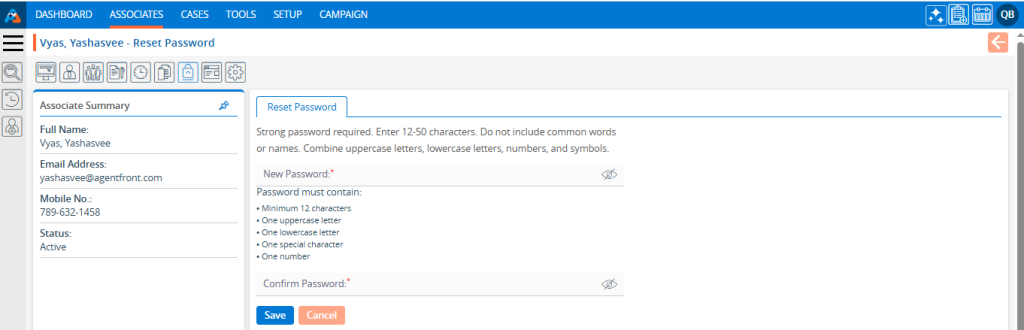
4. The Reset Password page will open, presenting the following rules for resetting the password:
a. Must include at least one uppercase letter.
b. Must include at least one lowercase letter.
c. Must include at least one special character.
d. Must include at least one numerical value
e. It must be between 12 and 50 characters in length.

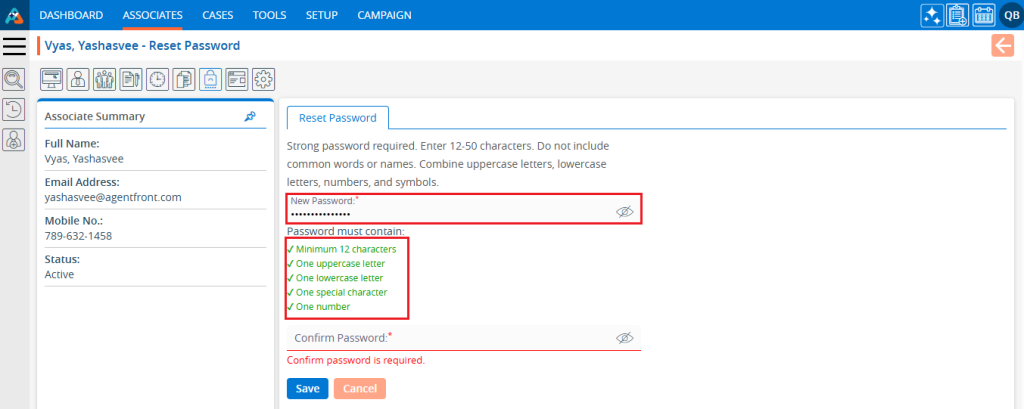
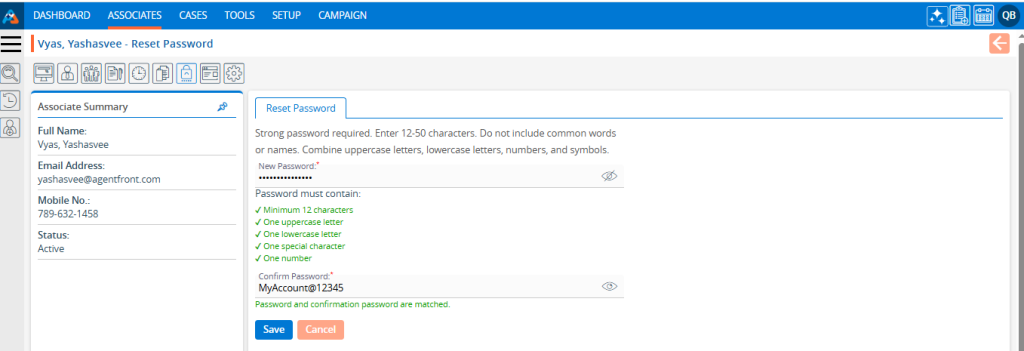
5. Enter a ‘New Password’ that adheres to the rules. As the criteria are met, the ‘Password must contain’ requirements will update to green with a checkmark icon.

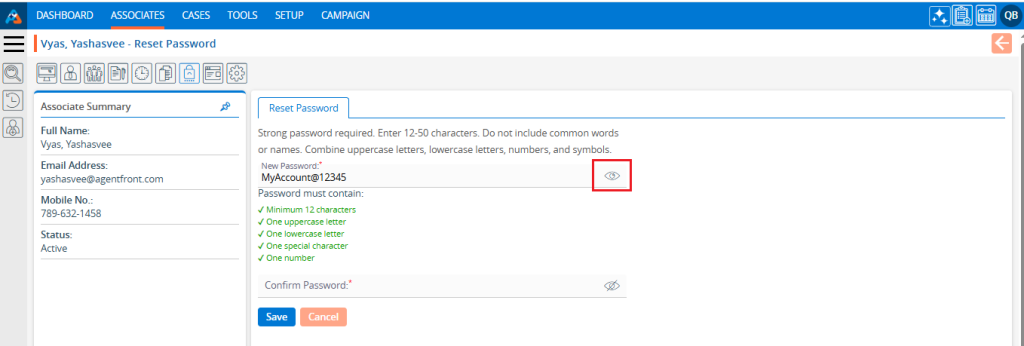
6. Click on the ‘Eye’ icon to view the entered password.

7. Next, re-enter the password in the ‘Confirm Password’ field. If the user enters a different password than the one entered in the ‘New Password’ field, the system will display a message stating ‘Password and confirmation password must match’.

8. Enter the same password in the Confirm Password field that you entered in the New Password field.

9. There are two options available at the bottom on this page.
a. Save
b. Cancel
10. By clicking Cancel, the New Password and Confirm Password fields will be cleared.

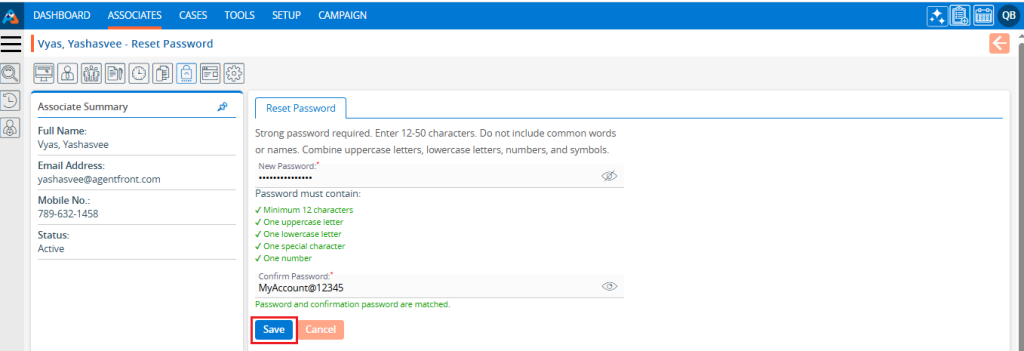
11. Click on the ‘Save’ button to initiate the password change process.

12. The system will display a confirmation message stating ‘Password updated successfully’.
13. The user should log in with the new password next time.

1
0

Associate History

The Associates History feature allows the user to view a timeline of activities associated with a specific associate, providing insight into updates and changes.

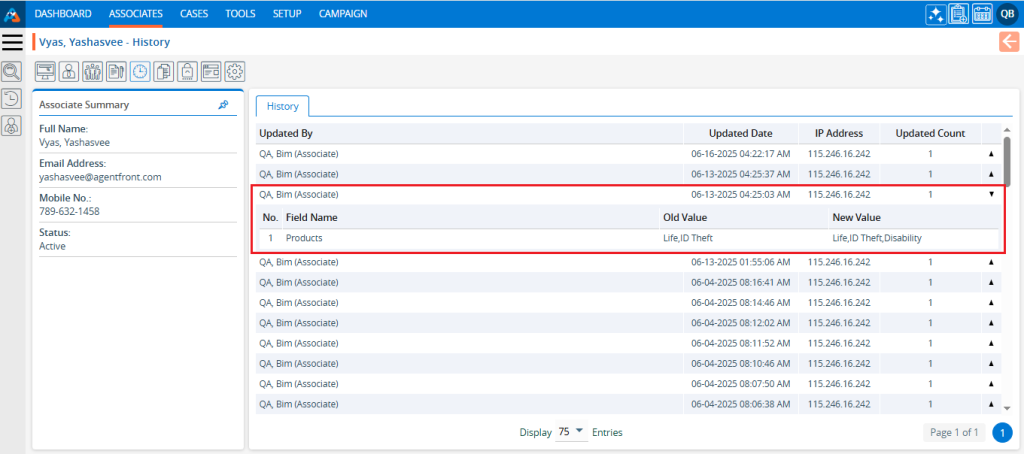
The following are the steps to access an Associates History:

1. Navigate to the ‘ASSOCIATES’ tab where you will find the ‘All Associates List’.

2. Click on an Associate to proceed.

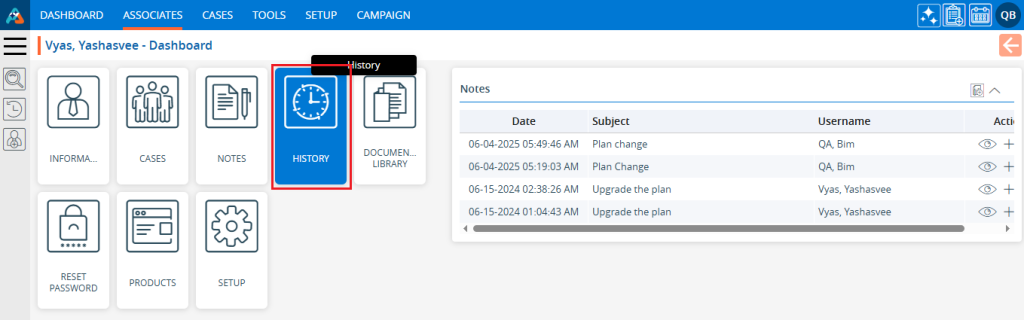
3. The ‘Dashboard’ will open. Click on the ‘History’ option.

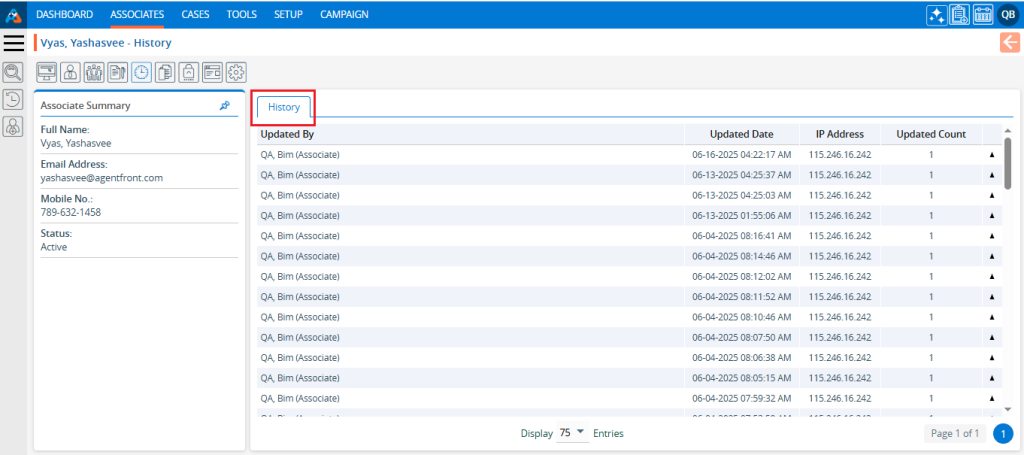
4. The Associate History page will be opened.

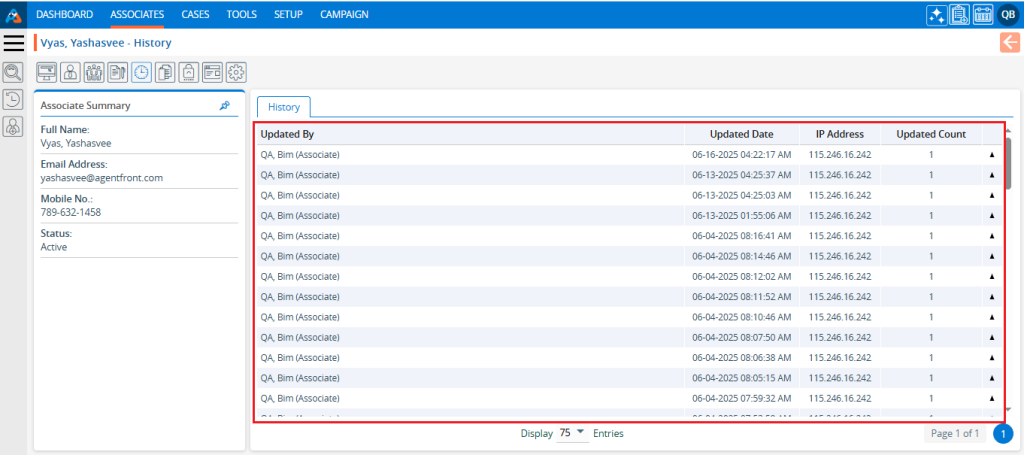
5. This section will display updated information, including their name and relevant details.
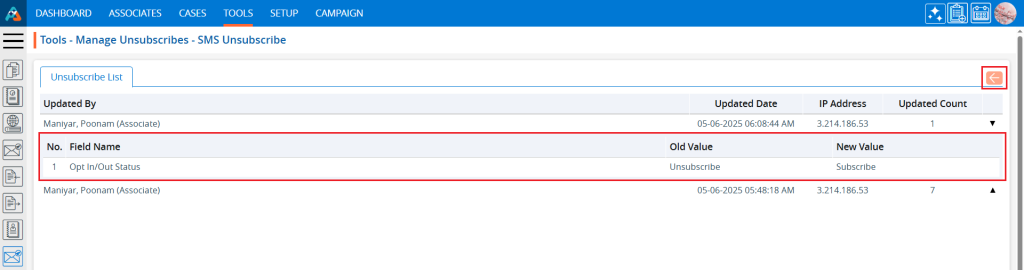
6. Fields in this section, such as ‘Updated By’, ‘Updated Date’, ‘IP Address’, and ‘Updated Count’, pertain to associate details.

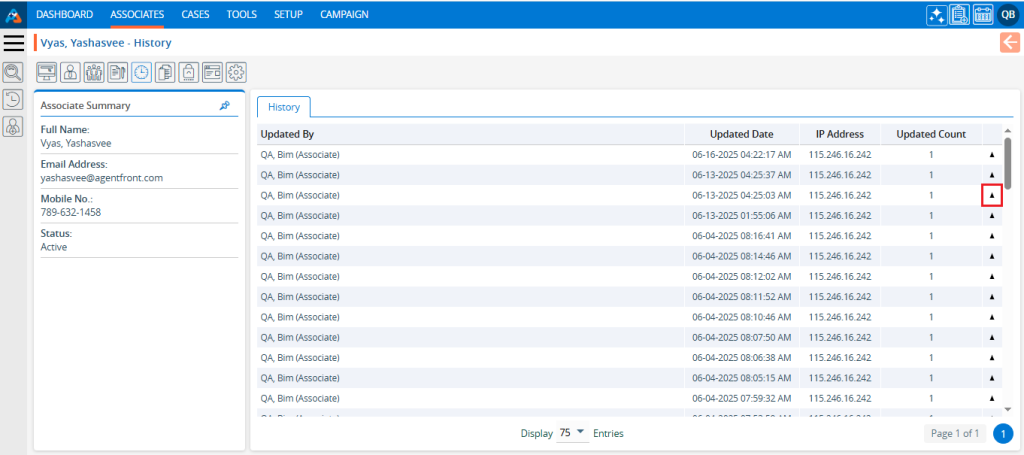
7. Click on the drop-down icon next to each line in Associate History to view the updated details.

8. The details of the history will open, showing the values of the fields ‘No.’, ‘Field Name’, ‘Old Value’, and ‘New Value’. These fields will show fields that have been updated.

0
0

Associate Cases > Associate Cases Export

The Export feature is used to export specific records according to the creation date.

The following are the steps to Export data:
1. Navigate to the ‘ASSOCIATES’ tab where you will find the All-Associate List. Click on an associate to proceed.

2. Click on an associate to proceed.

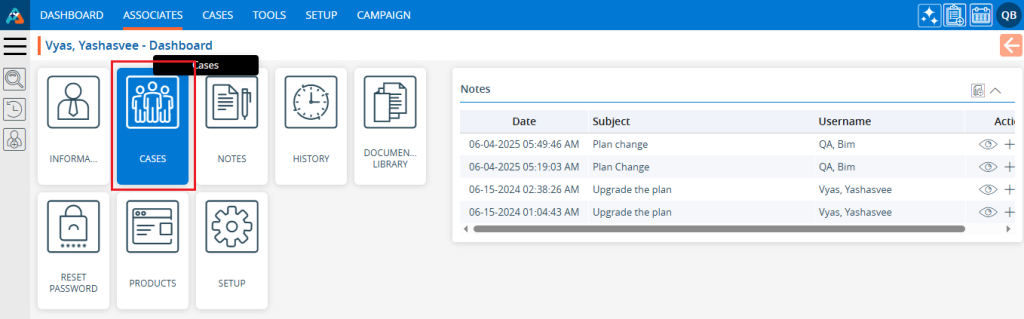
3. The ‘Dashboard’ will open. Click on the ‘CASES’ option.

4. A list of the associate’s cases will display. Click on the ‘Export’ icon.

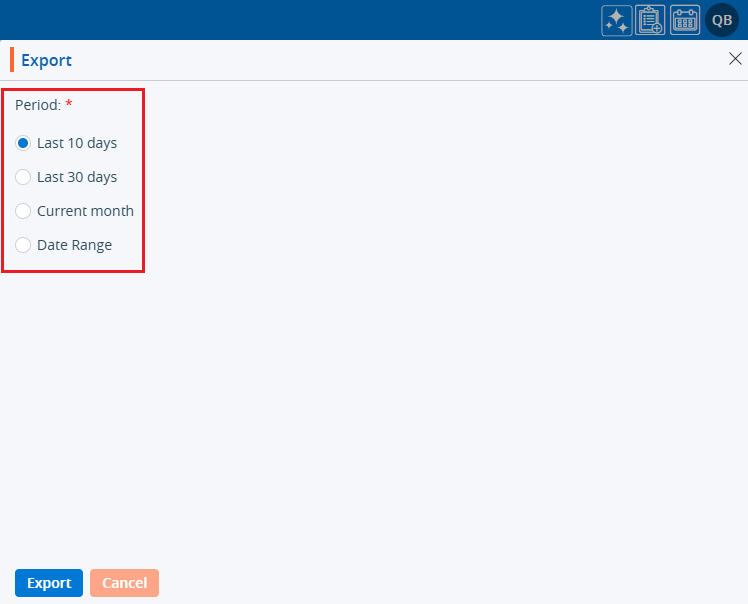
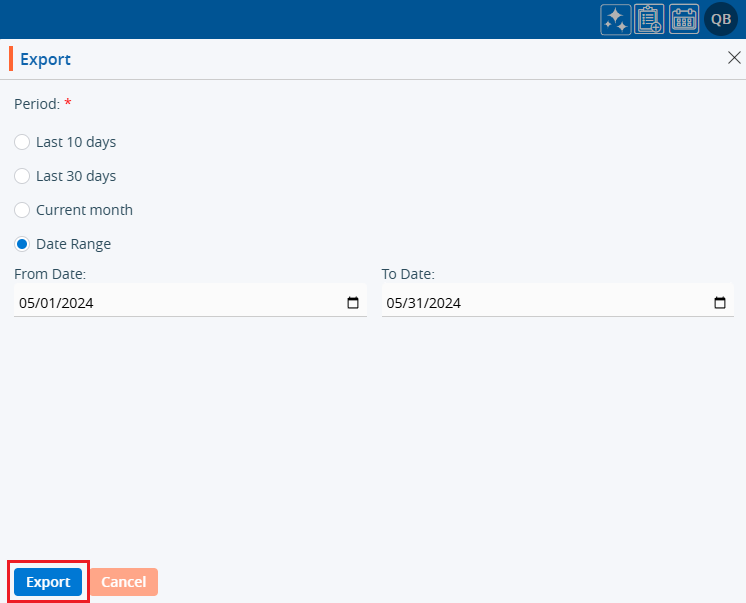
5. A pop-up window will open displaying the selection criteria for ‘Period’:
There are four options available:
a. Last 10 days – This option is used to export records from the last 10 days.
b. Last 30 days – This option is used to export records from the past 30 days.
c. Current month – This option is used to export records for the Current Month.
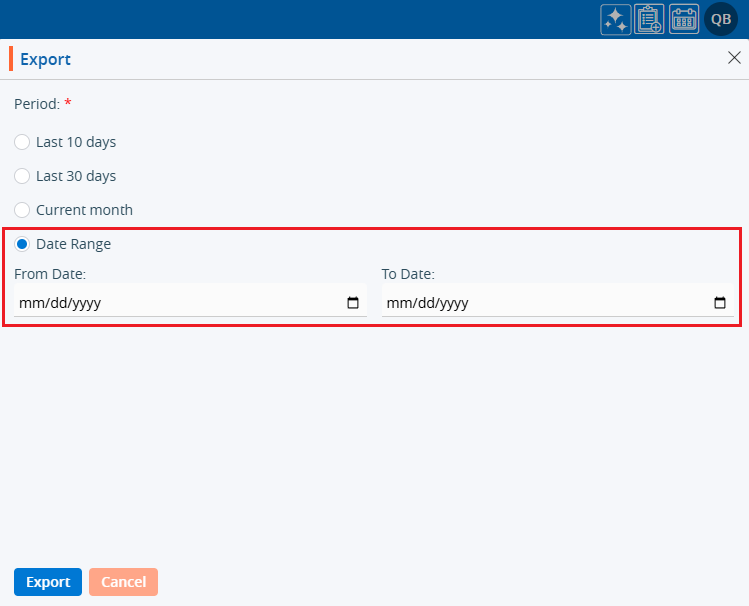
d. Date Range – This option is used to export records for the selected date range within 90 days.

6. For the first three options, select the radio button and click on the ‘Export’ button.
7. Records will be exported according to the selected option, and a CSV file will be saved.
8. For the Date Range option, specific dates will need to be selected.

9. After selecting the dates, click on the ‘Export’ button.

10. The records will be exported and a CSV file will be saved.

0
0

Associate Cases > Associate Cases Print

The Case Print feature is used to print specific data for the current page after applying any filters or search criteria. For example, if you are on the second page, it will only print the data displayed on that page, not all the data in the listing.

The following are the steps to view and update the Associate Cases List:
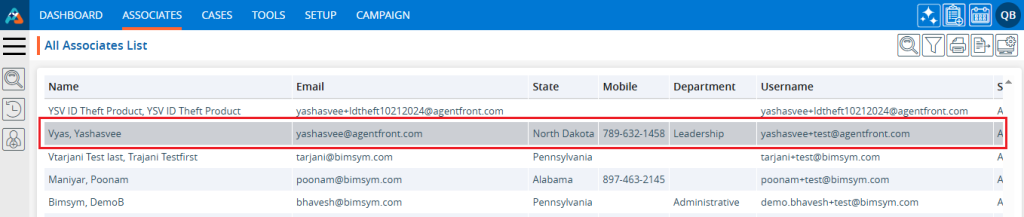
1. Navigate to the ‘ASSOCIATES’ tab where you’ll find the ‘All Associates List’.

2. Click on an Associate to proceed.

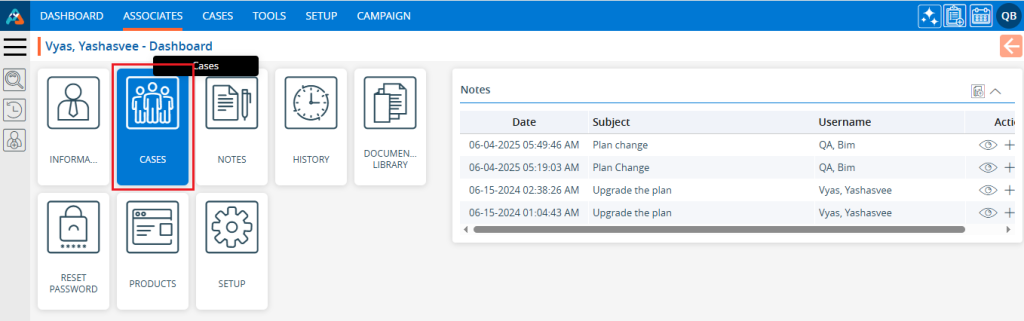
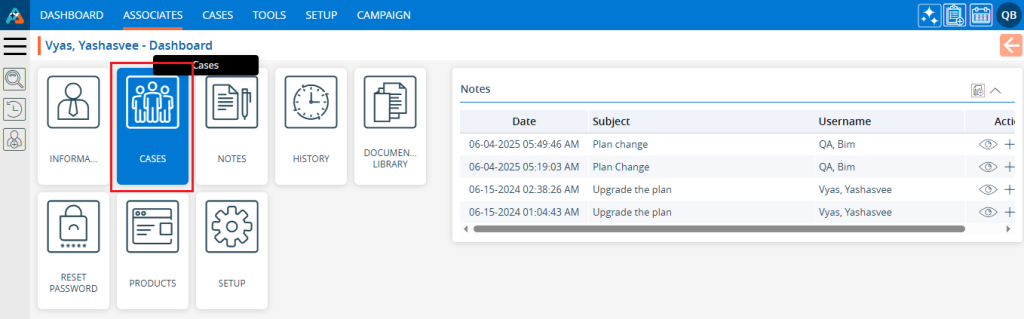
3. After clicking on the Associate, the ‘Dashboard’ of their profile will open. Then, click on the ‘CASES’ option.

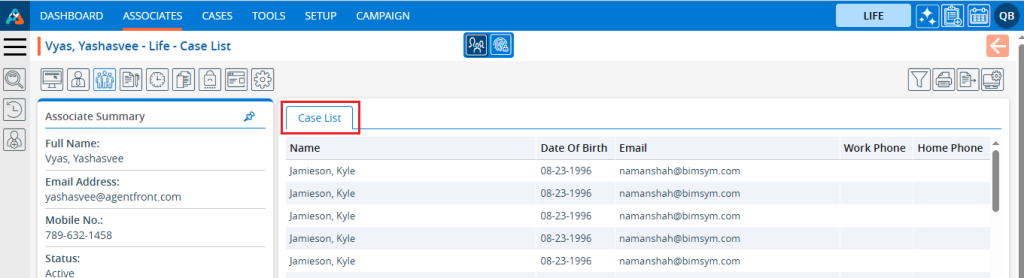
4. The ‘Cases’ page will open, showcasing a list of cases registered under this specific Associate.
5. Click on the ‘Print’ option.

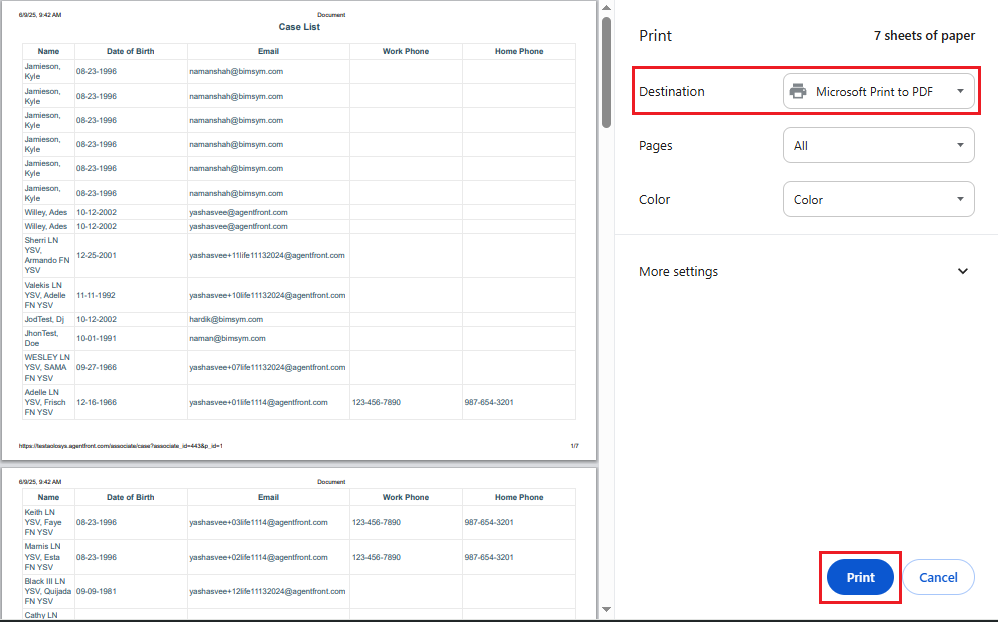
6. After clicking on ‘Print’, a popup page will open displaying the current page data and various print options.

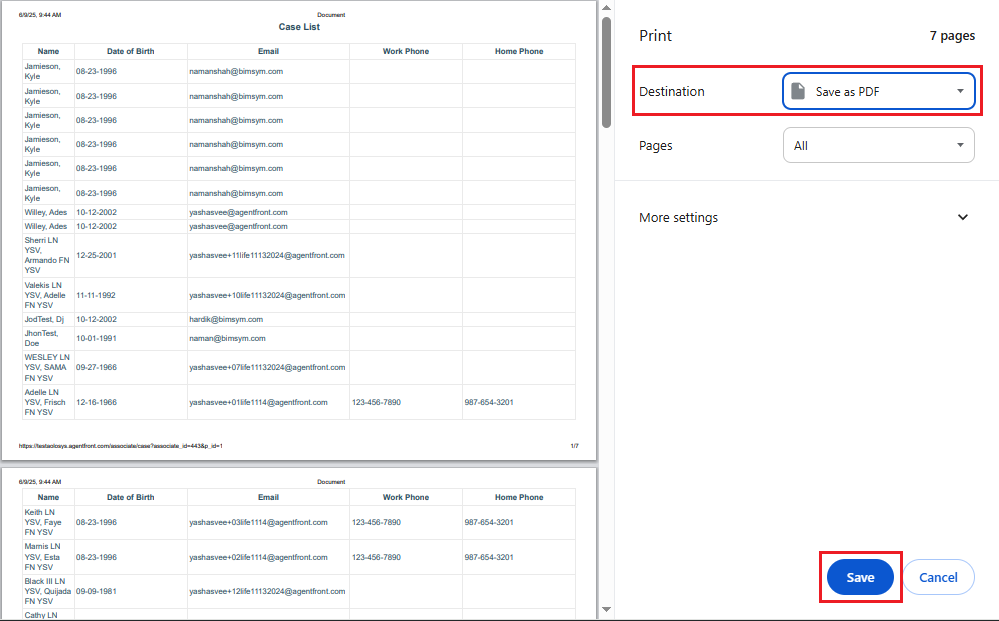
  • Select the print option from the ‘Destination’ field and click on the ‘Print’ button.
    • Select the ‘Save as PDF’ option from the ‘Destination’ field and click on the ‘Save’ button to save the file.
    0
    0

    Associate Cases > Associate Cases

    The CASES option will display all cases registered under a particular Associate, excluding those in the Trash and Archive SFA Folder.

    The following are the steps to view and update an Associate’s Case List:
    1. Navigate to the ‘ASSOCIATES’ tab where you’ll find the list of All Associates.

    2. Click on an Associate to proceed.

    3. The ‘Dashboard’ will open. Click on the ‘CASES’ option.

    4. The ‘Cases’ page will open displaying the list of cases registered under the Associate.

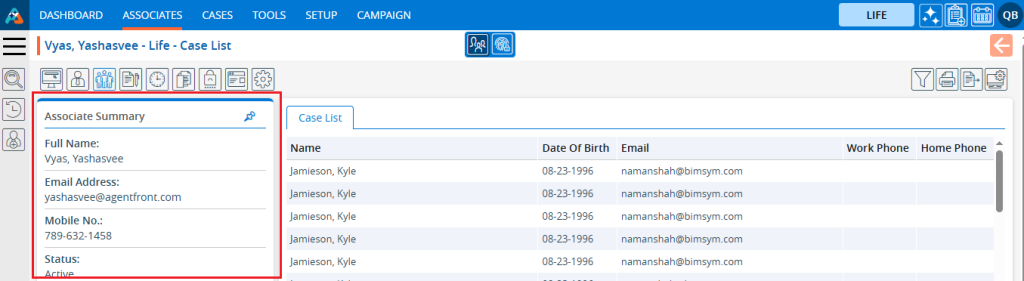
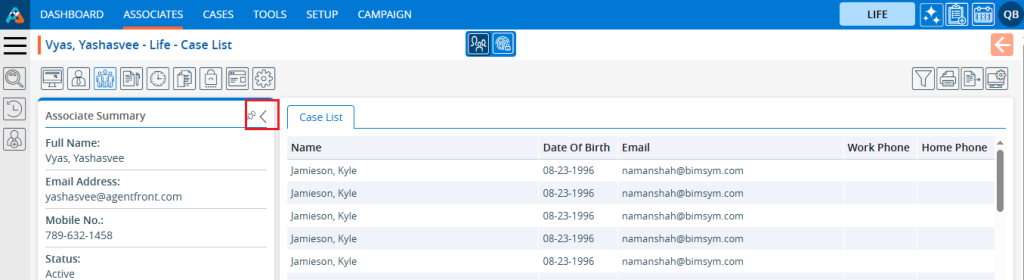
    5.The Associate Summary is displayed in the ‘Cases’ list on the left side. The display of the Associate Summary can be managed from Setup > Quick Profile > Associate.

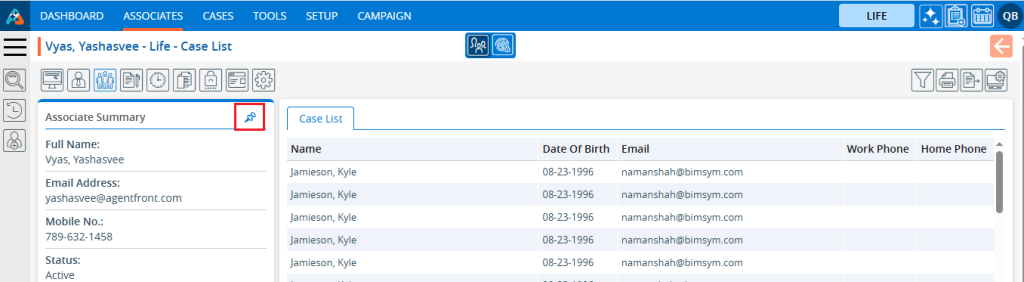
    6. Deselecting the pin on the Associate Summary will reveal the option to hide the Associate Summary.

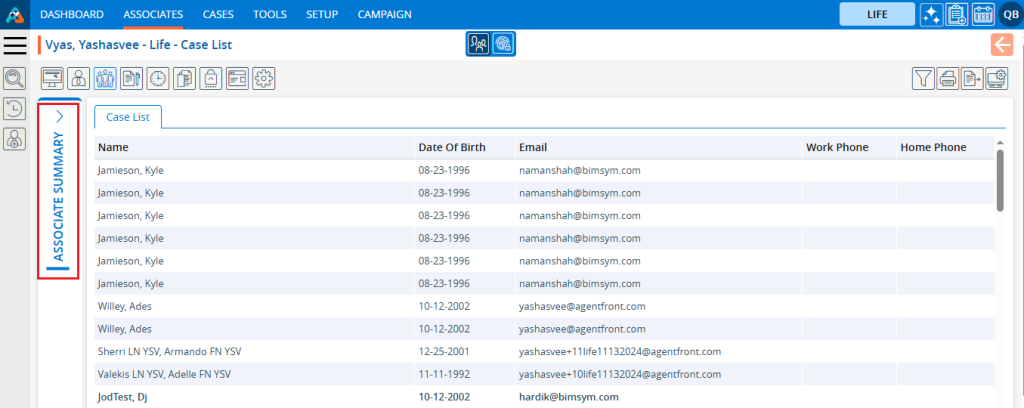
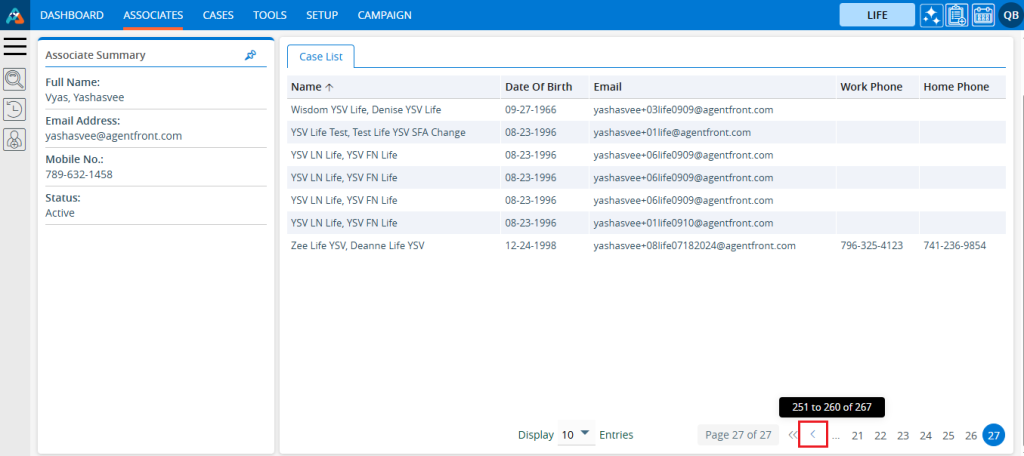
    7. Clicking the arrow ‘<’ will hide the Associate Summary.

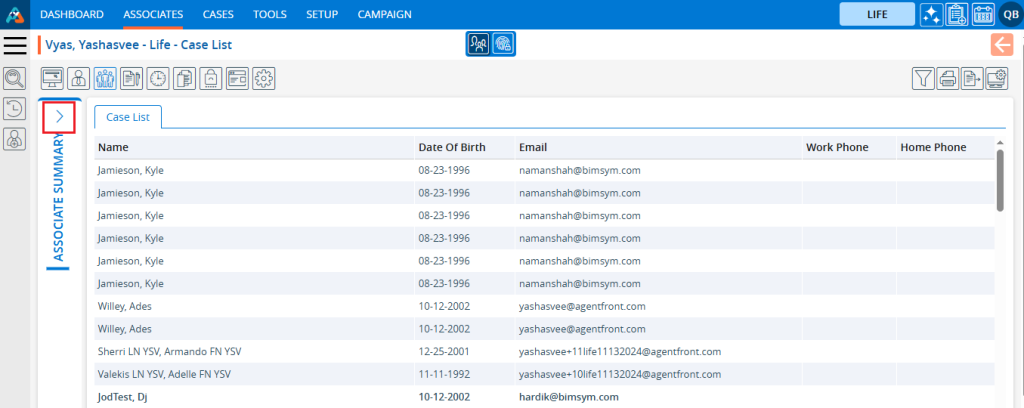
    8. Clicking the arrow ‘>’ will display the Associate Summary.

    9.Selecting the pin option will keep the Associate Summary visible.

    10. Data can be sorted in ascending or descending order by clicking on the field title. When the user clicks on the field title, the list of the ‘Cases’ will be arranged in descending order.

    11. When the user clicks on the title again, the list of the ‘Cases’ will be arranged in ascending order.

    12. On the right side at the top, there is a ‘Display’ feature. Users can customize the fields and arrange the specific display of the page using this option.

    13. On the right side at the top, there is a ‘Filter’ feature. Users can filter information from Associate’s ‘Cases’ using this option.

    14. On the right side at the top, there is an ‘Export’ feature. Users can export specific data from the Associate’s ‘Cases’ using this option. The exported data will be based on the selected date range.

    15. On the right side at the top, there is a ‘Print’ feature. Clicking on ‘Print’ allows users to print the current page. The print feature will print the data according to the selected display settings.

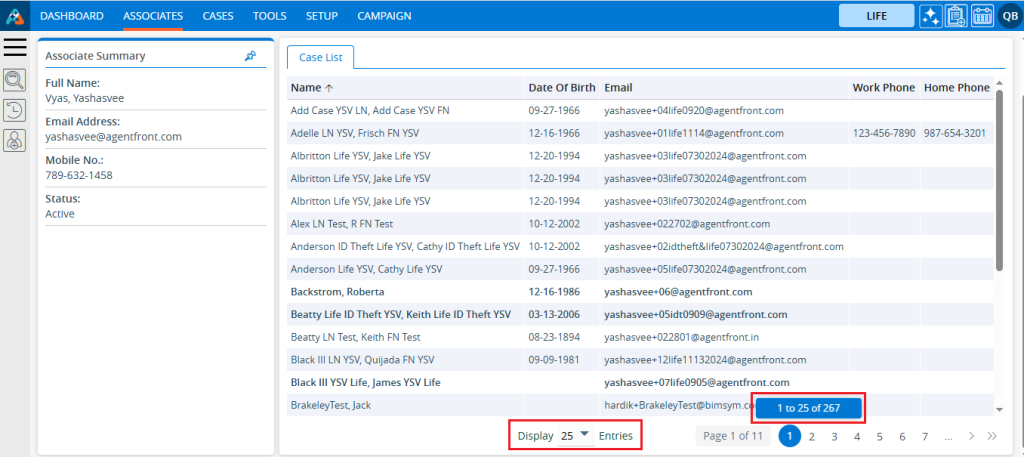
    16. At the bottom of the page, there is a feature to adjust the number of ‘Cases’ displayed per page from the ‘Display’ dropdown menu.

    17. The ‘Display’ dropdown menu offers six options to set the number of entries for the Display List:

    • 10
    • 20
    • 25
    • 50
    • 75
    • 100

    18. After selecting an option from the ‘Display’ dropdown, the system will arrange and display the entries on one page according to the user’s selection.

    19. Additionally, the pagination of the cases list will be adjusted by the system according to the selected option.
    For example,

    • If the user selects 10 entries per page, the system will display 10 entries per page, and the data will be distributed accordingly.
    • If the user selects 25 entries per page, the system will display 25 entries per page, and the data will be distributed accordingly.

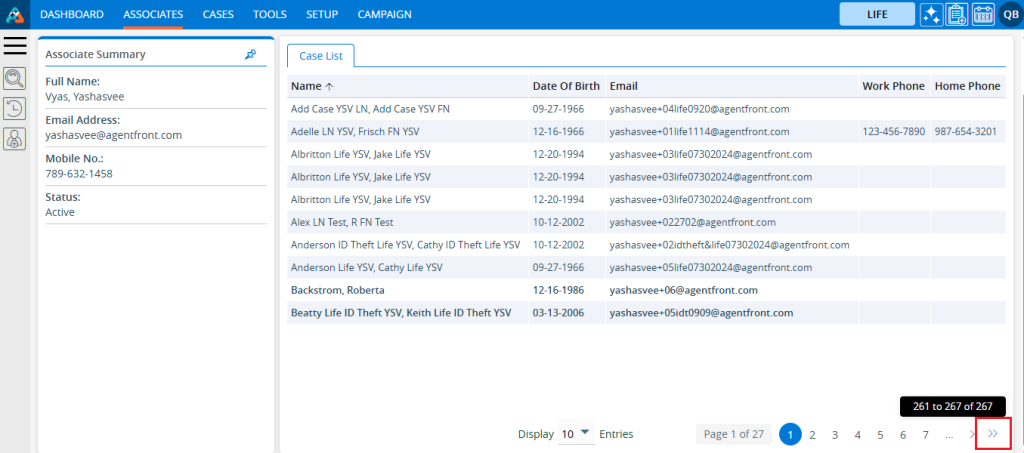
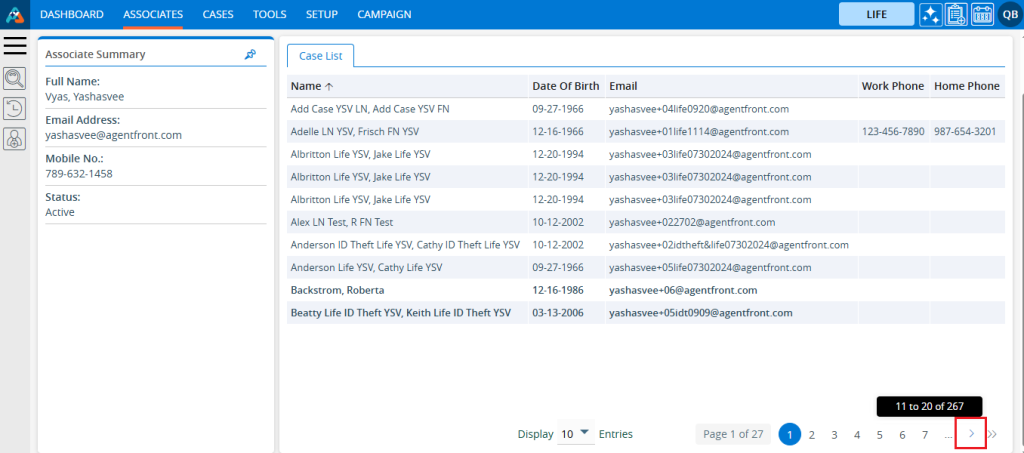
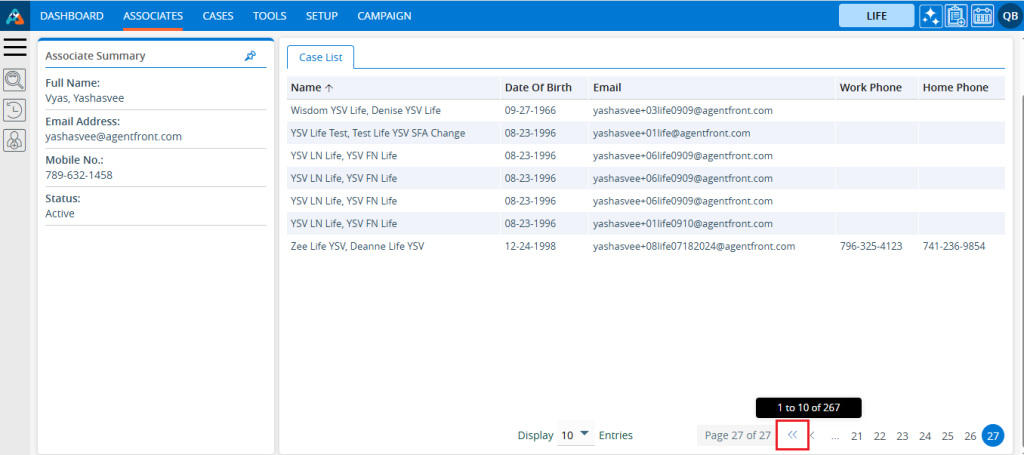
    20. The pagination will function according to the number of entries set, providing options for users to select a specific page or navigate directly to the first, next, previous, or last page.
    21. By clicking on the double arrow ‘>>’ on the right side, users can directly navigate to the last page.

    22. By clicking on the single right arrow ‘>’, users can navigate to the next page.

    23. By clicking on the double arrow ‘<<‘ on the left side, users can directly navigate to the last page.

    24. By clicking on the single left arrow ‘<‘, users can navigate to the previous page.

    0
    0

    Associates Documents

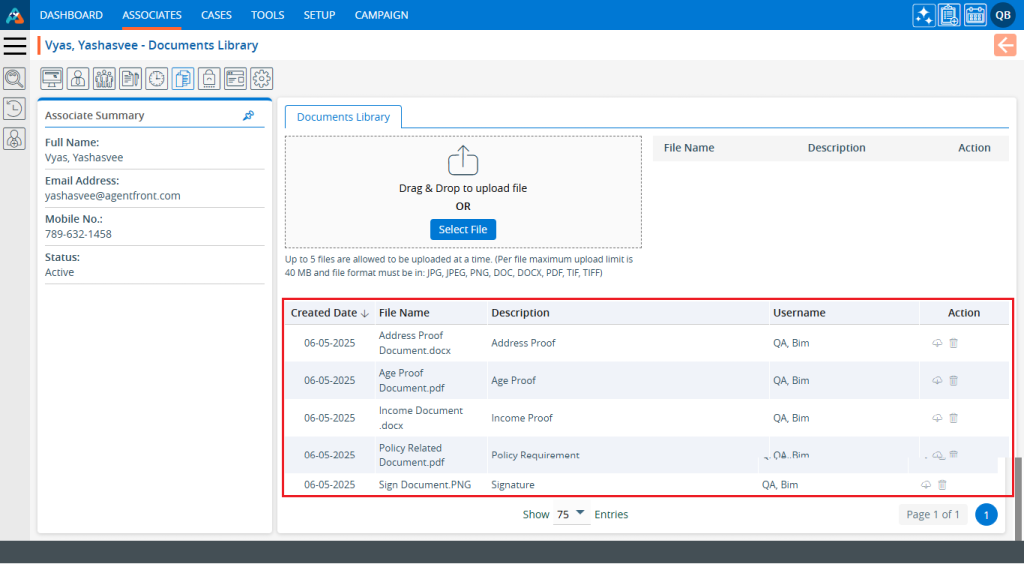
    The Documents feature allows users to add documents related to associates and save them in their profile.

    The following are the steps for adding and accessing Documents:

    1. Navigate to the ‘ASSOCIATES’ tab where you will find the list of All Associates.

    2. Click on an Associate to proceed.

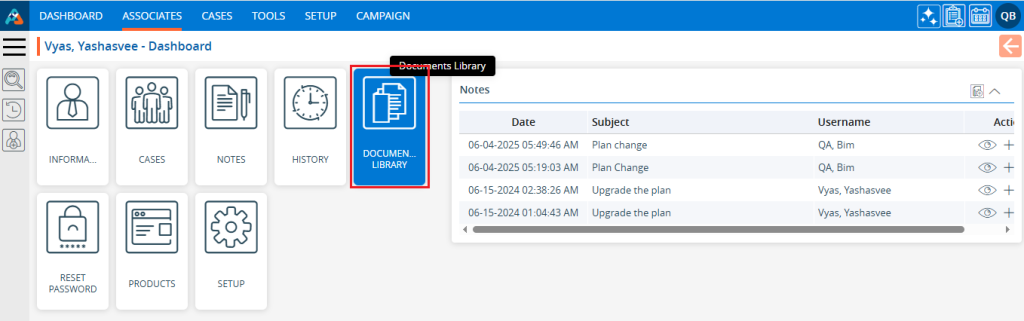
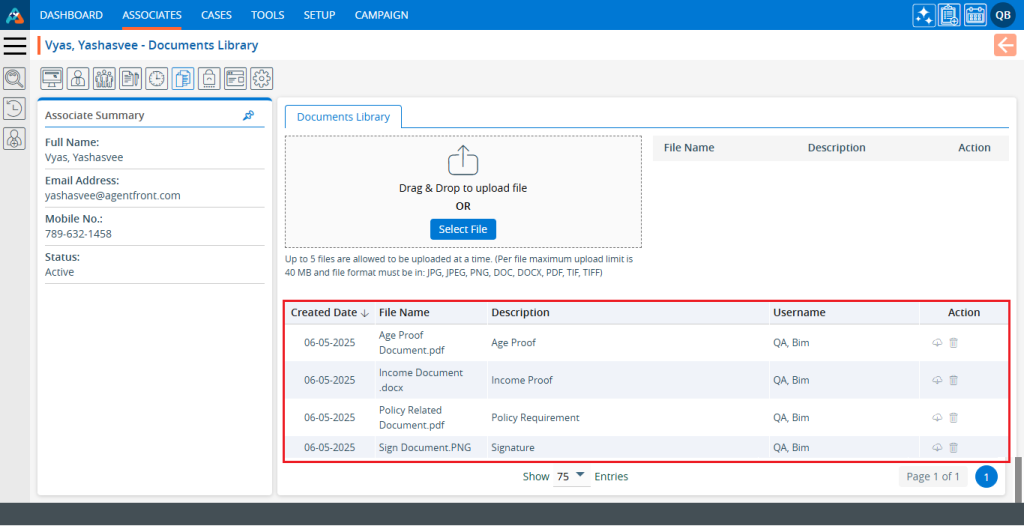
    3. The ‘Dashboard’ will open. Click on the ‘DOCUMENTS’ option.

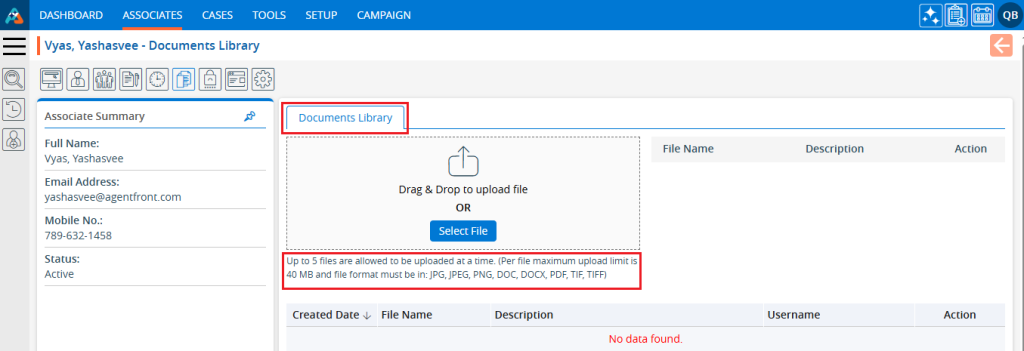
    4. The Associate Documents page will open:
    a. Users can upload up to 5 documents at once.
    b. The maximum file/document size for upload is 40 MB.
    c. Accepted formats for uploaded documents include JPG, JPEG, PNG, DOC, DOCX, PDF, TIF, and TIFF.

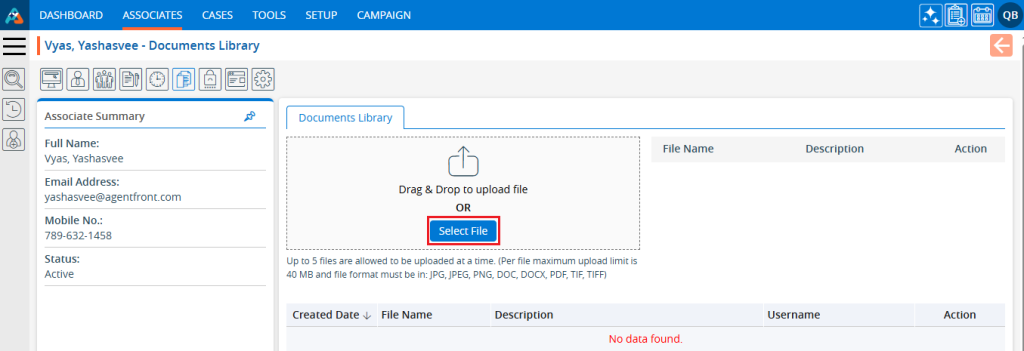
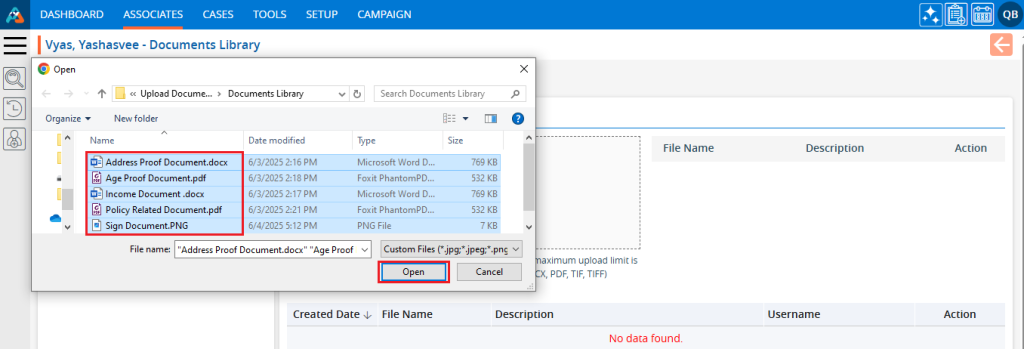
    5. Click on the ‘Select File’ button to upload files.

    6. A pop-up window will open. Select the documents and click the ‘Open’ button.

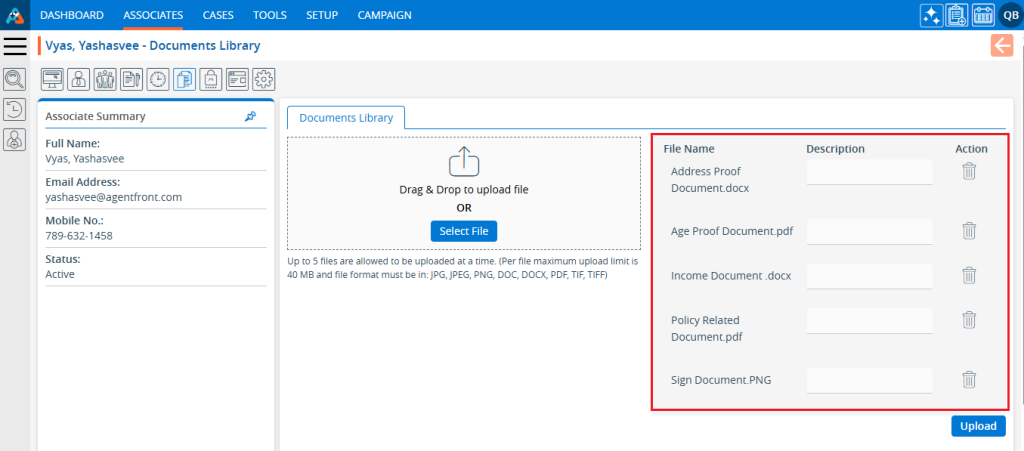
    7. The selected documents will be ready for upload.

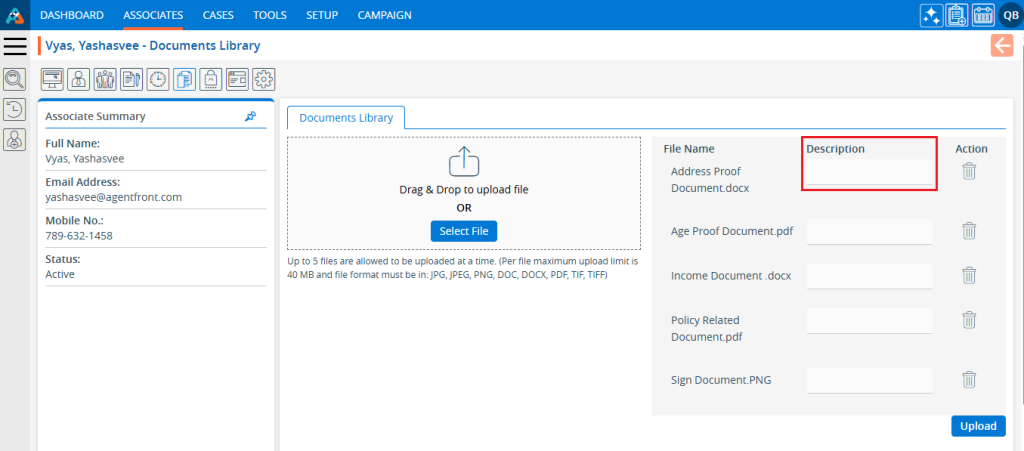
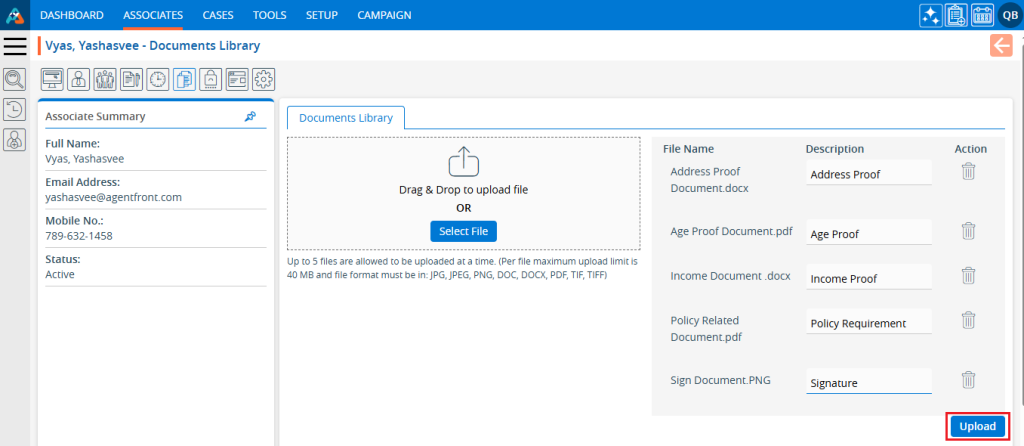
    8. Add a ‘Description’ to each document file.

    9. Click on ‘Upload’.

    10. The selected documents will be uploaded, and a confirmation message will display.

    11. The documents have been added successfully and will now be displayed in the listing.

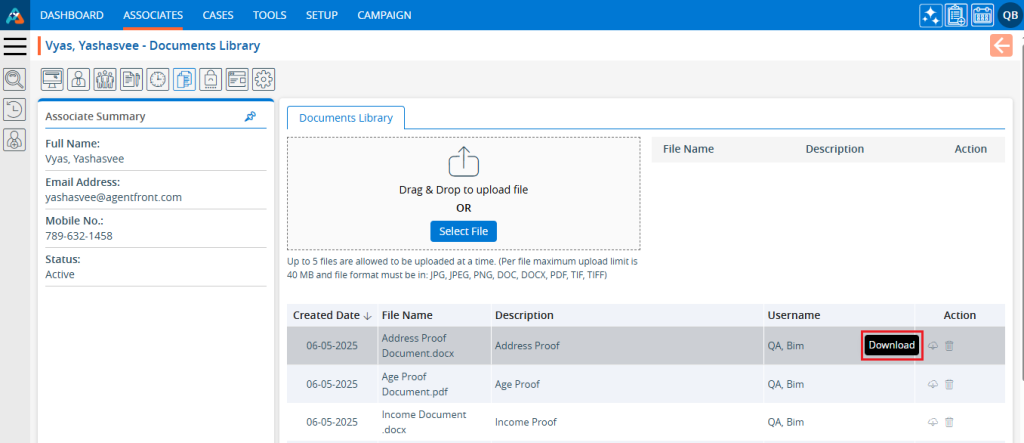
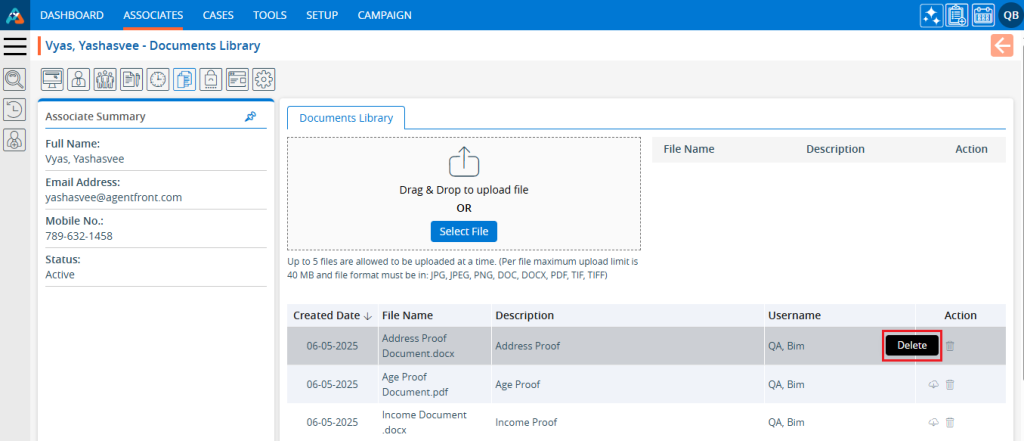
    12. There are two options for managing the documents.
    a. Download
    b. Delete
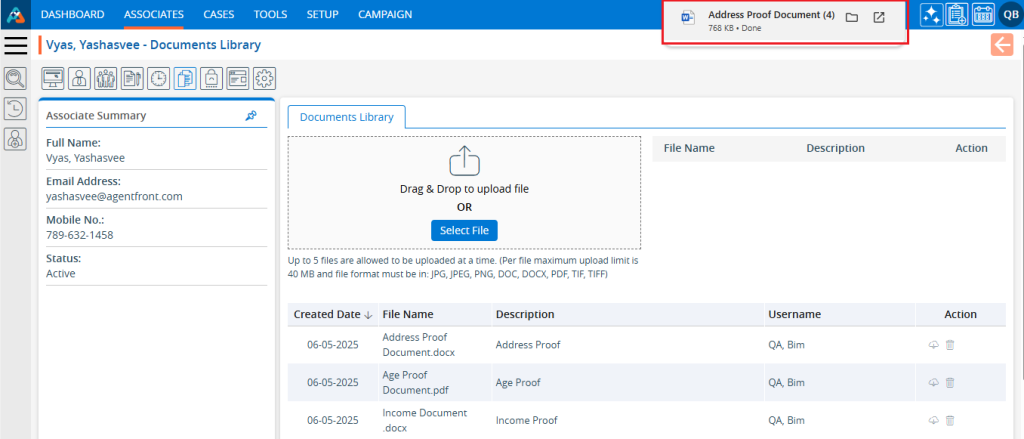
    13. If users want to download a document, they can use the ‘Download’ option. Click on the ‘Download’ icon next to the document that needs to be downloaded.

    14. The document will be downloaded to your device.

    15. To delete a document, click on the ‘Delete’ icon of the document that needs to be removed.

    16. The system will ask for confirmation to delete the document. Click on the ‘Delete’ button to proceed.

    17. The system will generate a confirmation message for the deletion of the document.

    18. The document has been removed and will no longer be available in the list.

    0
    0

    Associates Note

    Notes – The Note feature allows users to add and view notes in an associate’s profile

    The following are the steps to use the Note feature:
    1. Navigate to the ‘ASSOCIATES’ tab where you will find the ‘All Associates List’.

    2. Click on an associate to proceed.

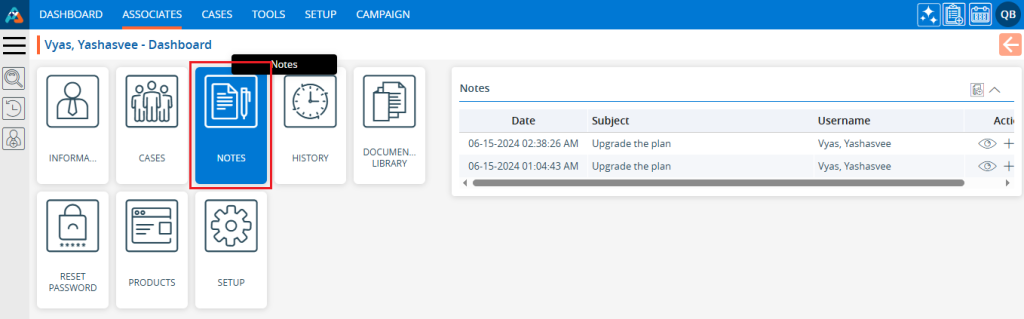
    3. The ‘Dashboard’ will open. Click on the ‘NOTES’ option.

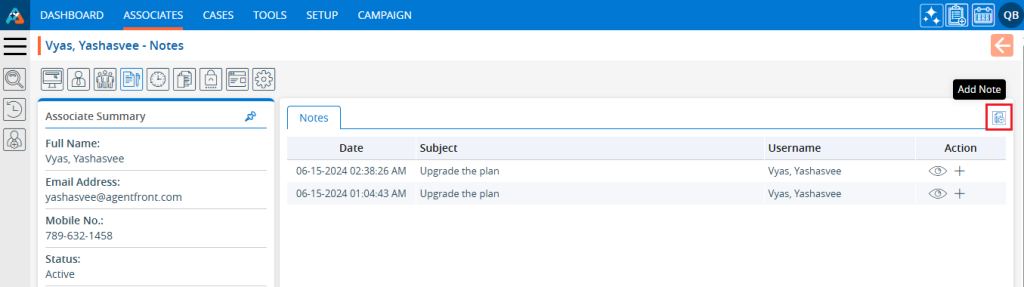
    4. The Notes page will open.
    a. Existing notes will be displayed under the Notes tab.
    b. Click on the ‘Add Note’ icon to add a note.

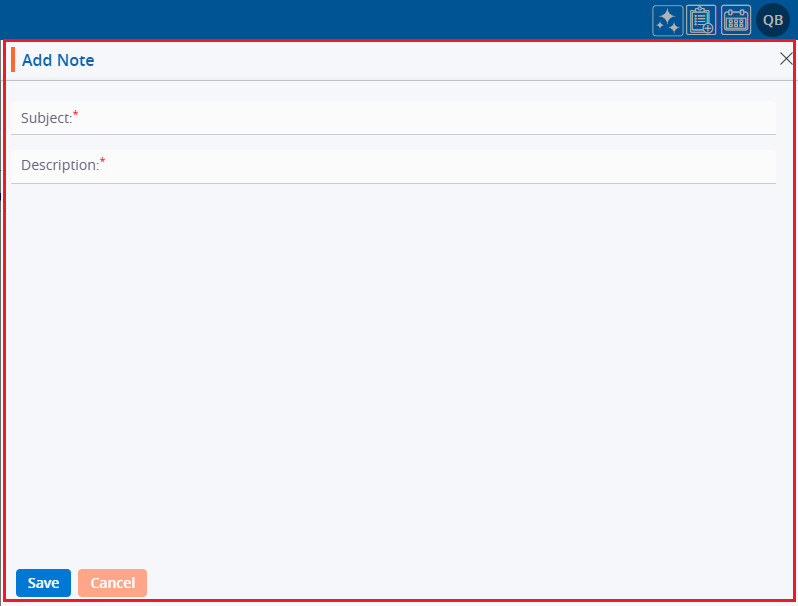
    5. A pop-up window to Add Note will open.

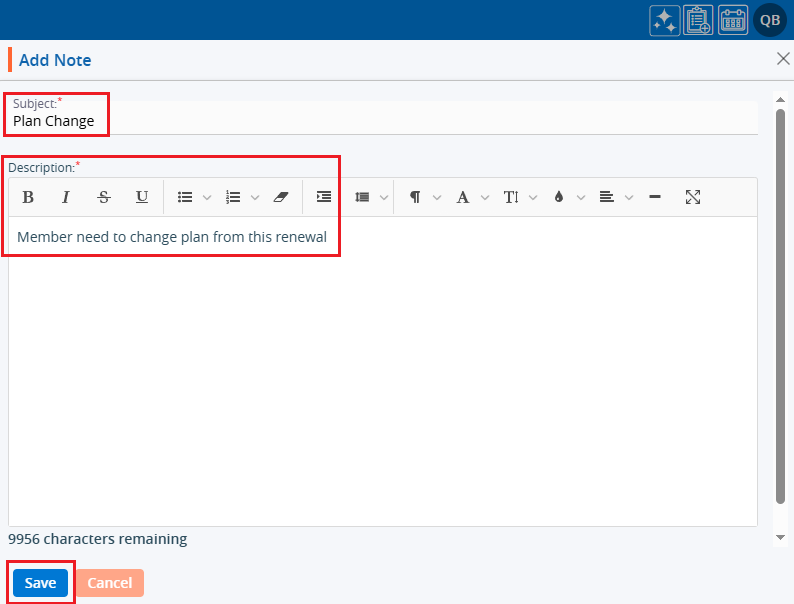
    6. Enter the subject and description, then click the ‘Save’ button.

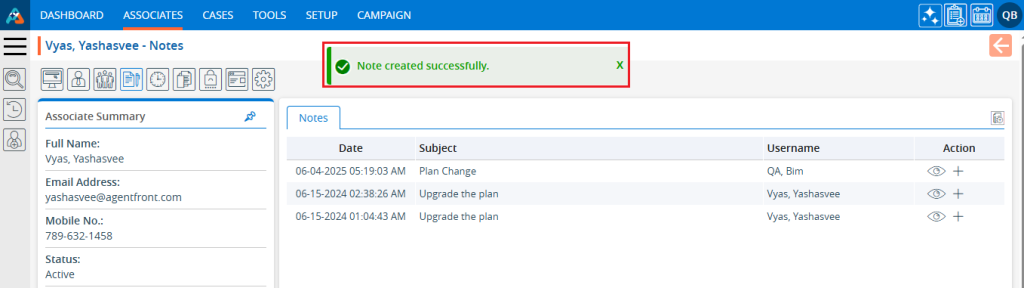
    7. A confirmation message that the note has been saved successfully will be generated. The note will then be displayed in the list.

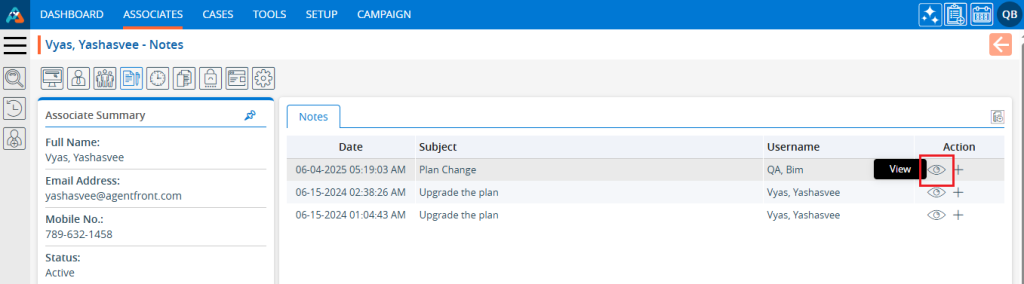
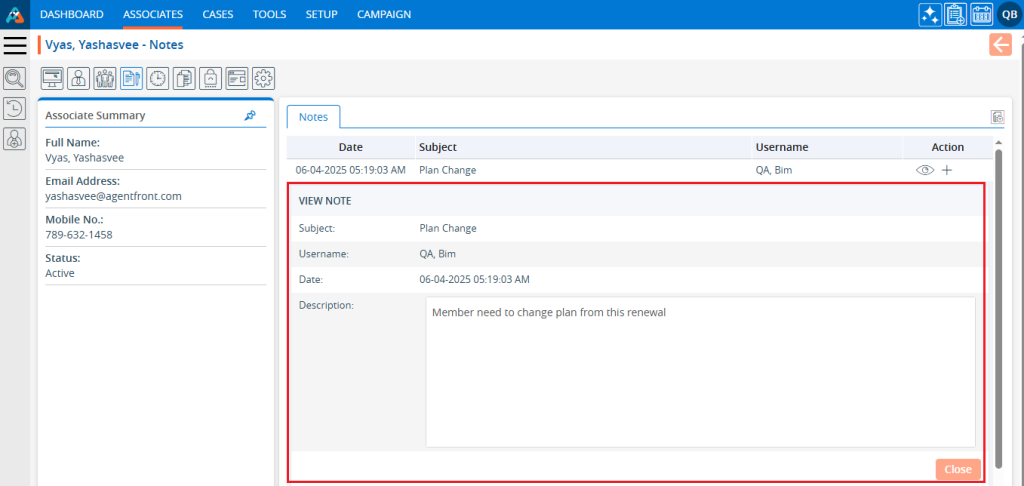
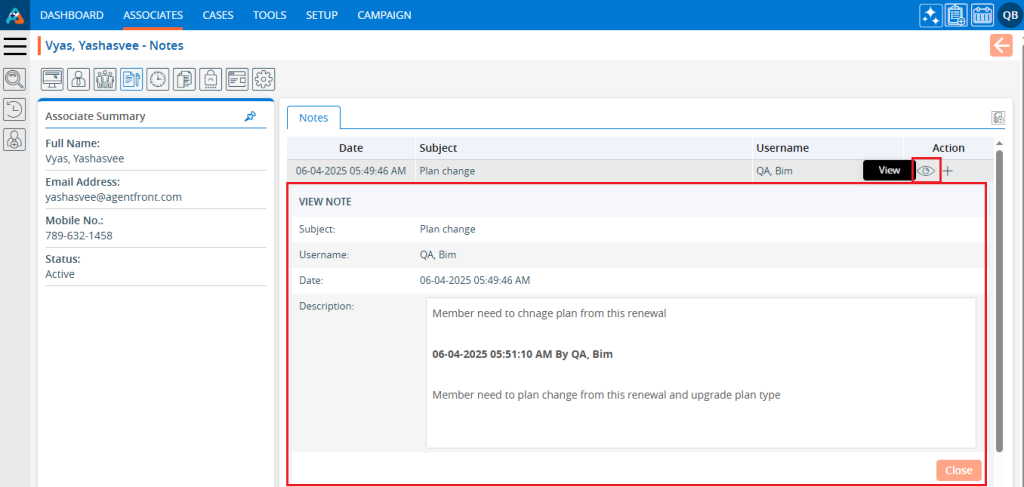
    8. To view the note, click on the ‘View’ icon.

    9. The note will be displayed. Review the note and click on ‘Close’ to exit.

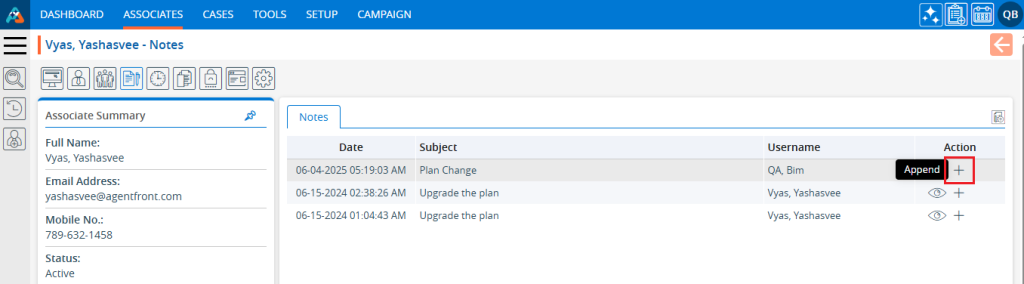
    10. Click on the ‘Append’ icon to add additional information to an existing note.

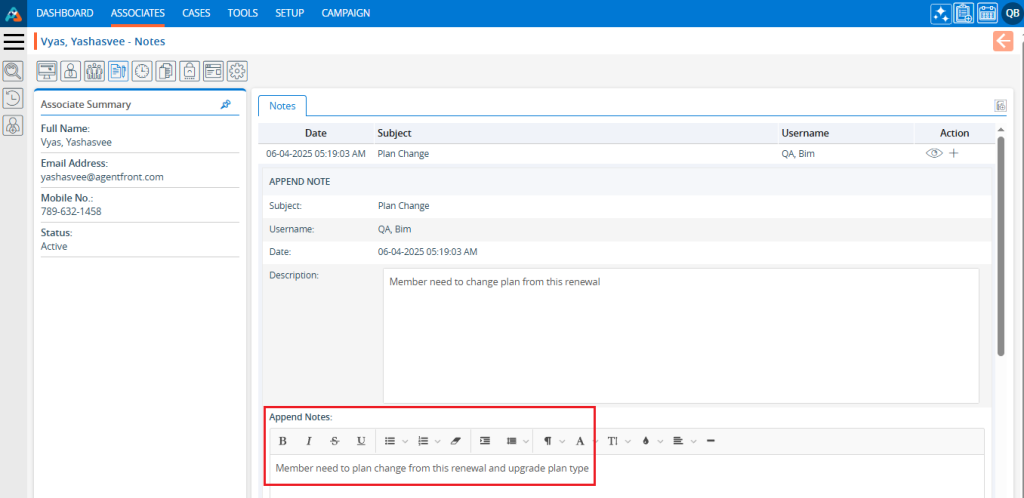
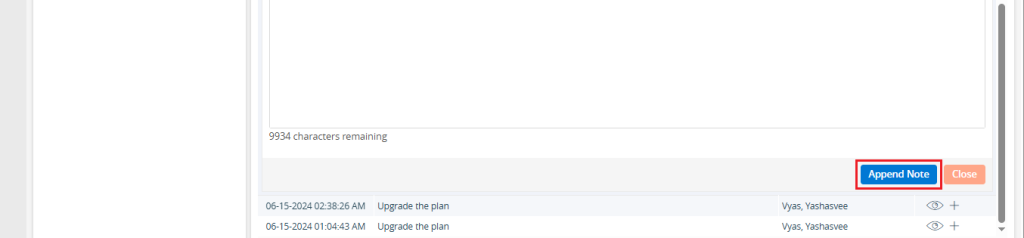
    11. The Append page will open, allowing users to add content to the existing note. Add the additional information  to the note and click on ‘Append Note’.

    12. The note has been successfully updated, and the system will display a confirmation message.

    13. Users can view the appended note by clicking on ‘View’ to display the note. To close the note, click on ‘Close’.

    0
    0

    Associates Information

    Information –The Information feature is used to add and update information related to associates in the system.

    The following are the steps to add and update information for an associate using the Information feature:

    1. Navigate to the ‘ASSOCIATES’ tab, where you’ll find the ‘All Associates List’.

    2. Click on an associate to proceed.

    3. After clicking on the associate, the Dashboard will open.
    4. Click on the ‘Information’ icon.

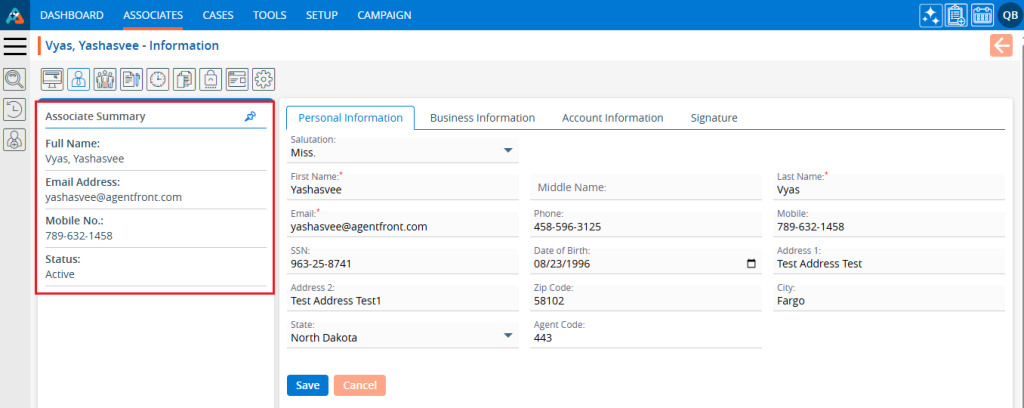
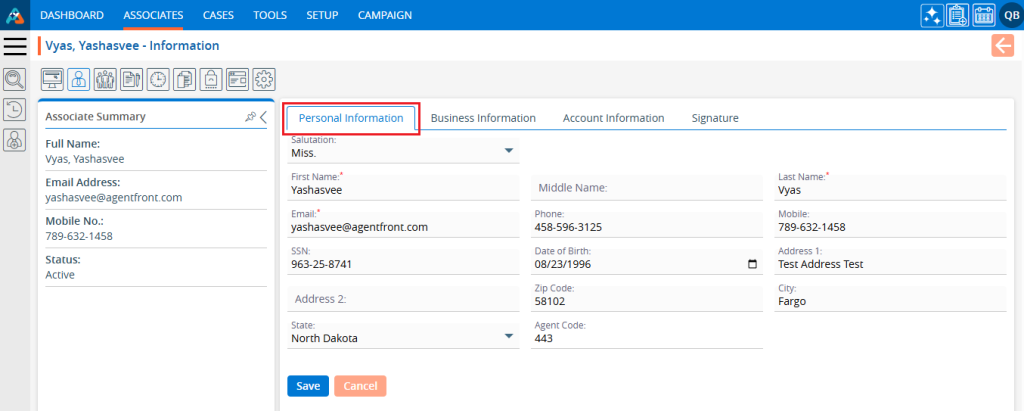
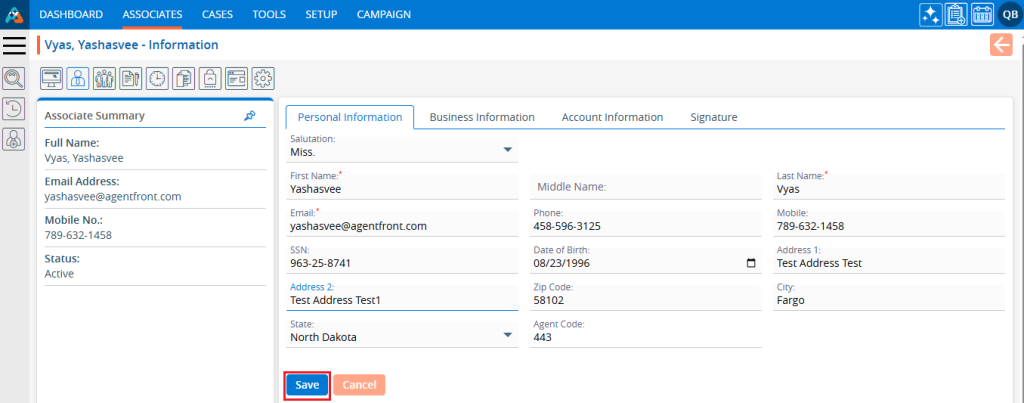
    5. The ‘Information’ page will open, displaying the following:

    • Associate Summary
    • Personal Information tab
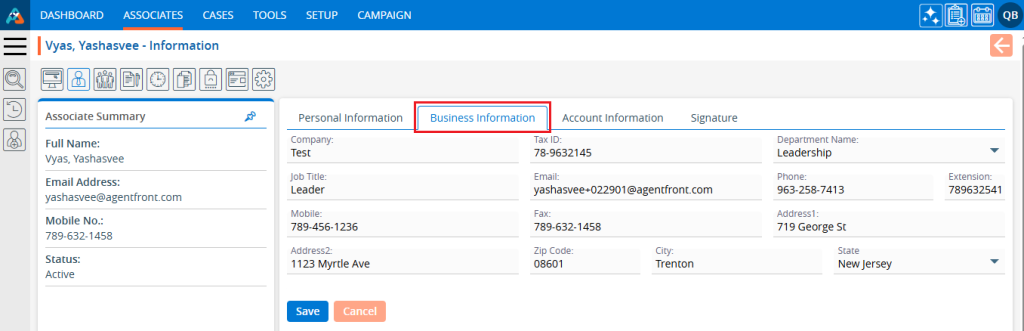
    • Business Information tab
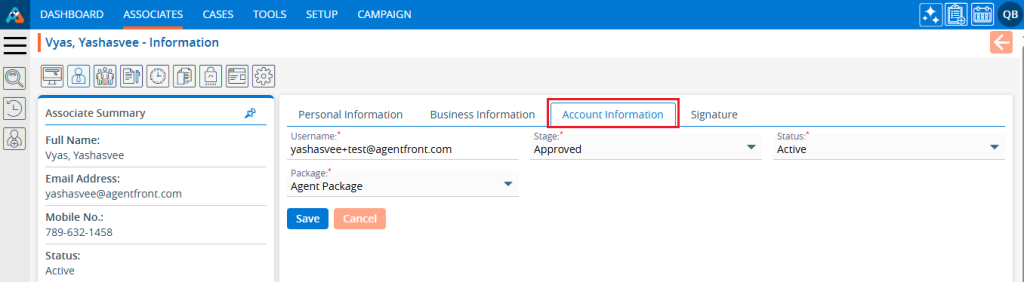
    • Account Information tab
    • Signature tab

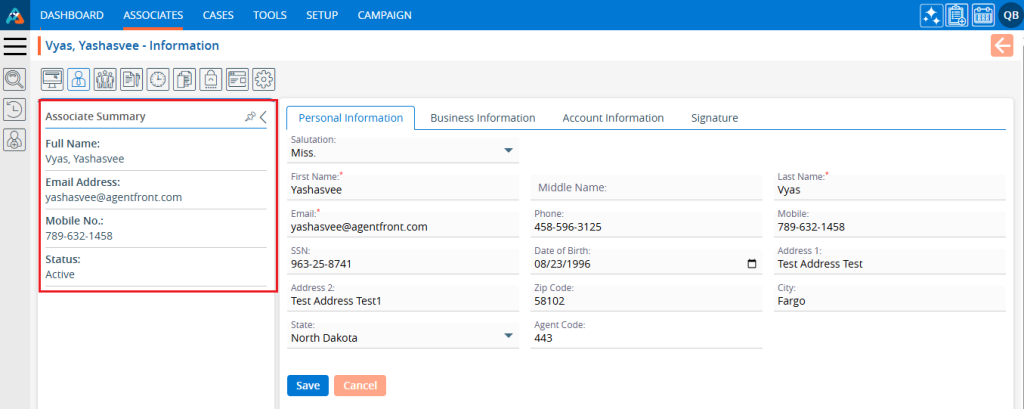
    6. The Associate Summary will display on the left side of the Information page.

    • The fields displayed under the Associate Summary can be configured from the Setup > Quick Profile > Associate > Associate Summary

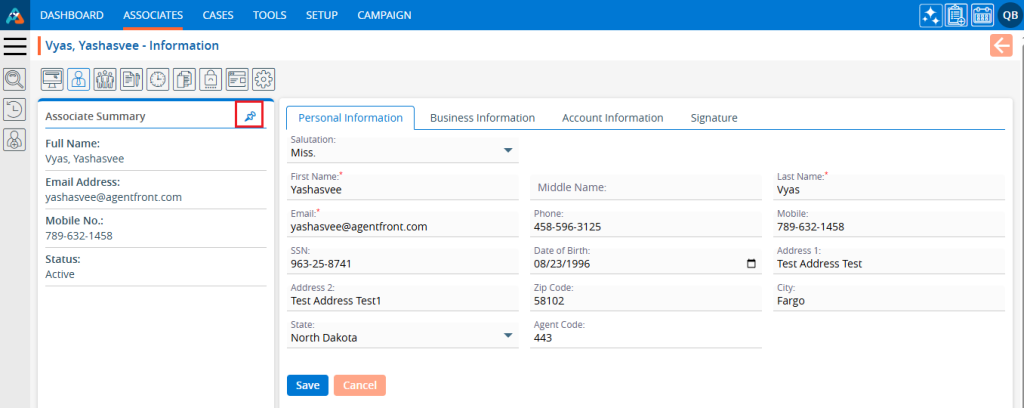
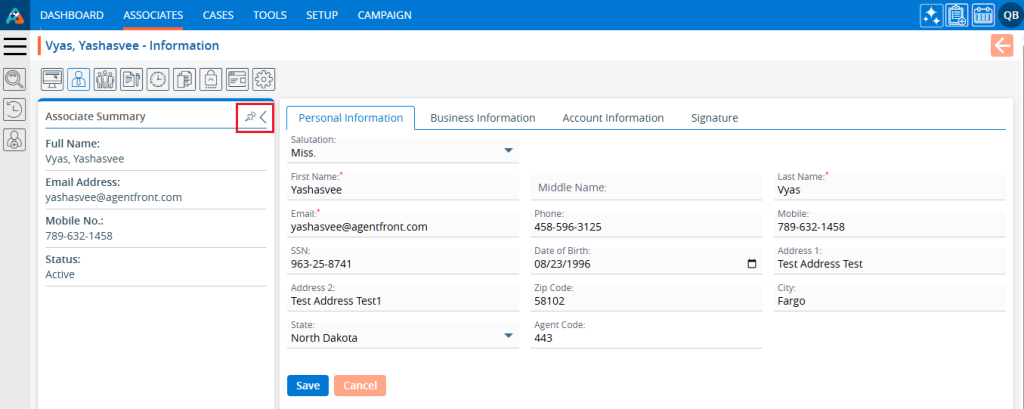
    7. The Associate Summary is pinned by default and cannot collapse while pinned. Click on the pin.

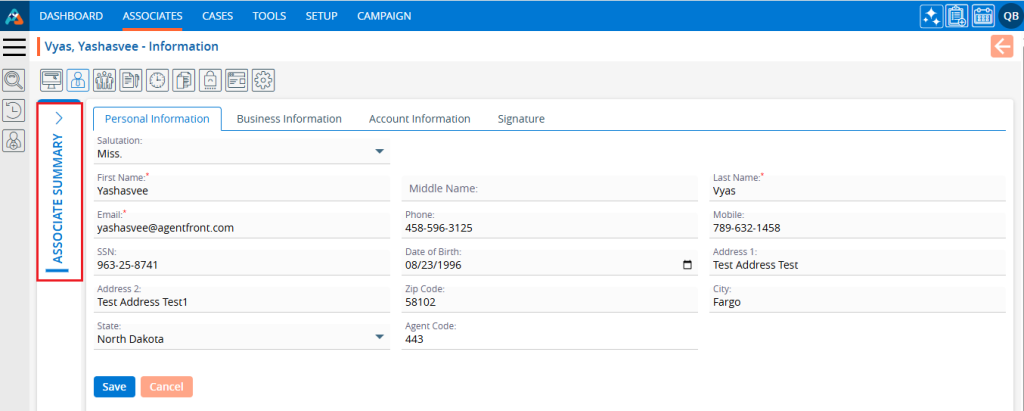
    8. Clicking on the Pin icon will unpin the Associate Summary and an arrow will appear.  Click on the arrow.

    9. Clicking on the arrow button will collapse the Associate Summary. Click on the arrow.

    10. Clicking on the arrow button again will expand and display the Associate Summary again.

    11. The ‘Personal Information’ page displays personal details, allowing users to add and update their information as needed.

    12. There are two options available on the ‘Personal Information’ page:
    a. Save
    b. Cancel

    13. After adding or updating the personal information, click on the ‘Save’ button.

    14. A confirmation message will appear indicating that the Associate Information has been updated successfully, and the updated information will be displayed.

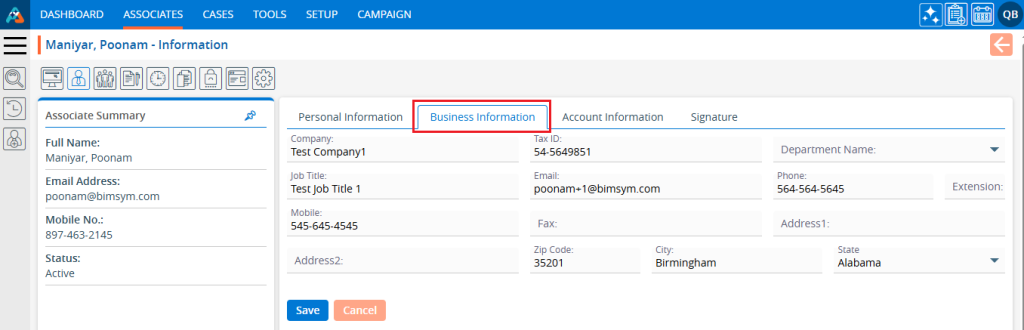
    15. Click on the ‘Business Information’ tab. The system will display business-related information on this page, where users can add and update their business details.

    16. There are two options available on the ‘Business Information’ page:
    a. Save
    b. Cancel

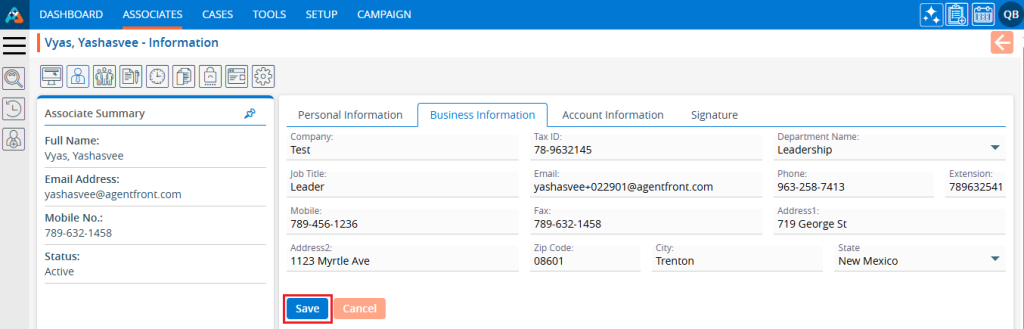
    17. After adding or updating the business-related information, click on the ‘Save’ button.

    18. A confirmation message will appear indicating that the Associate’s business Information has been updated successfully, and the updated information will be displayed.

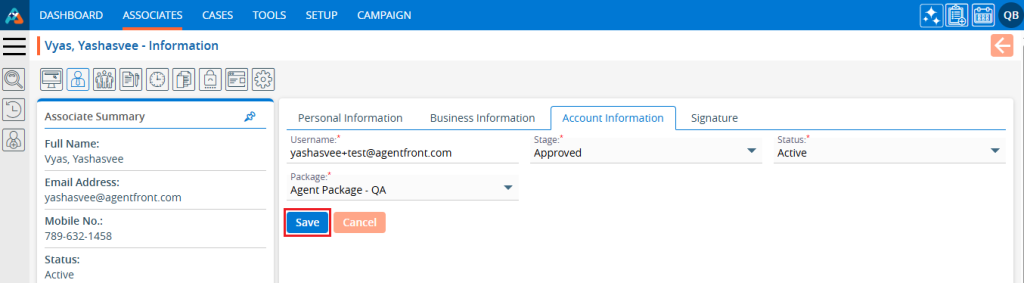
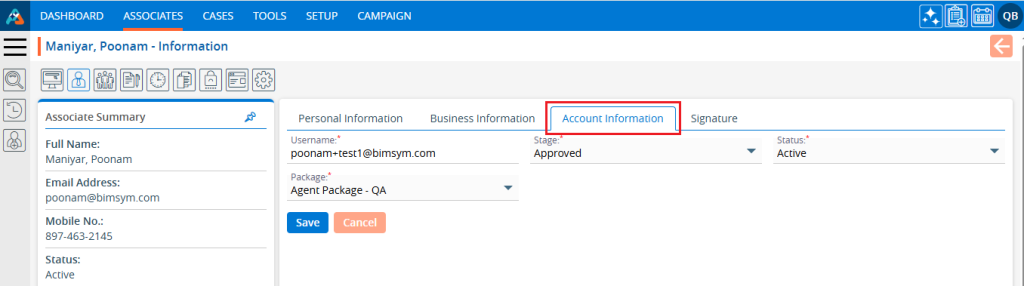
    19. Click on the ‘Account Information’ tab. The system will display account-related information on this page. From here, users can add and update account-related information.

    20. There will be two options available on the ‘Account Information’ page:
    a. Save
    b. Cancel

    21. After adding or updating the account-related information, click on the ‘Save’ button.

    22. A message will appear confirming that the Associate’s Account Information has been updated successfully, and the updated information will be displayed.

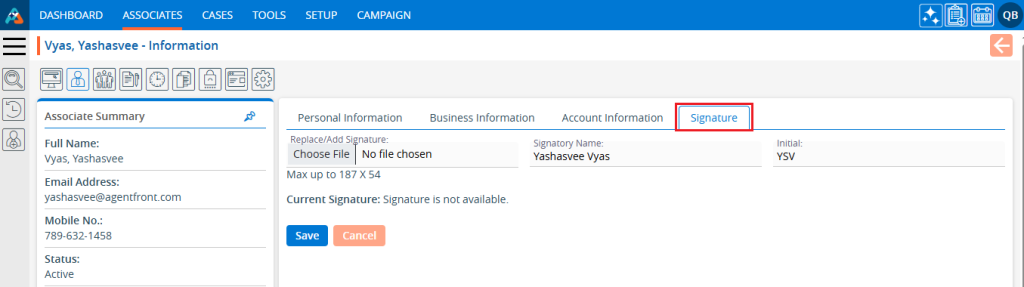
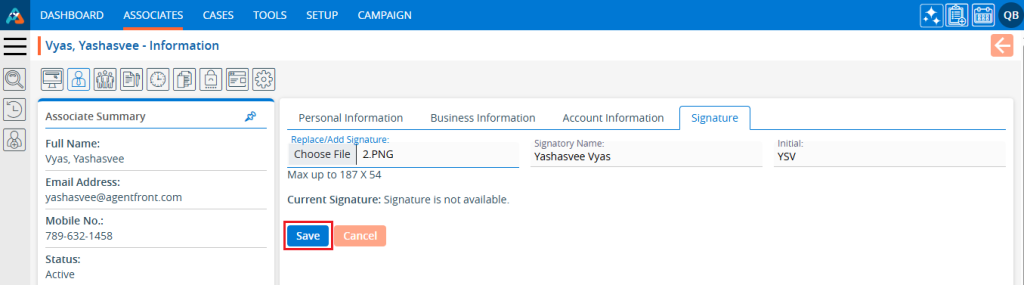
    23. Click on the ‘Signature’ tab. The system will display signature-related information on this page. From here, users can add and update signature-related information.

    24. There will be two options available on the ‘Signature’ page:
    a. Save
    b. Cancel

    25. After adding or updating the signature-related information, click on the ‘Save’ button.

    26. A message will appear confirming that the Associate’s Signature Information has been updated successfully, and the updated information will be displayed.

    0
    0

    Associate Dashboard

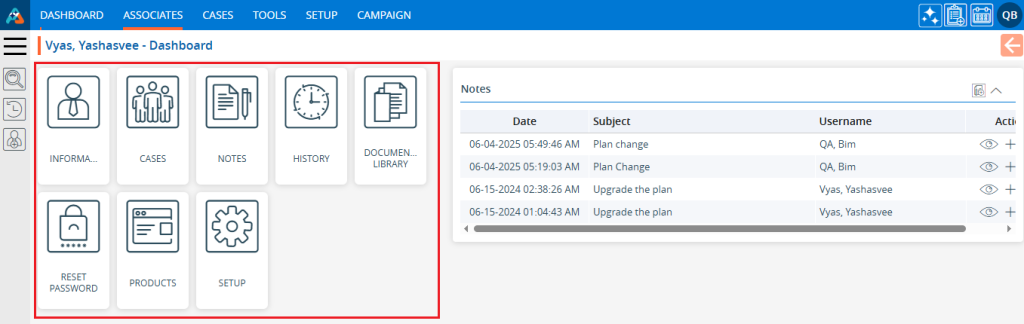
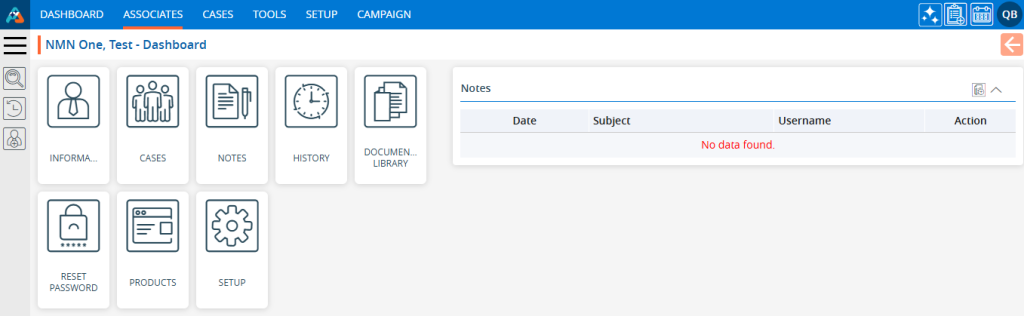
    Dashboard – The Dashboard serves as a summary page, showcasing all available functions, information, and features accessible to the user..

    The following are the steps to access the Associates Dashboard:

    1. Navigate to the ‘ASSOCIATES’ tab where you will find the ‘All Associates List’.

    2. Click on an associate to proceed.

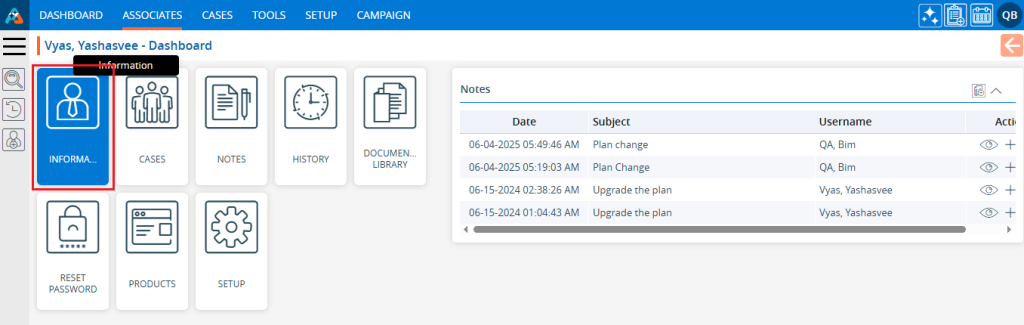
    3. A new page will open, displaying the available features on the left side of the screen.

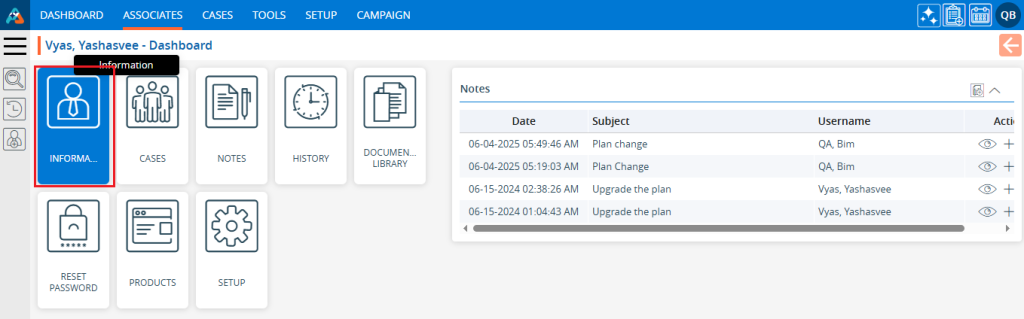
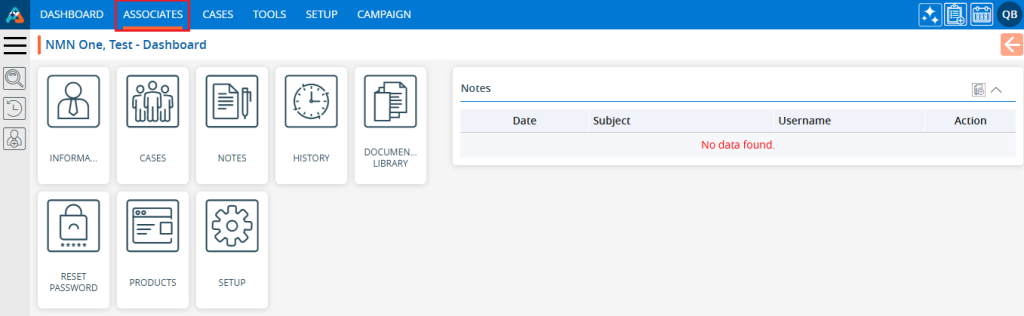
    4. To explore a feature, click on it. For example, to view a detailed profile, click the ‘INFORMATION’ feature.

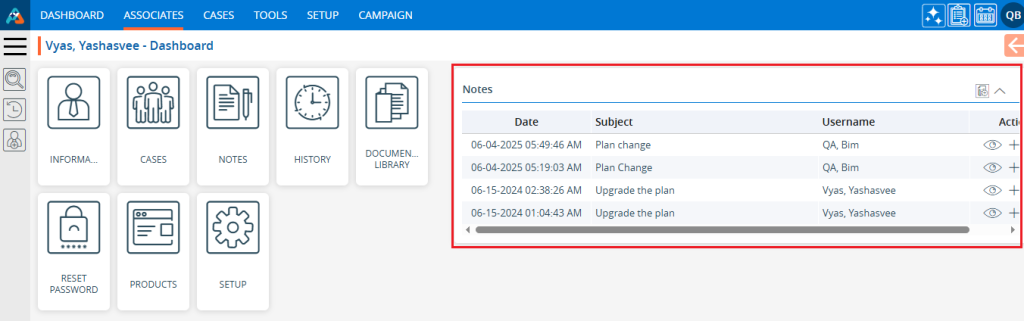
    5. On the right side of the screen, you will find a shortcut to the ‘Notes’ section. Only the five most recent updates will be shown.

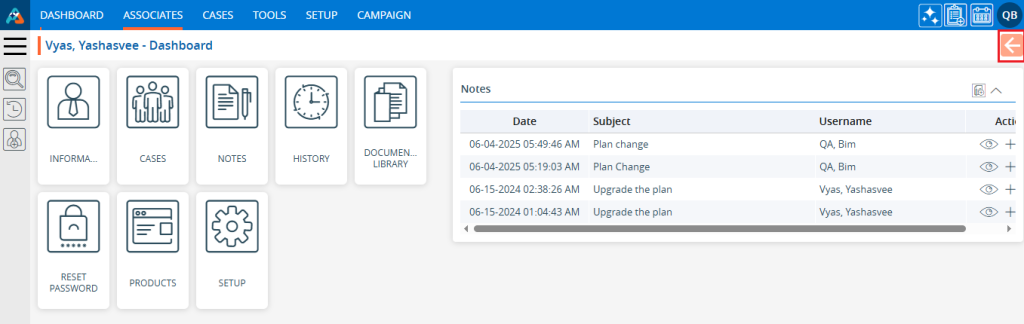
    6. By clicking the back arrow, the page will be redirected to the associates list.

    0
    0

    Associate List > All Associates List

    Associates List – All Associates display all associates currently available in the system, excluding those in the Trash and Archive SFA Folder.

    The following are the steps to access the Associates List:
    1. Navigate to the ‘ASSOCIATES’ tab, where you’ll find the ‘All Associates List’.

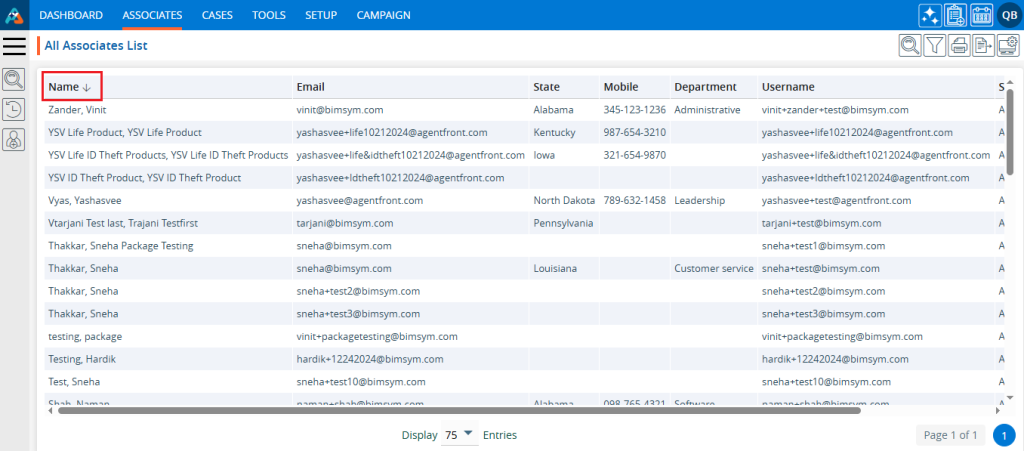
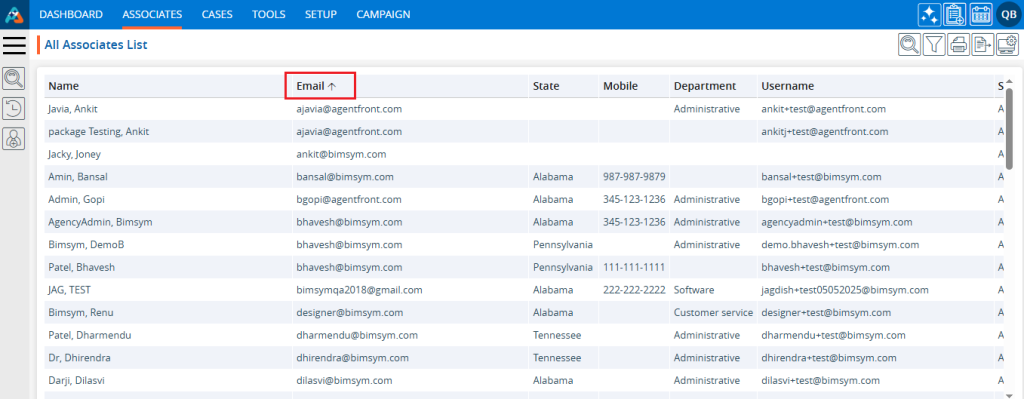
    2. Click on the field title to view associates in ascending or descending order. Clicking the title displays a downward arrow beside it, arranging associates accordingly. For instance, clicking ‘Name’ sorts of names in descending order.

    3. When the user clicks on the title again, an upward arrow will appear beside it, arranging associates in ascending order. For example, clicking the upward arrow next to the ‘Email’ title displays the email IDs in ascending order.

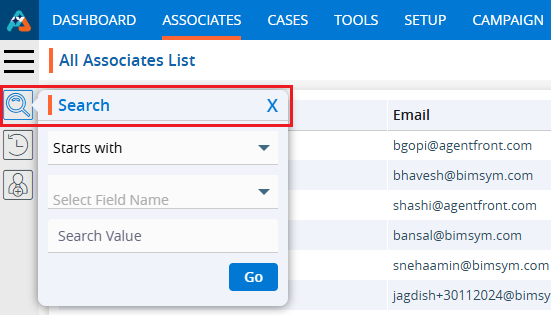
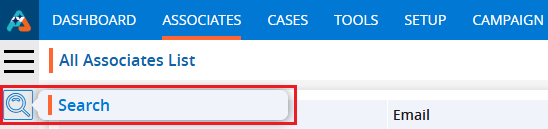
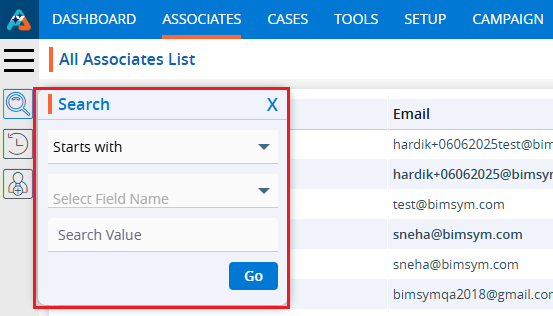
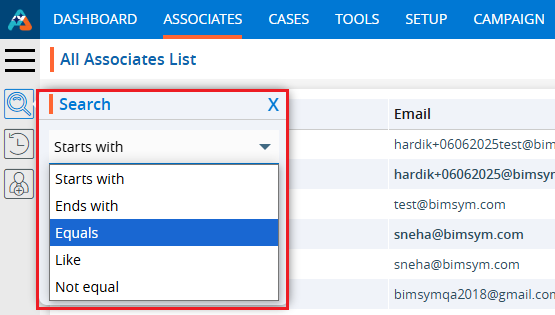
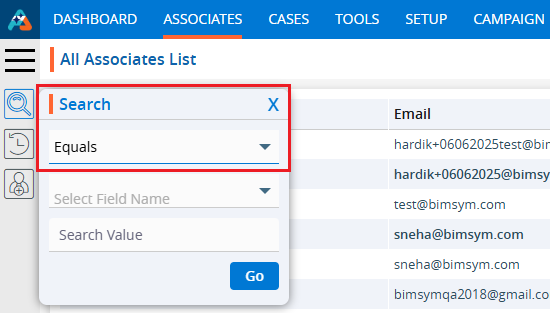
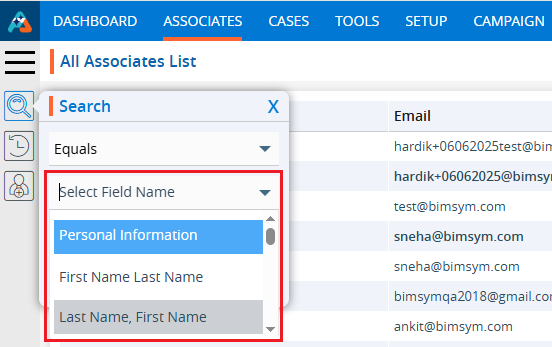
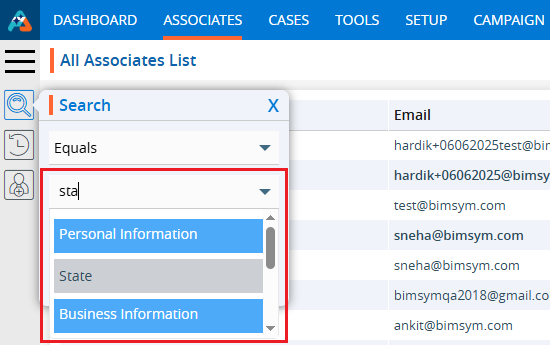
    4. On the left-side panel, there is a search feature. Users can utilize the ‘Search’ option to find specific associates by selecting different criteria.

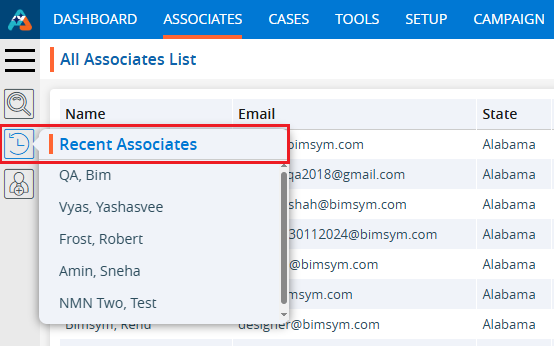
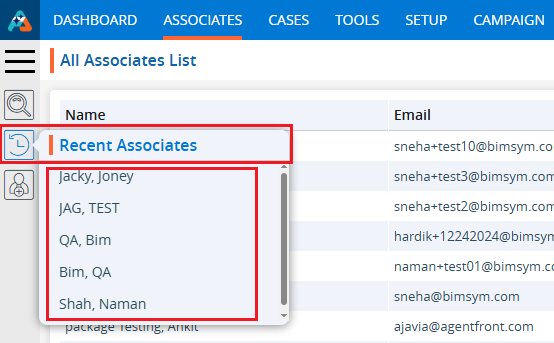
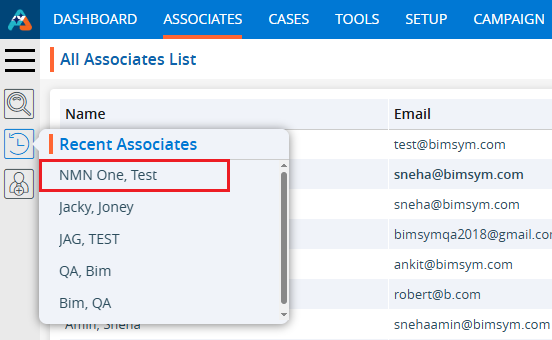
    5. On the left-side panel, there is an option to view recently accessed associates. Clicking on ‘Recent Associates’ allows users to see the five most recently accessed associates.

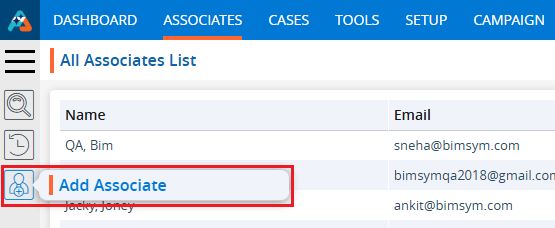
    6. On the left-side panel, there is a feature to add an associate. Clicking on the ‘Add Associate’ option will display a form with various fields, allowing users to input information and add an associate.

    7. On the right side at the top, there is a ‘Display’ feature. Users can customize the fields and arrange the display of the page using this option.

    8. On the right side at the top, there is an ‘Export’ feature. Users can export specific data from all associates using this option. The exported data will be based on the selected date range.

    9. On the right side at the top, there is a ‘Print’ feature. Clicking on ‘Print’ allows users to print the current page. The print feature will print the data according to the selected display settings.

    10. On the right side at the top, there is a ‘Filter’ feature. Users can refine the displayed data by filtering specific information from all associates using this option.

    11. On the right side at the top, there is a ‘Quick Search’ feature. Users can quickly search for data across all associates using this option.

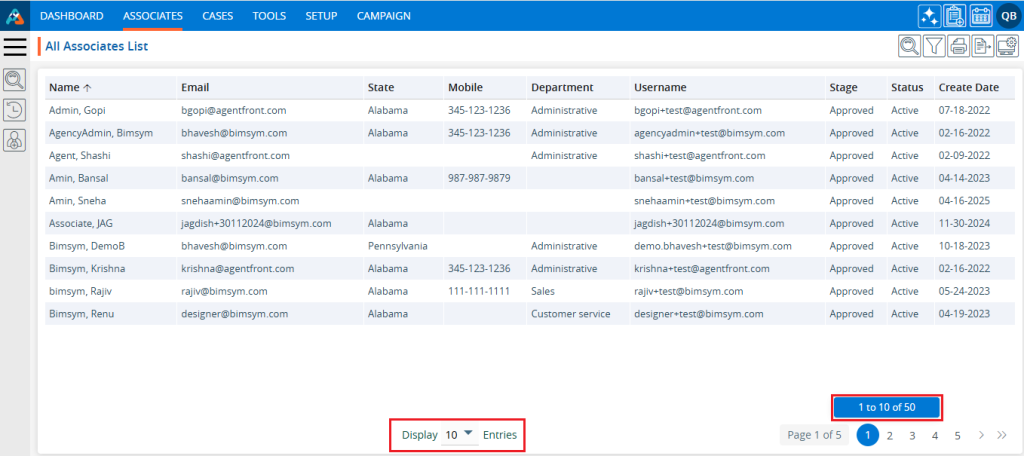
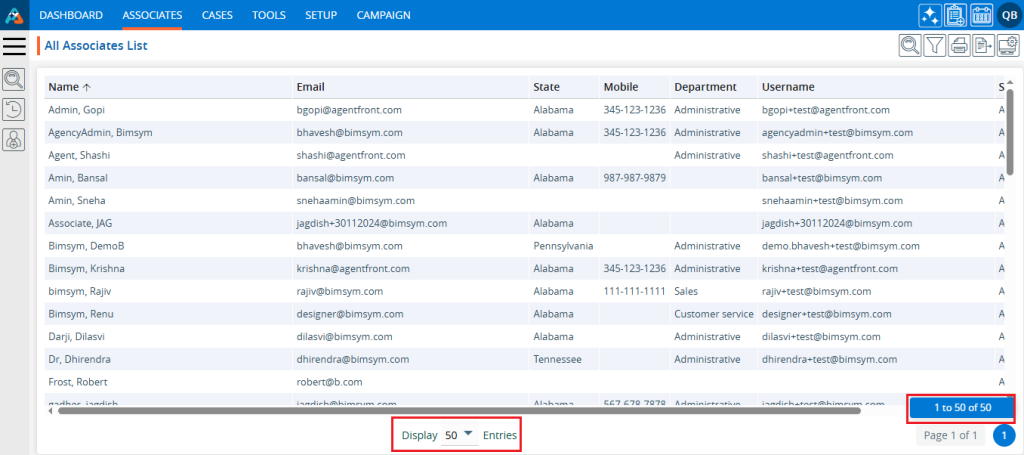
    12. At the bottom of the page, there is a feature to adjust the number of associates displayed per page from the ‘Display’ dropdown menu.

    13. The ‘Display’ dropdown menu offers six options to set the number of entries for the display list:
    a. 10
    b. 20
    c. 25
    d. 50
    e. 75
    f. 100
    14. After selecting an option from the ‘Display’ dropdown, the system will arrange and display the entries on one page according to the user’s selection.
    15. Additionally, the pagination of the associates list will be adjusted by the system according to the selected option.
    For example:

    • If the user selects 10 entries per page, the system will display 10 entries per page, and the data will be distributed accordingly.
    • If the user selects 50 entries per page, the system will display 50 entries on each page, and the data will be distributed accordingly.

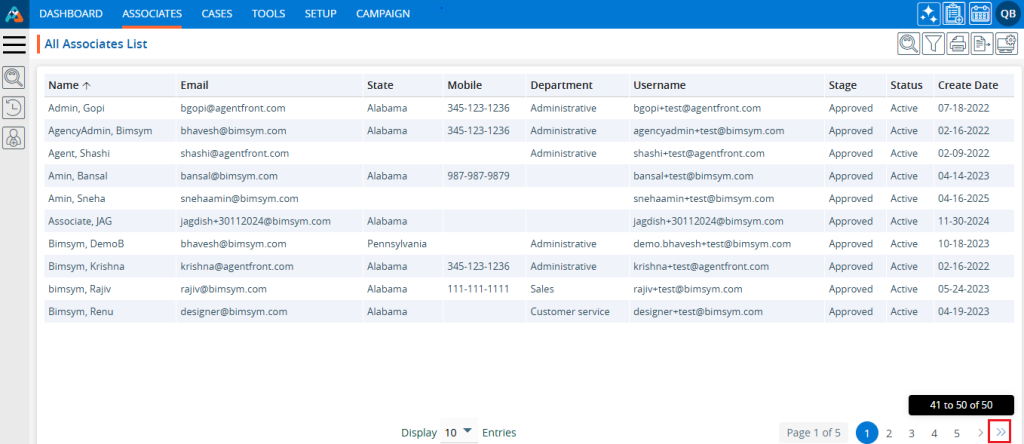
    16. The pagination will function according to the number of entries set, providing options for users to select a specific page or navigate directly to the first, next, previous, or last page.
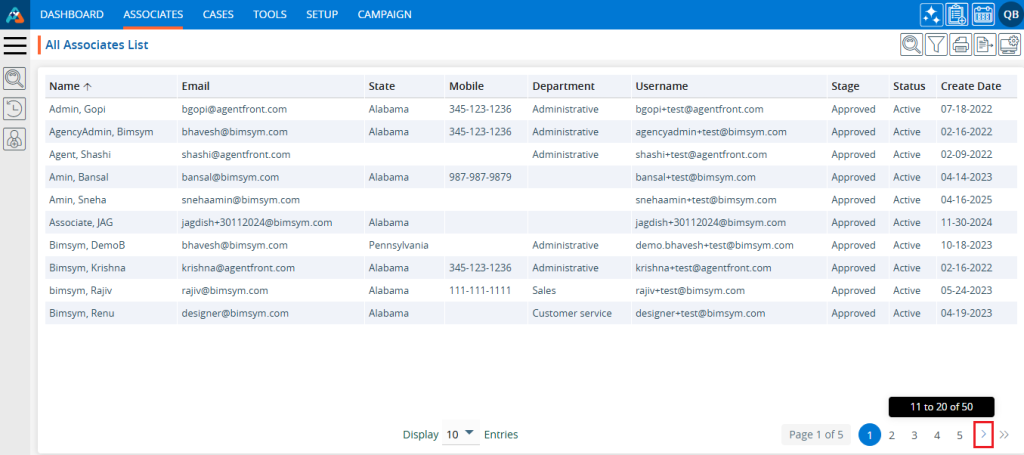
    17. By clicking on the double arrow ‘»’ on the right side, users can directly navigate to the last page.

    18. By clicking on the single right arrow ‘>’, users can navigate to the next page.

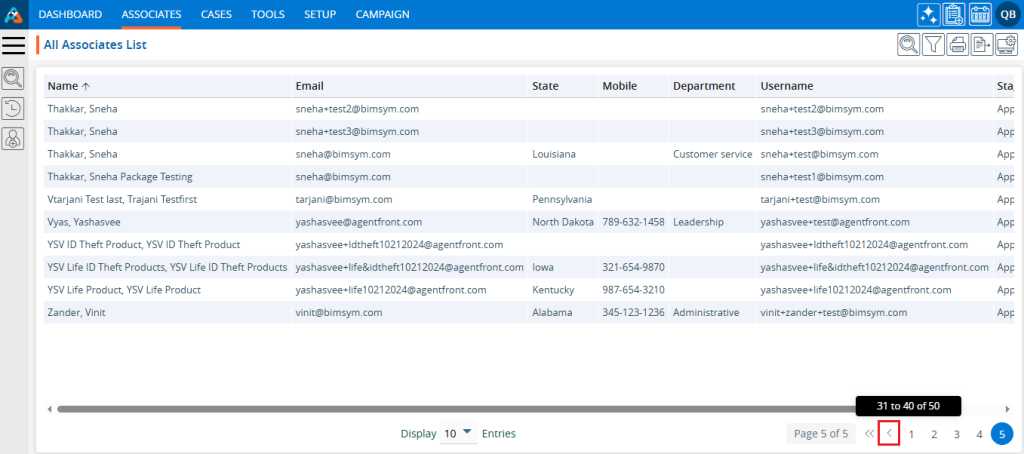
    19. By clicking on the single left arrow ‘<‘, users can navigate to the previous page.

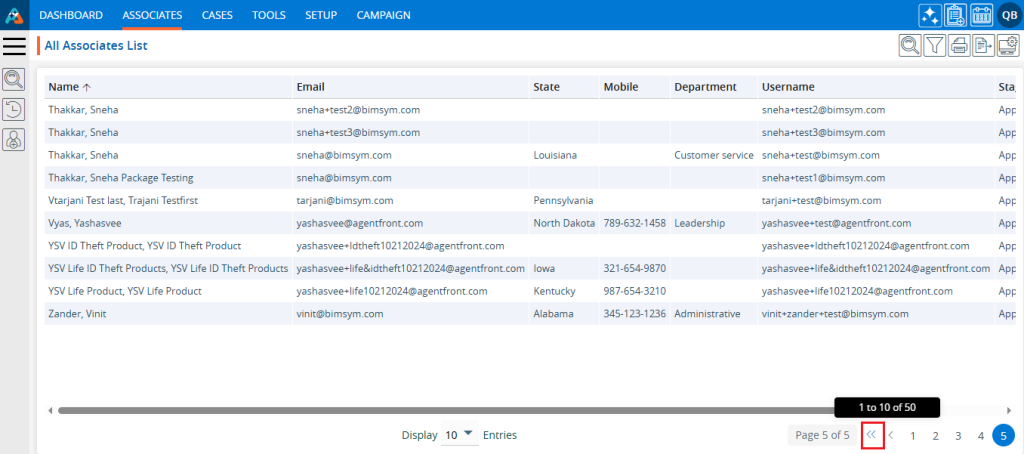
    20. By clicking on the double arrow ‘«’ on the left side, users can directly navigate to the first page.

    0
    0

    Associate Export

    Export – The Export feature is used to export specific data based on the creation date.

    The following are the steps to export data:
    1. Navigate to the ‘ASSOCIATES’ tab and All Associates List will be displayed.

    2. Click on the ‘Export’ icon.

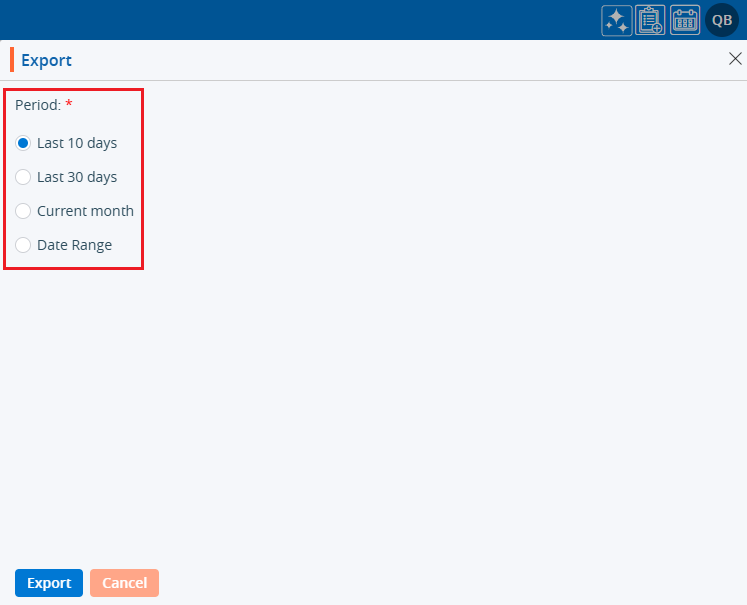
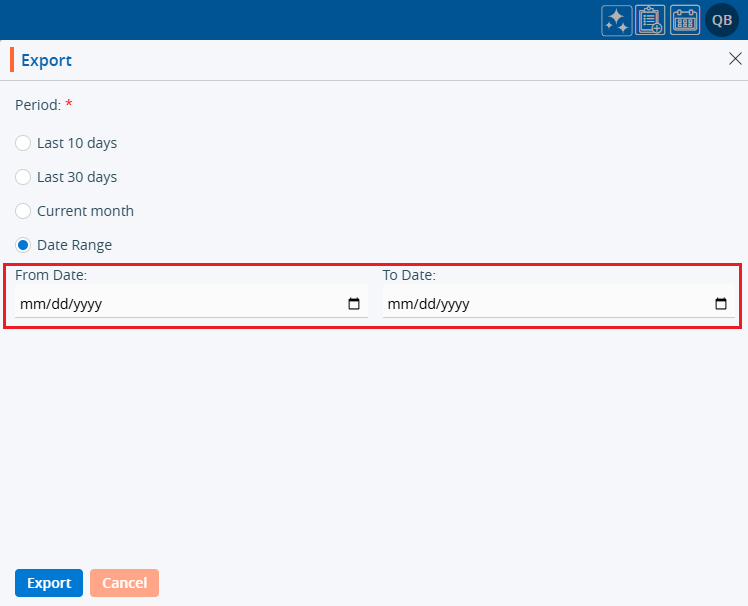
    3. Upon clicking Export, a pop-up window will open displaying the selection criteria for ‘Period’.
    There are four options available:

    • Last 10 days – This option is used to export records from the last 10 days.
    • Last 30 days – This option is used to export records from the past 30 days.
    • Current month – This option is used to export records for the Current Month.
    • Date Range – This option is used to export records for the selected date range within 90 days.

    4. For the first three options, simply select the radio button and click on the ‘Export’ button.
    5. Records will be exported, and the CSV file will be saved in a temporary location.
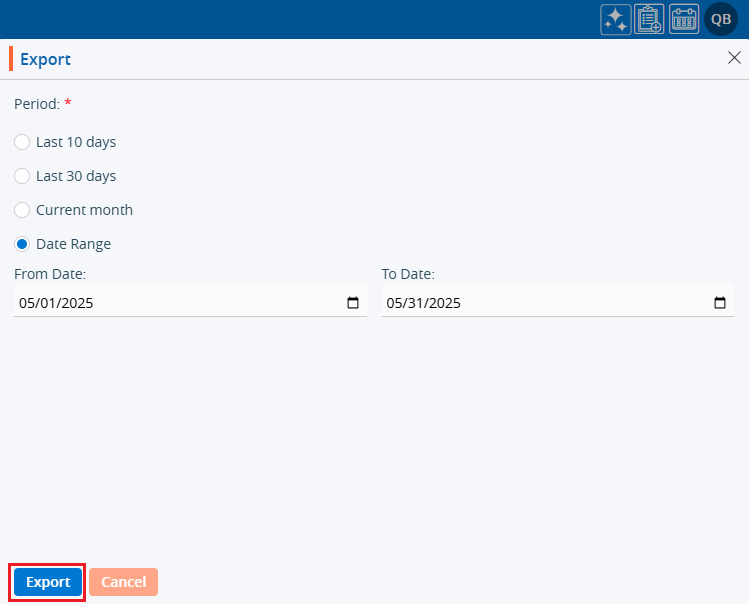
    6. For the Date Range option, specific dates need to be selected.

    7. Select the date and click on the ‘Export’ button.

    8. The records will be exported based on the selected option and a CSV file will be saved.

    0
    0

    Associate Print

    The Print feature is used to print specific data from the current page after applying any filters or search criteria. For example, if we are on the second page and print the data, it will only print the data visible on that page, not all the data available in the listing.

    The following are the steps to print data:

    1. Navigate to the ‘ASSOCIATES’ tab and All Associates List.

    2. Click on the Print icon.

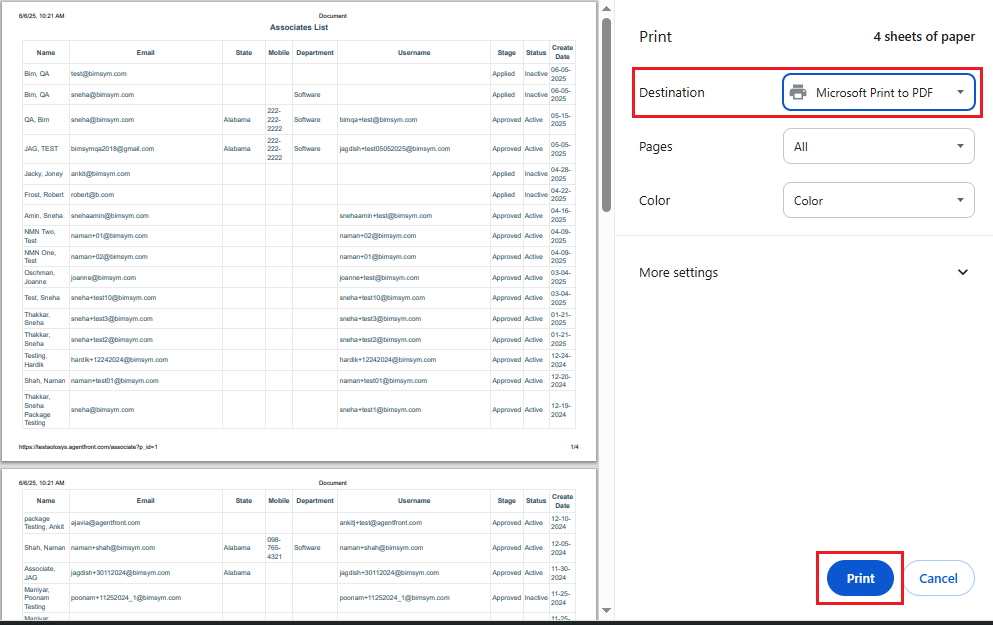
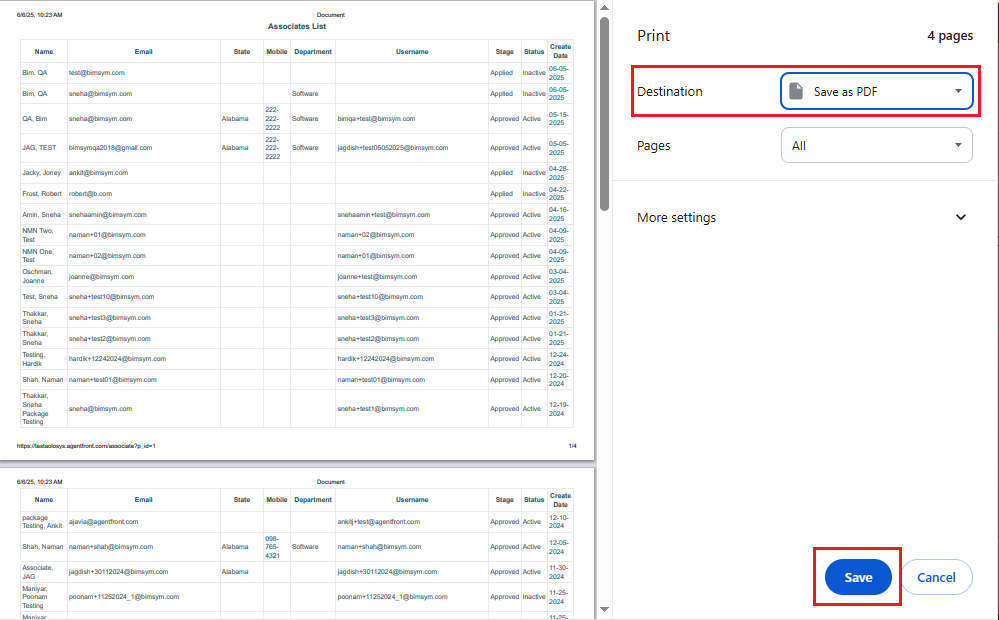
    3. After clicking on Print, a popup will open displaying the current page data and various print options.

    • Select the print option from the ‘Destination’ dropdown and click the ‘Print’ button.
    • Select the ‘Save as PDF’ option from the ‘Destination’ dropdown and click the ‘Save’ button to save the file to the required location.
    0
    0

    Associate Quick Search

    Quick search finds the required data as at least 3 characters are entered in the search box, displaying relevant results instantly. This allows users to quickly locate information without completing or submitting the full search term.

    1. Sign in to AgentFront CRM.
    2. From the top menu, choose Associate.
    3. From the top right corner, go to Quick Search.
    4. Quick search will search for the associate based on the fields set up under Setup > System Setup > Quick Search > Associate Quick Search.
    5. Enter at least 3 characters in the search box, then click the Search icon.
    6. Quick search results should be displayed based on the characters entered in the quick search bar.
    0
    0

    Add Associate

    This feature is used to create a new Associate in the system.

    The following are the steps to use the Add Associate feature:
    1. Navigate to the ‘ASSOCIATES’ tab.

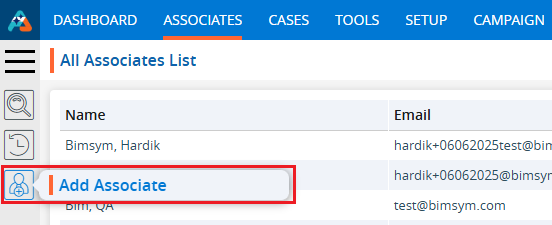
    2. Click on ‘Add Associate’ in the left-side panel.

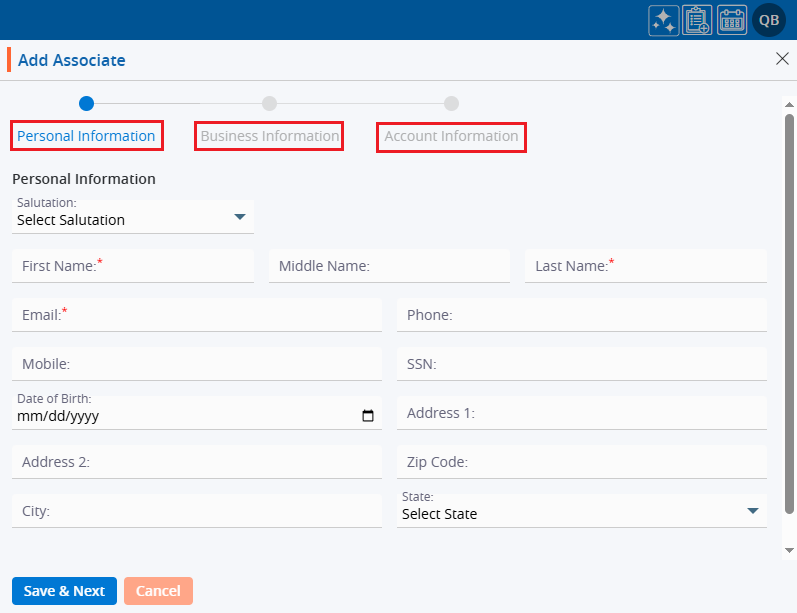
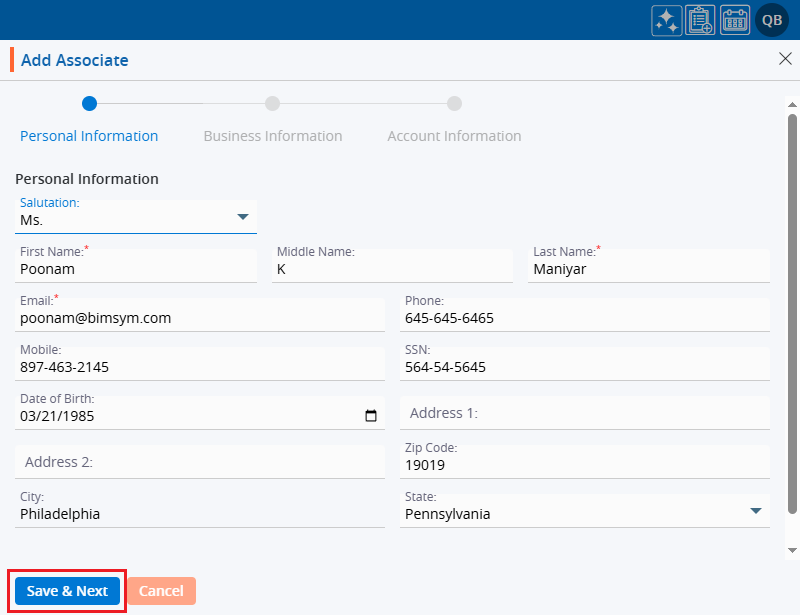
    3. A new pop-up form will open, offering the following three options: ‘Personal Information’, ‘Business nformation’, and ‘Account Information’.
    4. The default ‘Personal Information’ form will open.
    5. Users need to add their required information in these forms one by one.

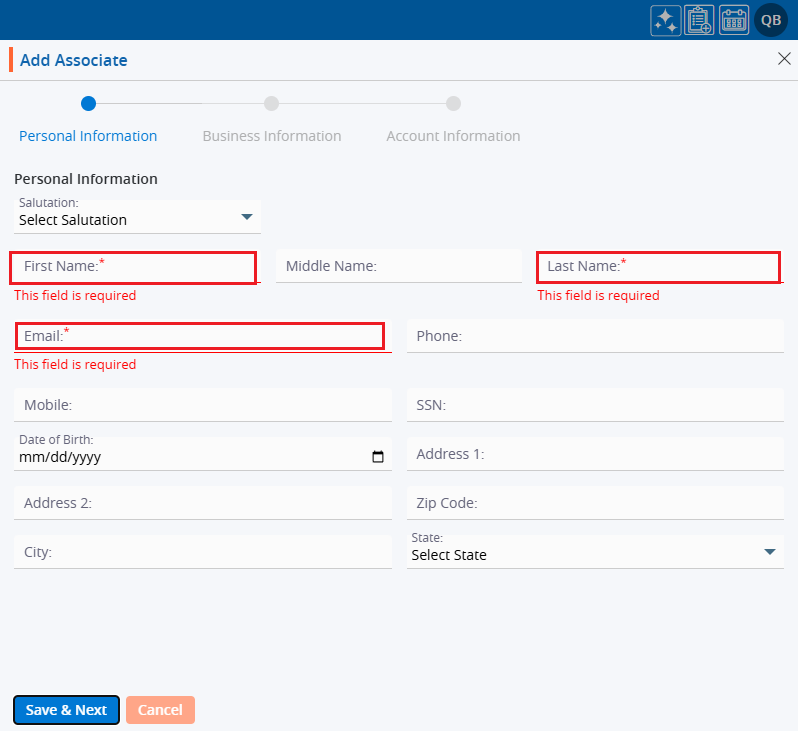
    6. In the Personal Information section, fields marked with an asterisk (*) are mandatory.

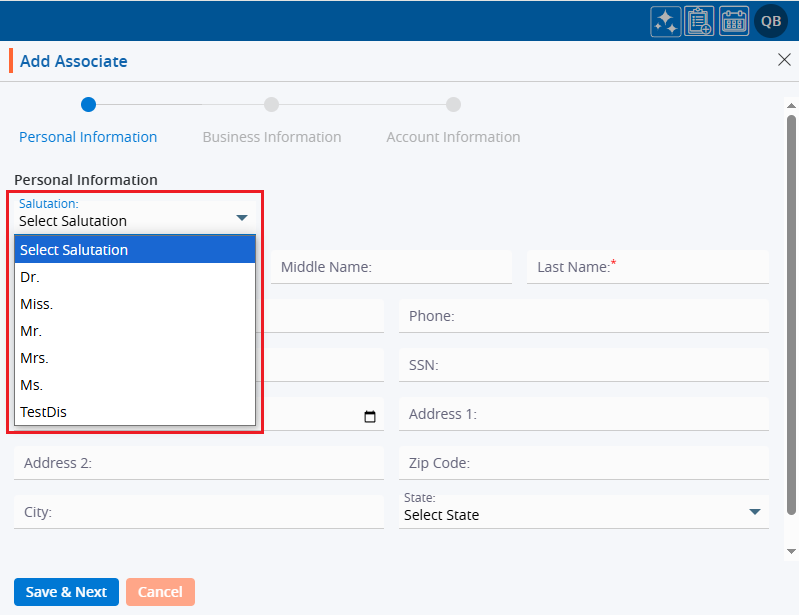
    7. The ‘Salutation’ field has a dropdown menu to select an option from.

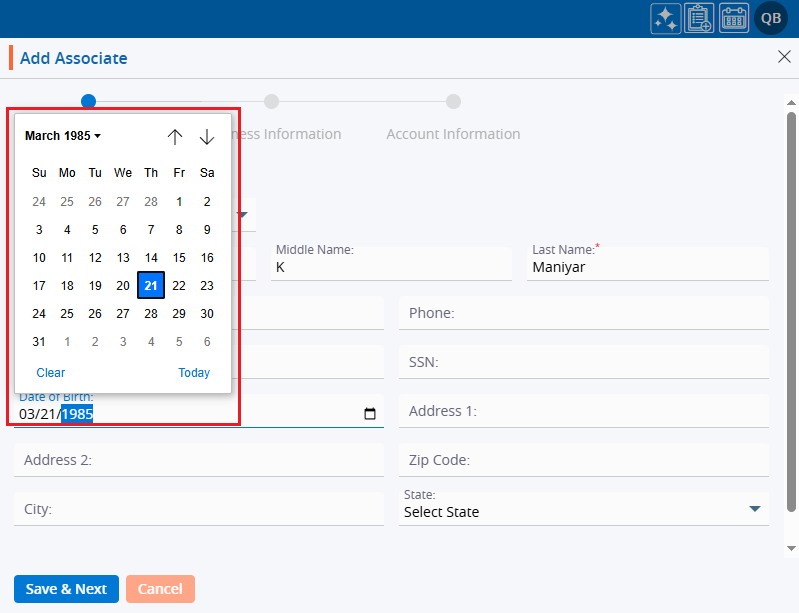
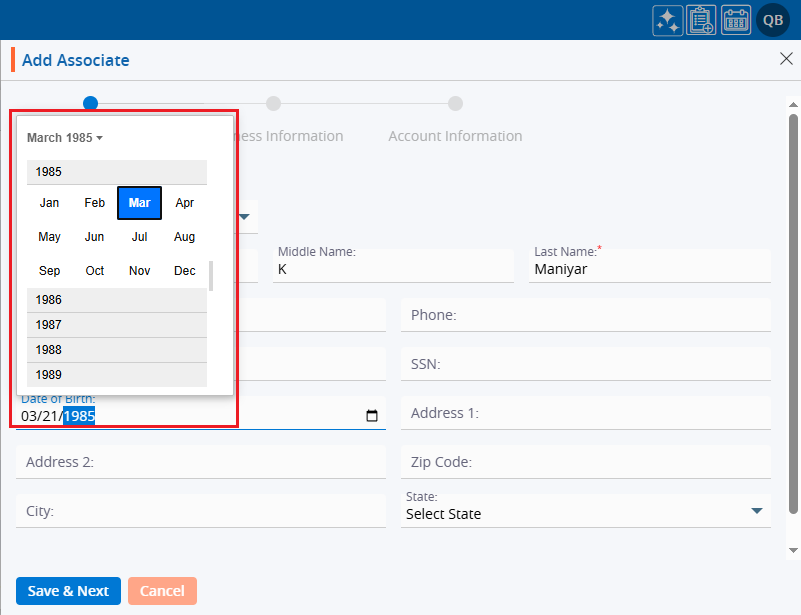
    8. Choose the ‘Date of Birth’ from the calendar option provided.

    9. Clicking on the up and down arrows will display years and months for selecting the ‘Date of Birth’.

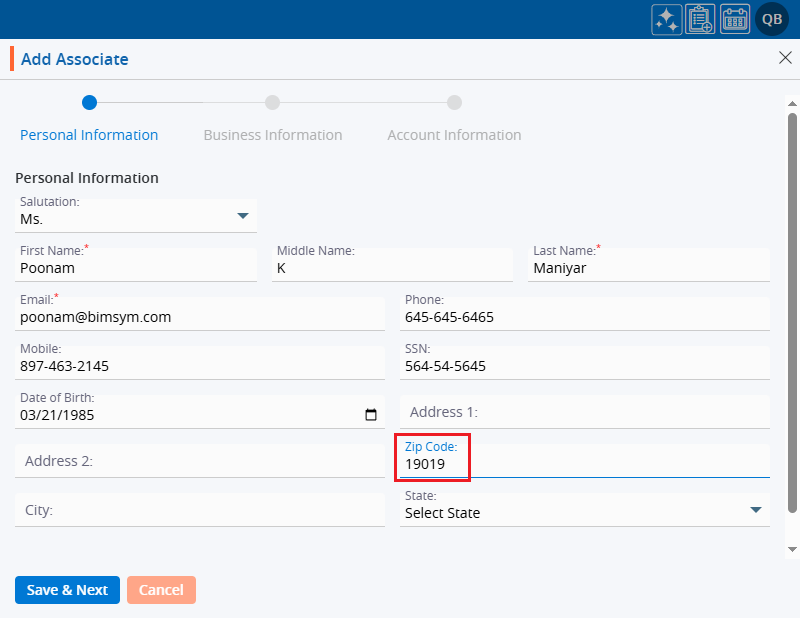
    10. Enter the ‘Zip code’. The system allows entering 5 digits only in this field.

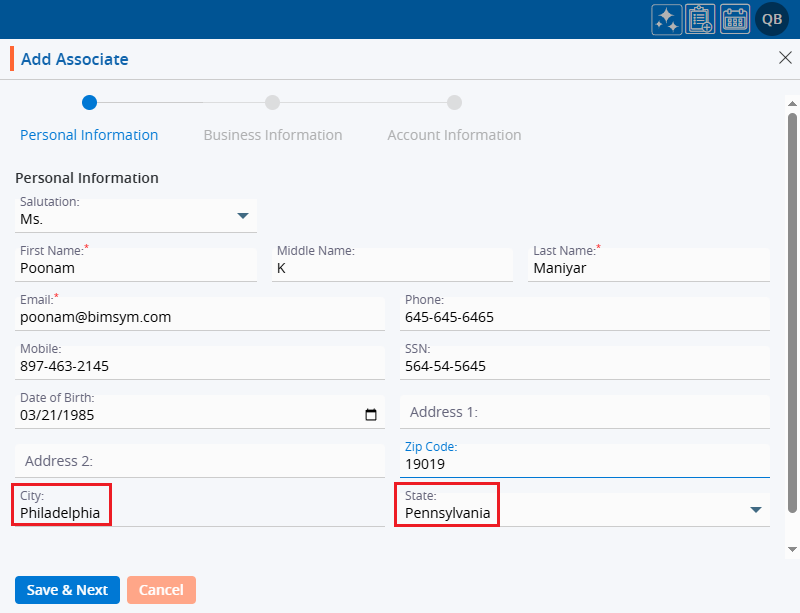
    11. After entering the Zip Code, the system will automatically retrieve the corresponding values for ‘City’ and ‘State’.

    12. Once all the details are filled in, click on the ‘Save & Next’ button.

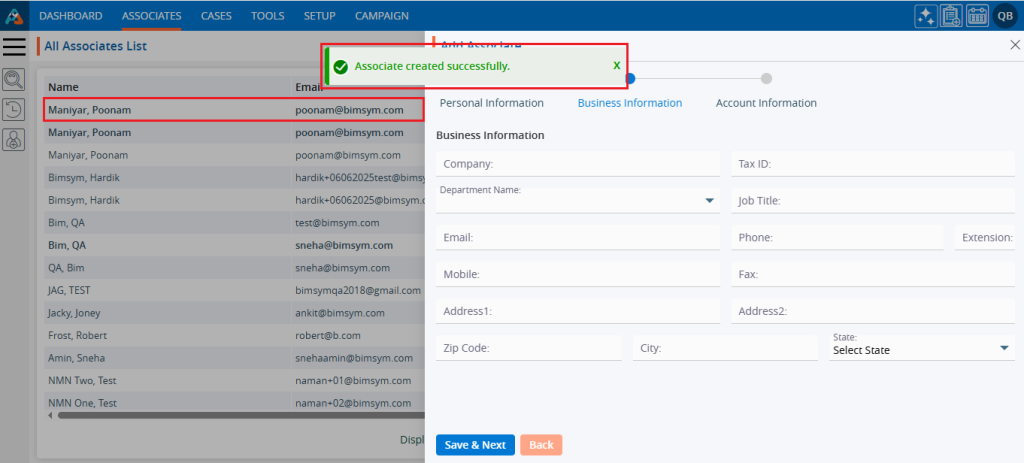
    13. The system will generate a confirmation message indicating the Associate was created successfully, and the newly created Associate will appear at the top of the ‘All Associate List’.

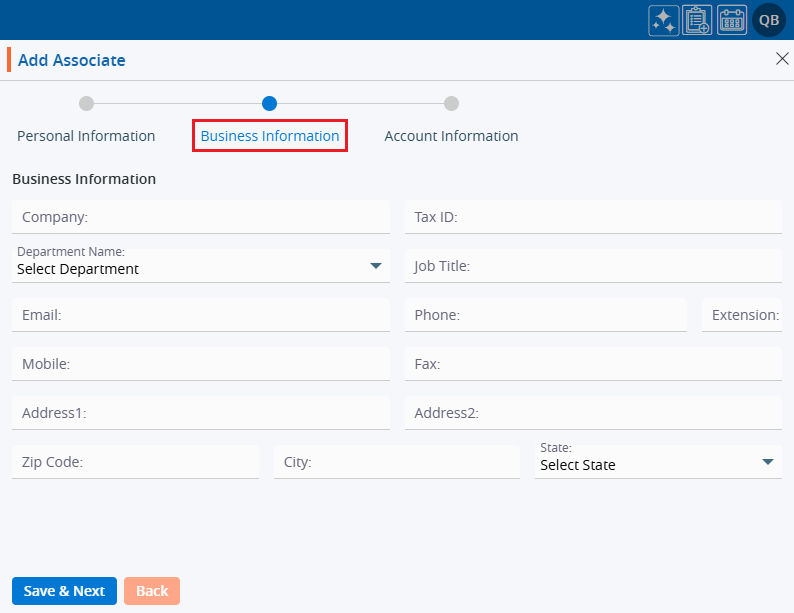
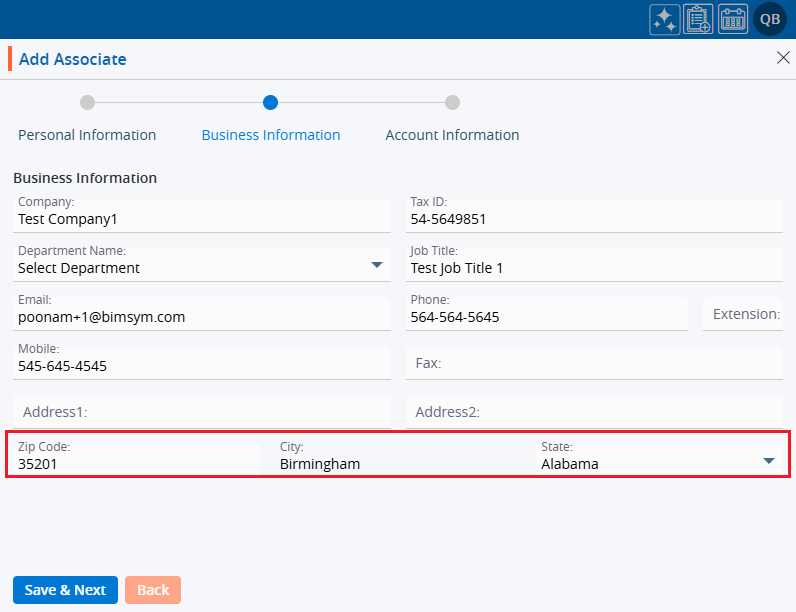
    14. After completing the Personal Information form, the ‘Business Information’ form will open.
    15. Users must fill in the mandatory fields marked with an asterisk (*).

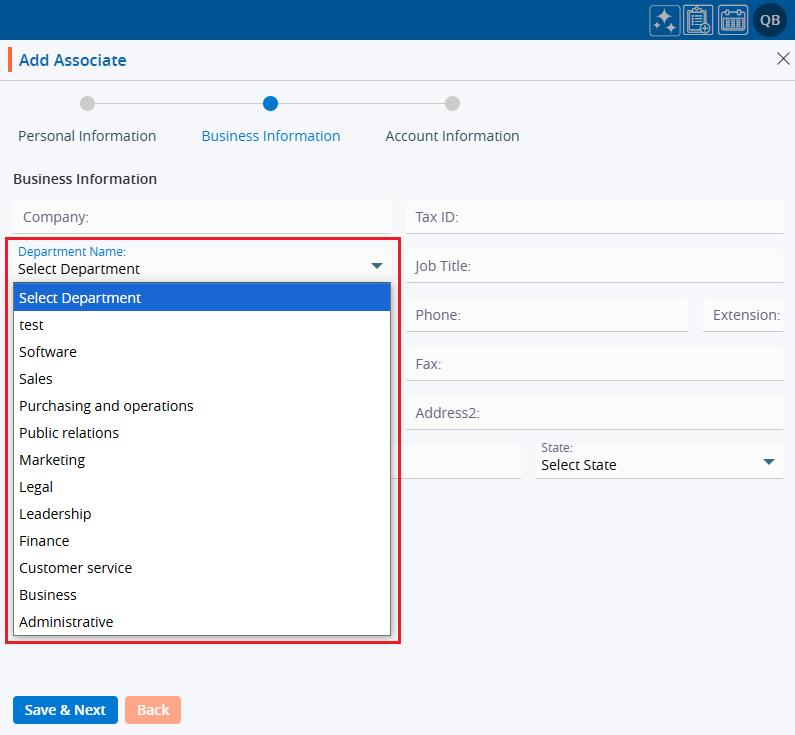
    16. The ‘Department’ field provides a dropdown menu for selecting a value.

    17. Enter the ‘Zip code’, and the system will automatically fetch the corresponding values for ‘City’ and ‘State’.

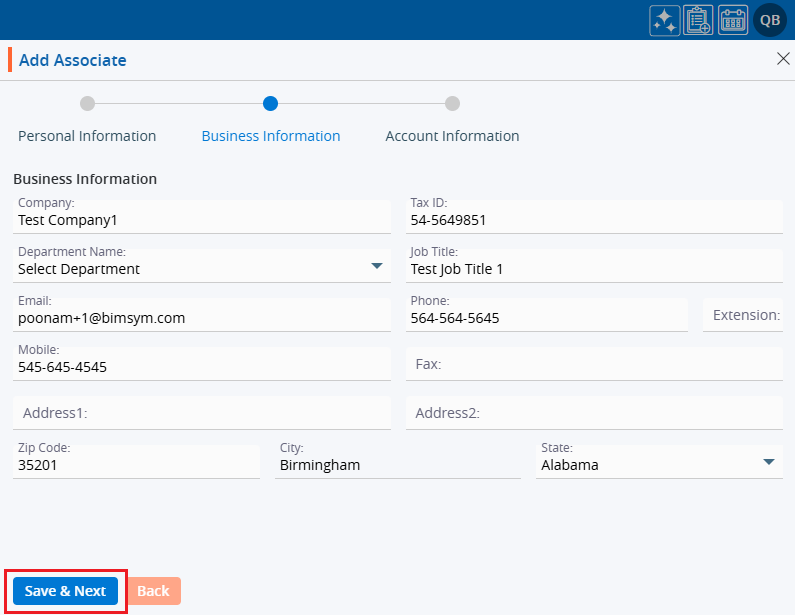
    18. Once all the details are filled in, click on the ‘Save & Next’ button.

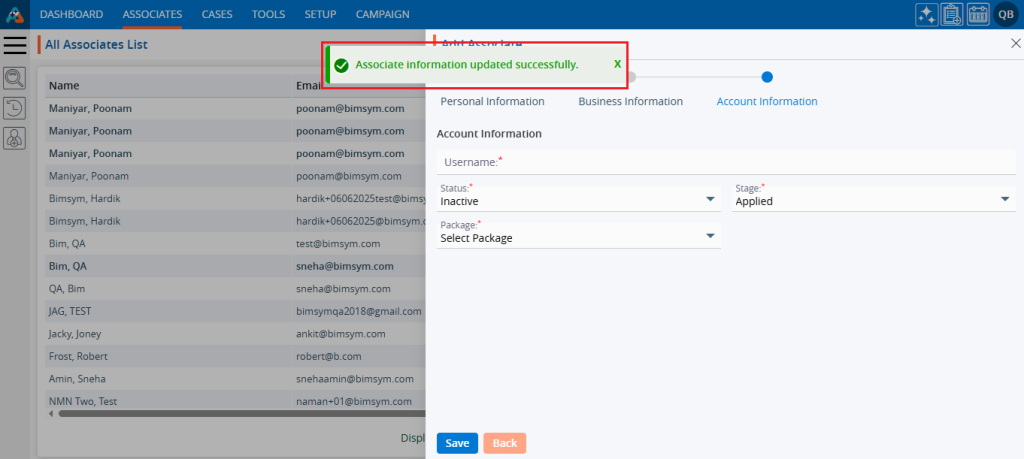
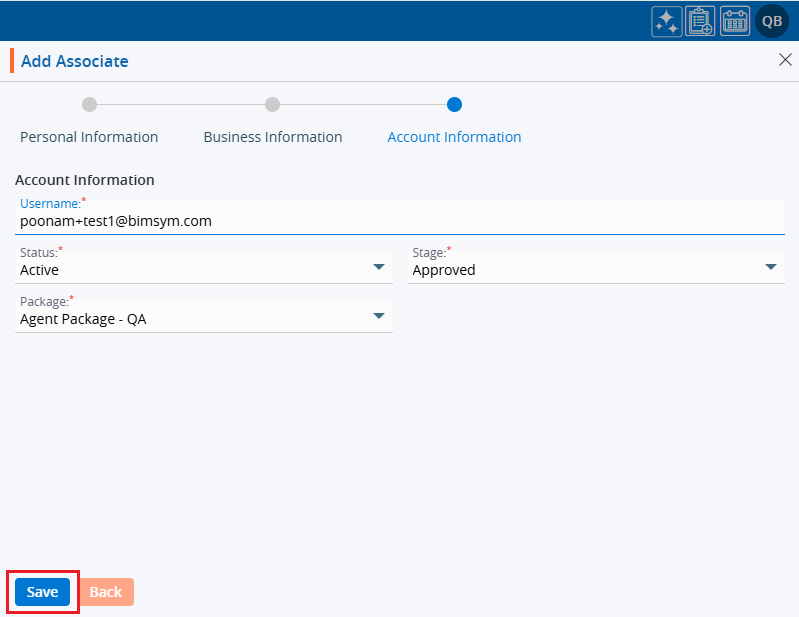
    19. The system will generate a confirmation message for “Associate Information updated successfully,” and the information will be shown in the Associate Information section. Following this, the ‘Account Information’ form will open next.

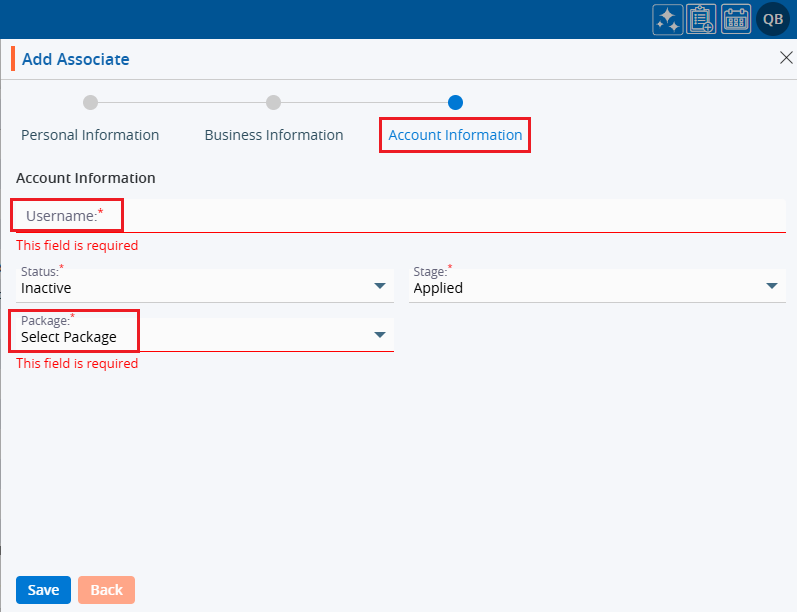
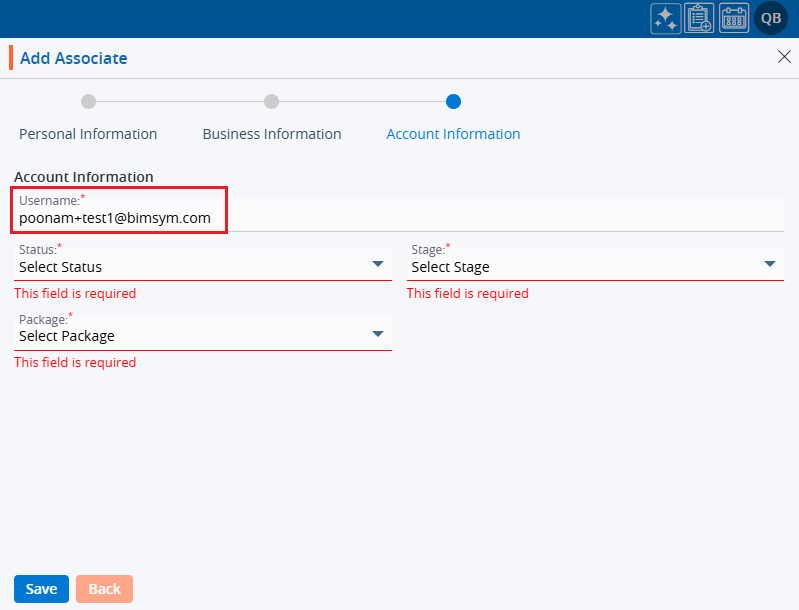
    20. Users must enter the mandatory fields marked with an asterisk (*).

    21. The Username must be in the format of an email address.

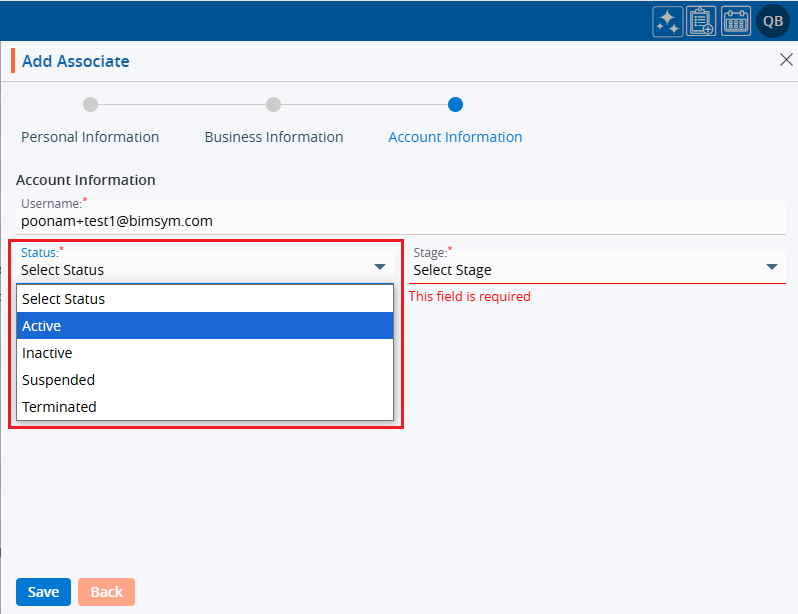
    22. The ‘Status’ field provides a dropdown menu for selecting the status of the Associate.

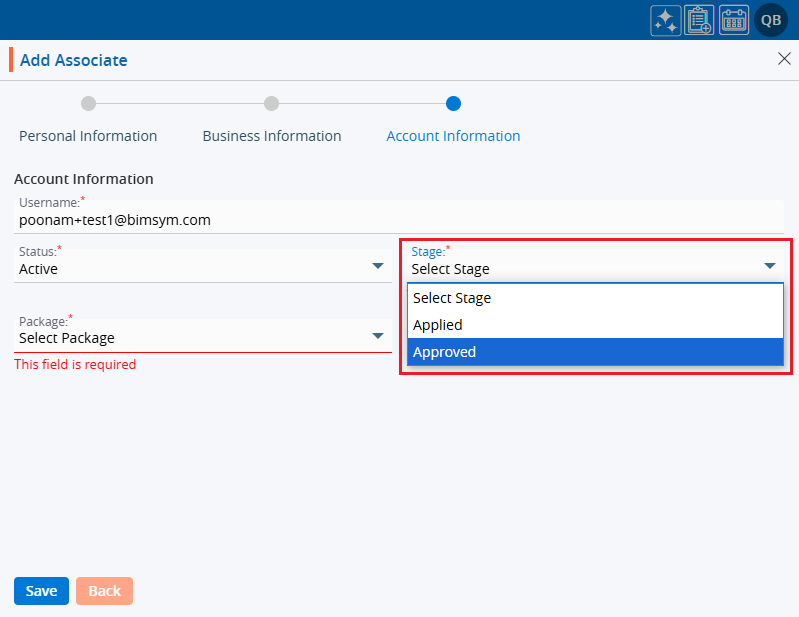
    23. The ‘Stage’ field offers a dropdown menu to select the stage of the Associate.

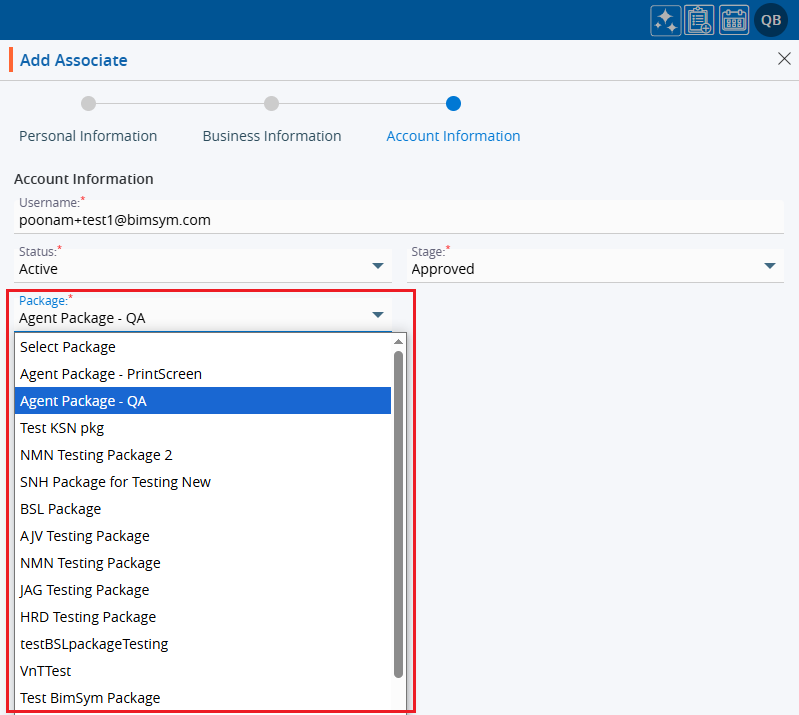
    24. Select the ‘Package’ of the Associate from the dropdown options.

    25. Once all the details are filled in, click on the ‘Save’ button.

    26. The system will generate a confirmation message for Associate Information updated successfully, and the Associate will be shown at the top of the ‘All Associate list’.

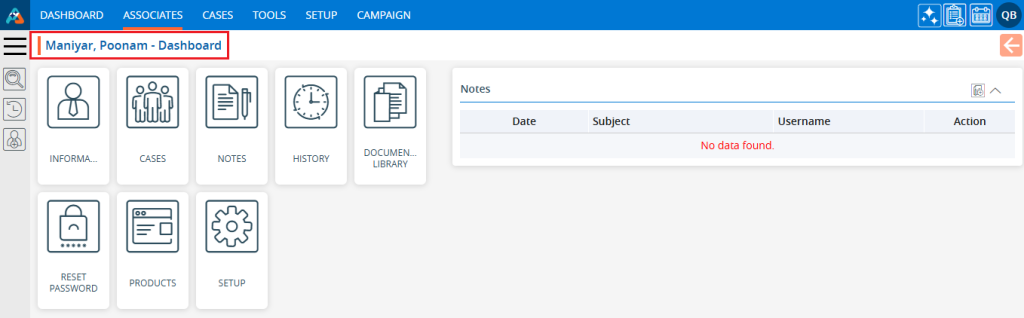
    27. Click on the newly created Associate.

    28. The associate ‘Dashboard’ will open as below.

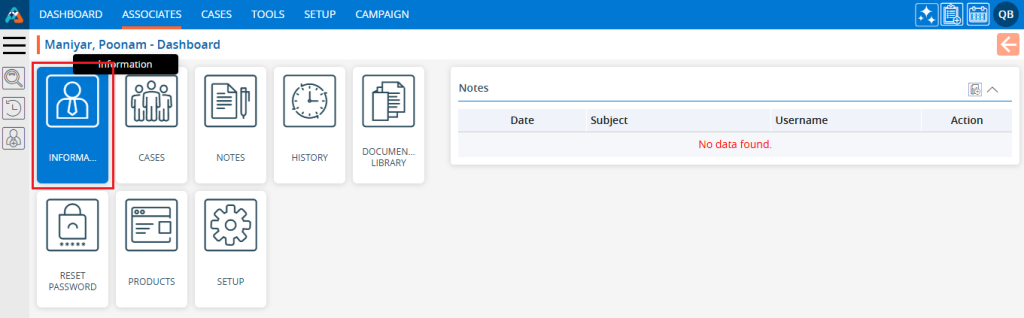
    29. Click on the ‘INFORMATION’ tab.

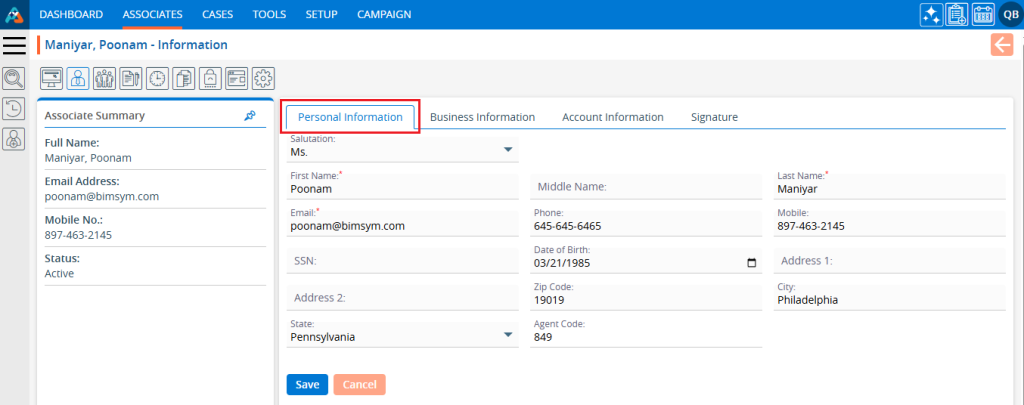
    30. The system will display the Personal Information in the ‘Personal’ tab which the user added at the time of creating the associate.

    31. Click on the ‘Business Information’ tab, and the system will display the Business Information details in the Business Information tab.

    32. Click on the ‘Account Information’ tab, and the system will display Account Information details in the Account Information tab.

    0
    0

    Recent Associates

    The Recent Associates icon in the left menu displays the five most recently viewed associates for easy access.

    The following are the steps to view the Recent Associates:
    1. Navigate to the ‘ASSOCIATES’ tab where you will find the ‘All Associates List’ displayed.

    2. Click on the ‘Recent Associates’ icon in the left-side panel. The five most recently viewed associates by the user will be listed here.

    3. Click on any associate from the All Associates List (other than those listed in the Recent Associates list).

    4. The selected associate’s information will open.

    5. Now, click on the ‘ASSOCIATES’ tab to return to the full list of associates.

    6. Click on the ‘Recent Associates’ again. The ‘Recent Associates’ list has been updated.

    0
    0

    Associate Left Search

    Left Search – The Search Feature allows users to find specific associates by applying chosen criteria, utilizing the available fields within the system.

    The following are the steps to search for data:
    1. Navigate to the ‘ASSOCIATES’ tab, where you’ll find the ‘All Associates List’.

    2. Click on the ‘Search’ option from the left panel.

    3. Upon clicking on Search, a popup will open with the following options:
    a. Search Criteria
    b. Select Field Name
    c. Search Value

    4. Click on the Search Criteria, and the following options will be displayed:
    a. Starts with
    b. Ends with
    c. Equals
    d. Like
    e. Not equal

    5. Select a search option. For example, we have chosen the ‘Equals’ option.

    6. Click on ‘Select Field Name’, and fields related to the associates will be displayed.

    7. Type the name of the field in the search box, and matching fields will be displayed. For example, we have entered the word ‘State’.
    8. It will display the list of available fields containing the entered word.

    9. Select the field to search.

    10. Go to the ‘Search Value’ field.

    11. Enter the desired value in the ‘Search Value’ field. For example, enter ‘Alabama’ as the search value and click ‘Go’.

    12. The search results will be displayed. Here, the search result is displaying the list of associates available with the ‘Alabama’ state.

    0
    0

    Enhance Report

    An enhanced report in CRM for its own data refers to a report generated using the data stored within the CRM system, which is enriched with advanced features like custom filters, segmentation, and data visualizations. This type of report provides deeper insights into customer interactions, sales trends, and other CRM-specific metrics, helping businesses make informed decisions and optimize customer relationship strategies.

    Create Enhance Report:

    1. Sign in to AgentFront CRM.
    2. From the top menu, choose Tools.
    3. Tools > Template Creator > Email setup page will open by default.
    4. In the left-side panel, select Reports > Enhance Report.
    5. The Enhance Report page opens with a list of existing Reports.
    6. There is an Add button above the Action Column on the top right side of the page to add new report.
    7. There are options to View (), Edit () and Delete () the existing Report under the Action column.

    Add New Report

    1. Click on Add button to create new Report.
    2. A new page titled ‘Life – Add Enhance Report‘ will open, featuring the ‘Enhance Report’ tab with five steps to complete the process for creating report.
      • Add Report
      • Display Fields
      • Set Criteria
      • Group By
      • Order By
      • Add Report
        1. To add Report, enter the following details:
          • Name: Enter the clear, descriptive name. This is what users can identify the purpose of the report.
          • Availability: Choose option Private/Public. When choosing ‘Private’, only the logged-in user can access this report, while selecting ‘Public’ allows all users of the application to access it.
          • Description: Optional explanation of the report’s purpose.
          • Once all the details have been filled in and the selection is complete, click ‘Save & Next’ to proceed to the next step: Display Fields.
      • Display Fields
        1. On the same page next step is for Display Fields.
        2. There will be 2 sections on this page:
          • Available Columns: The fields will be listed in this section as available in the application, with counts considered as columns.
          • Selected Columns: The selected fields will be listed in this section with counts, and these fields will be displayed as column header in the report. Maximum of 25 fields can be selected.
        3. Click on the down arrow to reveal the fields for selection.
        4. Additionally, the user can search for field names based on their requirements, and the system will display the corresponding results.
        5. Select the fields from the ‘Available Columns’ section, and the selected fields will be displayed under the ‘Selected Columns’ section.
        6. The sequence of the field list can be re-arranged using the six-dot () icon.
        7. Hover over the Re-arrange () icon at the beginning of a field name.
        8. Click and drag the Re-arrange () icon to move up or down the fields to the desired position, then drop it to save the new order.
        9. Fields can be removed by clicking on the cross (X) icon, if not required.
        10. Once the selection and arrangement of fields are complete, click on ‘Save & Next’ to proceed to the next step: Set Criteria.
      • Set Criteria:
        1. On the same page next step is for Set Criteria.
          • Set Criteria for Report: Set the condition by defining the specific criteria the data must meet using the following fields:
            • Search Column: Select the field for which the criteria need to be applied.
            • Condition: Set the appropriate condition for the selected column field.
            • Enter Value: Enter or select the value according to the selected column.
          • Using plus sign () users can set multiple criteria simultaneously for a single report.
        2. Match All Filter Rules or Match Any Filter Rule: Select any one of the given options.
        3. Criteria can be removed by clicking on the cross () icon, if not required.
        4. Once all criteria are set, click ‘Save & Next’ to proceed to the next step: Group By.
      • Group By:
        1. On the same page next step is for ‘Group By’.
        2. Again, there will be 2 sections on this page:
          • Available Columns: The fields will be listed in this section as available in the application, with counts considered as columns.
          • Selected Columns: The selected fields will be listed in this section with counts, and the report will segregate the records based on the selected fields. A maximum of 5 fields can be selected to divide into groups.
        3. Click on the down arrow to reveal the fields for selection.
        4. Additionally, the user can search for field names based on their requirements, and the system will display the corresponding results.
        5. Select the fields from the ‘Available Columns’ section, and the selected fields will be displayed under the ‘Selected Columns’ section.
        6. The sequence of the field list can be re-arranged using the six-dot () icon.
        7. Hover over the Re-arrange () icon at the beginning of a field name.
        8. Click and drag the Re-arrange () icon to move up or down the fields to the desired position, then drop it to save the new order.
        9. Fields can be removed by clicking on the cross (X) icon, if not required.
        10. Once the selection and arrangement of fields are complete, click on ‘Save & Next’ to proceed to the next step: Order By.
      • Order By
        1. On the same page next step is for ‘Order By’.
        2. Again, there will be 2 sections on this page:
          • Available Columns: The fields will be listed in this section as available in the application, with counts considered as columns.
          • Selected Columns: The selected fields will be listed in this section with counts, and the records in the report will be sorted in ascending order based on the selected fields. A maximum of 5 fields can be selected for sorting.
        3. Click on the down arrow to reveal the fields for selection.
        4. Additionally, the user can search for field names based on their requirements, and the system will display the corresponding results.
        5. Select the fields from the ‘Available Columns’ section, and the selected fields will be displayed under the ‘Selected Columns’ section.
        6. The sequence of the field list can be re-arranged using the six-dot () icon.
        7. Hover over the Re-arrange () icon at the beginning of a field name.
        8. Click and drag the Re-arrange () icon to move up or down the fields to the desired position, then drop it to save the new order.
        9. Fields can be removed by clicking on the cross (X) icon, if not required.
        10. Sorting will be applied according to the sequence set in the ‘Selected Columns‘ section.
        11. Once the selection and arrangement of fields for the sorting process are complete, click on ‘Save Changes’.
        12. Created report will now be listed and can be viewed according to the set criteria.

    View Report

    1. Click on View () icon from the Action Column for the report you want to view.
    2. Clicking on View () icon, new page will open and will display the records according to the set criteria.
      • Notes:
        1. When you view the report, you will see only the first 500 records. However, when you export the report, you will see all the records in the CSV file.
        2. Once you export, the field(s) selected in the ‘Group by’ will be displayed as a new column at the end of the file.
    3. Additionally, there will be a print () and export () feature available to print or download the report’s data.

    Update Report Criteria

    1. To update the existing report criteria from the available list, click on Edit () icon from the Action Column for the report you want to edit/change.
    2. The report window will open with the existing criteria, allowing the user to modify the report criteria and options.
    3. The user can make changes at any step as needed.

    Delete Report

    1. To delete the existing report from the available list, click on Delete () icon from the Action Column for the report you want to delete.
    2. It will ask for confirmation popup, click on Deleted button to delete report otherwise click on Close button.
    3. Multiple reports can be deleted simultaneously.
    4. Select the reports by checking the checkboxes before the report names, and then click the ‘Delete’ button at the bottom of the page.
      Note: The delete button will be enabled only after selecting at least one report using the checkbox.
    0
    0

    Manage Subscriptions > WhatsApp

    The ‘Manage Subscription for WhatsApp’ option allows users to control their WhatsApp message preferences, including subscribing or unsubscribing from notifications. This functionality is primarily used to manage phone numbers on the unsubscribe list, ensuring that users no longer receive unwanted WhatsApp messages.

    The following are the steps to manage WhatsApp Subscriptions:

    1. Navigate to the ‘TOOLS’ tab. Click on Manage Subscriptions from the left side panel.

    2. The user will be directed to the ‘Manage Subscription’ page, which includes three tabs: Email, SMS, and WhatsApp.

    3. Click on the ‘WhatsApp’ tab.

    4. The WhatsApp – Manage Subscription page will open, displaying a list of existing WhatsApp Subscriptions, including the From Number, To Number, Status, Type, Status Date, Created By, and Action fields.
    5. There are four options for each subscription:
    a. View
    b. Edit
    c. History
    d. Delete

    6. Click on the ‘Add WhatsApp unsubscribe’ icon in the top-right corner to add a new phone number to the WhatsApp unsubscribe list.

    7. A pop-up window will open with fields for From, To, To Number, Unsubscribe and Description and Save and Cancel buttons at the bottom.
    8. Fields marked with an asterisk (*) are mandatory.
    9. The user can enter up to 500 characters in the Description field.

    10. Fill in the fields and click on the ‘Save’ button to add the phone number to the WhatsApp subscriptions list.

    11. A confirmation message will appear and the user will see the phone number and its details in the list.

    12. To find specific subscription details, use the ‘Search’ functionality. Click on the second-to-last icon in the top-right corner.

    13. By clicking on the search icon, it will expand. Enter the keyword and click on the search icon again. For example, search for ‘9858645859,’ which is a phone number.

    • The User can use From Number, To Number, Status, and Type as keywords.
    • A minimum of 3 characters are needed to search.

    14. The search result will display. To restore the page to its original view, click the ‘Cancel’ button.

    15. The page will return to its default state.

    16. Click on the ‘View’ icon, the first option in the Action column on the right side of the Subscription List, highlighted by a red box, to view the details of unsubscribed phone number in the WhatsApp subscription list.

    17. A pop-up window will open where all the fields are read-only, and the user can view them without making any changes. After viewing the details, click the ‘Cancel’ button to close the pop-up.

    18. Click on the ‘Edit’ icon, the second option in the Action column on the right side of the Subscription List, highlighted by a red box, to modify the details of the unsubscribed WhatsApp phone number.

    19. A pop-up window will open, allowing the user to update the status or Description of the unsubscribed WhatsApp.

    20. Update the details to modify the subscription. For example, we updated the status from ‘Unsubscribe’ to ‘Subscribe’. After making the changes, click on the ‘Save’ button.

    21. A confirmation message will appear indicating that the subscription has been updated, and the phone no. has been removed from the unsubscribed list.

    22. Click on the ‘History’ icon, the third option in the Action column on the right side of the Subscription List, highlighted by a red box, to view the history of the subscription.

    23. A new page will open displaying the history of the Unsubscribe List.  Click the drop-down on the right side of the Unsubscribe List, highlighted by a red box, to view the detailed history.

    24. The detailed history will be displayed. Click the back button on the right side at the top, highlighted by a red box, to return to the Manage Subscription page.

    25. Click the ‘Delete’ icon, the last option in the Action column on the right side of the Subscription List, highlighted by a red box, to remove the subscription from the list if it is no longer needed.

    26. Click the ‘Delete’ option in the confirmation message to proceed with removing the subscription from the list.

    27. A confirmation message will appear, indicating that the subscription has been deleted and is no longer available on the list.

    0
    0

    Manage Subscriptions > SMS

    The ‘Manage Subscription for SMS’ option allows users to control their SMS preferences, including subscribing or unsubscribing from SMS notifications. This functionality is primarily used to manage phone numbers on the unsubscribe list, ensuring that users no longer receive unwanted SMS messages.

    The following are the steps to manage the SMS Subscriptions:
    1. Navigate to the ‘TOOLS’ tab. Click on ‘Manage Subscriptions’ from the left side panel.

    2. The user will be directed to the ‘Tools – Manage Subscription’ page, which includes three tabs: Email, SMS, and WhatsApp.

    3. Click on the ‘SMS’ tab.

    4. The ‘SMS – Manage Subscription’ page will open, displaying a list of existing SMS Subscriptions. The list includes the following fields: From Number, To Number, Status, Type, Status Date, Created By, and Action.
    5. There are four options for each subscription:
    a. View
    b. Edit
    c. History
    d. Delete

    6. Click on the ‘Add SMS Unsubscribe’ icon in the top-right corner to add a new phone number to the SMS unsubscribe list.

    7. A pop-up window will open with fields for From, To, To Number, Unsubscribe and Description and Save and Cancel buttons at the bottom.
    8. Fields marked with an asterisk (*) are mandatory.
    9. The user can enter up to 500 characters in the Description field.

    10. Fill in the fields and click on the ‘Save’ button to add the phone number to the SMS unsubscribe list.

    11. A confirmation message will appear once the phone number is successfully added to the SMS unsubscribe list, and the user will see the phone number and its details in the list.

    12. To find specific subscription details, use the ‘Search’ functionality. Click on the second-to-last icon in the top-right corner.

    13. Click the search icon to expand the search field. Enter the keyword and click the search icon again. For example, search for ‘9858645859,’ which is a phone number.
    • The User can use From Number, To Number, Status and Type as keywords.
    • A minimum of 3 characters are needed to search.

    14. The search results will be displayed. To restore the page to its original view, click the ‘Cancel’ button.

    15. The page will return to its default state.

    16. Click on the ‘View’ icon, the first option in the Action column on the right side of the Subscription List, highlighted by a red box, to view the details of the unsubscribed phone number in the SMS subscription list.

    17. A pop-up window will open where the fields are read-only, and the user can not make any changes. After viewing the details, click the ‘Cancel’ button to close the pop-up.

    18. Click on the ‘Edit’ icon, the second option in the Action column on the right side of the Subscription List, highlighted by a red box, to modify the details of the unsubscribed phone number.

    19. A pop-up window will open.

    20. Update user is able to update the status or Description of the unsubscribed SMS. For example, we updated the status from ‘Unsubscribe’ to ‘Subscribe’. After making the changes, click the ‘Save’ button.

    21. A confirmation message will appear and the phone number has been removed from the unsubscribed list.

    22. Click on the ‘History’ icon, the third option in the Action column on the right side of the Subscription List, highlighted by a red box, to view the subscription history.

    23. A new page will open displaying the history of the Unsubscribe List. Click the drop-down on the right side of the Unsubscribe List, highlighted by a red box, to view detailed history.

    24. The detailed history will display fields such as No., Field Name, Old Value, and New Value. Click the back button on the right side at the top, highlighted by a red box, to return to the Manage Subscription page.

    25. Click the ‘Delete’ icon, the last option in the Action column on the right side of the Subscription List, highlighted by a red box, to remove the subscription from the list if it is no longer needed.

    26. Click the ‘Delete’ option in the confirmation message to proceed with removing the subscription from the list.

    27. A confirmation message will appear, and the subscription is no longer available on the list.

    0
    0

    Manage Subscriptions > Email

    The ‘Manage Subscription for Email’ option allows users to control their email preferences, including subscribing to or unsubscribing from email notifications. This functionality is primarily used to manage email addresses on the unsubscribe list, ensuring that users no longer receive unwanted emails from the selected categories.

    The following are the steps to manage the Email Subscriptions:
    1. Navigate to the ‘TOOLS’ tab. Click on ‘Manage Subscriptions’ from the left side panel.

    2. The user will be directed to the ‘Manage Subscriptions’ page, which includes three tabs: Email, SMS, and WhatsApp.

    3. By default, the Manage Subscriptions page will open with the Email tab selected, displaying a list of existing Email Subscriptions, along with columns: Email, Email Category, Status, Type, Status Date, Created By, and Action.
    4. There are four options in ‘Action’ for each subscription:
    a. View
    b. Edit
    c. History
    d. Delete

    5. Click on the ‘Add Email Unsubscribe’ icon in the top-right corner to add a new email address to the subscription list.

    6. A pop-up window will open with fields for Email, Unsubscribe, Description, Email Category, and options Save and Cancel at the bottom.
    7. Fields marked with an asterisk (*) are mandatory.
    8. The user can enter up to 500 characters in the Description field.

    9. Fill in the fields and click the ‘Save’ button to add the required email to the unsubscribe list.

    10. A confirmation message will appear and the newly added email address and its details will appear in the list.

    11. The user can find the subscription using the search functionality. Click on the second-to-last icon in the top-right corner.

    12. Click the search icon to expand the search field. Enter the keyword and click the search icon again. For example, we are searching for the word ‘poonam’, which is in the email address.
    • The user can use Email Address, Email Category, Status, and Type as keywords.
    • A minimum of 3 characters is required to perform a search.

    13. The search results will be displayed. Click the ‘Cancel’ button to restore the page to its original view.

    14. The page will return to its default state.

    15. Click on the ‘View’ icon, in the first option in the Action column on the right side of the Subscription List, highlighted by a red box, to view the details of the unsubscribed email addresses.

    16. A pop-up window will appear where all the fields are read-only, and the user can view them without making any changes. After viewing the details, click the ‘Cancel’ button to close the pop-up.

    17. Click on the ‘Edit’ icon, the second option in the Action column on the right side of the Subscription List, highlighted by a red box, to modify the unsubscribed details.

    18. A pop-up window will open, allowing the user to update the status or Description of the unsubscribed email.

    19. Update the details as needed. For example, we updated the status from ‘Unsubscribe’ to ‘Subscribe’. After making the changes, click the ‘Save’ button.

    20. A confirmation message will appear and the email has been removed from the unsubscribed list.

    21. Click on the ‘History’ icon, the third option in the Action column on the right side of the Subscription List, highlighted by a red box, to view the history of the subscription.

    22. A new page will open with the history of the Unsubscribe List, showing the Updated By, Updated Date, IP Address, and Updated Count. Click the drop-down on the right side of the Unsubscribe List, highlighted by a red box, to view the detailed history.

    23. The detailed history will display fields such as No., Field Name, Old Value, and New Value. Click the back button on the right side at the top, highlighted by a red box, to return to the Manage Subscription page.

    24. Click the ‘Delete’ icon, the last option in the Action column on the right side of the Subscription List, highlighted by a red box, to remove the subscription from the list if it is no longer needed.

    25. Click the ‘Delete’ option in the confirmation message to proceed with removing the subscription from the list.

    26. A confirmation message will appear and the subscription is no longer available on the list.

    0
    0

    System Setup > Status Flag

    A Status Flag is a marker or indicator used to track the current state or condition of a record, such as contact, lead, or member. It typically helps categorize or highlight specific statuses, allowing users to quickly identify and manage records based on their status.

    Setup Status Flag

    1. Sign in to AgentFront CRM.
    2. From the top menu, choose Setup.
    3. In the left-side panel, select System Setup.
    4. Under System Setup, click Status Flag.
      • Note: The user can also access this page by typing Status Flag in the Enter Text to Search bar.
    5. The Status Flag page opens with a list of existing Status Flags.
    6. There is an Add button above the Action Column on the right panel to add new Status Flag.
    7. There are options to View (), Edit () andDelete () the existingStatus Flag under the Action column.
      Note: If any Status Flag is used or implemented, the deleting options will not be available for that Status Flag, meaning it cannot be deleted.
    8. Also, users can Rearrange () Status Flag according to their requirements.

    Add new Status Flag:

    1. Click the Add button to add new Status Flag.
    2. The Add Status Flag window will open, allowing the user to enter the required details to create a new Status Flag.
      • Initial Status Flag: Select this checkbox to keep the Status Flag at the top of the list.
      • Add Status Flag After: The user can choose an existing Status Flag from the drop-down menu, and the new Status Flag will be added immediately after the selected status flag, allowing it to be placed in the desired order.
      • Name: Enter the clear, descriptive name. This is what users will see under the Cases tab.
      • Description: Optional explanation of the Status Flag’s description.
    3. Click Save button. The Status Flag is now listed and ready to use.

    View Status Flag:

    1. Click View () icon from the Action Column for the Status Flag you want to view details of Status Flag, new page will open with all details of Status Flag.

    View Status Flag in Cases tab:

    1. Navigate to the Cases tab from the top menu.
    2. Cases List – All Cases page will open by default.
    3. Open any case from all cases lists.
    4. The dashboard for the selected case will open by default.
    5. Click the ‘Quick Profile’ tab from the dashboard.
    6. Navigate to the ‘Life’ tab below the ‘Beneficiary’ section to view the drop-down of available Status Flags.

    Update Status Flag:

    1. To update the existing Status Flag from the available list, Click on Edit () icon from Action Column for the Status Flag you want to edit/change.
    2. Clicking Edit () icon will open the selected Status Flag in edit mode with title Edit Status Flag. Update the required details and click Save.

    Delete Status Flag:

    1. To delete the existing Status Flag from the available list, click on Delete () icon from the Action Column for the Status Flag you want to delete.
      Note: If any Status Flag is used or implemented, the deleting options will not be available for that Status Flag, meaning it cannot be deleted.
    2. It will ask for confirmation popup, click on Deleted button to delete Status Flag otherwise click on Close button.

    Re-arrange Status Flag:

    1. Status Flags can be rearranged () to set their priority in the search results.
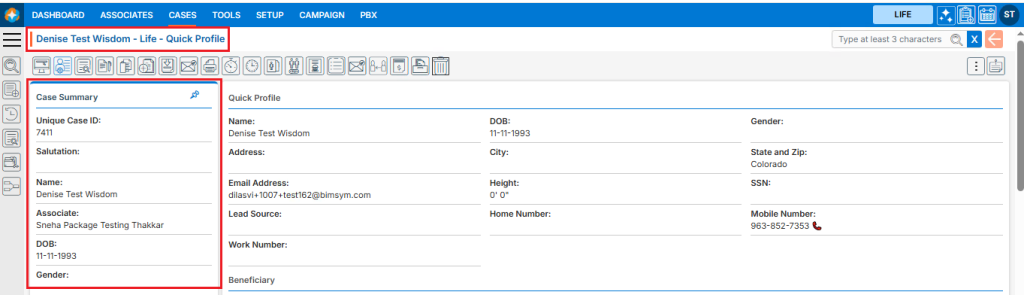
    2. Hover over the Re-arrange () icon at the beginning of a Status Flag.
    3. Click and drag the Re-arrange () icon to move up or down the Status Flag to the desired position, then drop it to save the new order.
    0
    0

    Merge Profile

    Merge Profile – Merging profiles combines multiple records related to a case, which may exist in the same or different products, into a single consolidated profile.
    The following are the steps to merge one or more than one profiles:
    1. Navigate to the ‘CASES’ tab where you’ll find the Cases List – All Cases.
    2. Click on a case to proceed.

    3. The member’s ‘Dashboard’ will open. Click on ‘MERGE PROFILE’.

    4. The Merge Profile page will open, displaying two lists. If a profile has been merged with an open case, it will appear in either the ‘To’ or ‘From’ list:
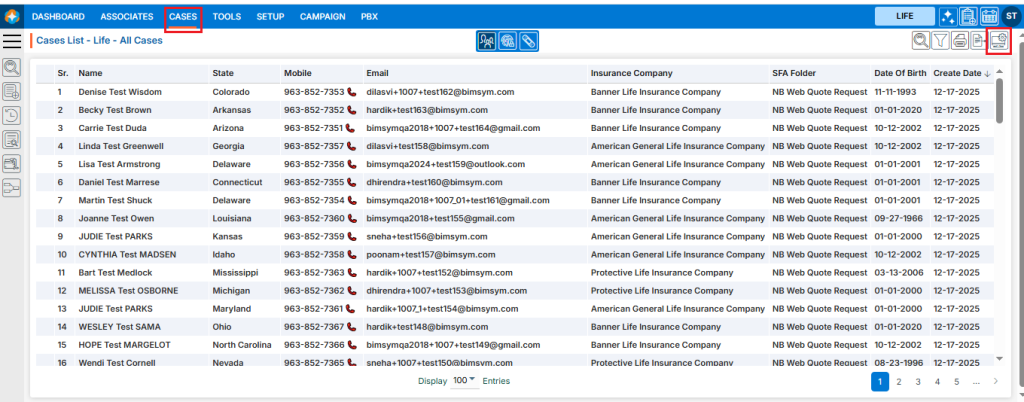
    a. Merge Profile To: This list shows the case that received the merged profile.
    b. Merge Profile From: This list shows the case from which the profile was merged.

    5. To proceed with merging the profile, click on the search option.

    6. The Search Profile page will open, presenting five search options. The user must enter at least one field value, and the user can add multiple field values with exact matches:
    a. First Name
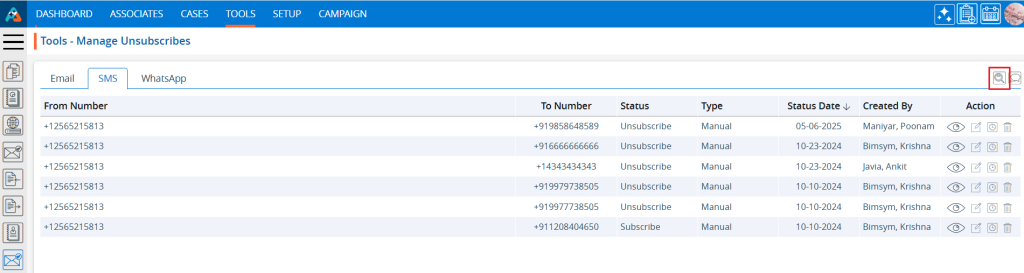
    b. Last Name
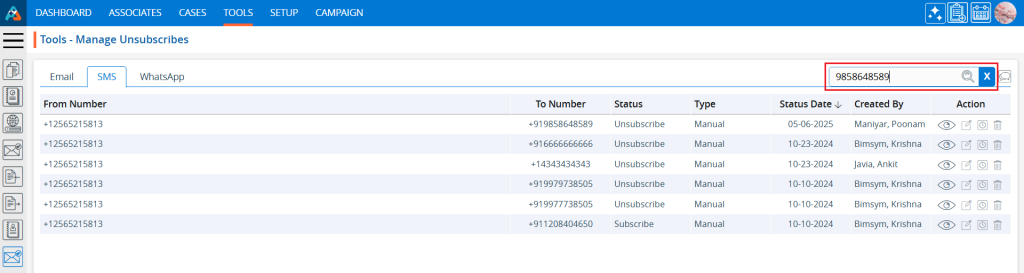
    c. Email
    d. Home Phone
    e. Zip Code

    7. For example, we are searching using the email field. Enter the email field value with an exact match, then click the ‘Search’ button.

    8. The search results will be displayed on the page, showing all available cases that contain the searched email address.

    9. The user can merge a single or multiple cases into the open profile.
    10. Select the case to merge the profile by checking the checkbox, then click the ‘Merge’ option.
    a. The user can select multiple cases to merge into the profile of a different product.
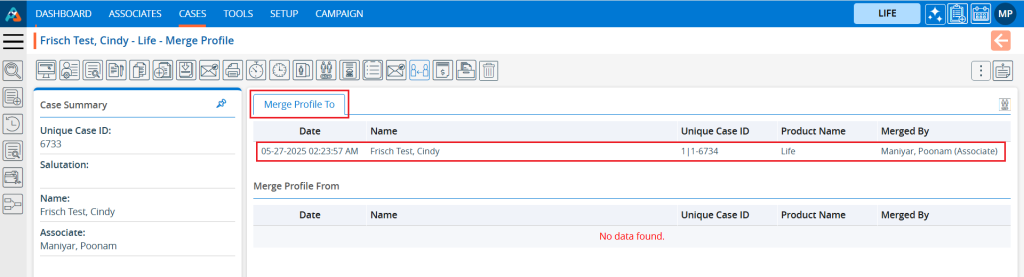
    11. The system will display the selected case(s) and prompt for confirmation to ‘Merge’ the profile.
    12. Click on ‘Merge’ to proceed.

    13. The profile will be successfully merged, and the system will display a confirmation message. The merged profile will appear in the ‘From’ list.

    14. For the merged profile, the case that was opened for the merge will be displayed in the ‘To’ list.

    15. After the merger, the system will update the profile name and basic information of the selected profile.

    • Example: Here we are merging profiles by selecting multiple cases.

    16. Open the Merge Profile page for the case, enter the email field value with an exact match, and then click the ‘Search’ button’.

    17. The search results will display showing all available cases containing the searched email address.

    18. Select the cases to merge the profile by checking the checkbox, then click the ‘Merge’ option.

    19. The system will display the selected case(s) and prompt for confirmation to ‘Merge’ the profile. Click on ‘Merge’ to proceed.

    20. The profile will be successfully merged, and the system will generate a confirmation message. The merged profiles will be displayed in the ‘From’ list for all products and profiles selected for the merge.

    21. For the merged profiles, the case that was opened for the merge will be displayed in the ‘To’ list for all products and profiles selected for merging.

    22. After the merge, the system will update the profile name and basic information of the selected profile for all products and profiles involved in the merge.

    Life Product:

    ID Theft Product:

    0
    0