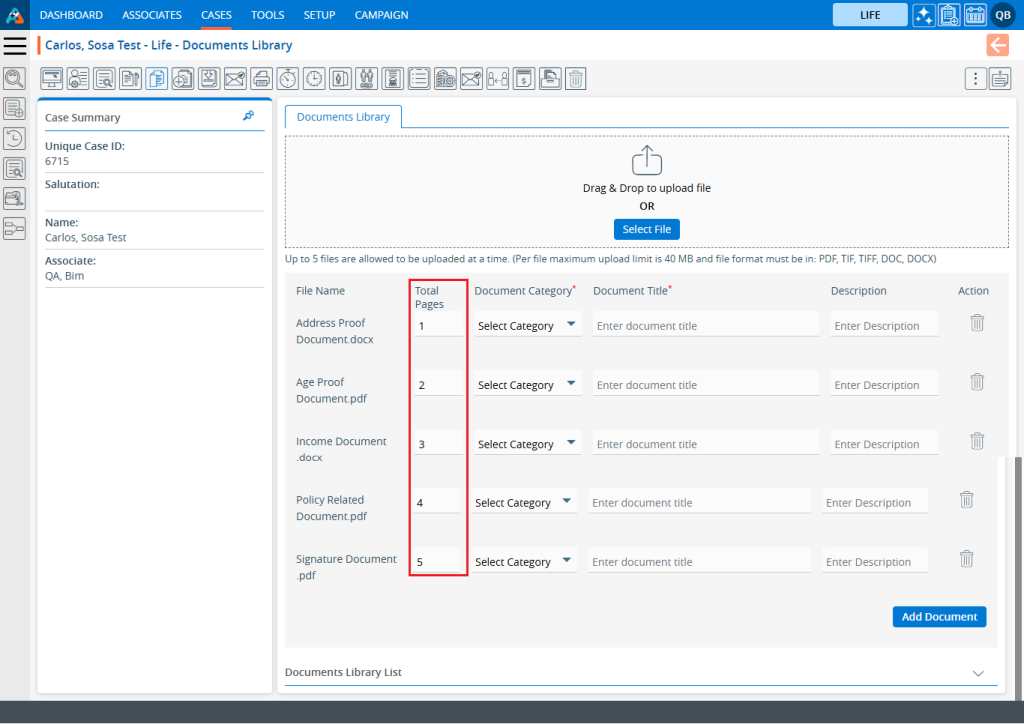
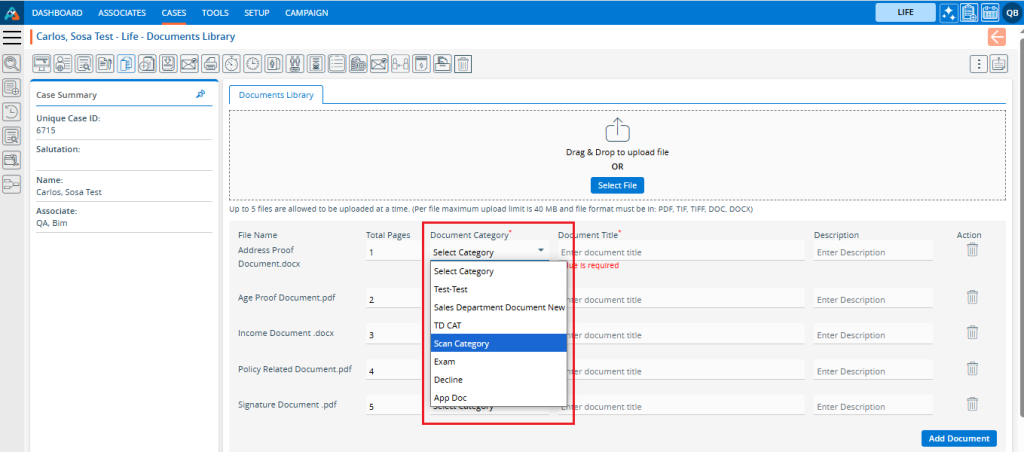
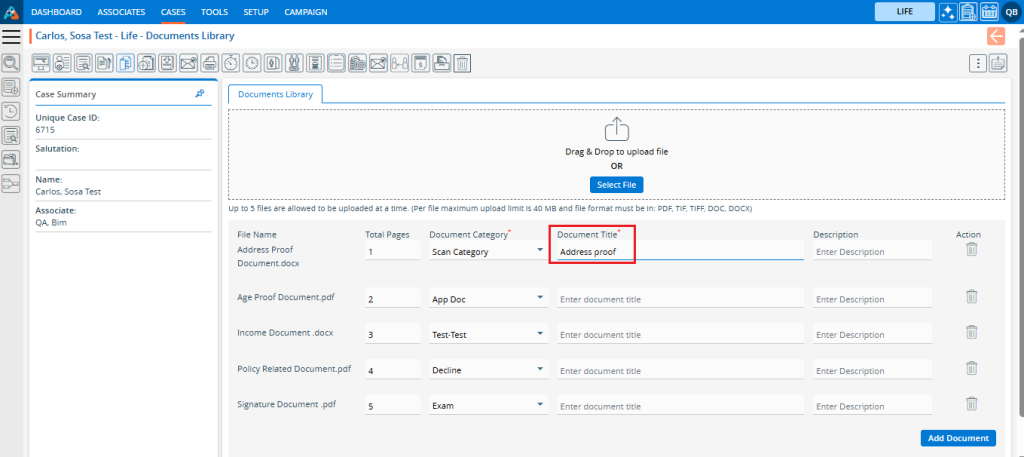
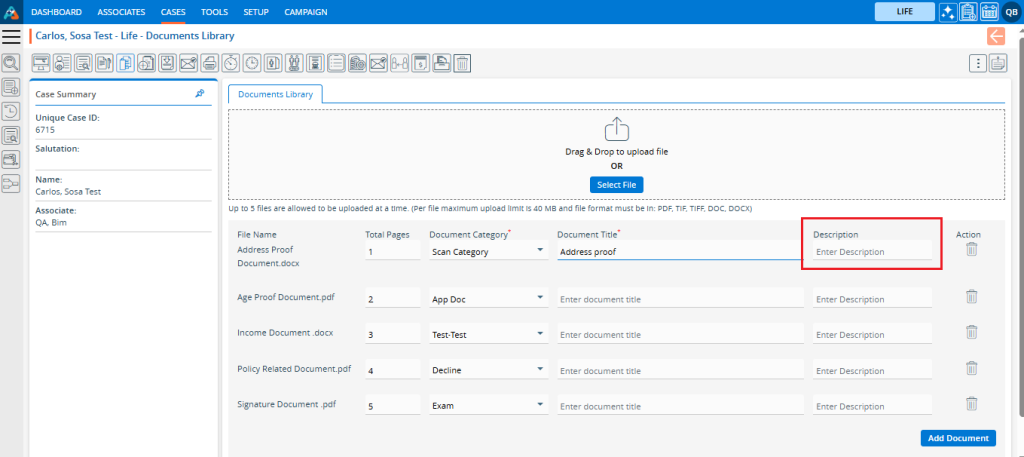
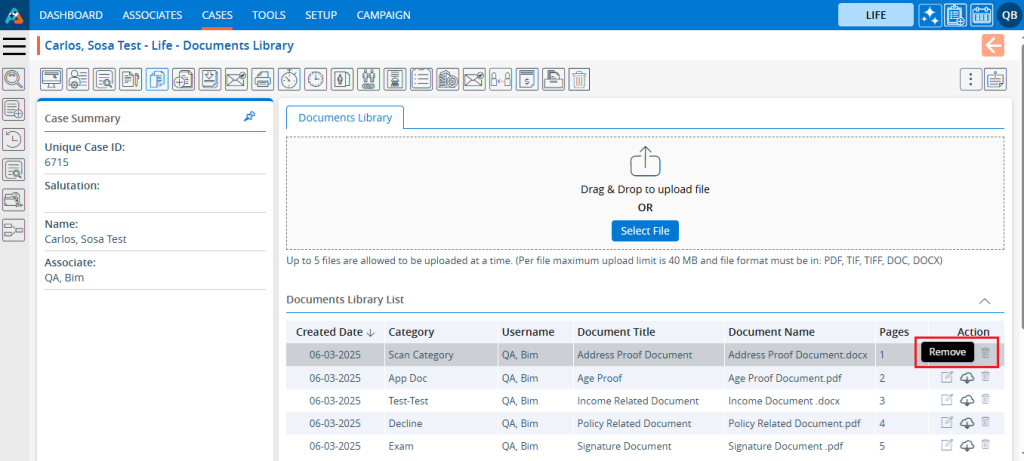
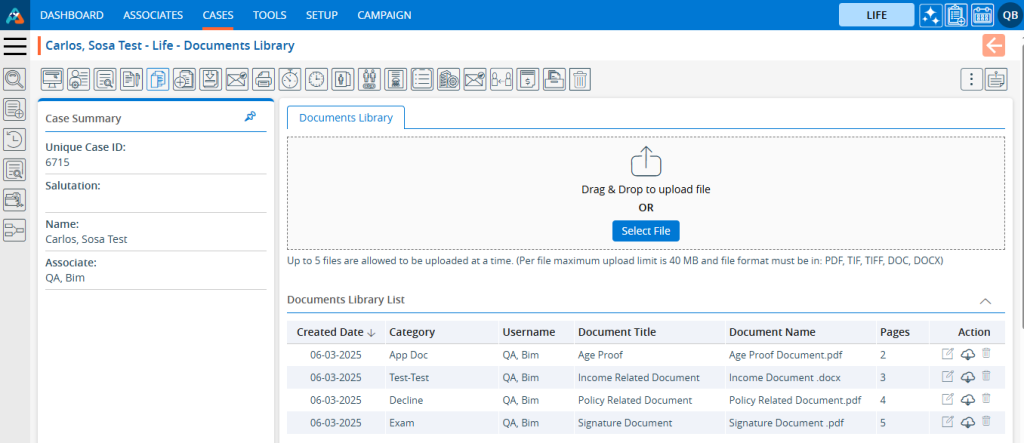
Add cases refers to the process of entering new records into the system. This process ensures that all required information is accurately captured, properly validated, and securely stored.
Sign in to AgentFront CRM.
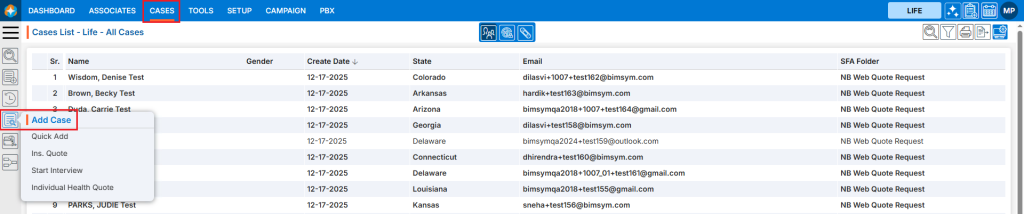
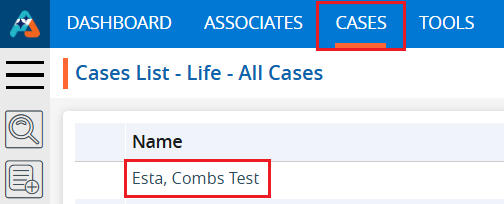
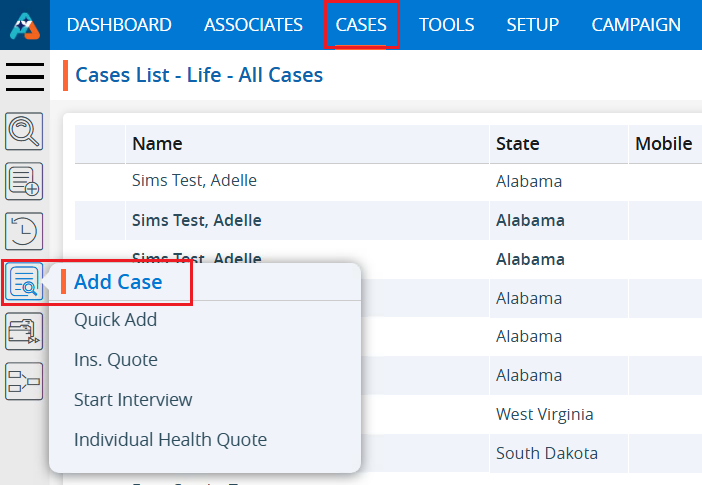
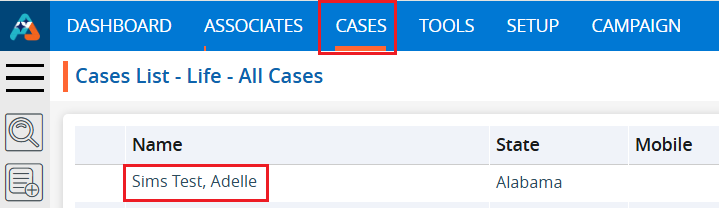
From the top menu, select CASES.
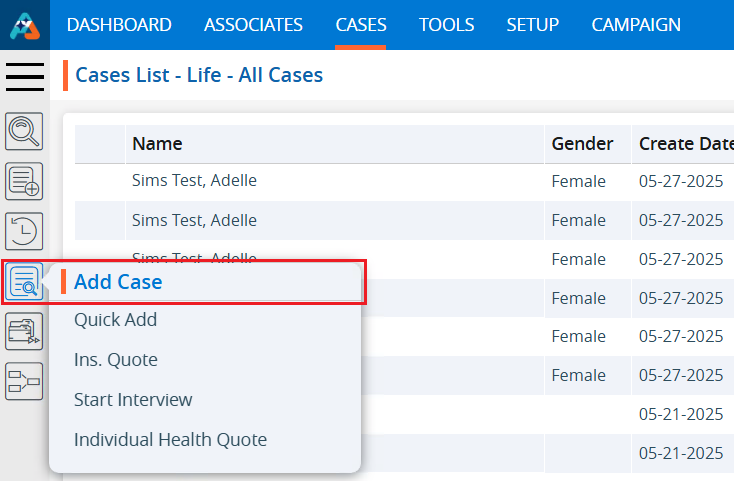
In the left-side panel, click Add Case to view all available forms for creating a new case.
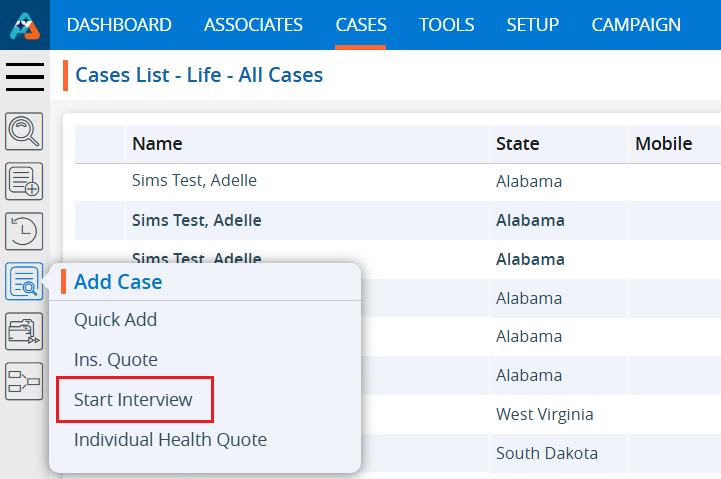
Select an option such as Start Interview to begin the process of creating a new case.
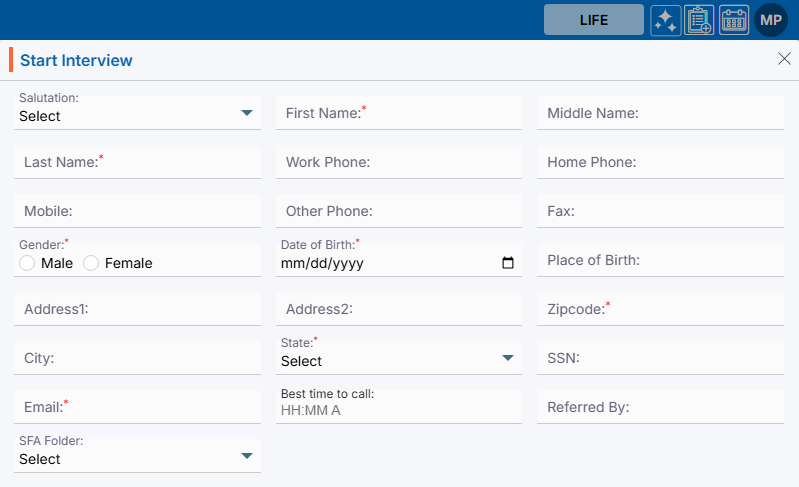
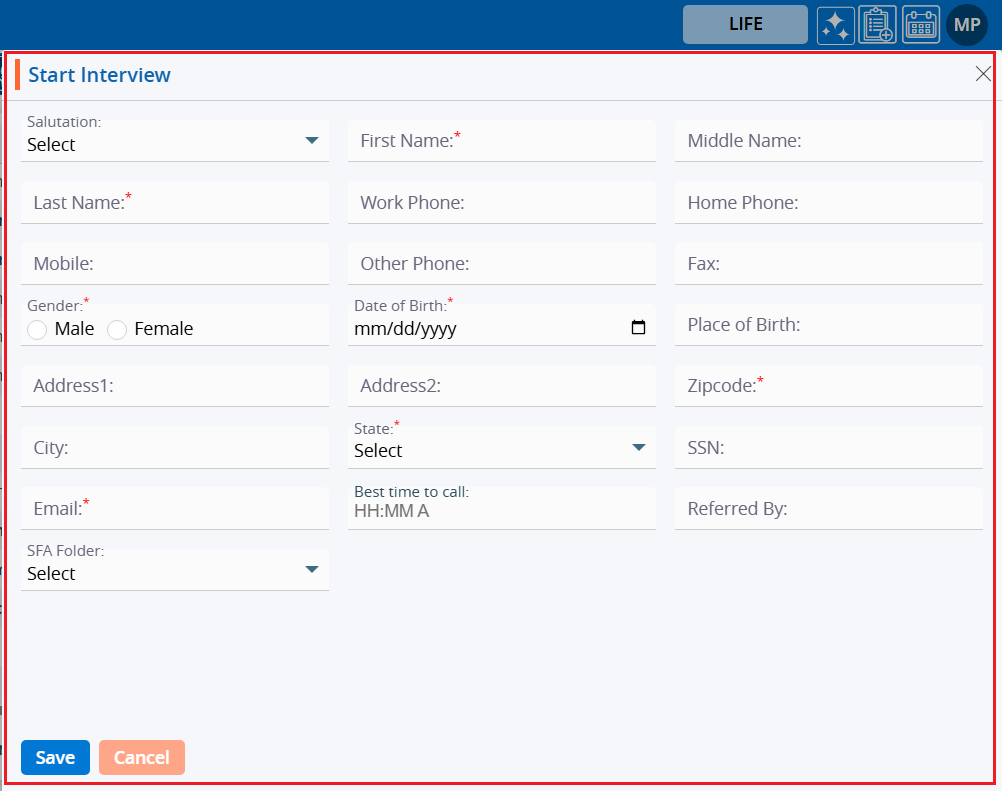
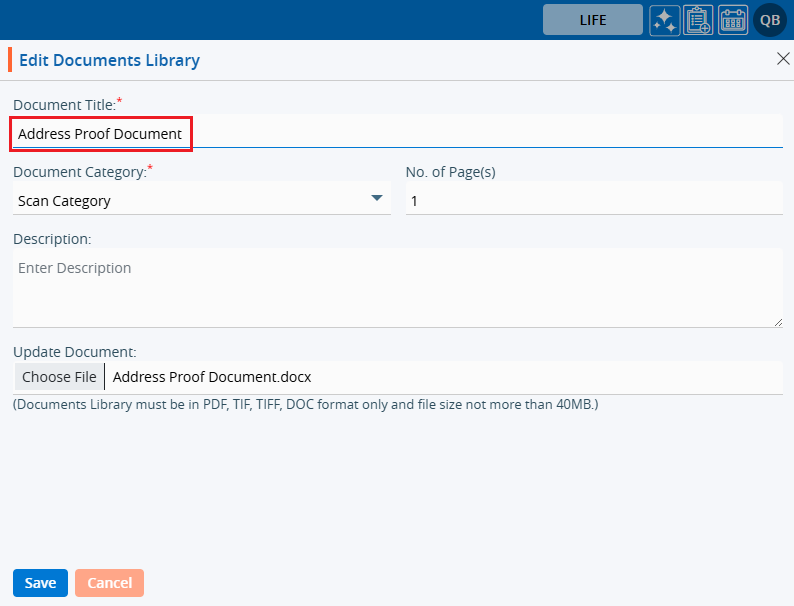
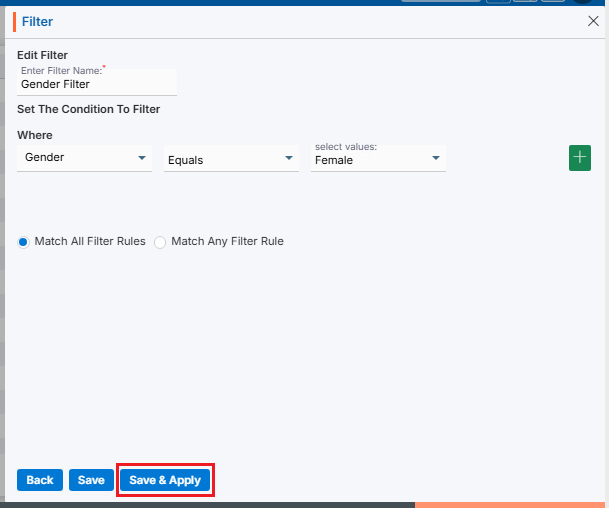
A new pop-up window will open, displaying a form that must be completed to create the case.
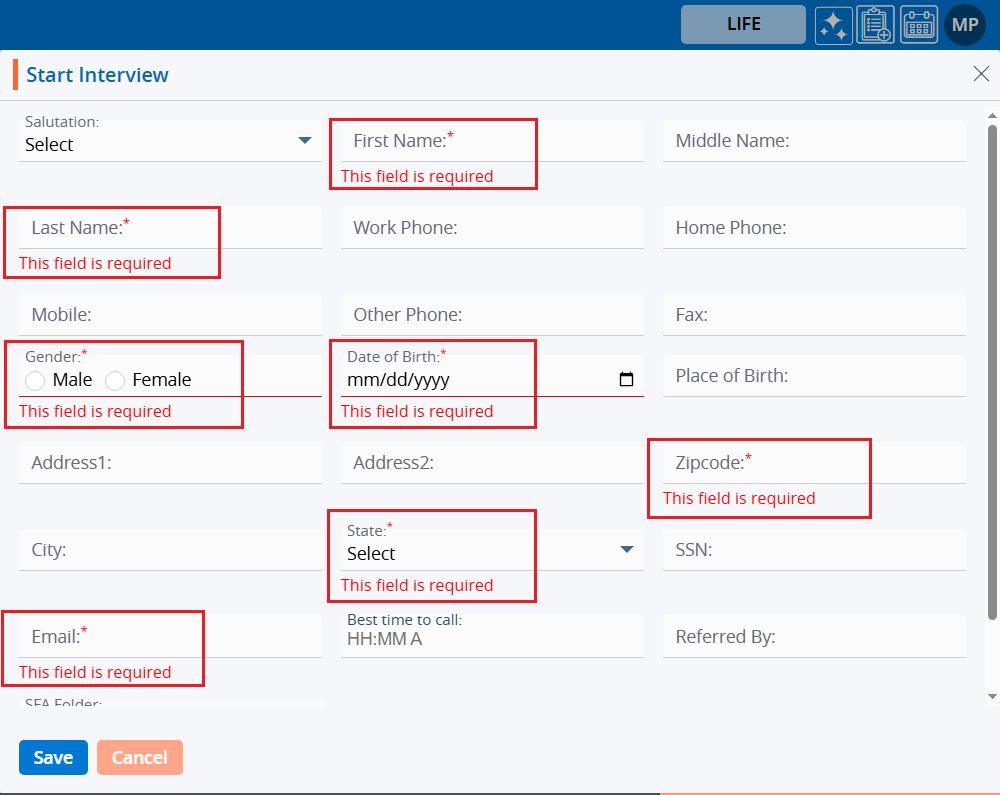
Some fields are mandatory and must be filled in, such as First Name and Last Name.
Certain fields provide drop-down menus, requiring the user to select predefined options, such as Salutation and State.
The Date of Birth field includes a calendar picker, enabling the user to select the date easily.
All remaining fields provide standard text boxes, where the user can manually enter the required information.
All remaining fields provide standard text boxes, where the user can manually enter the required information.
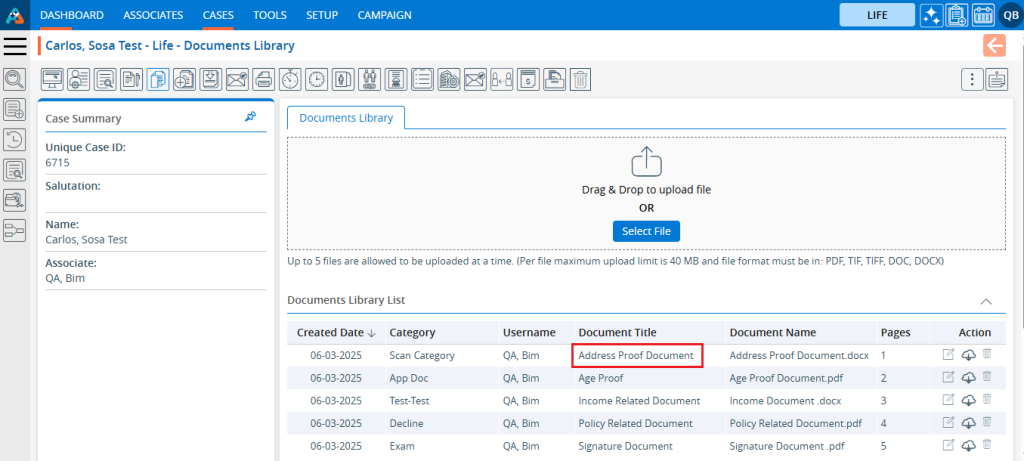
Once the information is saved successfully, the case will be securely stored in the system and will appear in the Cases List and click on it to open the case details for review, updates, or further actions as needed.
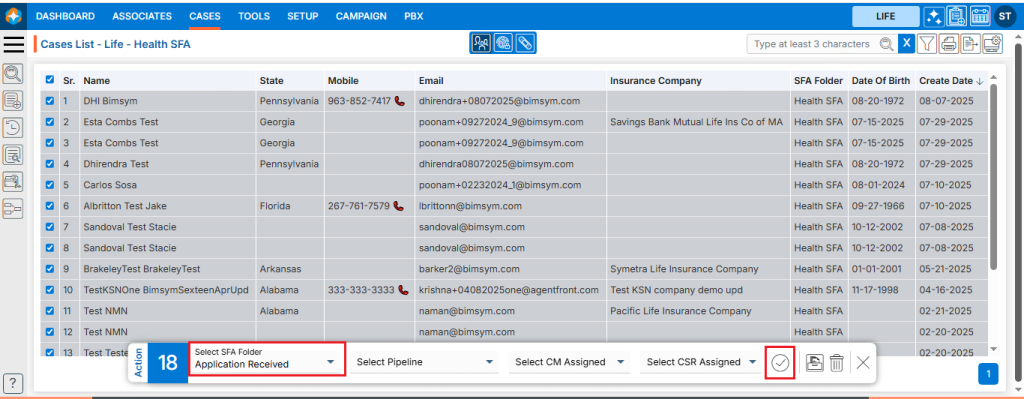
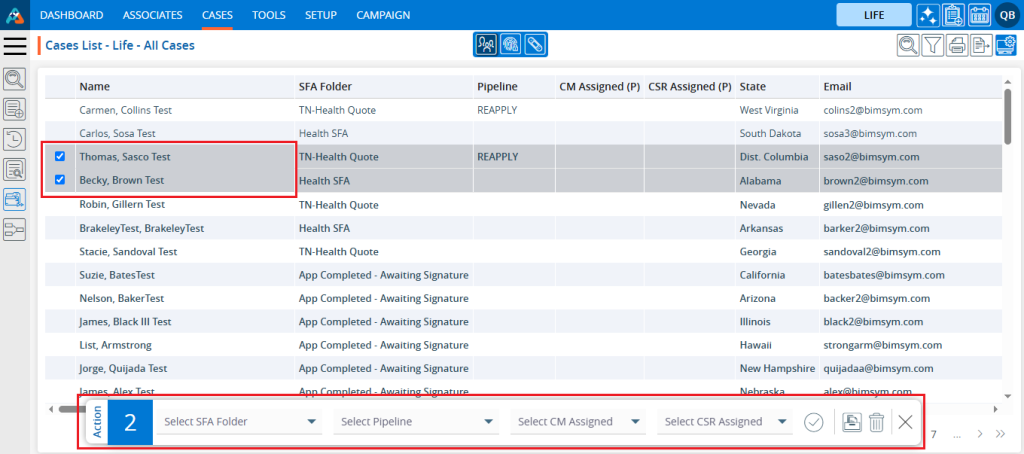
Using the Quick Action Menu the user can perform mass action on single or multiple profiles at a time. It enables the user to change the SFA Folder status or move single or multiple cases from one SFA Folder to another SFA Folder simultaneously.
Sign in to AgentFront CRM
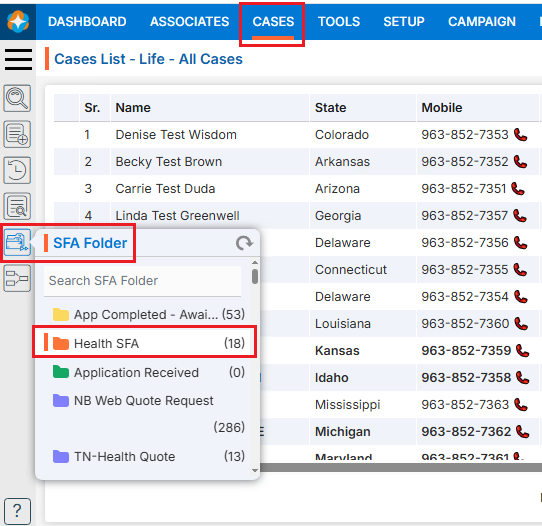
From the top menu, choose Cases
In the left-side panel, select SFA Folder
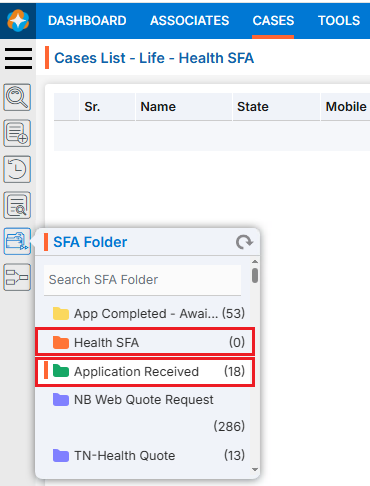
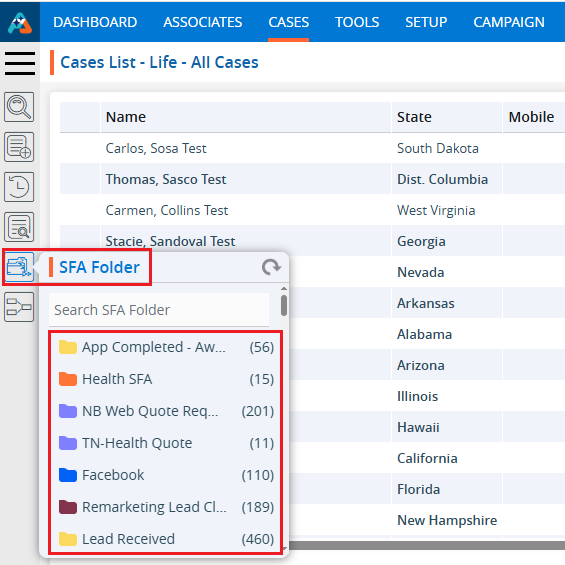
Select the desired SFA Folder. For example, here we have selected ‘Health SFA’ SFA Folder and there are 18 cases available in this SFA Folder
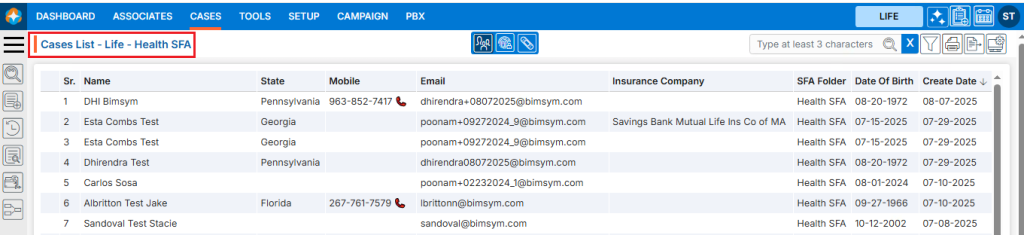
A new page will open for the ‘Health SFA’ SFA Folder, displaying the available cases within it
Select the case(s)
After selecting the case(s) action menu will be enabled
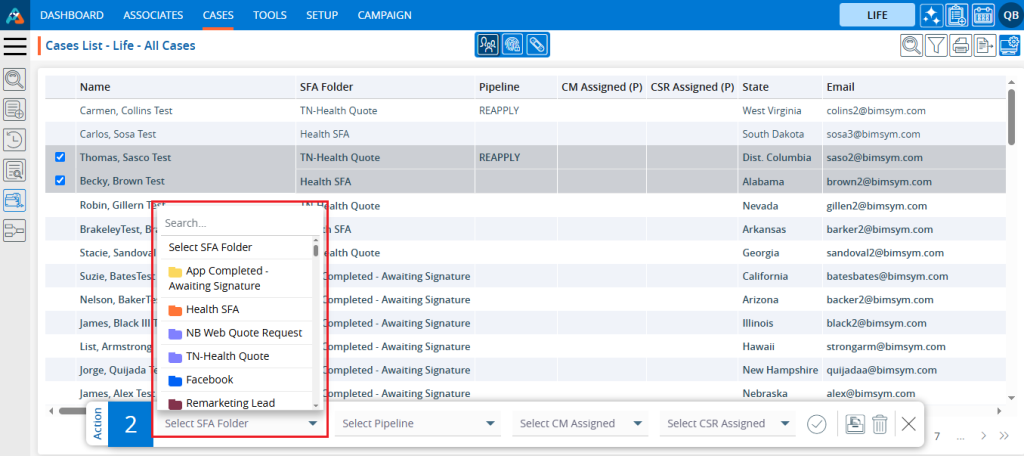
Select the another SFA Folder from the drop-down menu. Here we have selected ‘Application Received’ SFA Folder from the drop-down menu
Click on Submit () icon
The selected case(s) will be moved from the current SFA Folder to the selected SFA Folder from the dropdown menu
User can see the number of cases will be updated in SFA Folder on cases tab.We have moved cases from the ‘Health SFA’ SFA Folder to the ‘Application Received’ SFA Folder. As a result, 18 cases were transferred to ‘Application Received’, updating its count from 0 to 18, while the count for the ‘Health SFA’ SFA Folder are updated from 18 to 0.
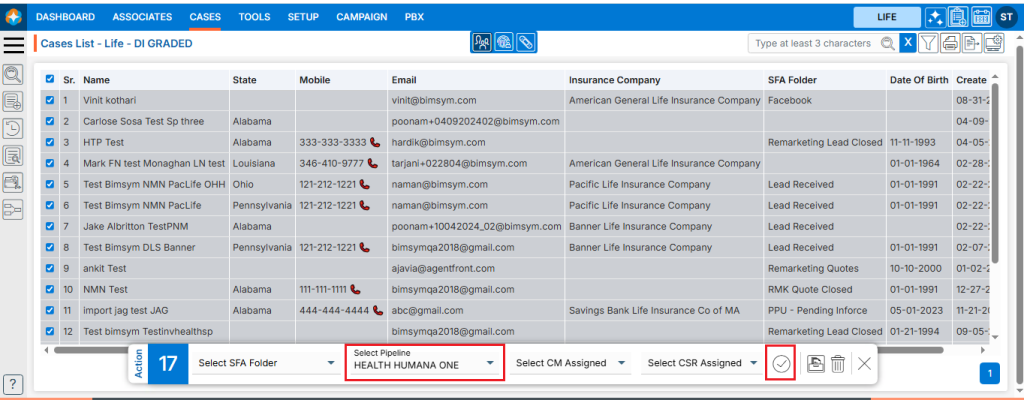
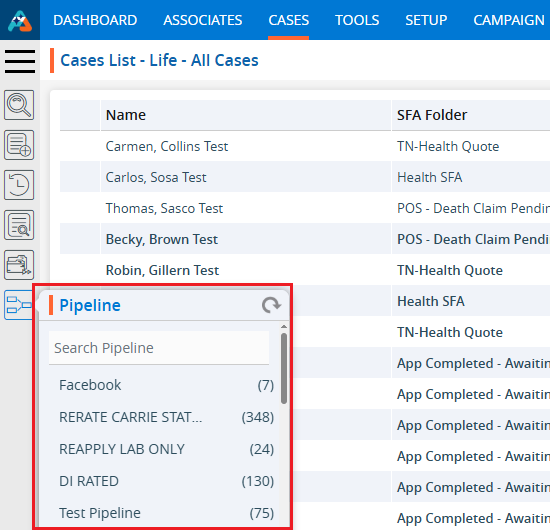
Using the Quick Action Menu the user can perform mass action on single or multiple profiles at a time. It enables the user to change the Pipeline status or move single or multiple cases from one pipeline to another pipeline simultaneously.
Sign in to AgentFront CRM
From the top menu, choose Cases
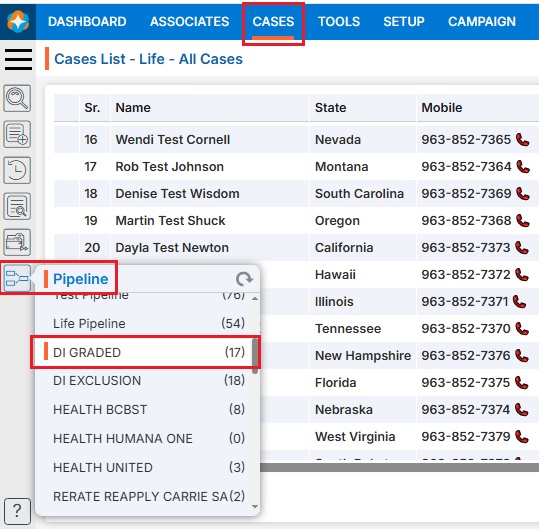
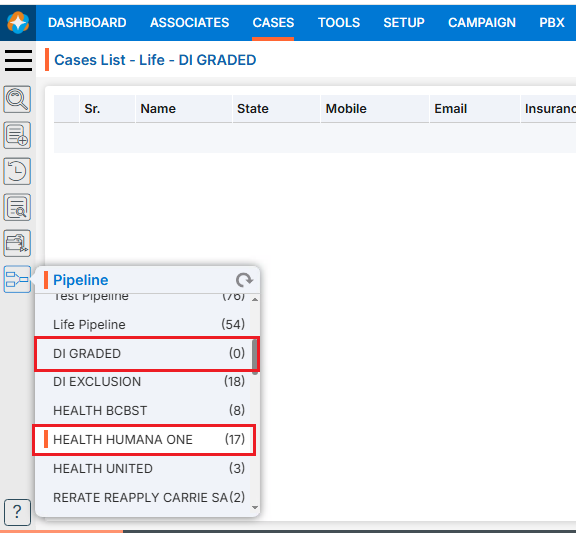
In the left-side panel, select Pipeline
Select the desired Pipeline. For example, here we have selected ‘DI GRADED’ pipeline and there are 17 cases available in this pipeline
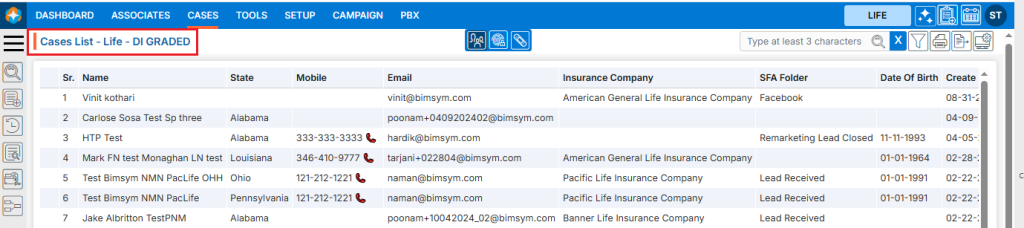
A new page will open for the DI GRADED pipeline, displaying the available cases within it
Select the case(s)
After selecting the case(s) action menu will be enabled
Select the another pipeline from the drop-down menu. Here we have selected ‘HEALTH HUMANA ONE’ pipeline from the drop-down menu
Click on Submit icon
The selected case(s) will be moved from the current pipeline to the selected pipeline from the drop-down menu
User can see the number of cases will be updated in Pipeline on cases tab. We have moved cases from the ‘DI GRADED’ pipeline to the ‘HEALTH HUMANA ONE’ pipeline. As a result, 17 cases were transferred to ‘HEALTH HUMANA ONE’, updating its count from 0 to 17, while the count for the ‘DI GRADED’ pipeline are updated from 17 to 0.
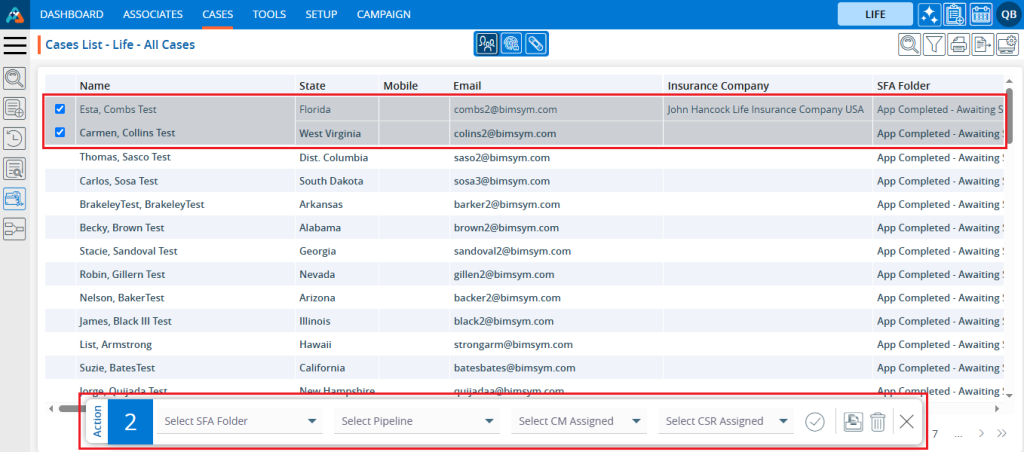
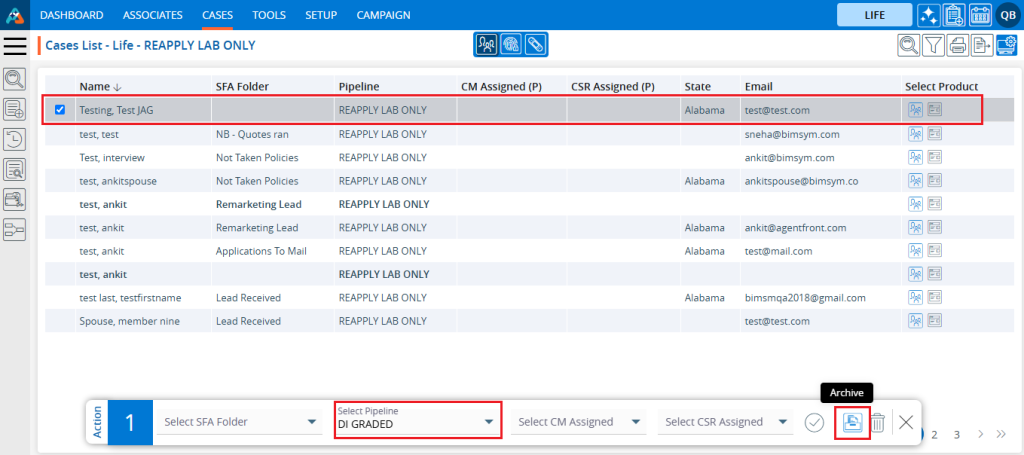
The Archive feature is used to temporarily move cases to Archive folder that are not currently needed.
The following are the steps to move Cases to the Archive: 1. Navigate to the ‘CASES’ tab where you’ll find the Cases List – All Cases.
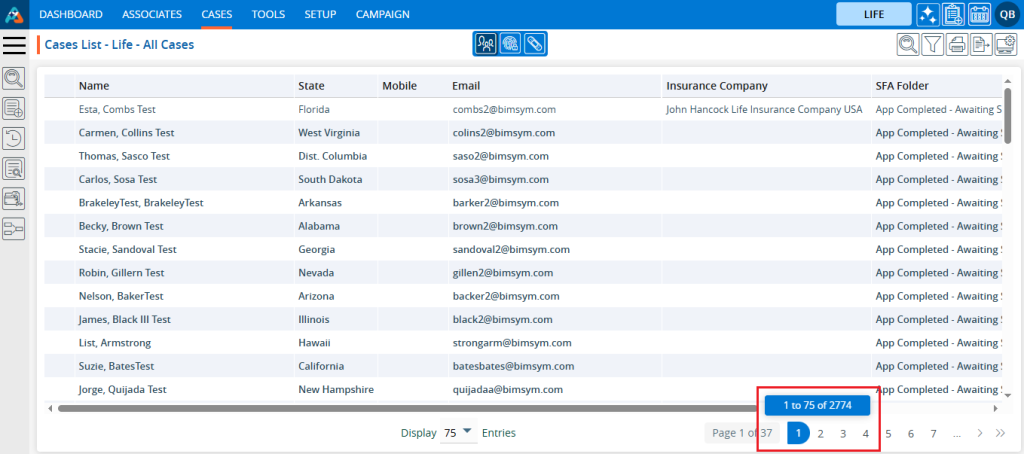
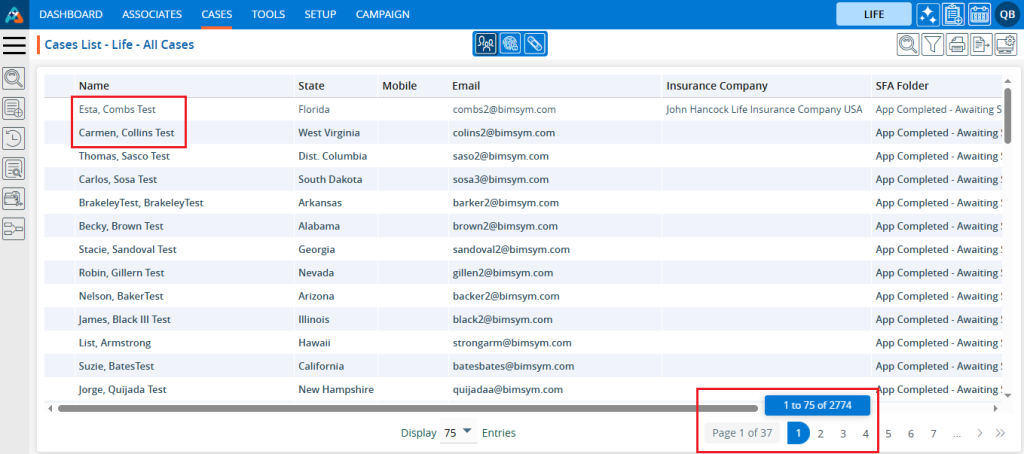
2. Check the total number of cases in the All-Cases List; it shows 2774 cases available.
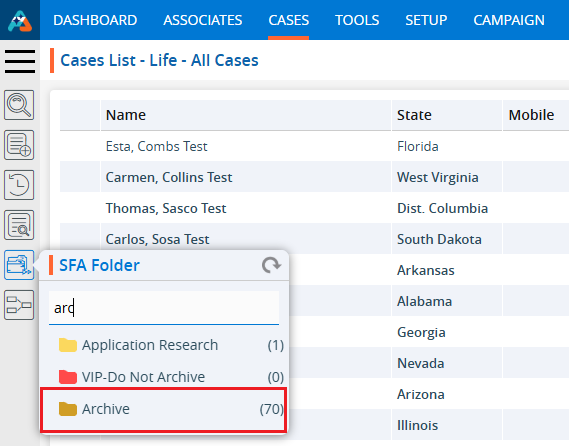
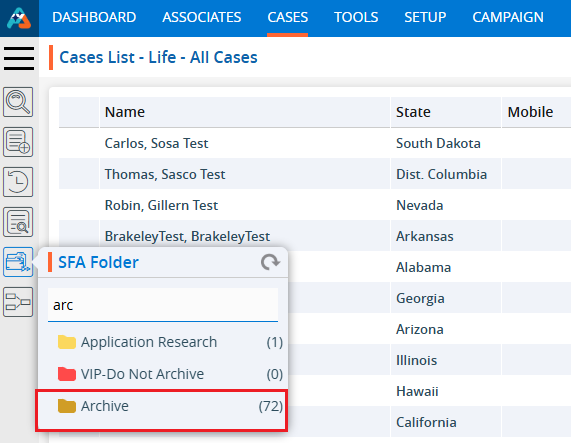
3. Before moving a case to the ‘Archive’ check the number of cases in the ‘Archive’ folder (located within the SFA folder). There are currently 70 cases in the Archive.
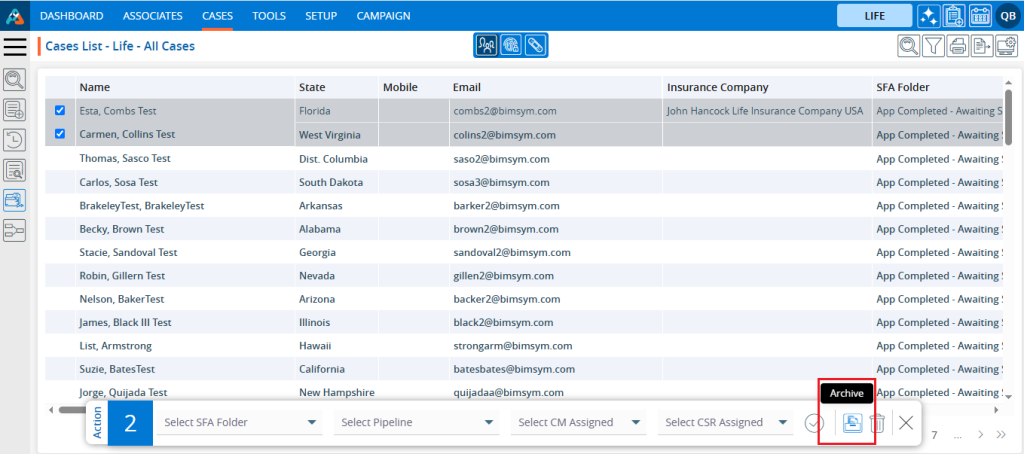
4. Select the cases from the ‘Cases List – All Cases’ list that is currently not needed. After clicking the check-box the Quick Action pop-up menu will be enabled.
5. Click on the ‘Archive’ option.
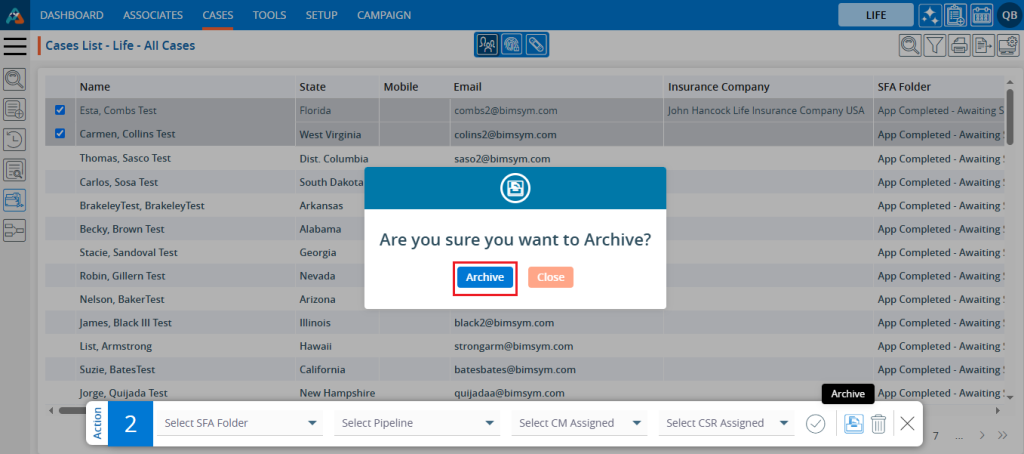
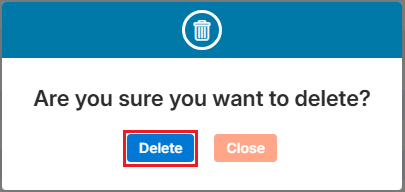
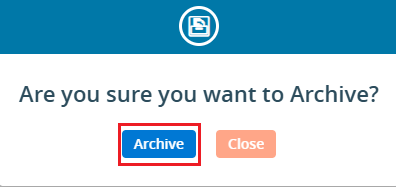
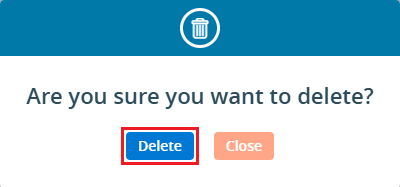
6. A validation message pop-up will appear to confirm your action to move the cases to the archive. Click on the ‘Archive’ button.
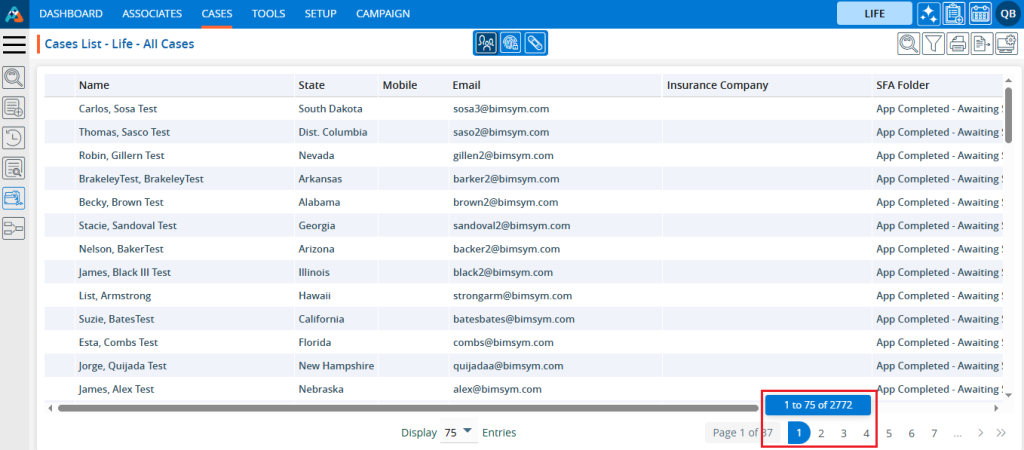
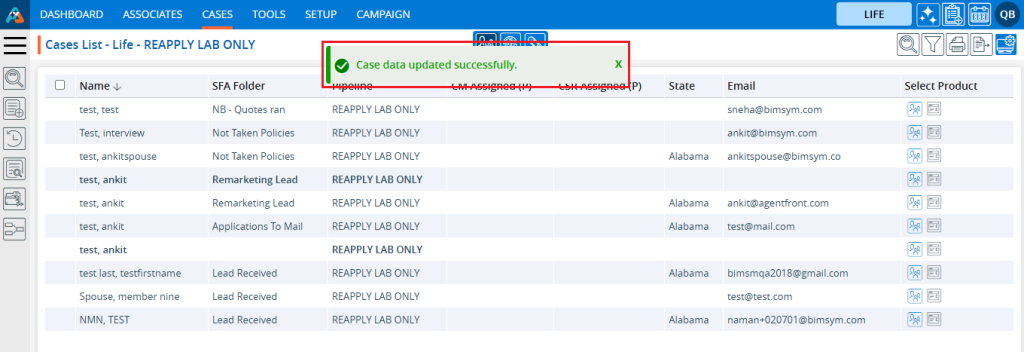
7. The selected cases will be removed from the ‘Cases List – All Cases’ list and moved to the ‘Archive’ folder. A confirmation message will be generated by the system.
8. Check the total number of cases available in the All-Cases list. It should have decreased by 2.
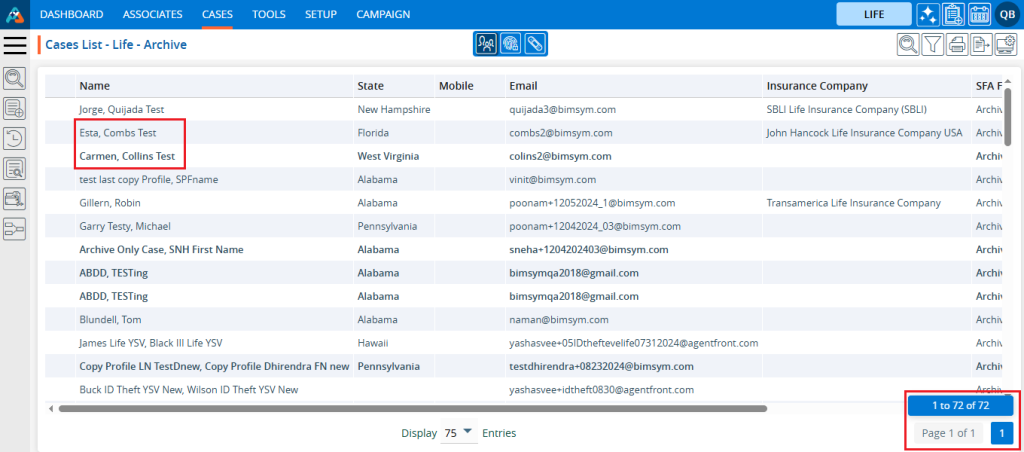
9. Check the total number of cases available in the Archive folder. It should have increased by 2.
10. Navigate to the ‘Archive’ folder, and you will find the cases moved there. You can also verify the total number of available cases here.
11. Any case from ‘Archive’ can be moved back to ‘Cases List – All Cases’. To move a case from the ‘Archive’ back, select the cases check box and the Quick Action pop-up menu will open. 12. Choose the SFA Folder or Pipeline or both, then click on the ‘Click To Submit’ option.
13. The selected cases will move from the ‘Archive’ folder, and a confirmation message will be generated by the system. The cases will disappear from the ‘Cases List – Archive’.
14. Check the total number of cases available in the ‘Cases List – Archive’. It should have decreased by 2
15. Navigate to the ‘CASES’ tab, and you will find the cases moved. Verify the total number of available cases in ‘Cases List – All Cases’. It should have increased by 2.
16. There is another way to move the case to the ‘Archive’. Open the case profile by clicking on it.
17. The profile’s ‘DASHBOARD’ will open. Click on the ‘ARCHIVE’ option.
18. A validation message pop-up will appear to confirm your action to move the case to the archive. Click on the ‘Archive’ button.
19. The case is moved to the Archive folder, and a confirmation message will be generated by the system. The case will disappear from the ‘Cases List – All Cases’ list.
20. Navigate to the ‘Archive’ folder, and you will find the case moved there. Verify the total number of available cases.
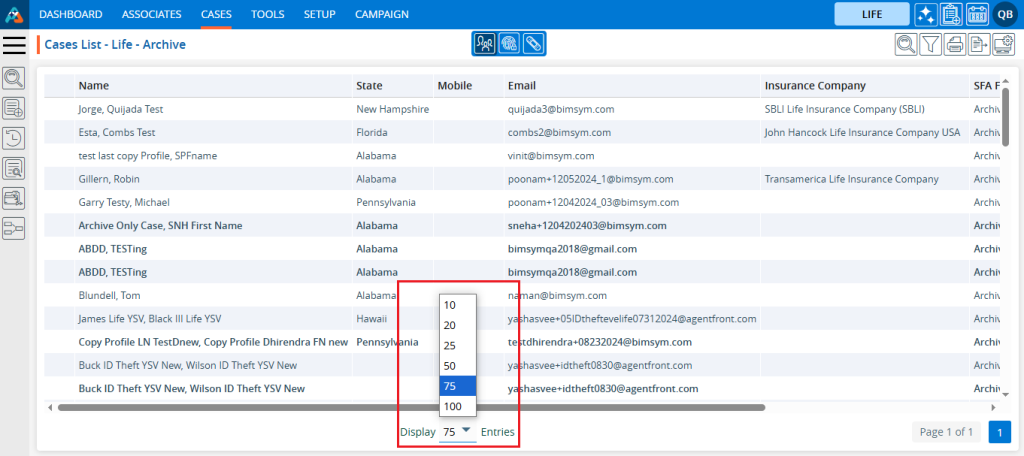
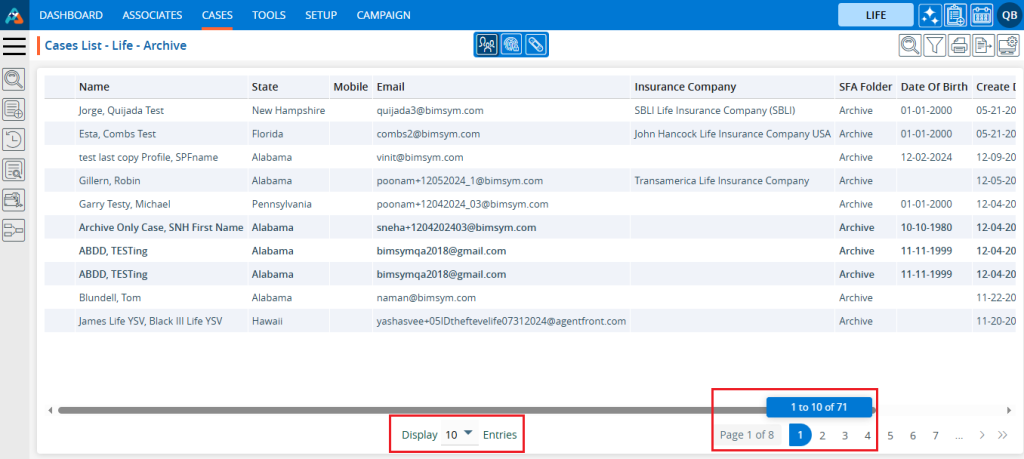
21. Update the number of records to display from the drop-down to specify the number of cases per page based on the total number of cases available in the Archive.
22. After updating the Display, the system will present cases and pagination based on the chosen setting. For example, if the user selects 10 cases per page, the system will display 10 cases per page, with the data distributed accordingly.
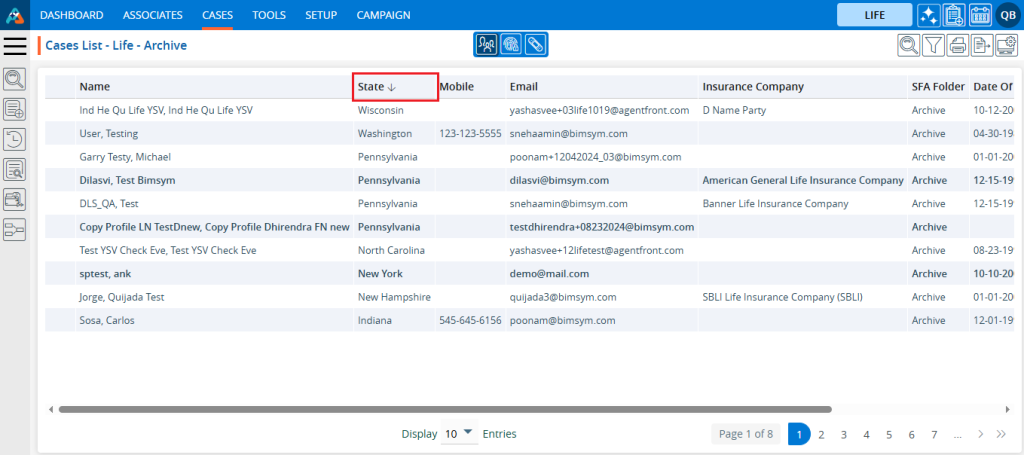
23. To view the cases in ascending or descending order, click on the field title. When the user clicks on the title, a downward arrow will appear next to it, indicating that the cases are arranged in descending order.
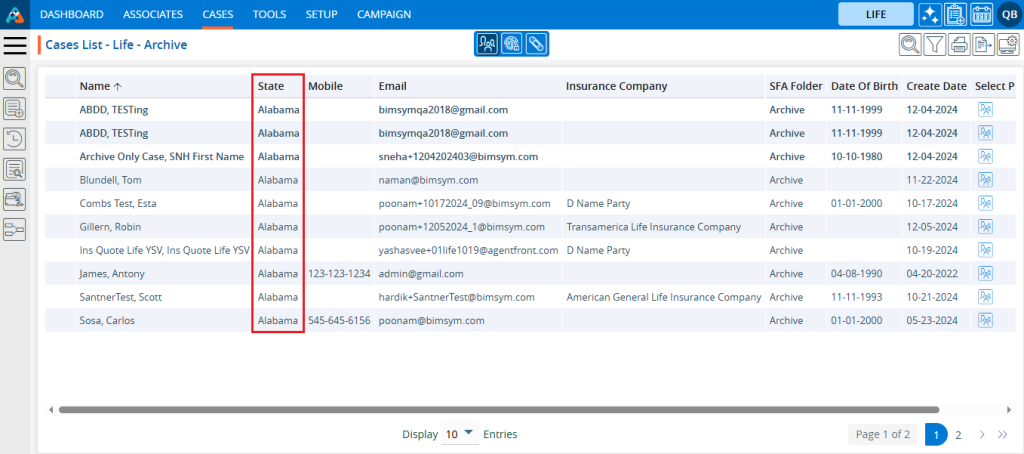
For example, this list displays State in descending order for the Archive List.
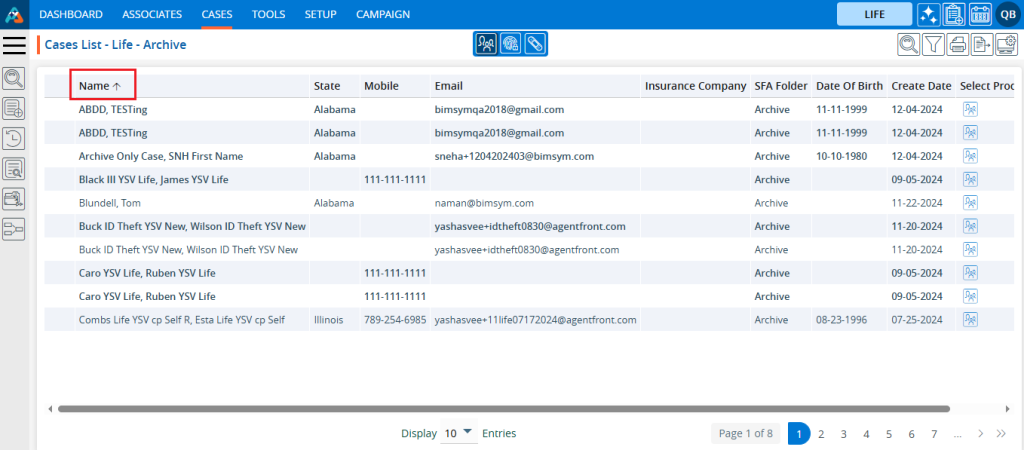
24. When the user clicks on the title again, an upward arrow will appear beside the title, indicating that the cases are now arranged in ascending order.
For example, this list displays Name in ascending order for the Archive List.
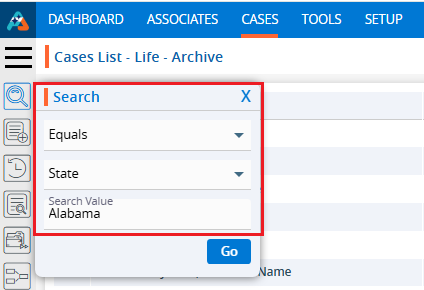
25. Click on the left search bar and enter the data you wish to search for from the Archive List. For example, select the option ‘Equals’, select the field as ‘State’ and keep the value as ‘Alabama,’ which will display the cases associated with cases from Alabama.
26. The result displays the list of cases in the Archive Folder where the cases are belongs to ‘Alabama’ state.
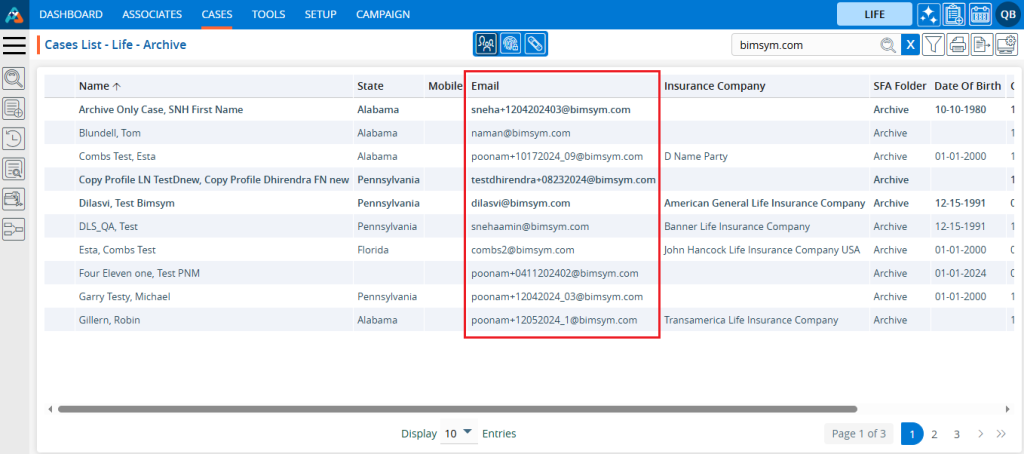
27. Click on the Quick Search and enter the data you want to search for from the Archive List. For example, entering ‘bimsym.com’ will display the cases with the email available with ‘bimsym.com’ domain.
28. Therefore, the result displays the list of cases in the Archive Folder where the email domain is available with ‘bimsym.com’.
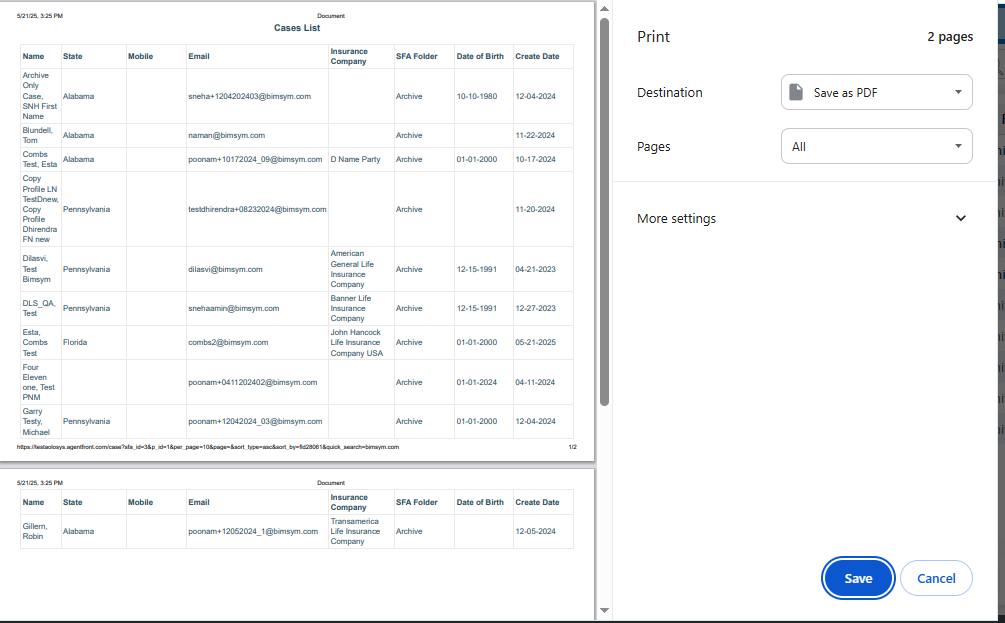
29. Click on the ‘Print’ option to print the current page. The print feature will print the data based on the current display settings.
30. Filters, display options, and export functions will consistently operate on the entire Case List.
Display is used to create specific views of the Cases Listing. Users can set a maximum of 5 displays, choosing from the available fields and apply them to the listing as needed.
Sign in to AgentFront CRM
From the top menu, choose CASES
Cases list will open by default
Click the Display icon in the top right corner
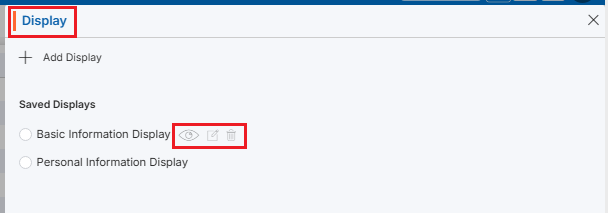
A new pop-up window named ‘Display’ will open
Existing displays will be listed under Saved Displays
There is an Add Display link with (+) icon on top of the page
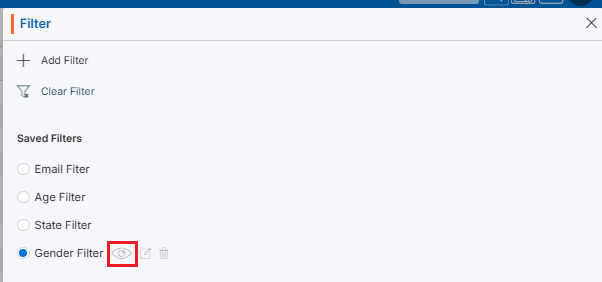
Also, there are options to View (), Edit () and Delete () the existing display for each one, to view those options hover over the display name; the system will display the View (), Edit (), and Delete () options
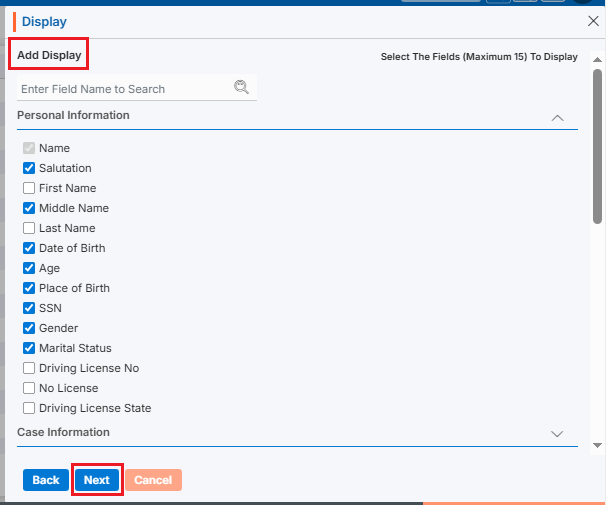
Add Display
Click on ‘Add Display‘ to add a new display to the system. (Maximum 5 displays can be created)
A new page will open, select the fields from group according to the requirements and click on Next. (Maximum 15 fields can be selected)
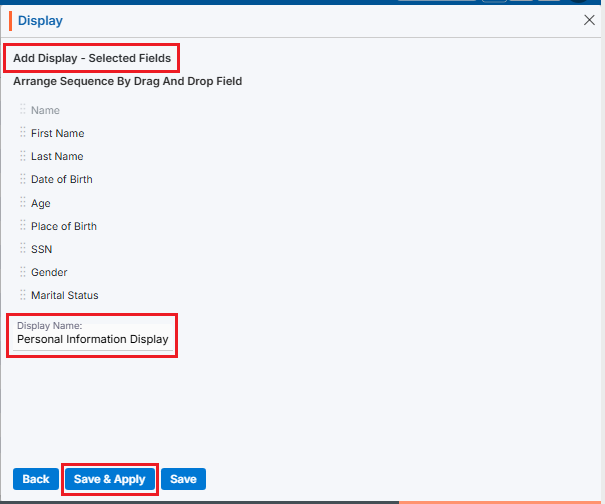
Next Page: Add Display – Selected Fields
Arrange Sequence: Arrange the fields sequence for display
Enter Display Name: Enter the clear, descriptive name. This is what users can identify the purpose of the Display
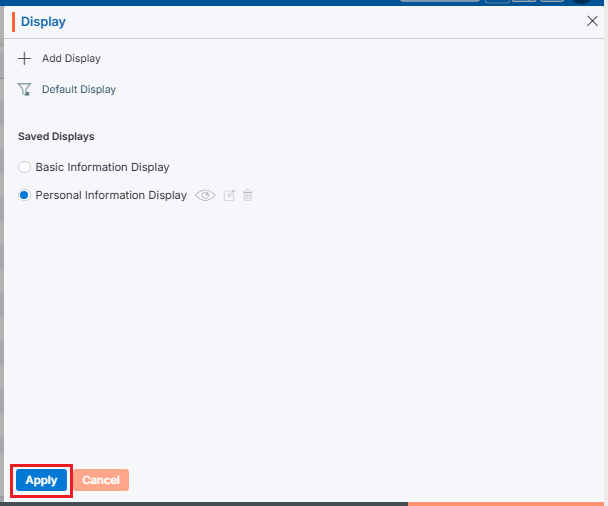
‘Save & Apply’ and ‘Save’ options are available. The Save option creates the display only, while Save & Apply saves the display and will apply it to the list
Click the Save & Apply
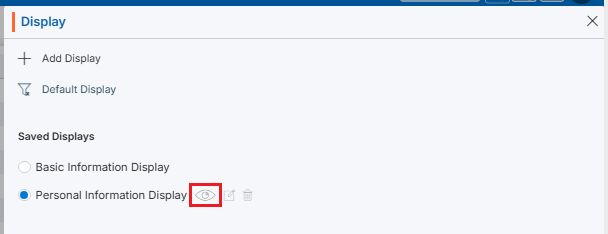
The new display will be saved in the system and applied to the listing
View Display
To view the existing display, select the display and click ‘View Display’ () from the available options
Apply Display
To apply the display from existing display, select the display and click ‘Apply’ button
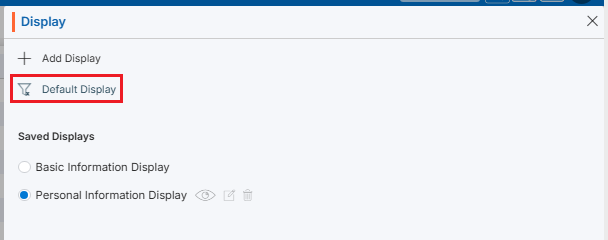
Reset Display
If any display is already applied to the listing and user wants to reset the display (System Generated – Default Display) click the ‘Default Display’ link
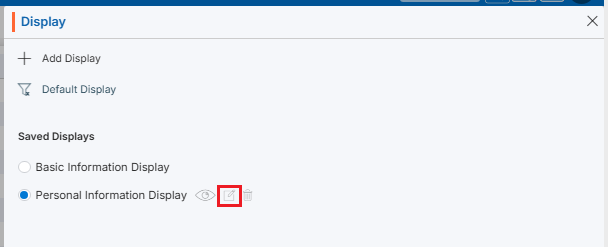
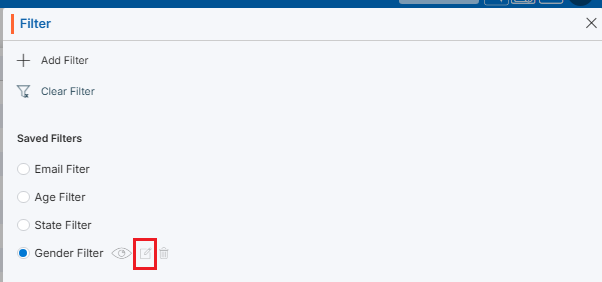
Edit Display
To update the existing display, select the display and click ‘Edit Display’ () from the available options
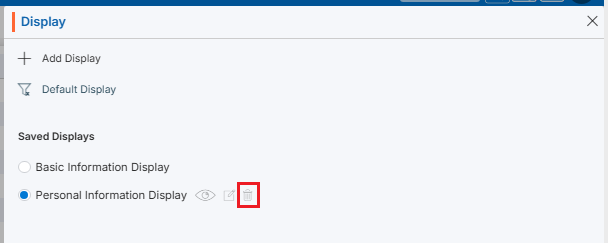
Delete Display
To delete any existing display, select the display and click ‘Delete Display’ () from the available options
The system will ask for confirmation. Click Delete to proceed
An Information Custom Field is a feature designed for adding and updating specific case information within the system. It allows users to customize data entry fields according to their needs, enhancing the flexibility and efficiency of managing case-related details.
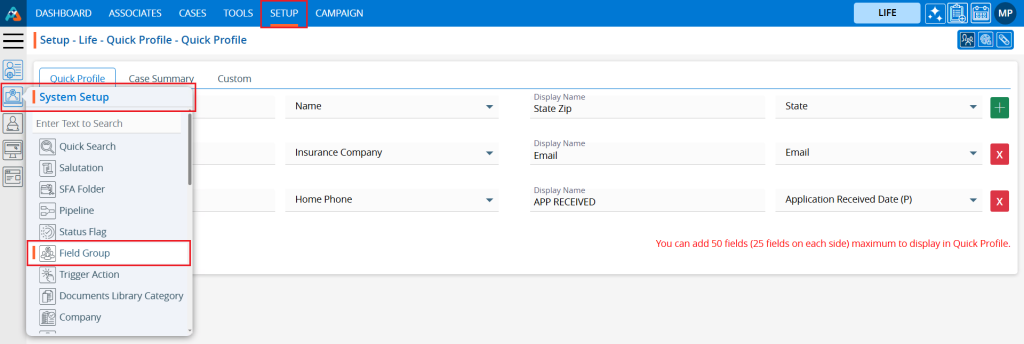
The following are the steps for setting up a Custom Group and Fields:
The user needs to create a ‘Field Group’ first. 1. Navigate to the ‘SETUP’ tab. Open the ‘System Setup’ dropdown from the left menu. Select the ‘Field Group’ option.
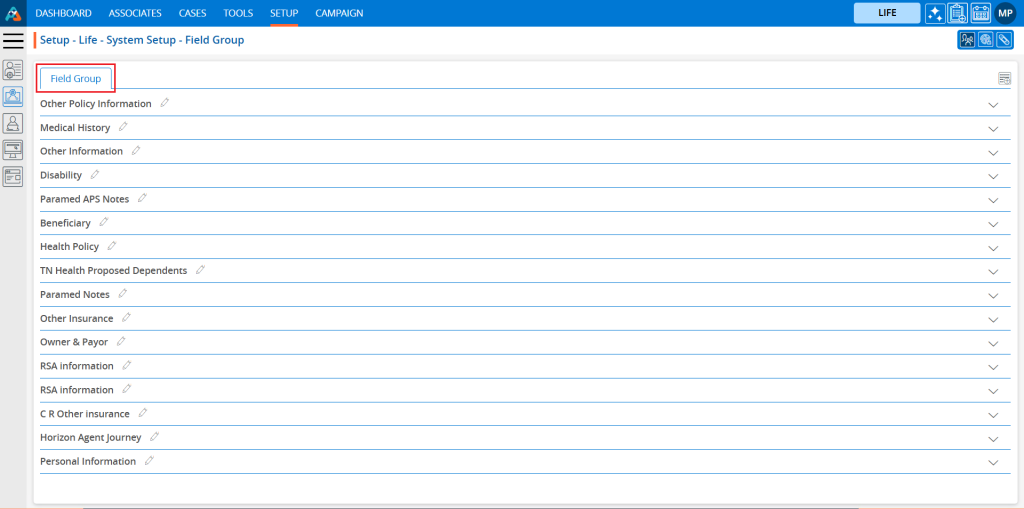
2. The ‘Field Group’ tab is listed displaying all groups already created. After creating a ‘Field Group’, required fields can be set for the created group.
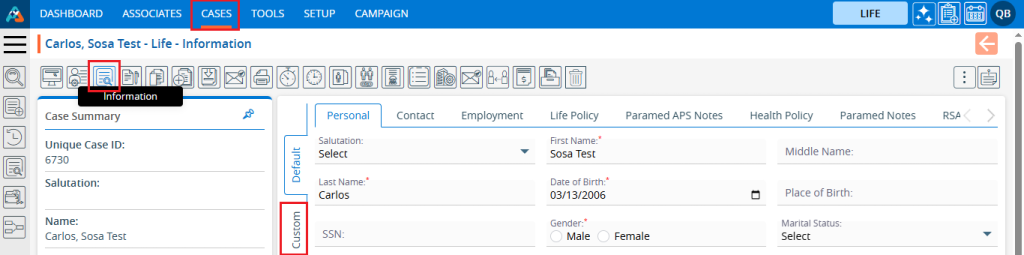
3. The created field groups are displayed in the ‘Custom’ tab under the ‘INFORMATION’ section of the CONTACTS’ tab. Users can add values to custom fields corresponding to the values added in the ‘Default’ tab.
4. Two types of Custom Groups can be created as follows: a. With Single Entry (values are added or updated using a single-entry form) b. With Multiple Entry (values can be added, and multiple entries can be saved) 5. Custom groups created with the single-entry option display the values added by users in the fields.
6. Custom groups created with the multiple-entry option, after values are added and saved, will be displayed in the list under the ‘Field Group’ title as separate sections.
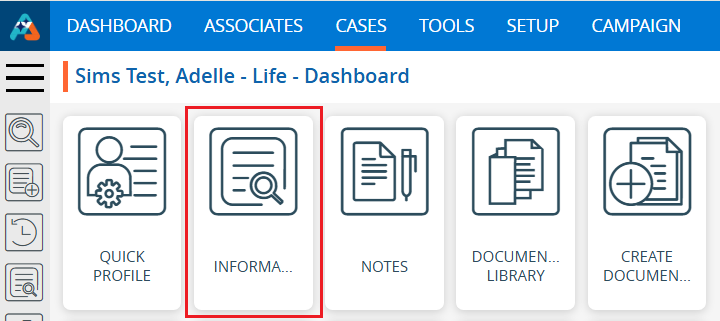
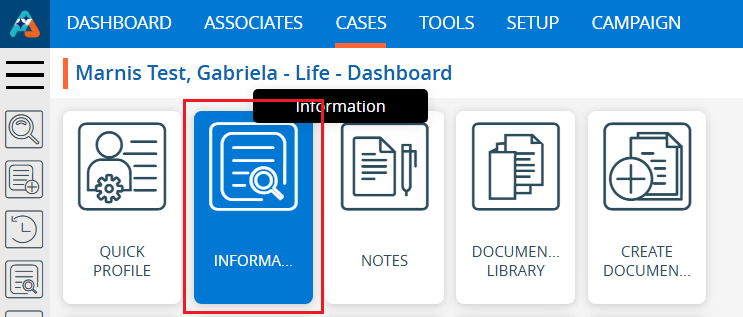
Full Profile displays key information on the case.
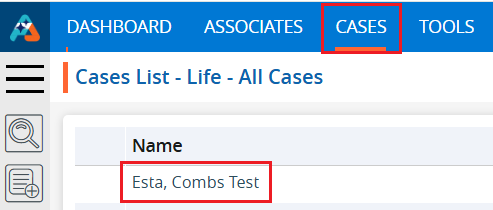
The following are the steps to access the Full Profile: 1. Navigate to the ‘CASES’ tab where you’ll find the Cases List – All Cases. 2. Click on a case to proceed.
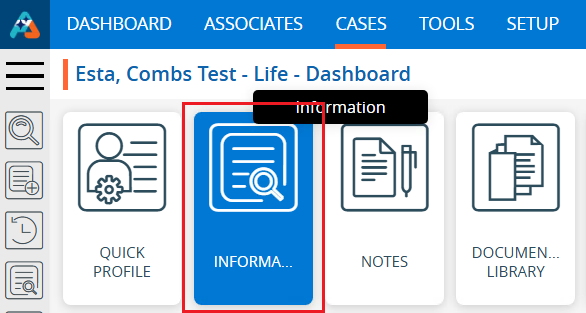
3. After clicking on a case, the profile’s ‘Dashboard’ will open. Click on the ‘INFORMATION’ option.
4. The Information page will open. Hover the cursor over the option icon located on the left side of Quick Notes, which has three dots. 5. There will be three options displayed: a. Full Profile b. Quote Sheet c. Ins. Quote 6. Click on the ‘Full Profile’ option.
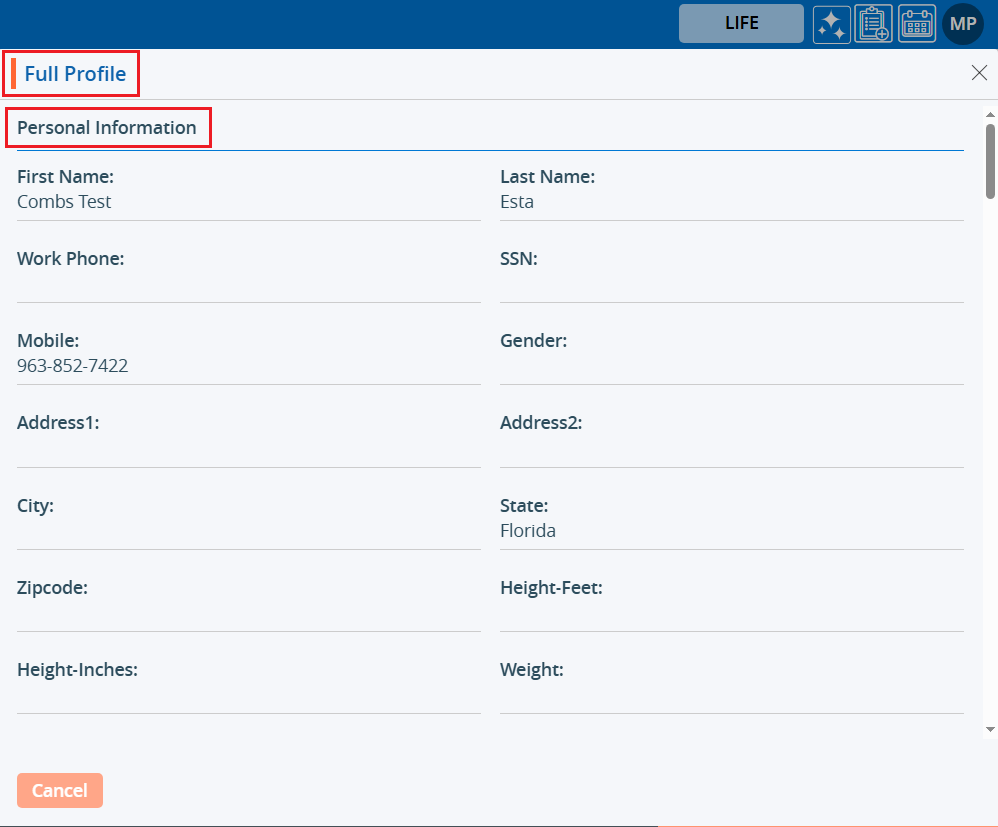
7. The Full Profile pop-up window will open, showing ‘Personal Information’ by default. The information on this page is read-only; users cannot update it from this page. This page will display the basic information of the user.
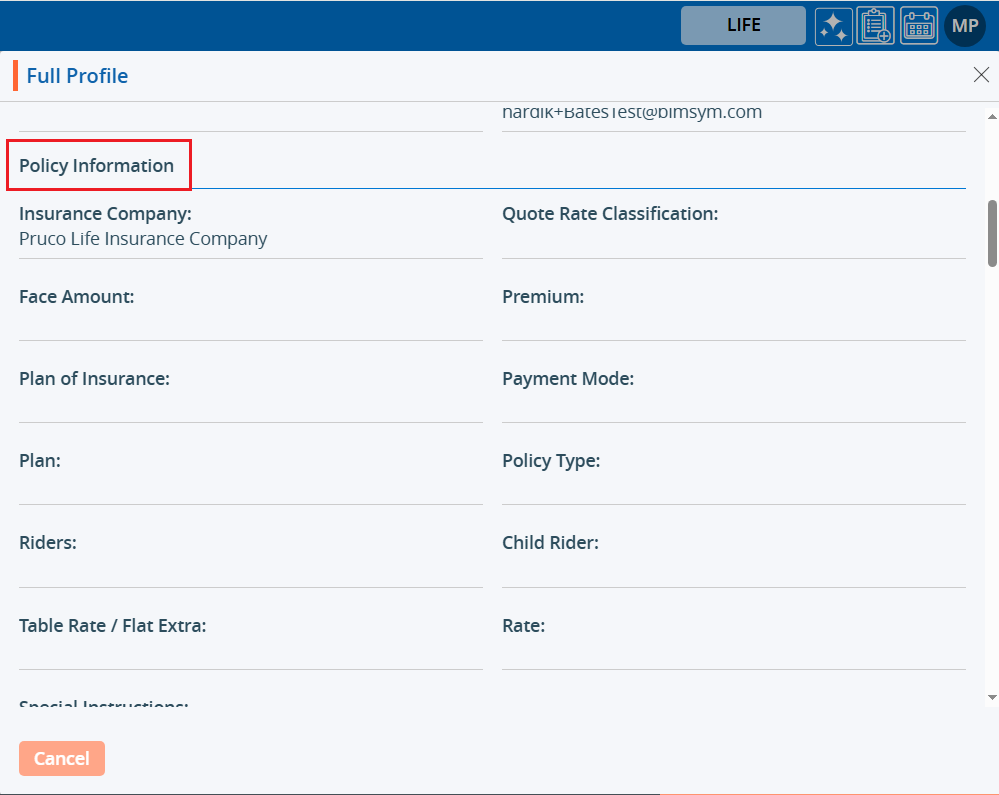
8. Scroll down to this page to view the ‘Policy Information’ section.
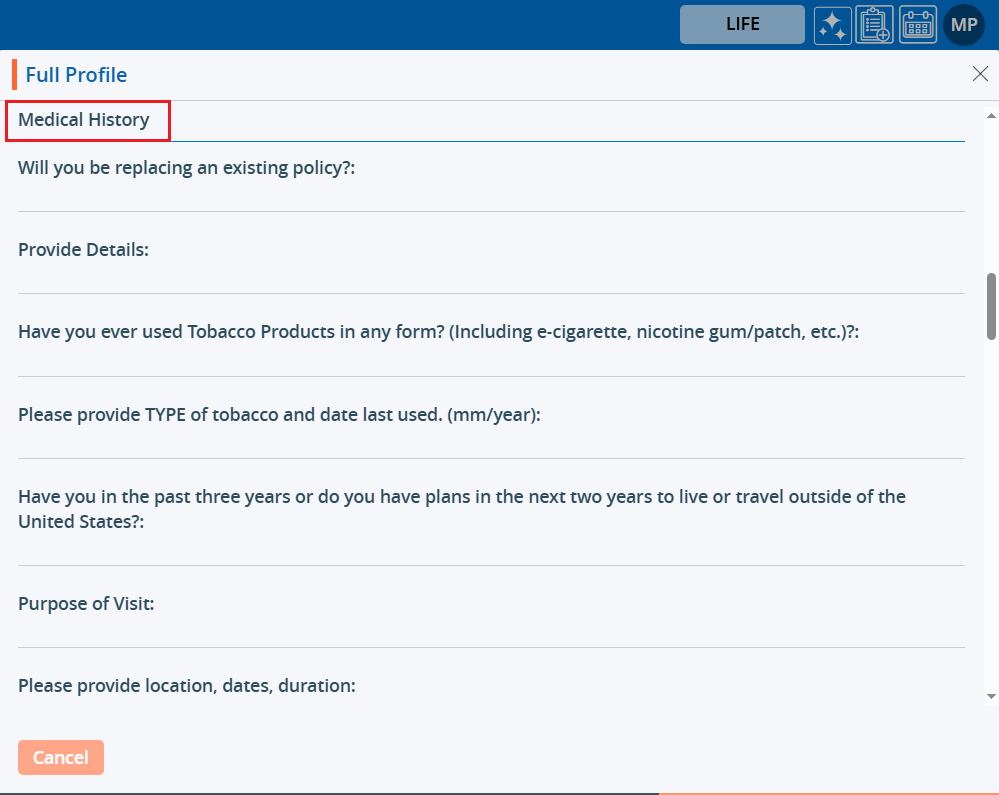
9. Scroll down to this page to view the ‘Medical History’ section.
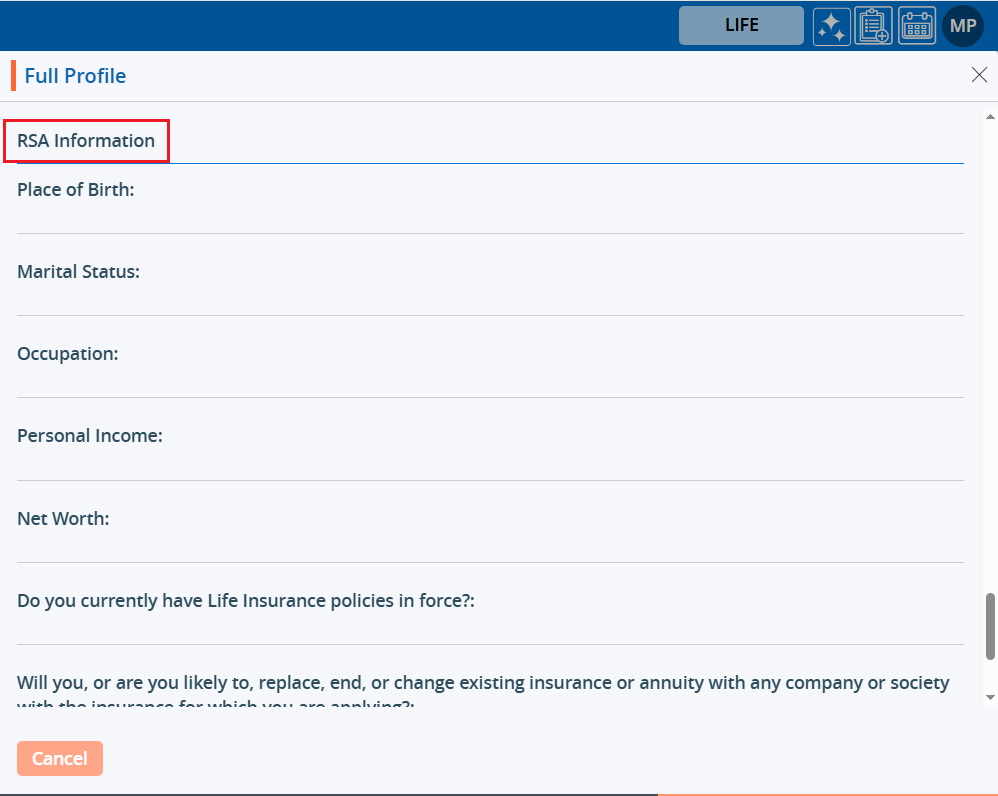
10. Scroll down to this page to view the ‘RSA Information’ section. Click on the ‘Cancel’ button to close this page.
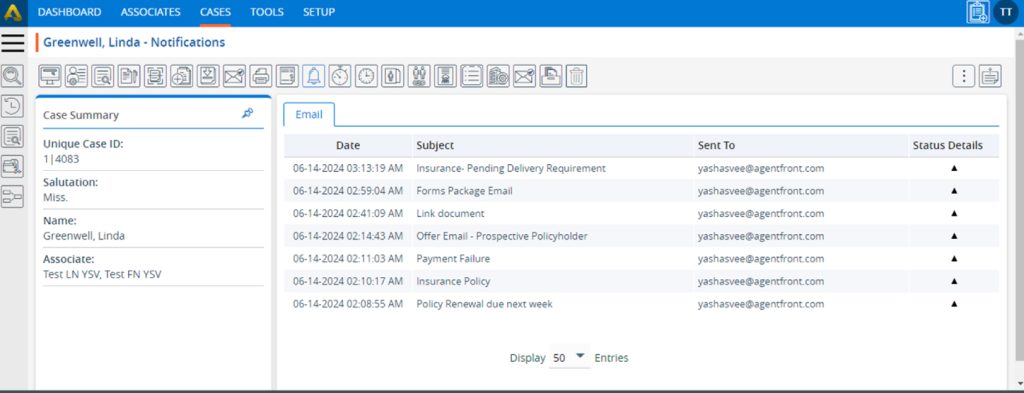
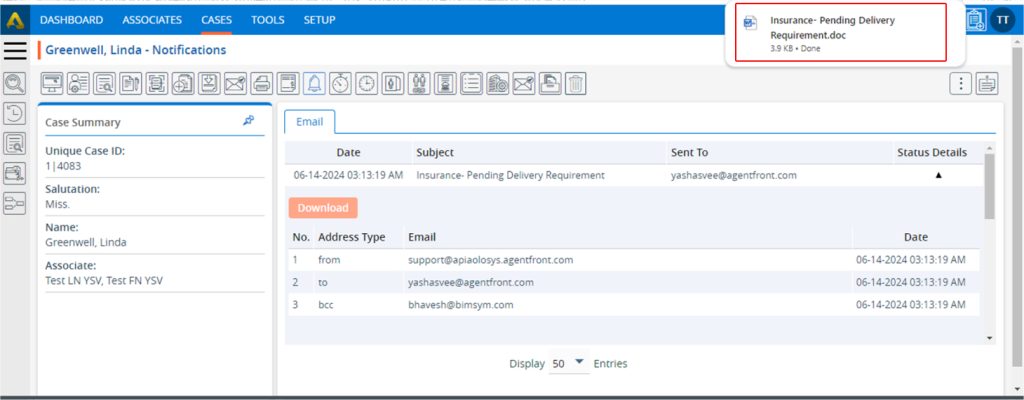
Notification Email – The Sent Email list is available under the Email option within the Notification Tab. The Sent Email feature is used to view and check emails sent regarding the case.
The following are the steps to check the sent email list: 1. Navigate to the ‘CASES’ tab where you’ll find the Cases List – All Cases. 2. Click on a case to proceed.
3. After clicking on a case, the profile’s ‘Dashboard’ will open. Then, select the ‘NOTIFICATIONS’ option.
4. The Notifications page will open, and the system will display the list of emails that were sent. 5. Users can send emails from both the dashboard and the individual email page options.
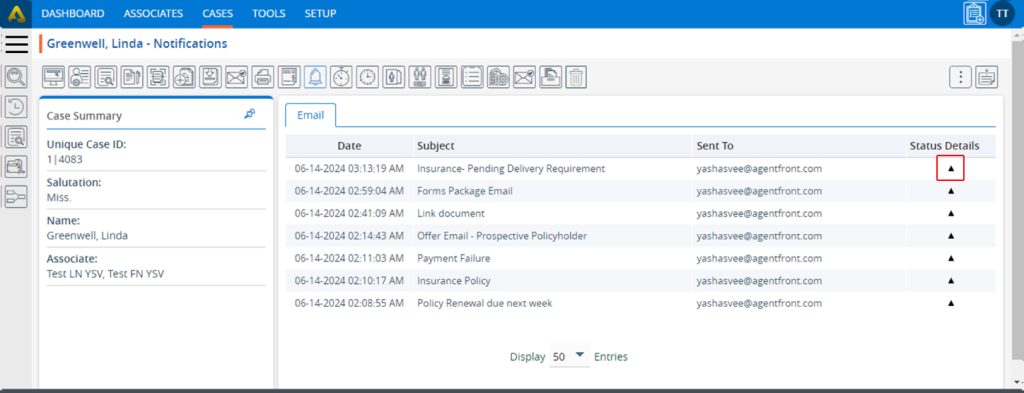
6. Click on the arrow below ‘Status Details.
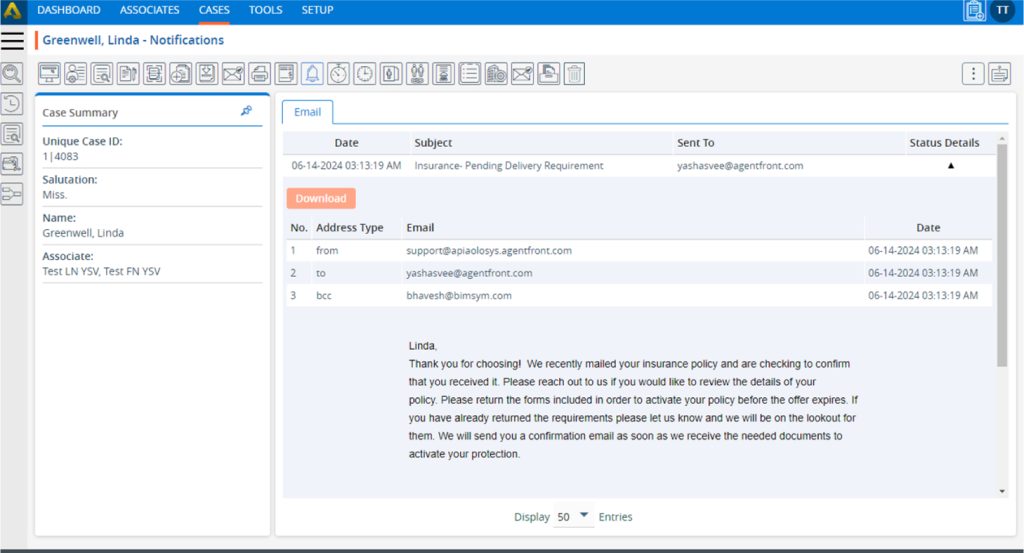
7. After clicking on the arrow, the system will display the details of the email.
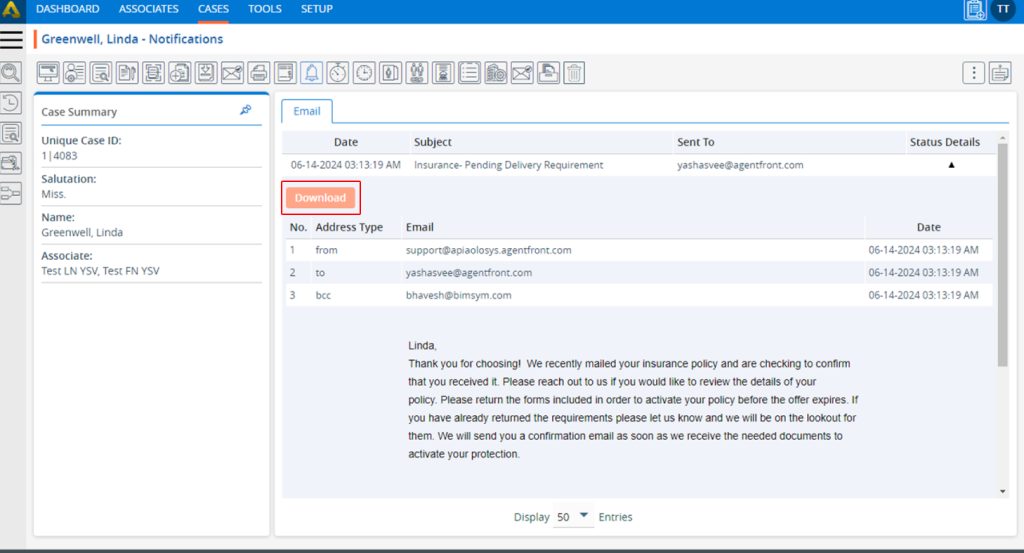
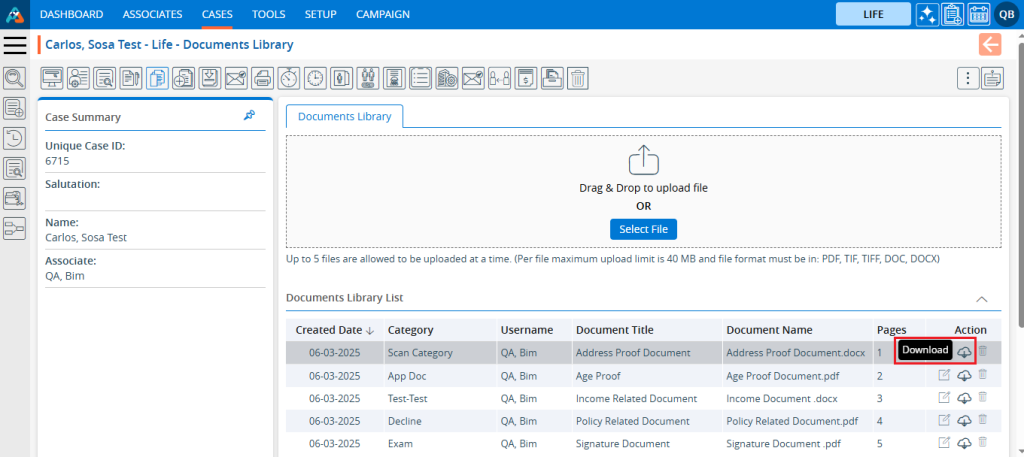
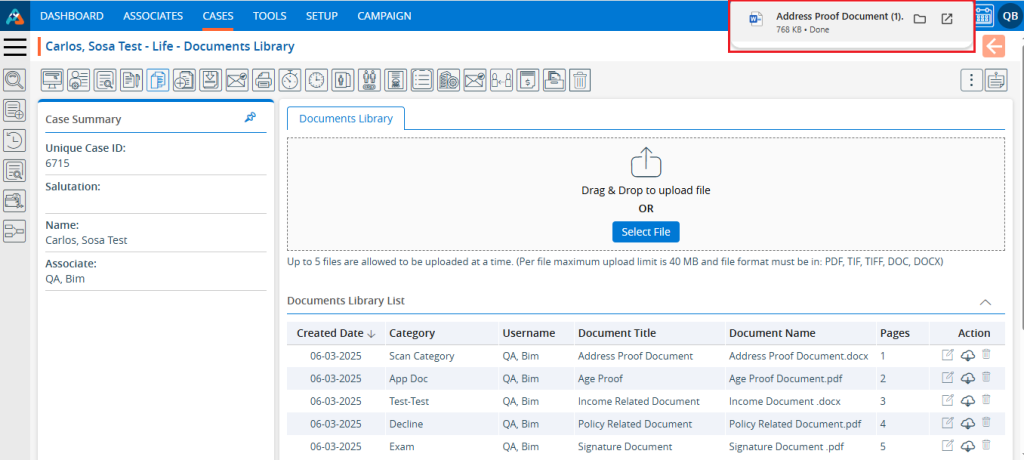
8. Users can download the details of the email by clicking on the ‘Download’ button.
9. The ‘Email’ will be downloaded to the selected location.
10. Users can send emails from the ‘Dashboard’ using the ‘Send Email’ icon located within the ‘Email’ section. 11. The sent emails will be displayed under the ‘Email’ option within the Notifications page.
12. Users can also send emails from the ‘EMAILS’ option.
13. On the Emails page, users will be able to send an email using the ‘Send Email’ icon. 14. The sent emails will be displayed under the ‘Email’ option within the Notifications page.
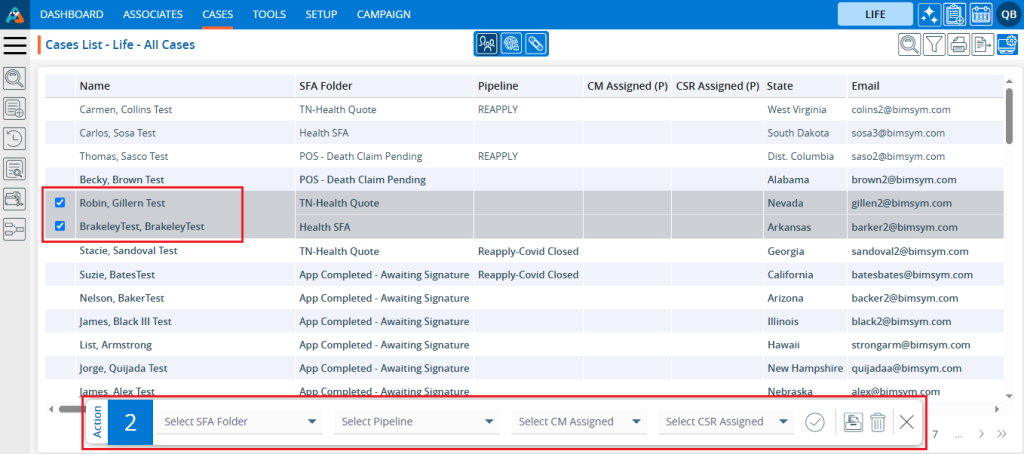
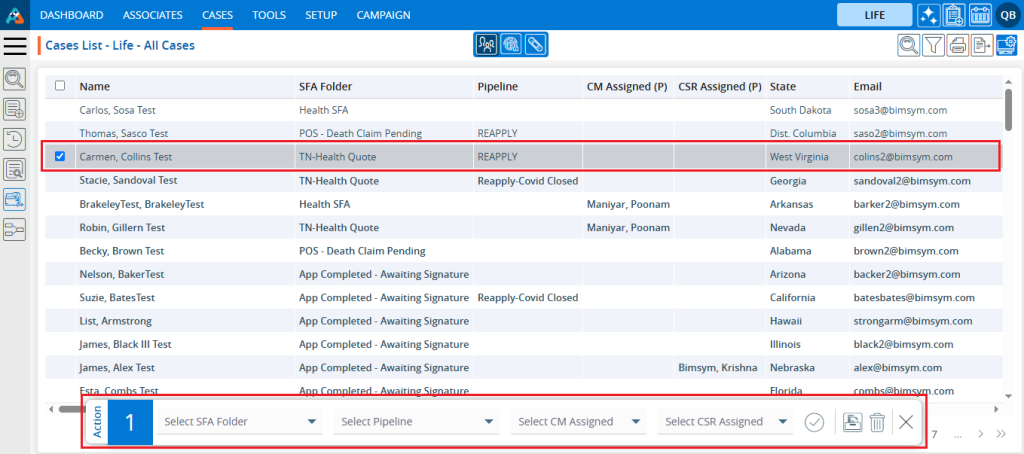
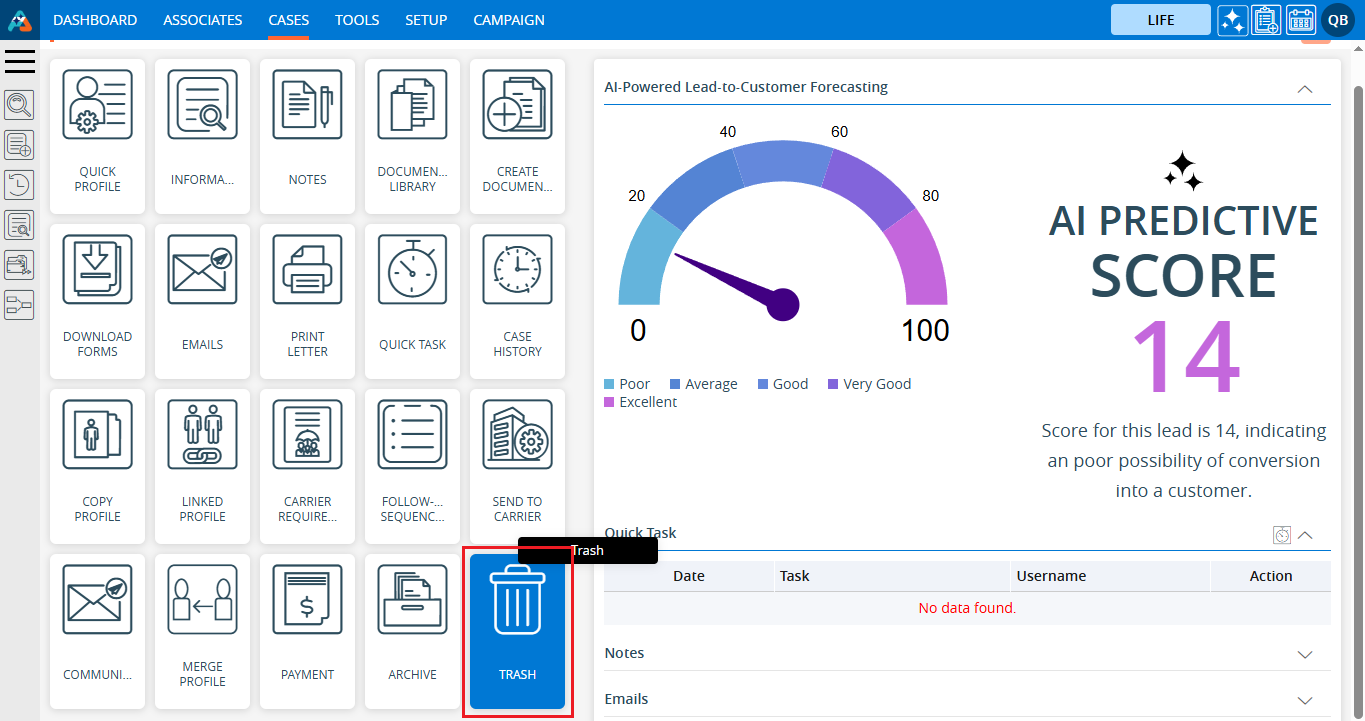
Quick Action Menu – The Quick Action Menu allows the user to mass perform the same action on single or multiple profiles. It enables the user to update the SFA Folder, change the Pipeline status, or move cases to Trash or Archive for specific profile(s).
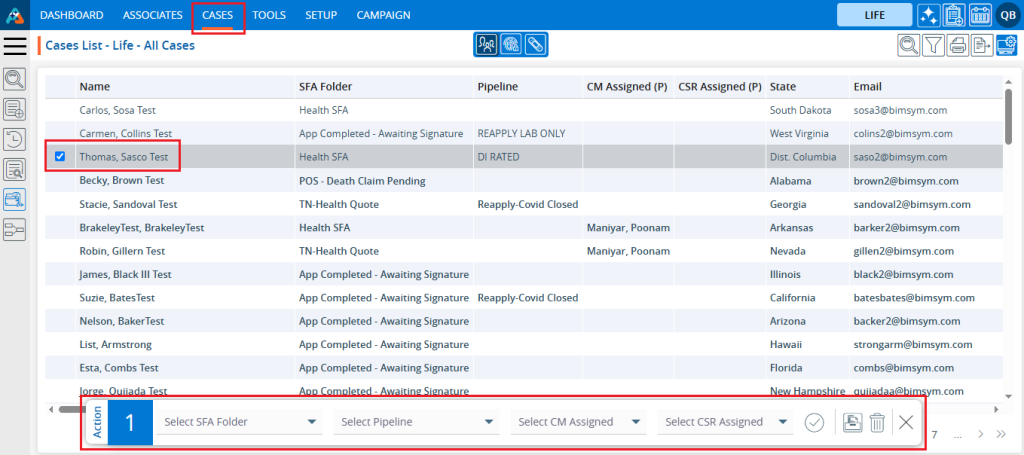
The following are steps to manage Quick Action: Steps to update the SFA Folder: 1. Navigate to the ‘CASES’ tab, where you will find the Cases List – All Cases.
2. Select a profile by checking the corresponding checkbox, and the ‘Quick Action Menu’ will be enabled.
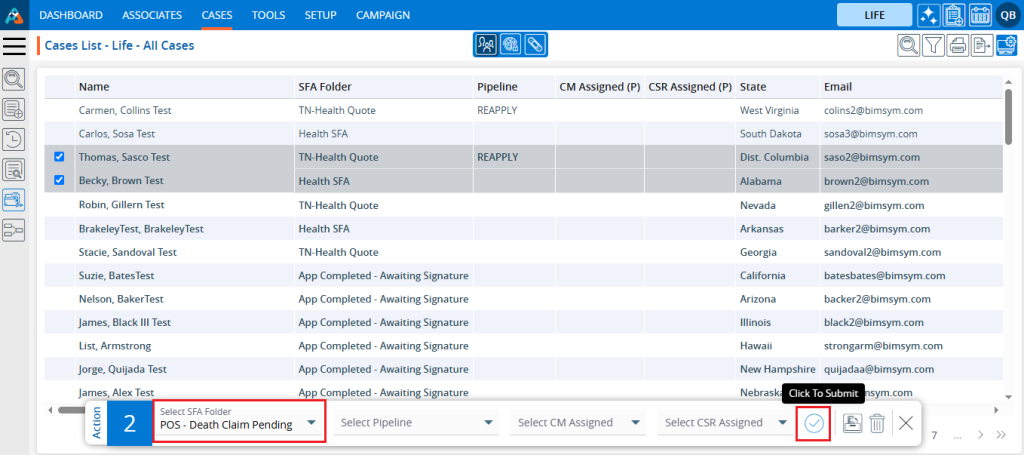
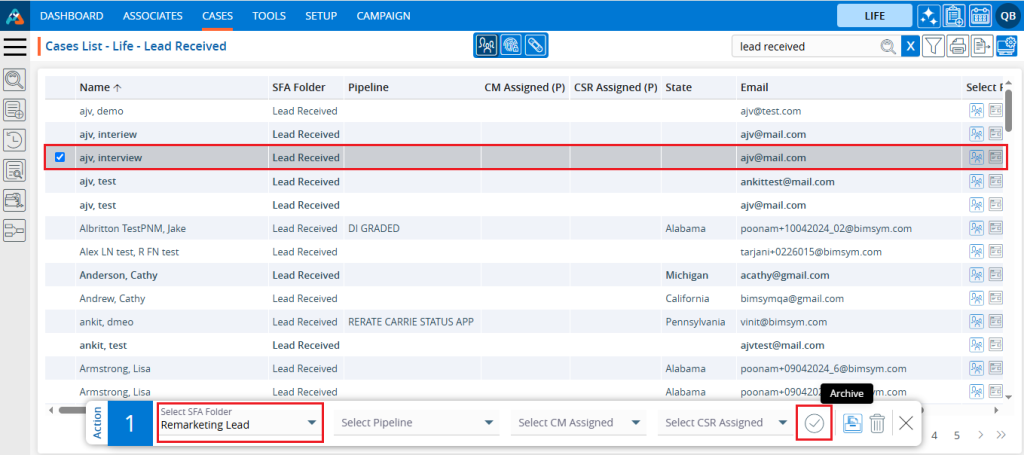
3. Multiple profile(s) can be selected by checking the corresponding checkbox. 4. After selecting the profile(s), It will allow the user to change the ‘SFA Folder’, ‘Pipeline’, ‘CM Assigned’ and ‘CSR Assigned’ for the selected profiles. Additionally, users can move the selected profiles to ‘Archive’ or ‘Trash’.
Steps to update SFA Folder: 5. Select the desired ‘SFA Folder’ from the provided dropdown menu to move the selected profiles to that specific ‘SFA Folder’.
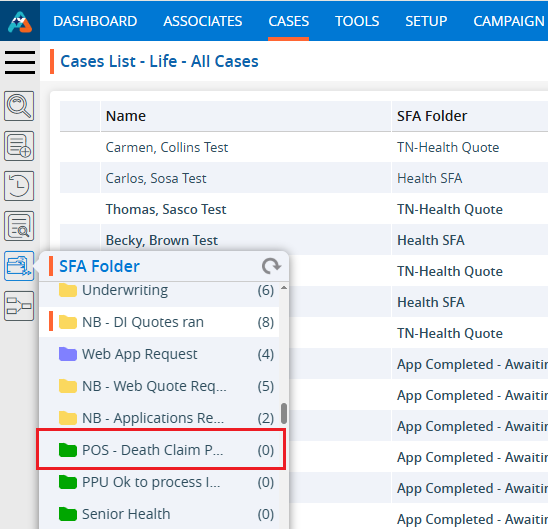
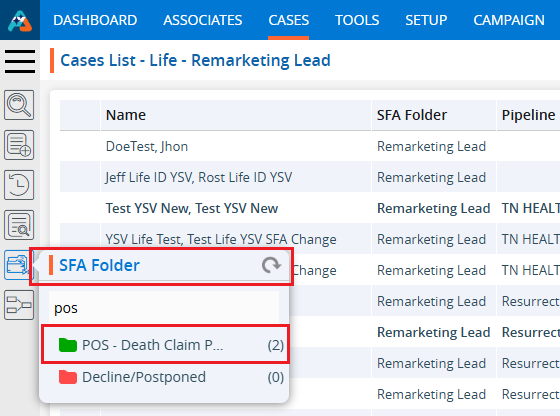
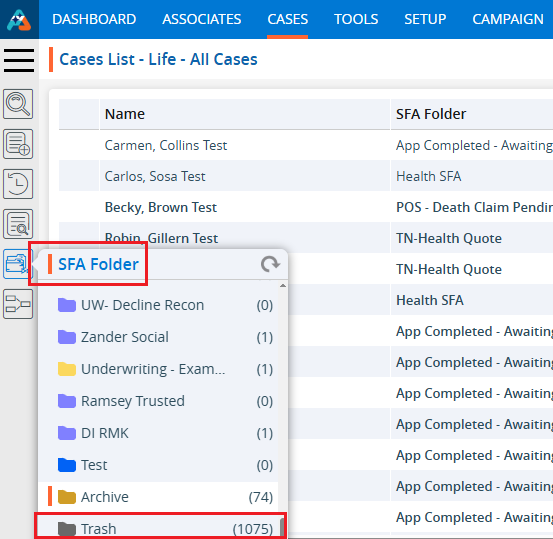
6. Navigate to the ‘SFA Folder’ section on the left side panel to view specific folders along with their respective counts.
7. Here we are moving the cases to the ‘POS – Death Claim Pending’ SFA Folder, which currently has a count of 0.
8. Select the ‘ POS – Death Claim Pending’ SFA Folder from the dropdown menu and click the submit button icon.
9. The system will display a confirmation message indicating that the cases have been updated successfully. 10. The selected profiles have been moved to the ‘ POS – Death Claim Pending’ SFA Folder. The updated ‘SFA Folder’ will be reflected in both the ‘Cases List – All Cases’ and ‘SFA Folder’ sections.
11. Click on ‘SFA Folder’ in the left side panel to check the counts of the updated ‘SFA Folders.’ The count will be updated from 0 to 2.
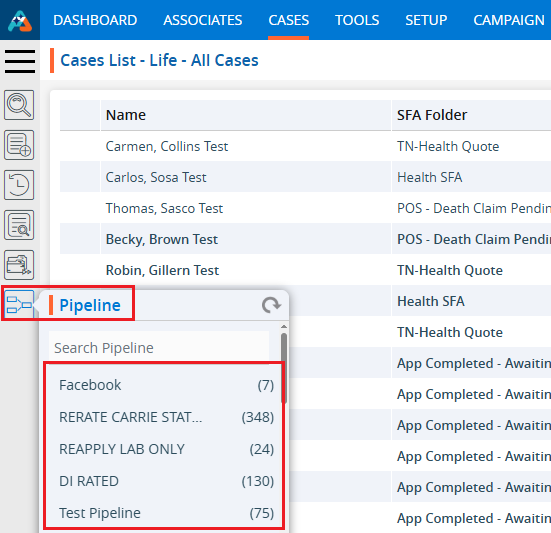
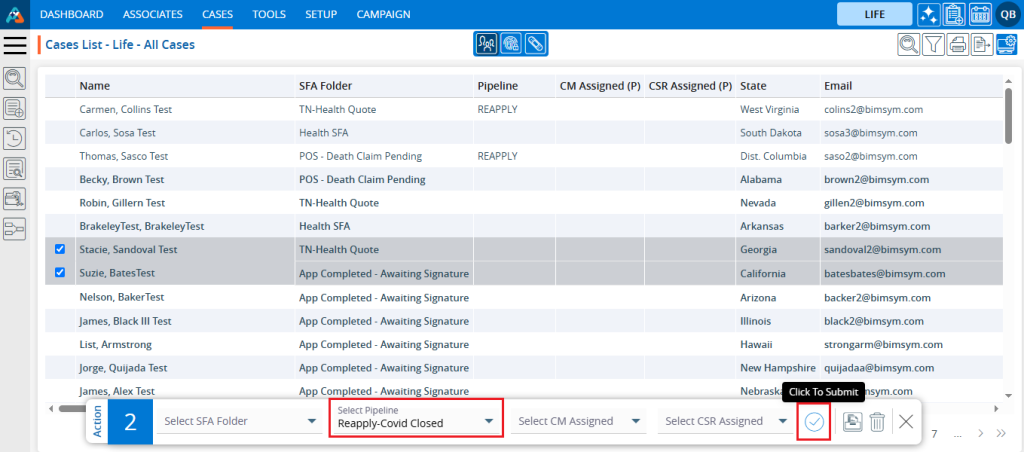
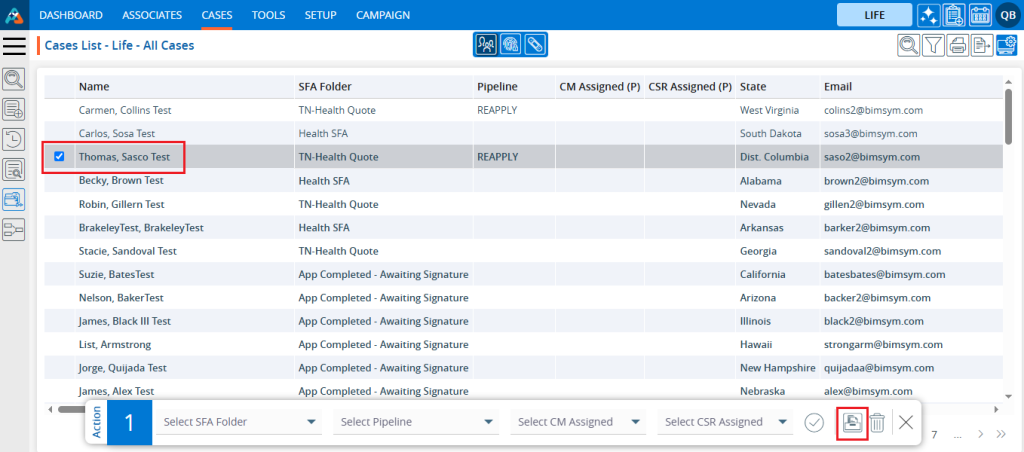
Steps to update Pipeline status: 12. Navigate to the ‘CASES’ tab again and select the profile(s) by checking the corresponding checkbox, and the ‘Quick Action Menu’ will be enabled.
13. Select the desired ‘Pipeline’ from the provided dropdown menu to move the selected profiles to that specific ‘Pipeline’.
14. Navigate to the ‘Pipeline’ section on the left side panel to view the specific statuses along with their respective counts.
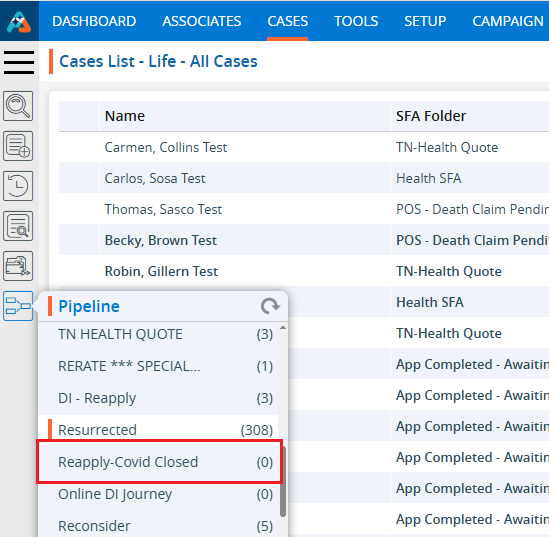
15. Here we are moving the cases to the ‘Reapply-Covid Closed’ Pipeline, which currently has a count of 0.
16. Select the profiles from the list and choose the ‘Reapply-Covid Closed’ Pipeline from the dropdown menu. Click the ‘Submit’ icon.
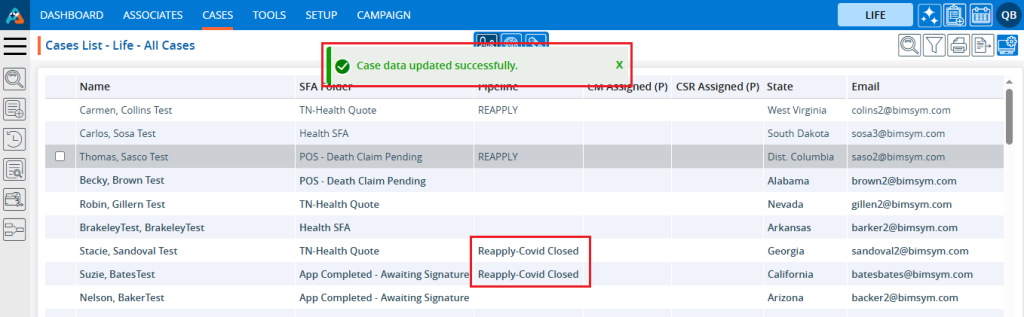
17. The system will display a confirmation message indicating that the case data has been updated. 18. The selected profiles have been moved to the ‘Reapply-Covid Closed’ Pipeline. The updated ‘Pipeline’ will be reflected in both the ‘Cases List – All Cases’ and ‘Pipeline’ sections.
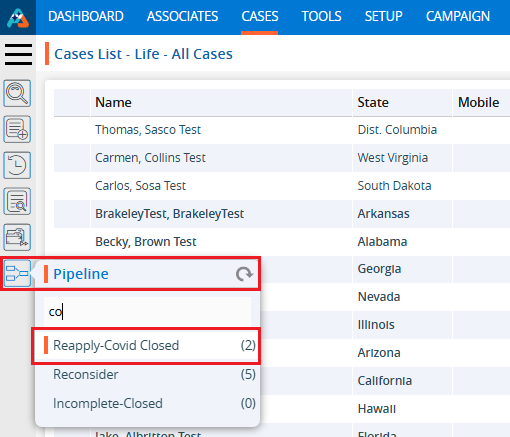
19. Click on ‘Pipeline’ in the left side panel to check the count of the ‘Reapply-Covid Closed’ Pipeline. The count will be updated from 0 to 2.
Steps to move profile(s) to Archive Folder: 20. Navigate to the ‘SFA Folder’ section on the left side panel to view the count for the ‘Archive’ folder. The count is 73.
21. Select the profile(s) from the list and click the Archive button icon in the ‘Quick Action Menu’..
22. The system will generate a validation message and ask for confirmation. Click ‘Archive’ to proceed
23. After clicking ‘Archive,’ the system will display a confirmation message indicating that the case data has been updated, and the cases will be moved to the ‘Archive’ folder. 24. The selected profile(s) have been moved to the ‘Archive’ SFA Folder successfully. The profile(s) which moved to the Archive folder will not be visible in ‘Cases List – All Cases’.
25. Click on ‘SFA Folder’ in the left side panel to check the counts of the ‘Archive’ folder.’ The count will be updated from 73 to 74.
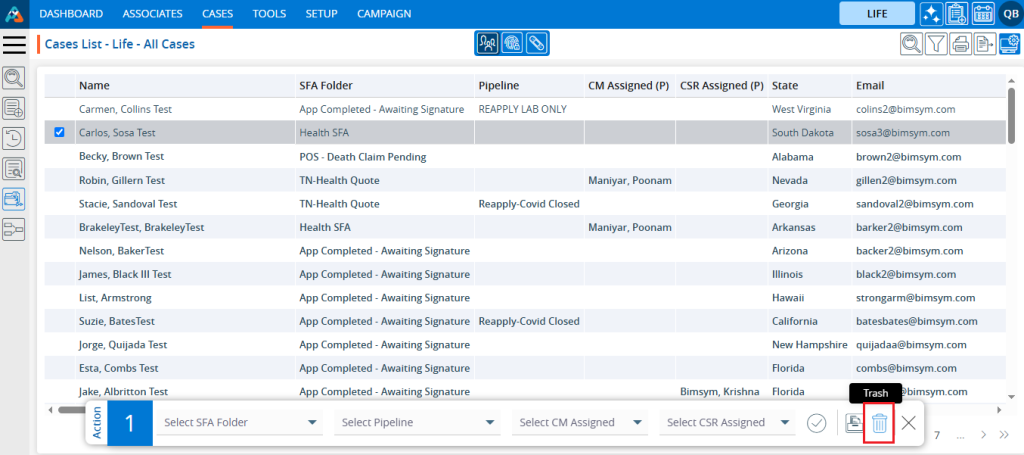
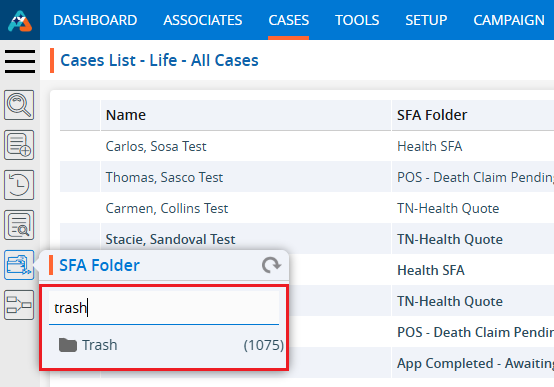
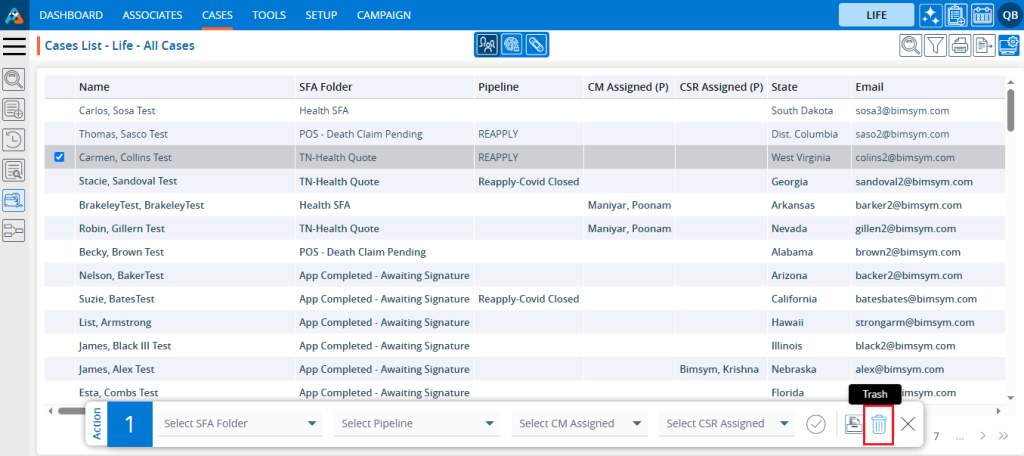
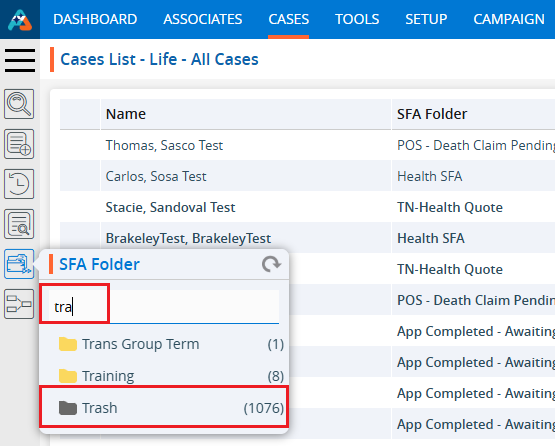
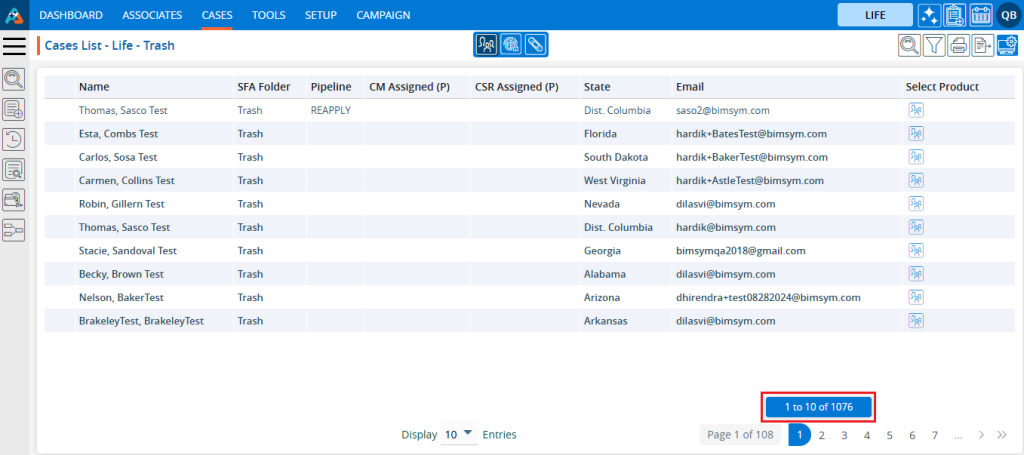
Steps to move profile(s) to Trash Folder: 26. Navigate to the ‘SFA Folder’ section on the left side panel to view the count for the ‘Trash’ folder. The count is 1075.
27. Select the profile(s) from the list, then click the Trash button icon in the ‘Quick Action Menu’.
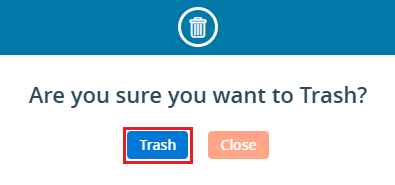
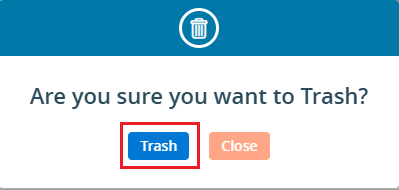
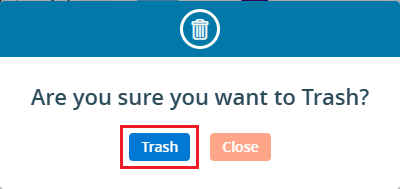
28. The system will generate a validation message and ask for confirmation. Click ‘Trash’ to proceed.
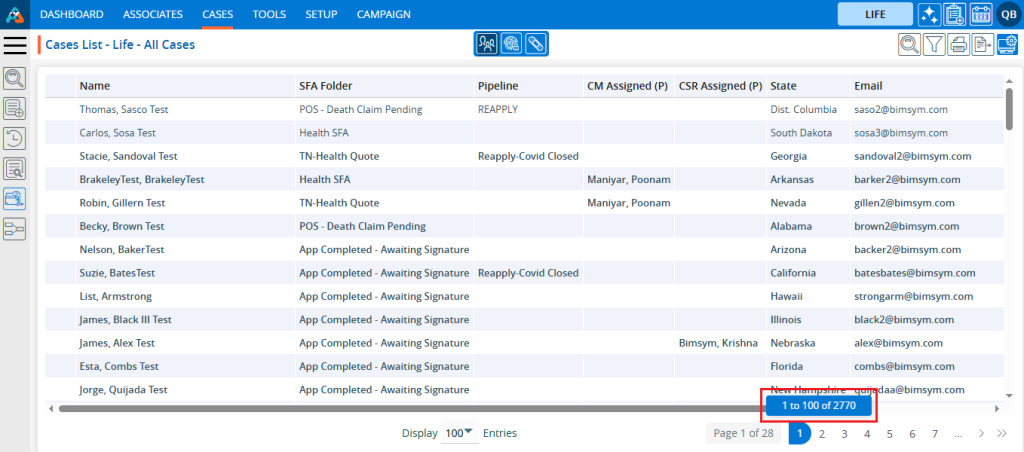
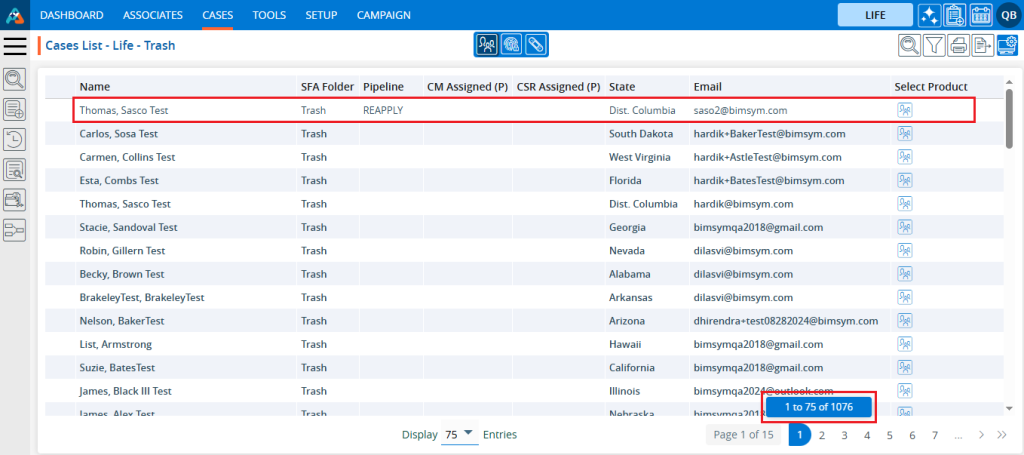
29. After clicking Trash,’ the system will display a confirmation message indicating that the case data has been updated successfully, and the profile(s) will be moved to the ‘Trash’ folder. 30. Selected profile(s) have been moved to ‘Trash’ SFA Folder successfully. The profile(s) which moved to Trash folder will not be displayed in the ‘Cases List – All Cases’.
31. Click on ‘SFA Folder’ in the left side panel to check the counts of the ‘Trash’ folder.’ The count will be updated from 1075 to 1076.
Steps to move profile(s) to CM Assigned: 32. Navigate to the ‘CASES’ tab again and select the profile(s) by checking the corresponding checkbox, and the ‘Quick Action Menu’ will be enabled.
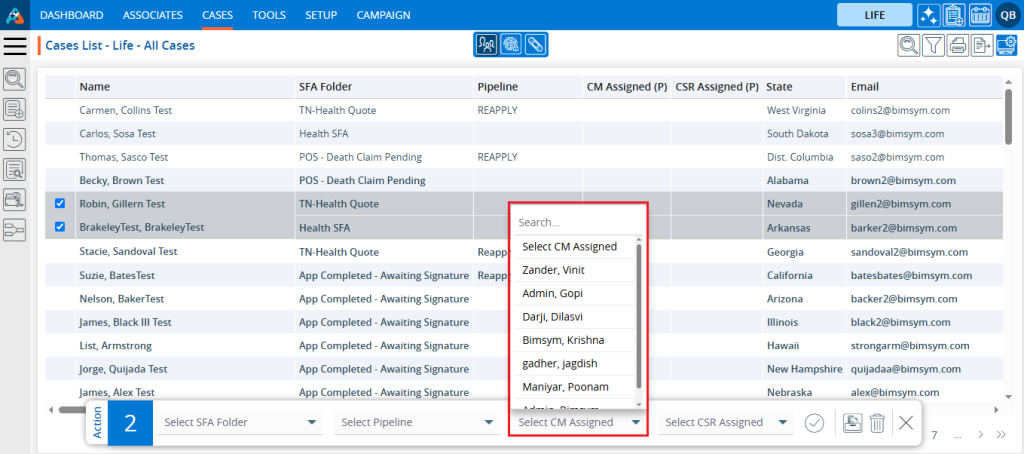
33. Select the desired ‘CM Assigned’ from the provided dropdown menu to move the selected profiles to that specific ‘CM Assigned’
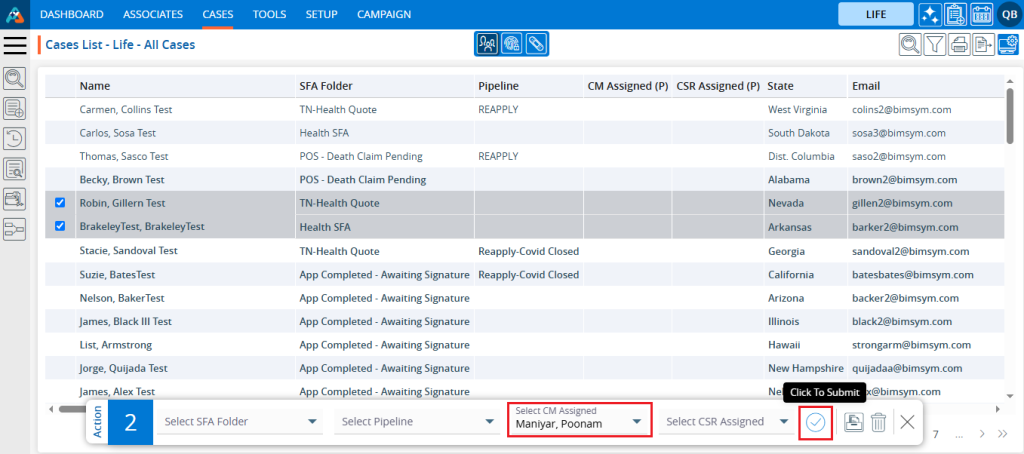
34. Select the profiles from the list and choose the ‘Maniyar, Poonam’ CM Assigned from the dropdown menu. Click the ‘Submit’ icon.
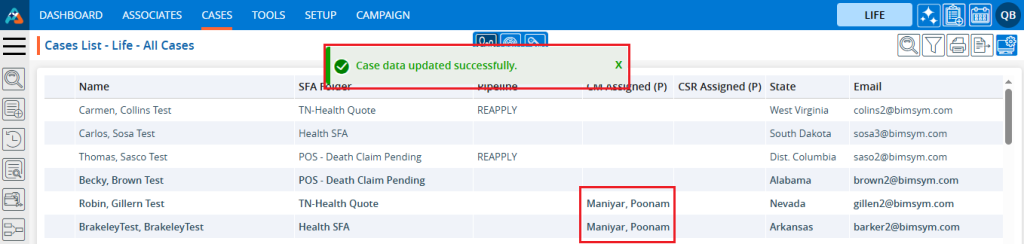
35. The system will display a confirmation message indicating that the case data has been updated. 36. The selected profiles have been moved to the ‘Maniyar Poonam’ CM Assigned. The updated ‘CM Assigned’ will be reflected in both the ‘Cases List – All Cases’ and ‘CM Assigned’ sections.
Steps to move profile(s) to CSR Assigned: 37. Navigate to the ‘CASES’ tab again and select the profile(s) by checking the corresponding checkbox, and the ‘Quick Action Menu’ will be enabled.
38. Select the desired ‘CSR Assigned’ from the dropdown menu provided to move the selected profiles to that specific ‘CSR Assigned’.
39. Select the profiles from the list and choose the ‘BimSym, Krishna’ CSR Assigned from the dropdown menu. Click the ‘Submit’ icon.
40. The system will display a confirmation message indicating that the case data has been updated. 41. The selected profiles have been moved to the ‘BimSym Krishna’ CSR Assigned. The updated ‘CM Assigned’ will be reflected in both the ‘Cases List – All Cases’ and ‘CSR Assigned’ sections.
The pipeline is used to track sales for each case within the system. Here, the case is moved from one Pipeline to another. Pipeline status can be created according to the requirement from the Setup > System Setup > Pipeline.
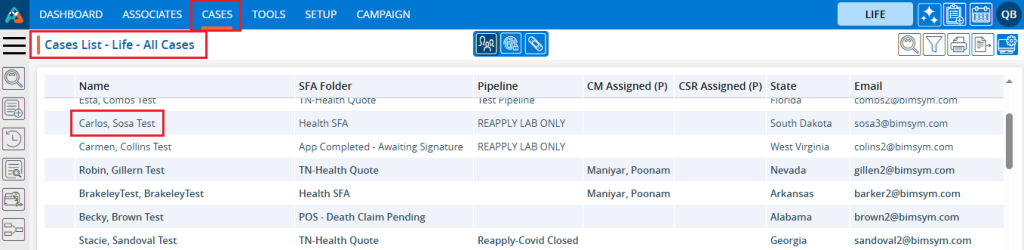
The following are the steps to move cases through the Pipelines: 1. Navigate to the ‘CASES’ tab where you’ll find the ‘Cases List – Life – All Cases’.
2. Click on the ‘Pipeline’ option from the left-side panel, and a list of available pipelines will be displayed.
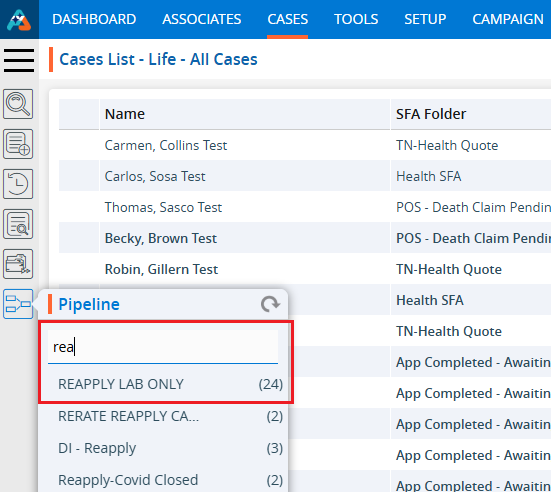
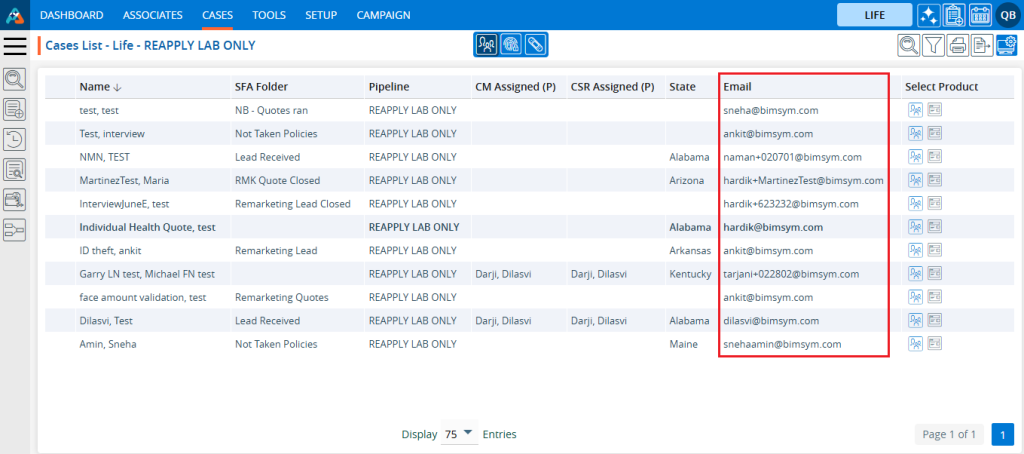
3. Search for the required Pipeline by entering its keyword in the search box. For example, if the user types ‘rea’, they will get a list that includes ‘REAPPLY LAB ONLY’. Check the total number of cases displayed (24) and click on it to open the list of cases.
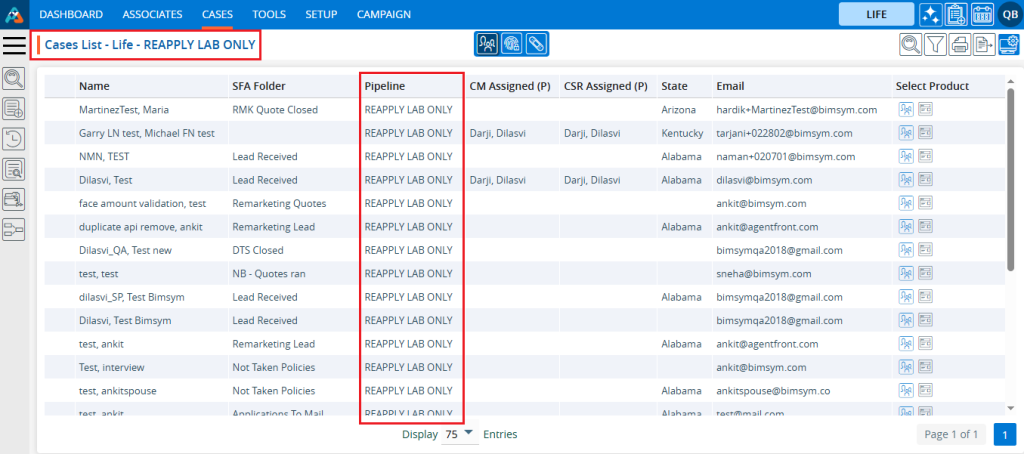
4. In Pipeline cases are displayed below. The page will be named ‘Cases List – REAPPLY LAB ONLY’. In the Pipeline column, only ‘REAPPLY LAB ONLY’ pipeline cases will be shown.
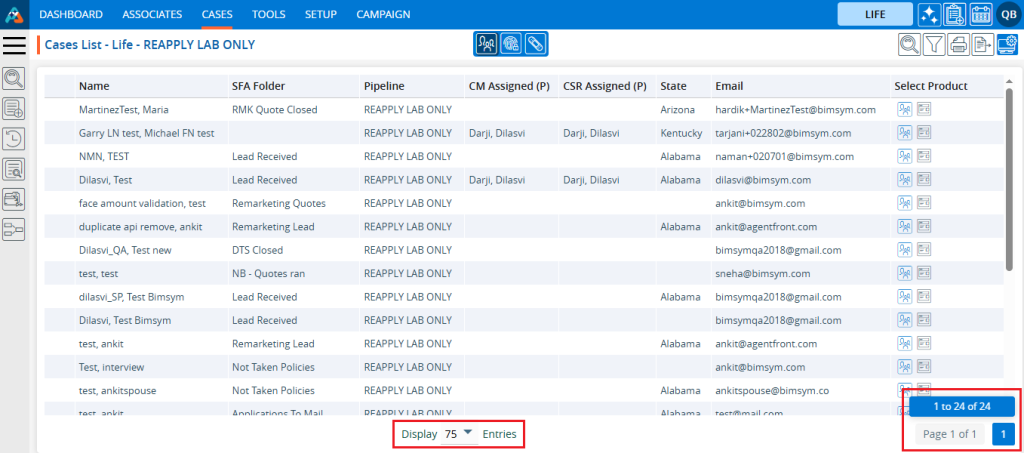
5. Select the option from the Display Options menu to set the number of cases displayed per page based on the total number of cases available in the ‘REAPPLY LAB ONLY’.
6. After selecting the Display option, the system will display cases and pagination according to the chosen option. If the user selects 20 cases per page, the system will display 20 cases per page, distributing the data accordingly.
7. Click on the Print option to print the current page. The printing feature will print the data based on the selected display settings.
8. Click on the field title to view the cases in ascending or descending order. When the user clicks on the title, a downward arrow will be displayed next to it, and the cases will be arranged in descending order.
9. When the user clicks on the title again, an upward arrow will be displayed next to it, and the cases will be arranged in ascending order.
10. Click on the left search bar and enter the data you wish to search for within the ‘REAPPLY LAB ONLY’ list. For example, if you select ‘Like’ ‘Email’ ‘bimsym.com’, it will display all cases that have an email address like ‘bimsym.com’.
11. The resulting display is a list of cases in the ‘REAPPLY LAB ONLY’ Pipeline which have an email address like ‘bimsym.com’.
12. Click on Quick Search and enter the data the user wants to search for within the ‘REAPPLY LAB ONLY’ Pipeline. For example, if the user inputs ‘carmen’ and clicks on the search button.
13. The resulting display is a list of cases in the member with the name “CARMEN’ in ‘REAPPLY LAB ONLY’ Pipeline.
14. Users can move the case to another Pipeline by selecting the case and choosing an option from the Action Pop-up menu. For instance, if the user selects a case from the ‘REAPPLY LAB ONLY’ folder and moves it to ‘DI GRADED’.
15. Once the selected case is moved from the ‘REAPPLY LAB ONLY’, a confirmation message will be displayed by the system, and the case will no longer appear in the listing in the ‘REAPPLY LAB ONLY’ Pipeline.
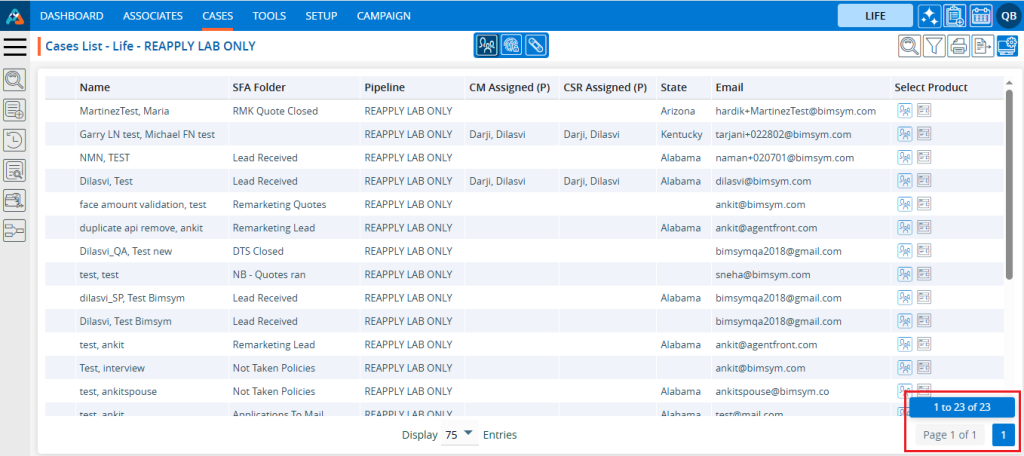
16. Check the total number of cases available in the ‘REAPPLY LAB ONLY’ Pipeline. It has decreased by 1.
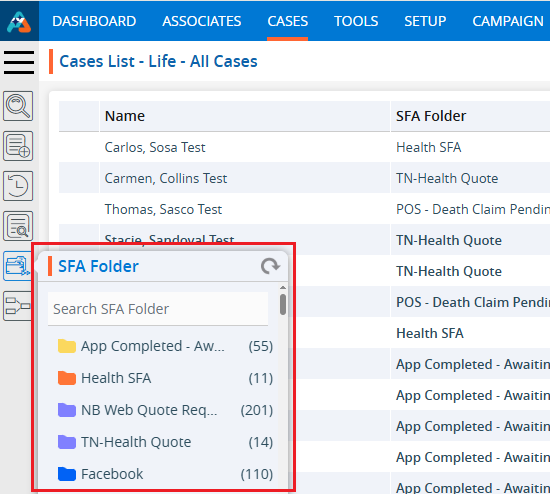
The SFA Folders are used to track cases. SFA Folders can be created according to the requirement from the Setup > System Setup > SFA Folder.
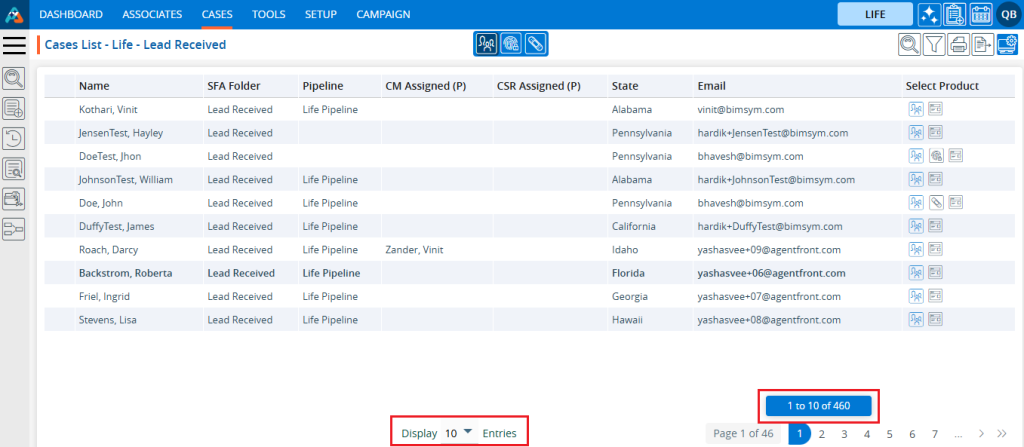
The following are the steps to utilize the SFA Folders: 1. Navigate to the ‘CASES’ tab where you’ll find the ‘Cases List – All Cases’ list.
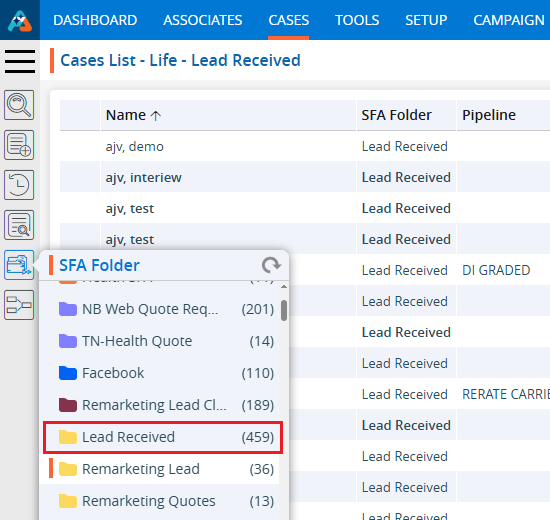
2. Click on the ‘SFA Folder’ option in the left-side panel to display all available SFA Folders.
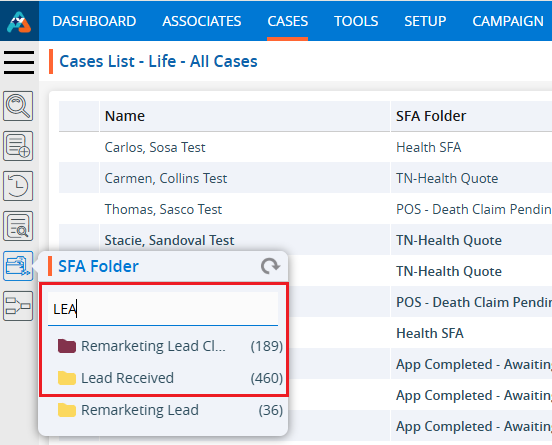
3. Search for the SFA Folder by entering the name in the search box. For example, if the user types ‘LEA’, they will get a list that includes the ‘Lead Received’ folder.
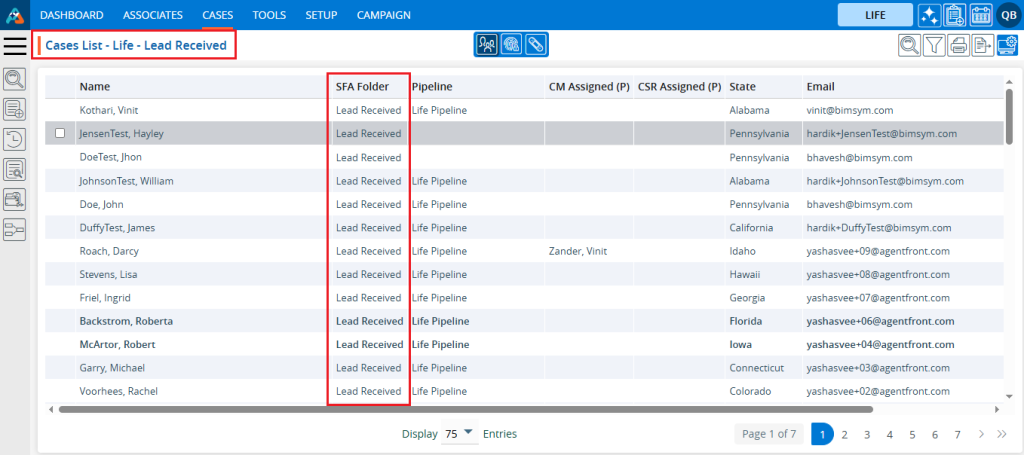
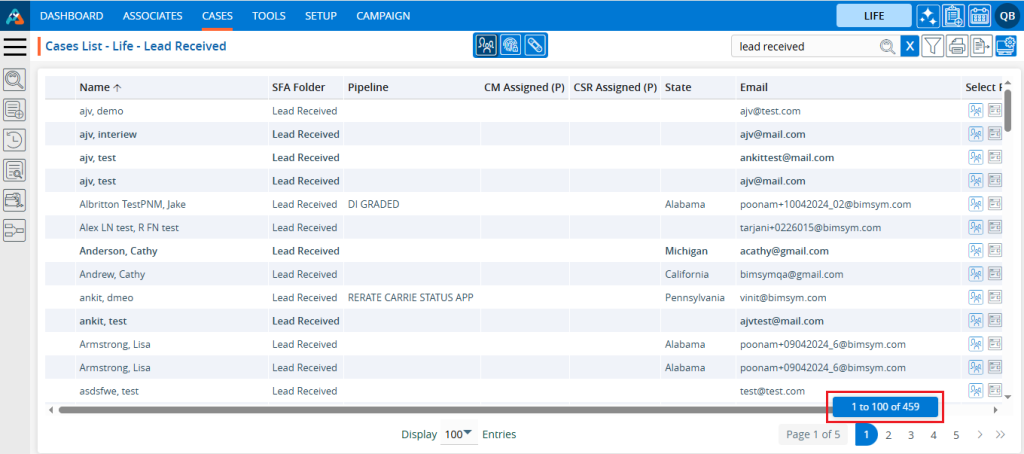
4. The selected SFA Folders cases are now displayed. The page will be named ‘Case List -Life – Lead Received’. In the ‘SFA Folder’ column, only cases labeled ‘Lead Received’ will be shown.
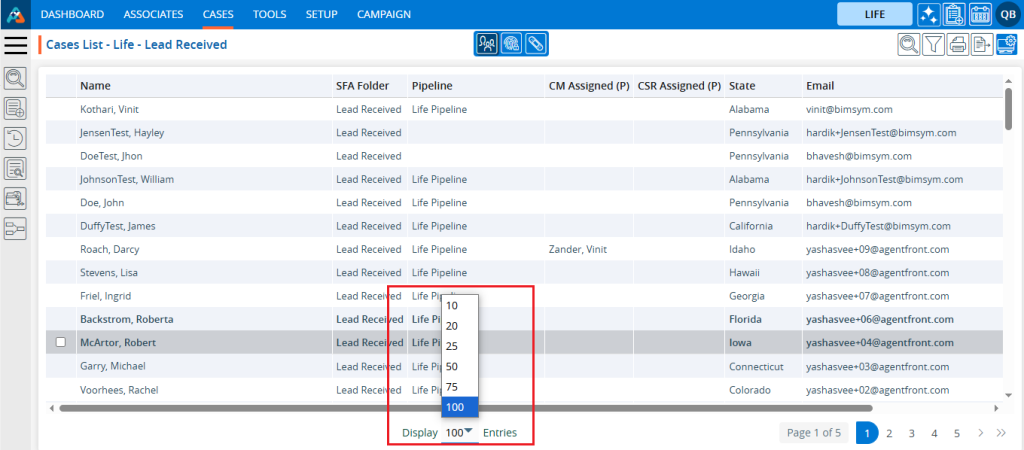
5. Select the option from the display settings to specify the number of cases to show per page, based on the total number of cases available in ‘Lead Received’.
6. After selecting the display option, the system will display cases and pagination based on the selected setting. For instance, if the user chooses 10 cases per page, the system will organize and display 10 cases per page.
7. Click on the ‘Print’ option to print the current page. The print feature will print the data according to the current display settings.
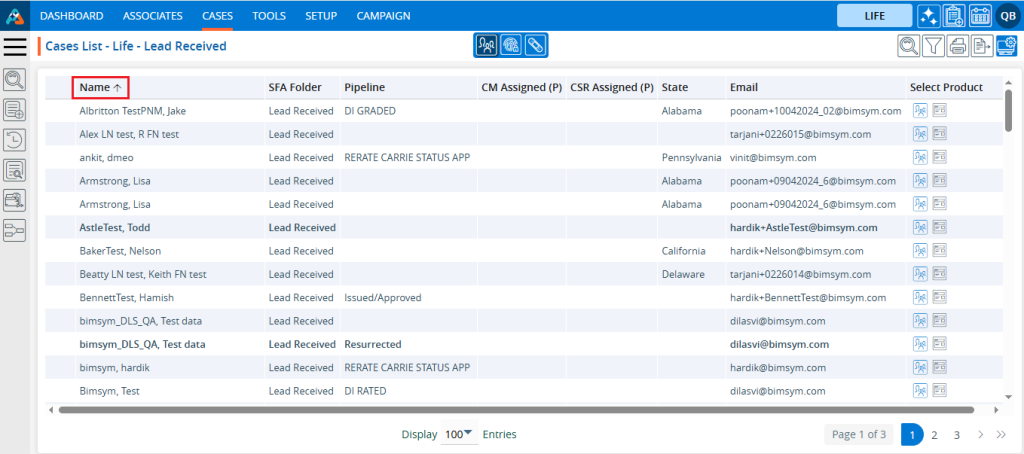
8. Click on the field title to view the cases in ascending or descending order. When the user clicks on the title, a downward arrow will appear beside it, indicating that the cases are arranged in descending order. For example, in the ‘Lead Received’ list, names will be displayed in descending order after clicking the title.
9. When the user clicks on the title again, an upward arrow will appear beside it, indicating that the cases are now arranged in ascending order. For example, in the ‘Lead Received’ list, names will be displayed in ascending order after clicking the title again.
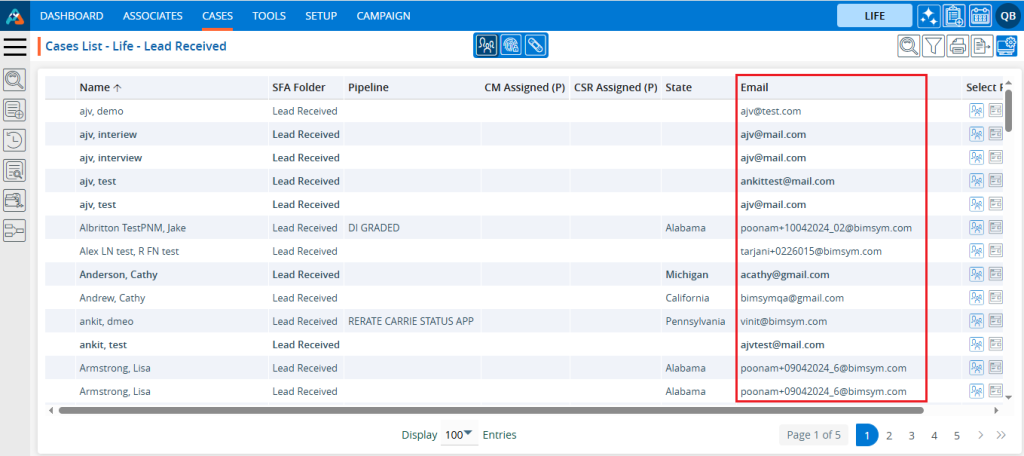
10. Click on the ‘Left Search’ and enter the data the user wants to search for in the Lead Received SFA Folder list. For example, if the user enters ‘Like’ ‘Email’ ‘bimsym.com’, it will display cases that have an email like ‘bimsym.com’.
11. The result is a list of cases in the ‘Lead Received’ SFA folder where the email like ‘bimsym.com’.
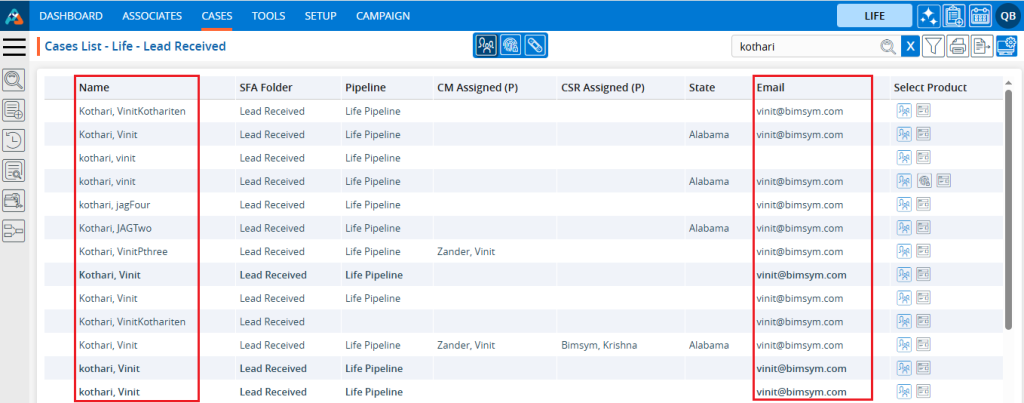
12. Click on the Quick Search and enter the data the user wants to search for in the ‘Lead Received’ SFA Folder list. For example, if you enter ‘Kothari’, it will display cases that have cases with this name in Lead Received SFA.
13. The resulting display is a list of cases in the ‘Lead Received’ SFA Folder where member name and email address contain word ‘kothari’.
14. Users can move the case to another SFA Folder by selecting the case and choosing an option from the Action Pop-up menu. For example, if the user selects a case from the ‘Lead Received’ folder and moves it to ‘Remarketing Lead’.
15. Once the selected case is moved from ‘Lead Received’, the system will display a confirmation message, and the case will then be available in the ‘Remarketing Lead’ SFA Folder.
16. The total number of cases available in the ‘Lead Received’ list has decreased by 1.
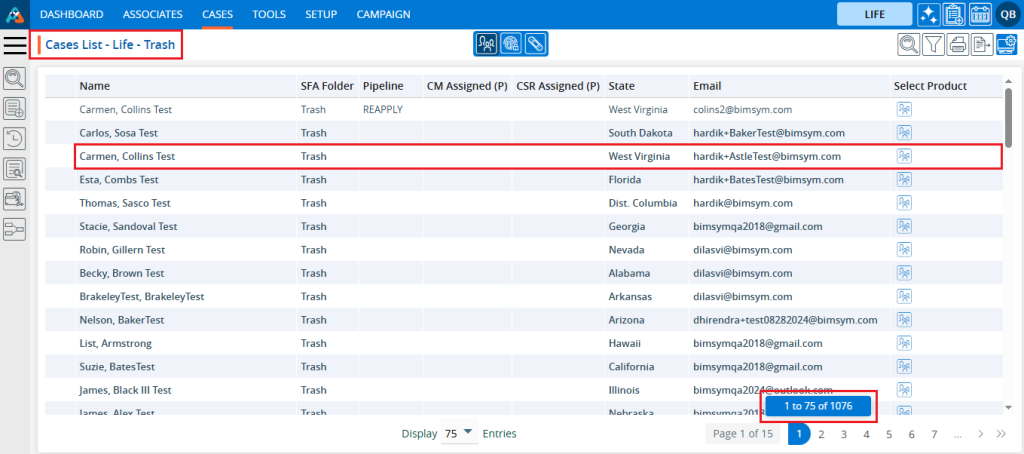
The Trash folder is for unused cases with the intention of discarding or removing unnecessary items.
The following are the steps to manage the Trash folder: 1. Navigate to the ‘CASES’ tab where you’ll find the ‘Cases List -Life – All Cases’.
2. Check the total number of cases in the ‘All Cases’ list; it shows 2771 cases.
3. Before moving a case to ‘Trash’ verify the number of cases in the ‘Trash’ folder, located within the SFA folder options.
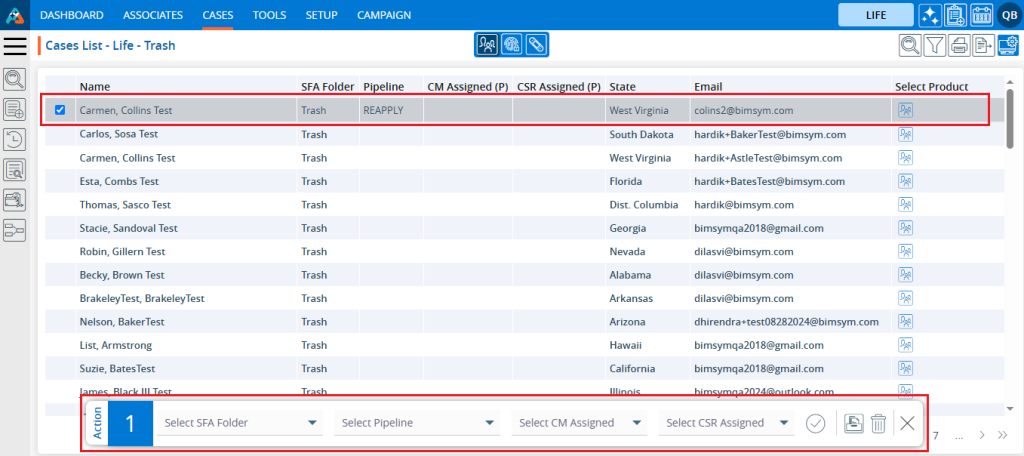
4. Select the case from the ‘Cases List – Life – All Cases’ list that is currently not needed. The Quick Action pop-up will be enabled.
5. Click on the ‘Trash’ option.
6. A pop-up will appear to confirm your action to move the case to the trash. Click on the ‘Trash’ option.
7. The case will disappear from the ‘Cases List – Life – All Cases’ and a confirmation message will be generated.
8. Check the total number of cases available in the Cases List – Life – All Cases. It should have decreased by 1.
9. Check the total number of cases available in the Trash folder. It should have increased by 1.
10. Navigate to the ‘Trash’ folder, and you will find the case has moved there.
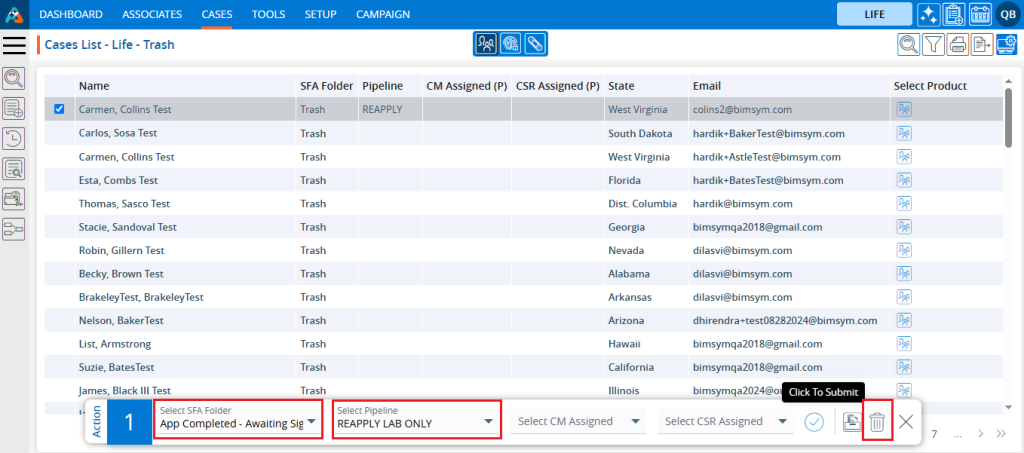
11. Any case can be moved back to ‘Cases List – Life – All Cases’. To move a case from the ‘Trash’ back select the case and the Quick Action pop-up will open.
12. Choose the SFA Folder or Pipeline or both and click the ‘Click To Submit’ option.
13. The selected case will disappear from the ‘Cases List – Life – Trash’ and a confirmation message will be generated.
14. Now, check the total number of cases available in the ‘Cases list – Life – Trash’. It should have decreased by 1.
15. Navigate to the ‘CASES’ tab, and you will find the case moving. Example: the total number of cases available in ‘Cases List – Life – All Cases’ has increased by 1.
16. There is another way to move a case to the ‘Trash’. Navigate to the ‘CASES’ tab where you’ll find the ‘Cases List – Life – All Cases’. Open a case by clicking on it.
17. After clicking on the case, the ‘DASHBOARD’ will open. Click on the ‘TRASH’ option.
18. A pop-up will appear to confirm your action to move the case to the trash. Click on the ‘Trash’ option.
19. The case is moved to the Trash Folder, and a confirmation message will be generated. The case will disappear from the ‘Cases List – All Cases’ list.
20. Navigate to the ‘Trash’ folder, and you will find the case has moved there..
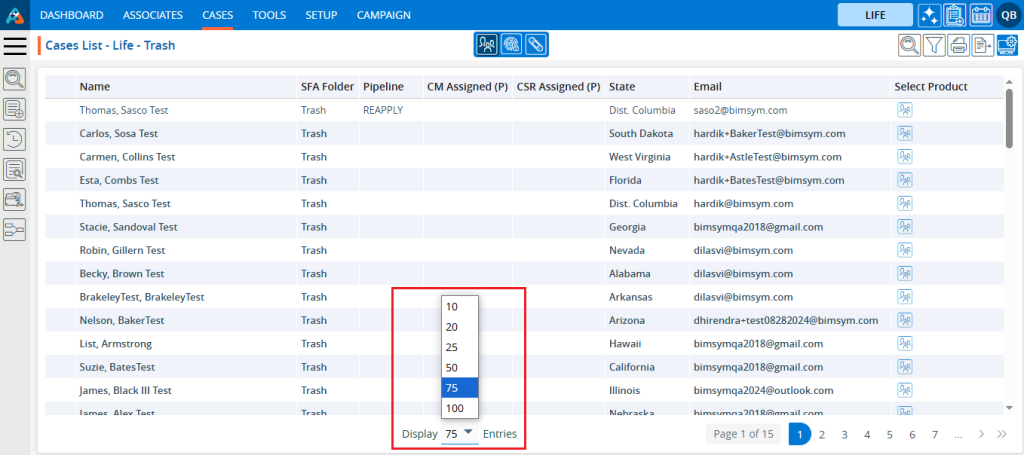
21. The user can update the number of entries through the Display drop-down..
22. After changing the Display, the system will update the cases and pagination based on the chosen setting. For example, if the user selects 10 cases per page, the system will display 10 cases with the data distributed accordingly.
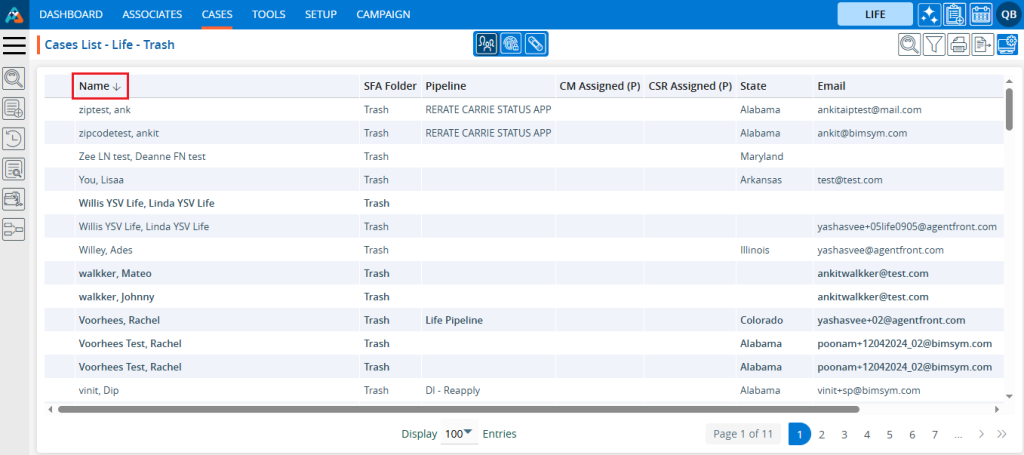
23. To view the cases in an ascending or descending order, click on the field title. When the user clicks on the title, a downward arrow will appear next to it, indicating that the cases are arranged in the descending order. For example, the list displays ‘Name’ in descending order for the Trash List.
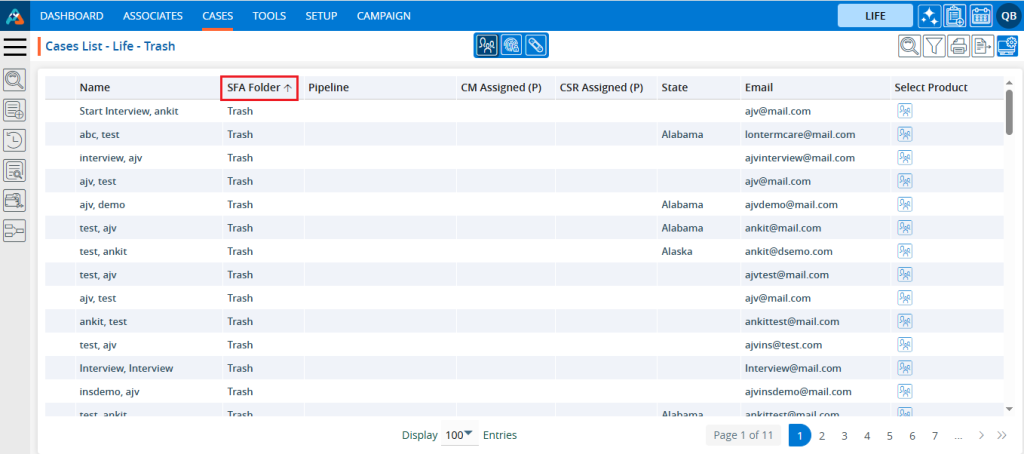
24. When the user clicks on the title again, an upward arrow will appear beside the title, indicating that the cases are now arranged in an ascending order. For example, the list displays ‘SFA Folder’ in ascending order for the Trash List.
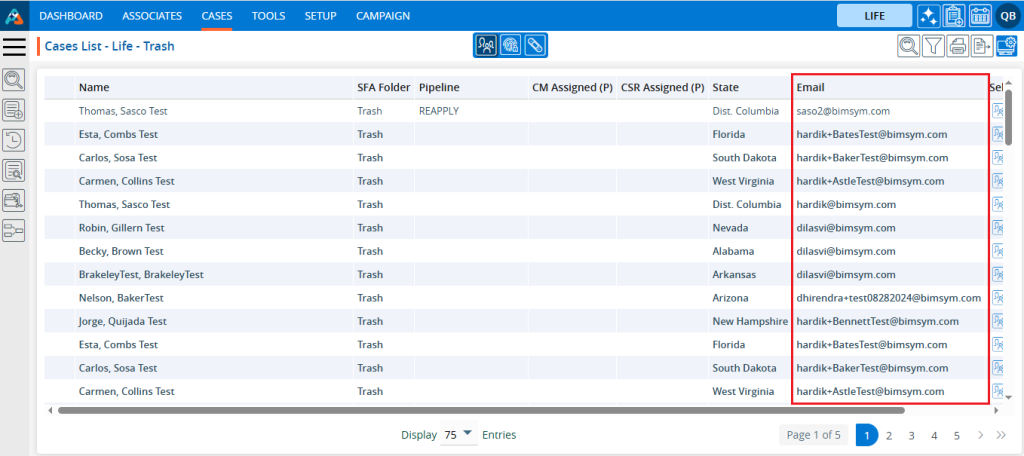
25. Click on the left search bar and enter the data you wish to search for from the Trash List. For example, select the option ‘Starts with’, select the field as ‘Email’ and keep the value as ‘bimsym.com’, which will display cases whose email starts with ‘bimsym.com’.
26. The resulting display is a list of cases in the Trash Folder where the case’s email starts ‘bimsym.com’.
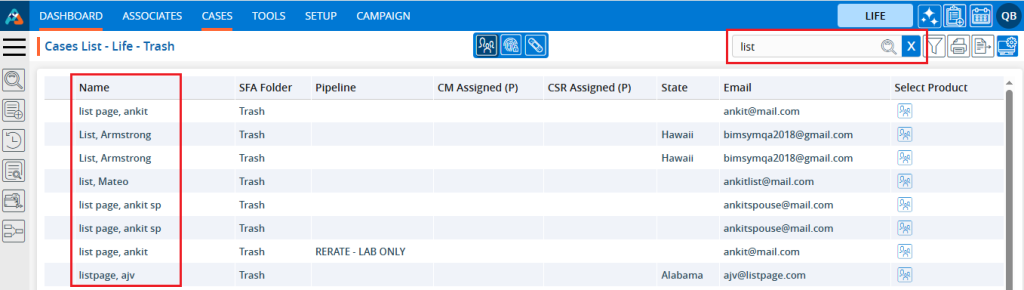
27. Click on the Quick Search and enter the data you want to search for from the Trash.
28. For example, entering word ‘List’ will display cases with the name containing the word ‘List’. The resulting display is the list of cases in the Trash Folder where the Name field contains the word ‘List’.
29. Click on the Print option to print the current page.
30. Filters, display options, and export functions will consistently operate on the entire list of cases.
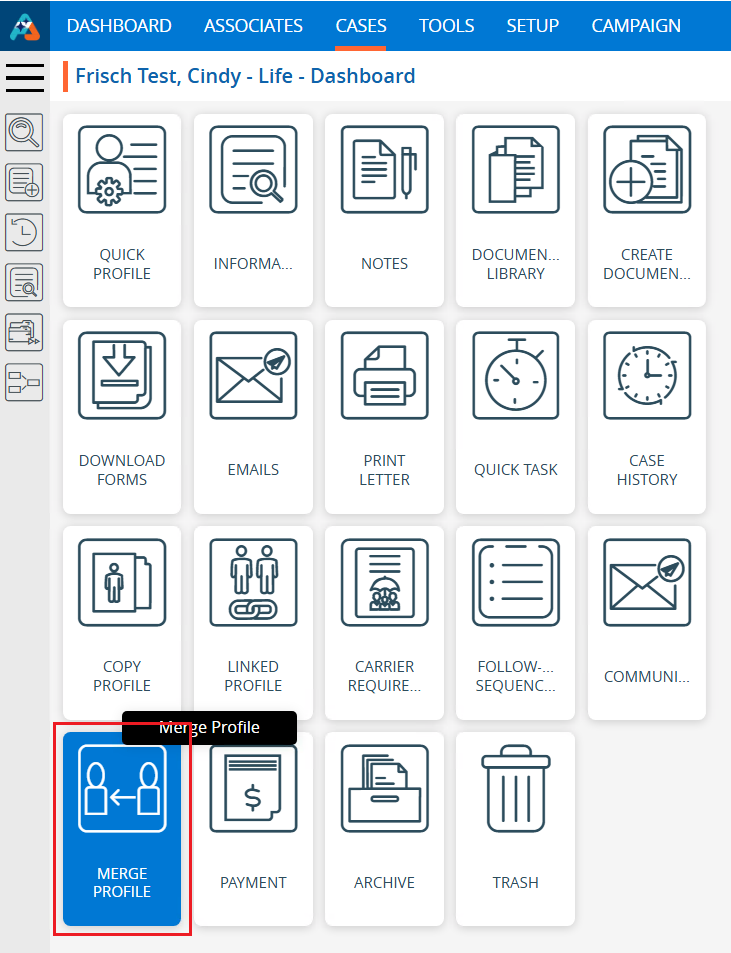
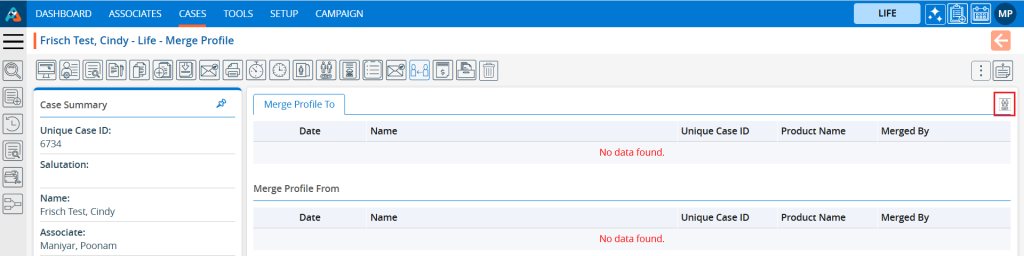
Merge Profile – Merging profiles combines multiple records related to a case, which may exist in the same or different products, into a single consolidated profile. The following are the steps to merge one or more than one profiles: 1. Navigate to the ‘CASES’ tab where you’ll find the Cases List – All Cases. 2. Click on a case to proceed.
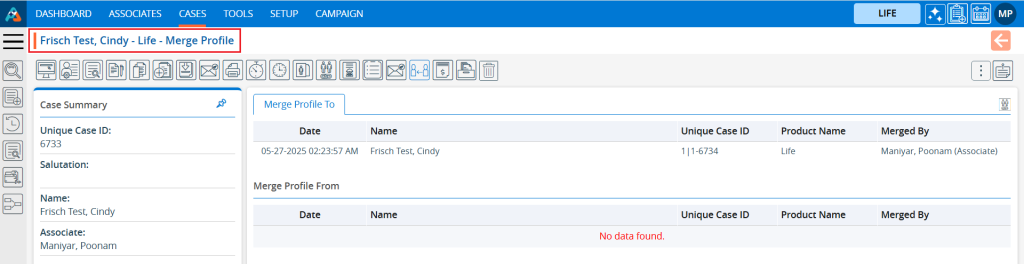
3. The member’s ‘Dashboard’ will open. Click on ‘MERGE PROFILE’.
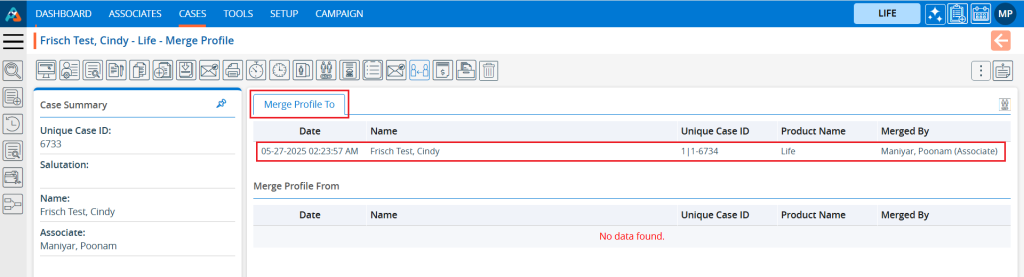
4. The Merge Profile page will open, displaying two lists. If a profile has been merged with an open case, it will appear in either the ‘To’ or ‘From’ list: a. Merge Profile To: This list shows the case that received the merged profile. b. Merge Profile From: This list shows the case from which the profile was merged.
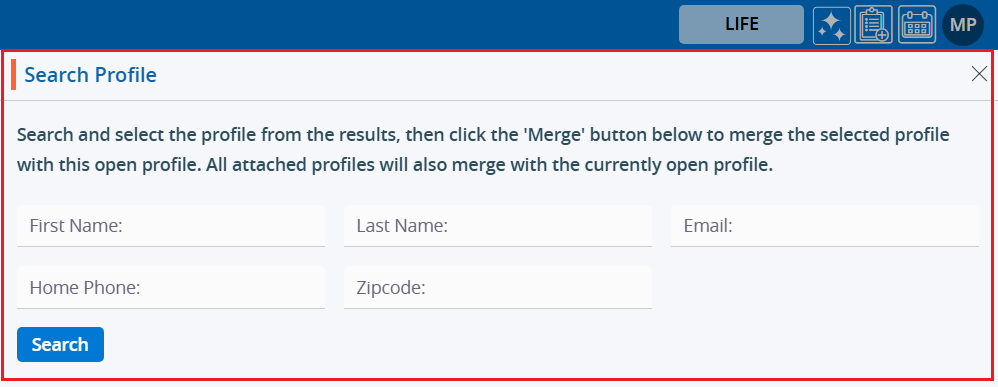
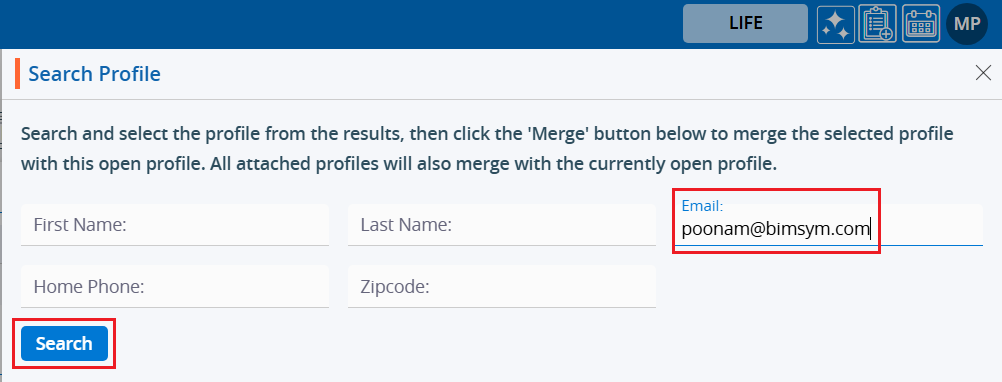
5. To proceed with merging the profile, click on the search option.
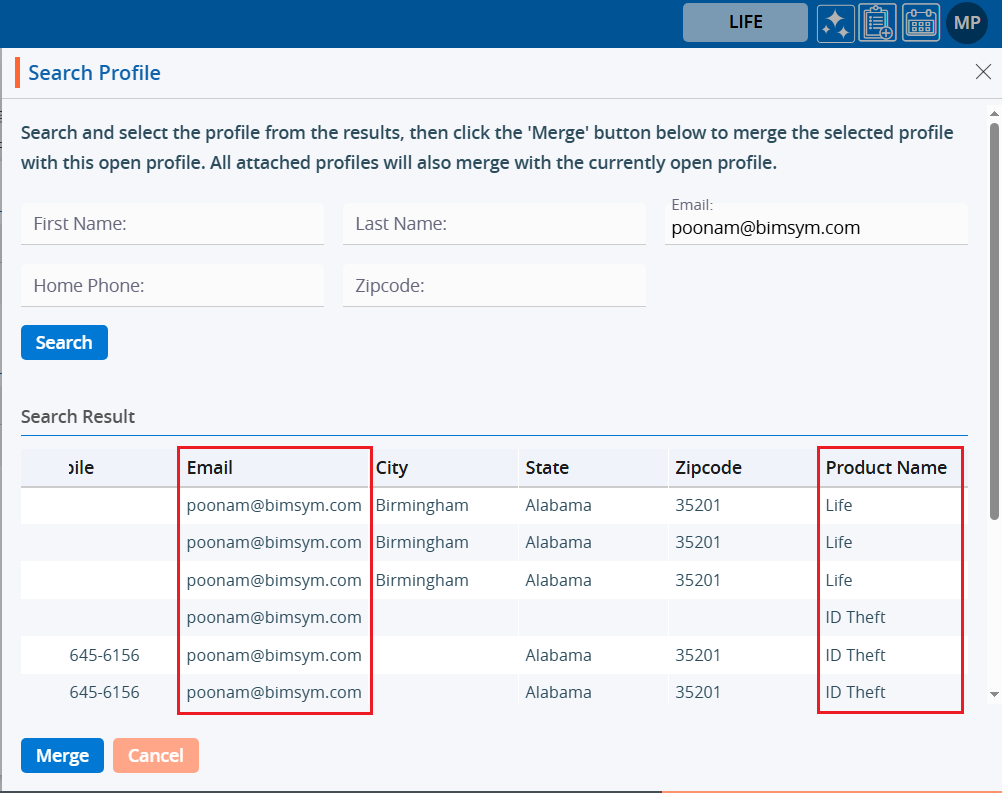
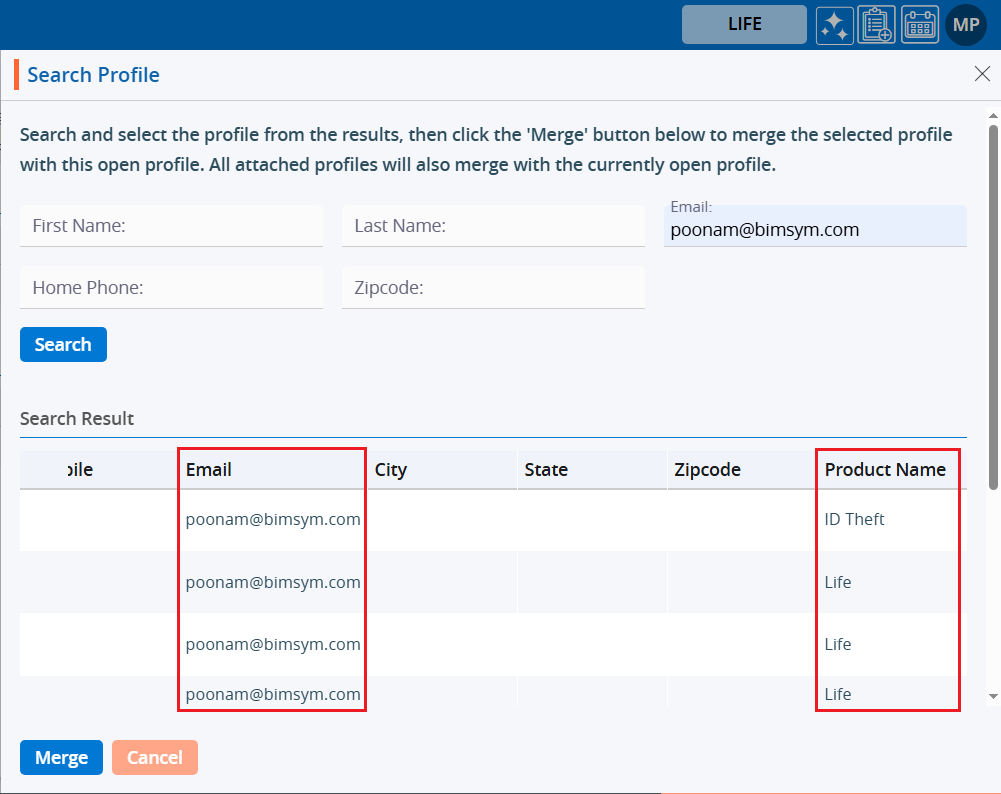
6. The Search Profile page will open, presenting five search options. The user must enter at least one field value, and the user can add multiple field values with exact matches: a. First Name b. Last Name c. Email d. Home Phone e. Zip Code
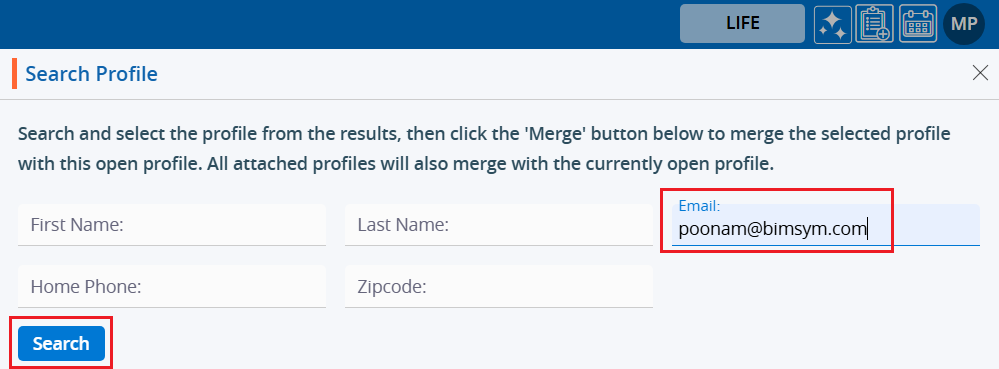
7. For example, we are searching using the email field. Enter the email field value with an exact match, then click the ‘Search’ button.
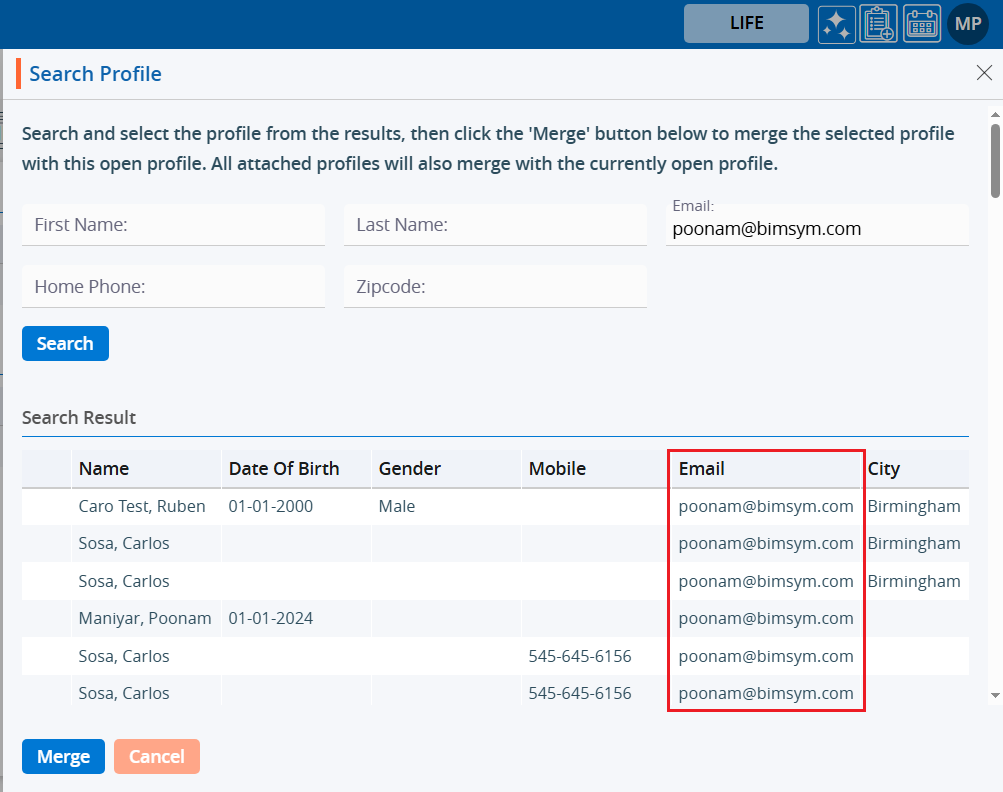
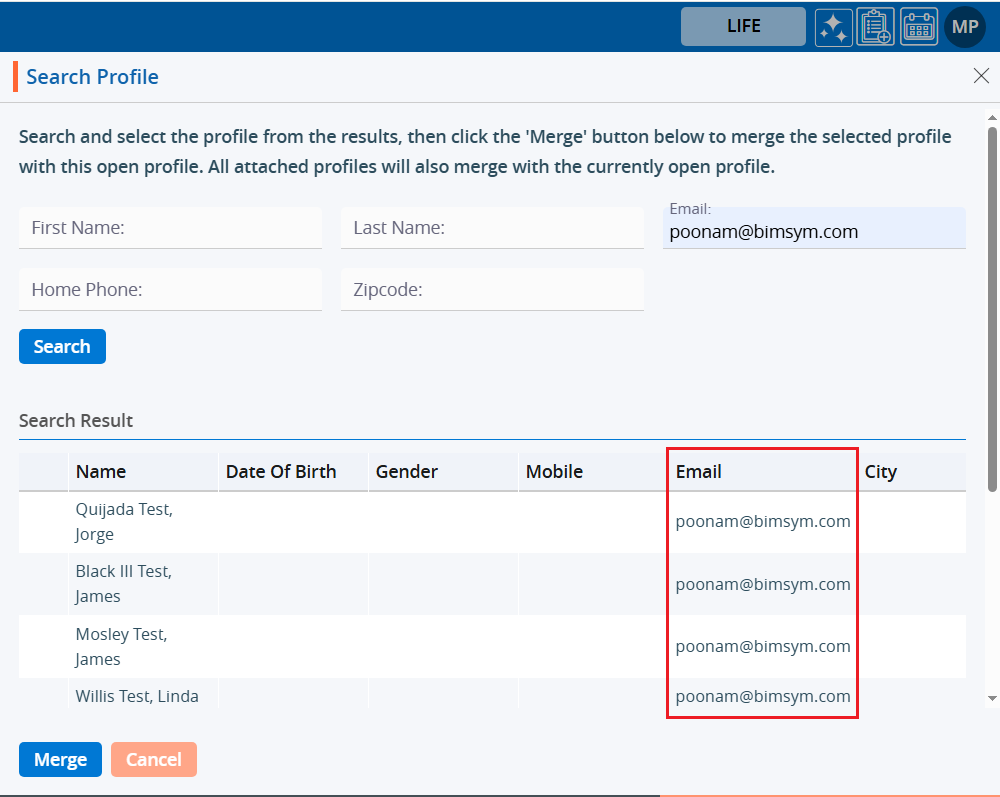
8. The search results will be displayed on the page, showing all available cases that contain the searched email address.
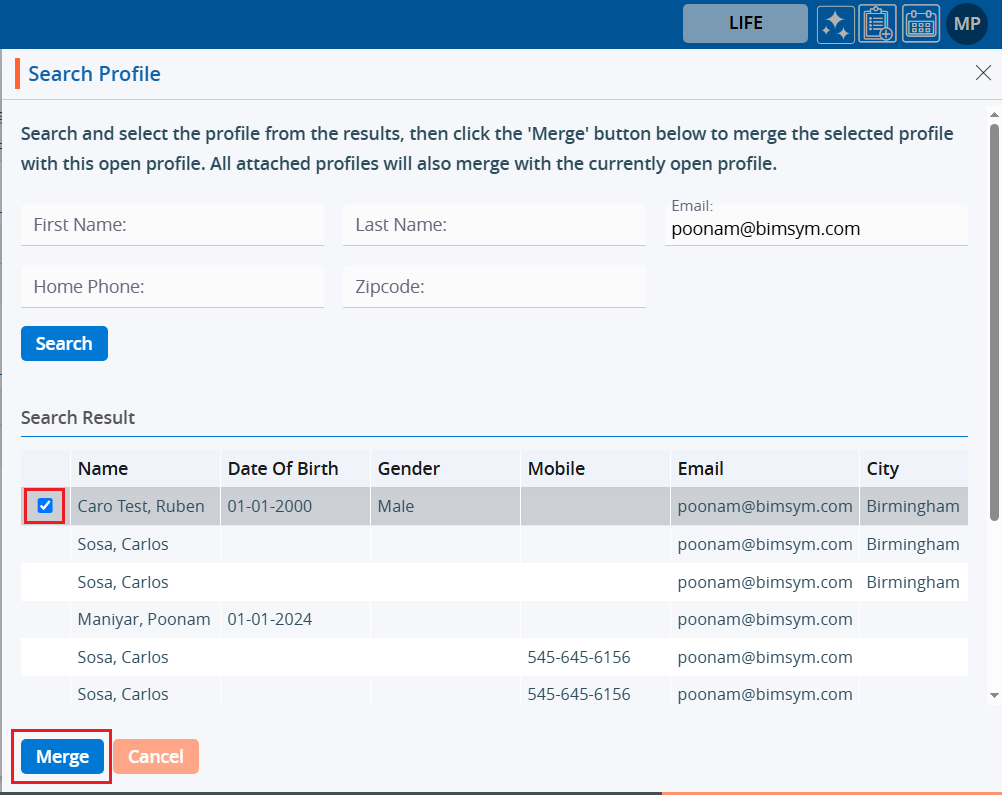
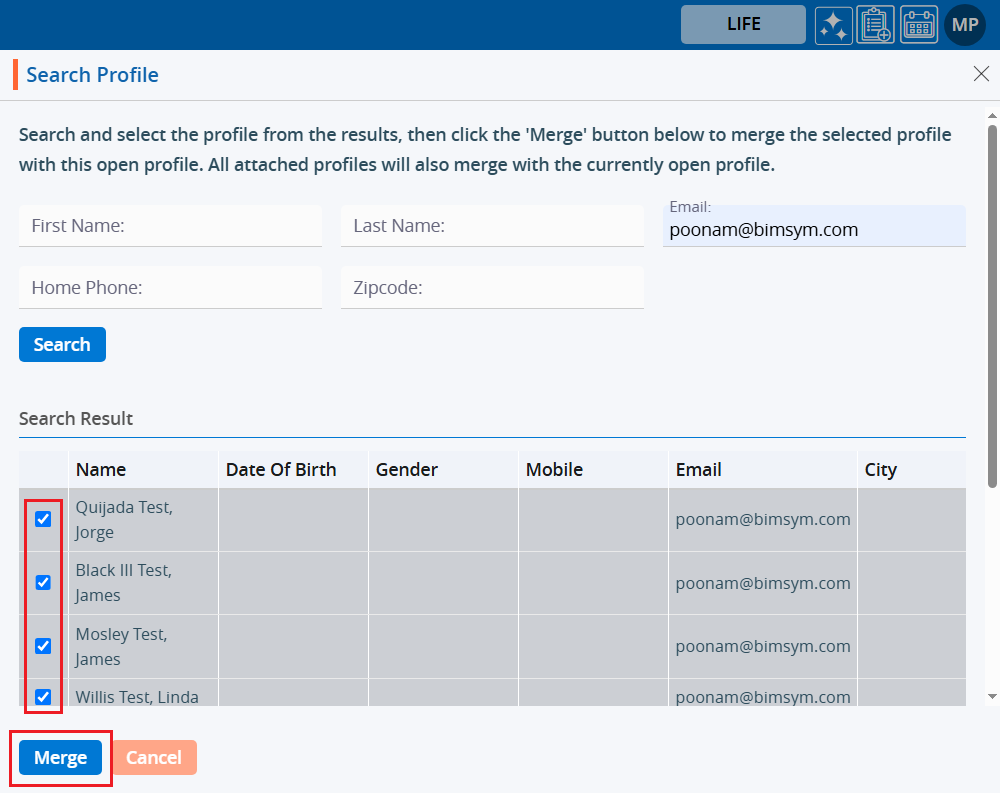
9. The user can merge a single or multiple cases into the open profile. 10. Select the case to merge the profile by checking the checkbox, then click the ‘Merge’ option. a. The user can select multiple cases to merge into the profile of a different product.
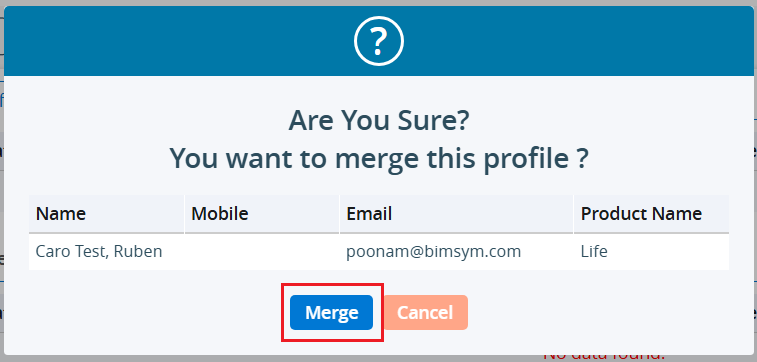
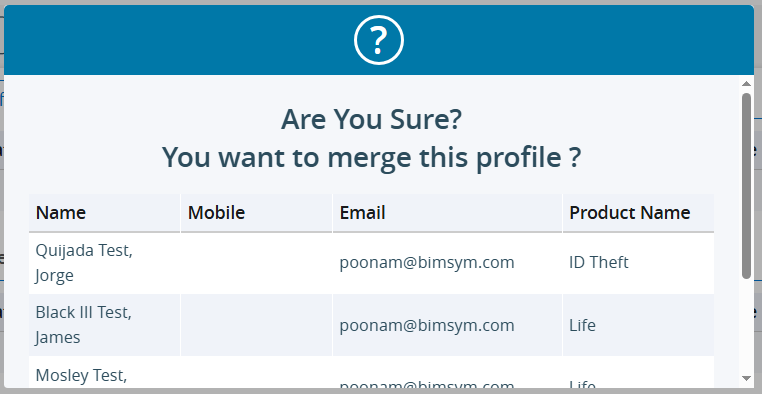
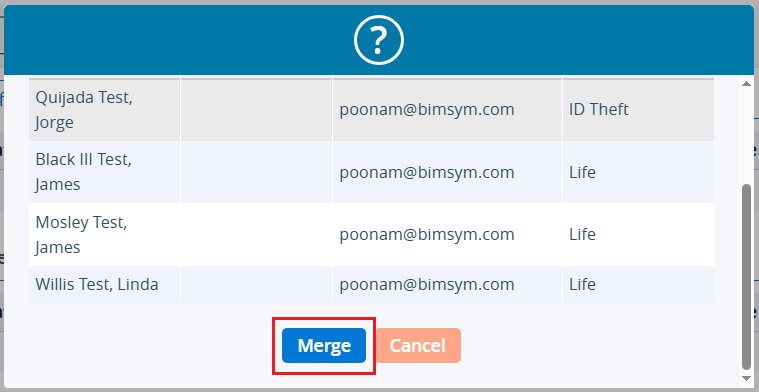
11. The system will display the selected case(s) and prompt for confirmation to ‘Merge’ the profile. 12. Click on ‘Merge’ to proceed.
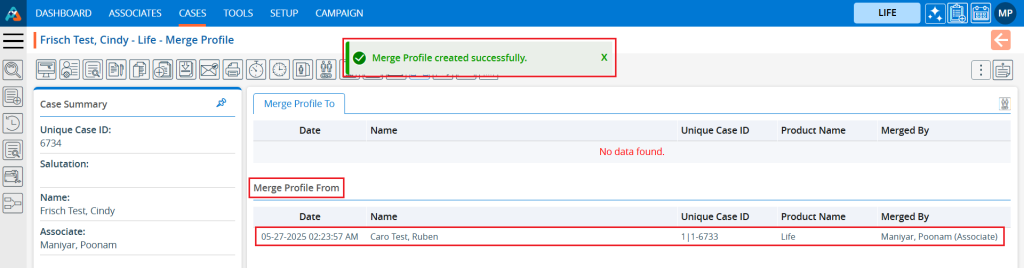
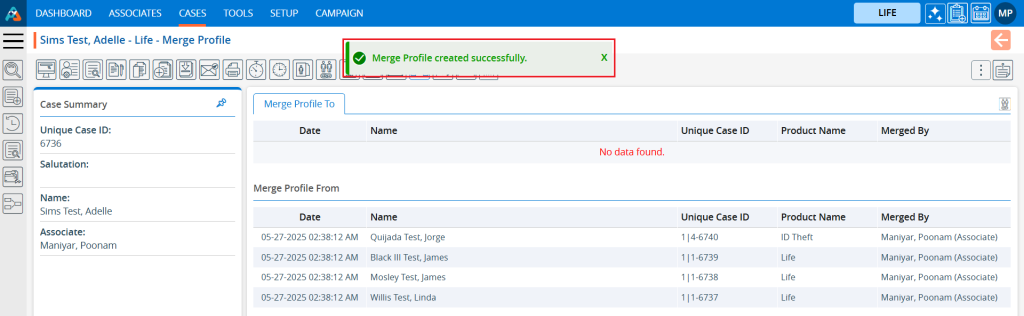
13. The profile will be successfully merged, and the system will display a confirmation message. The merged profile will appear in the ‘From’ list.
14. For the merged profile, the case that was opened for the merge will be displayed in the ‘To’ list.
15. After the merger, the system will update the profile name and basic information of the selected profile.
Example: Here we are merging profiles by selecting multiple cases.
16. Open the Merge Profile page for the case, enter the email field value with an exact match, and then click the ‘Search’ button’.
17. The search results will display showing all available cases containing the searched email address.
18. Select the cases to merge the profile by checking the checkbox, then click the ‘Merge’ option.
19. The system will display the selected case(s) and prompt for confirmation to ‘Merge’ the profile. Click on ‘Merge’ to proceed.
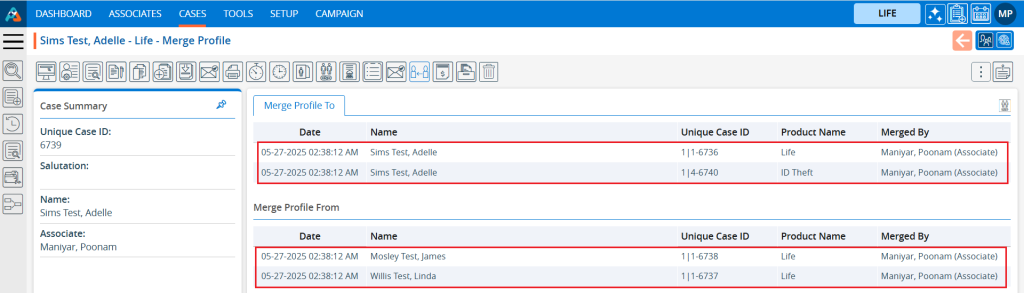
20. The profile will be successfully merged, and the system will generate a confirmation message. The merged profiles will be displayed in the ‘From’ list for all products and profiles selected for the merge.
21. For the merged profiles, the case that was opened for the merge will be displayed in the ‘To’ list for all products and profiles selected for merging.
22. After the merge, the system will update the profile name and basic information of the selected profile for all products and profiles involved in the merge.
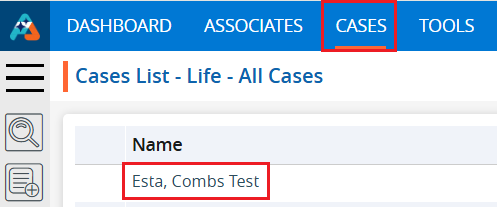
Custom Emails – refers to viewing personalized or uniquely designed emails, often featuring custom content, fonts, or typography, created for specific projects, branding, or communication purposes. The following are the steps to view Custom Emails in the system for a case: 1. Navigate to the ‘CASES’ tab where you’ll find the Cases List – All Cases. 2. Click on a case to proceed.
3. After clicking on the case, the profile’s ‘Dashboard’ will open.
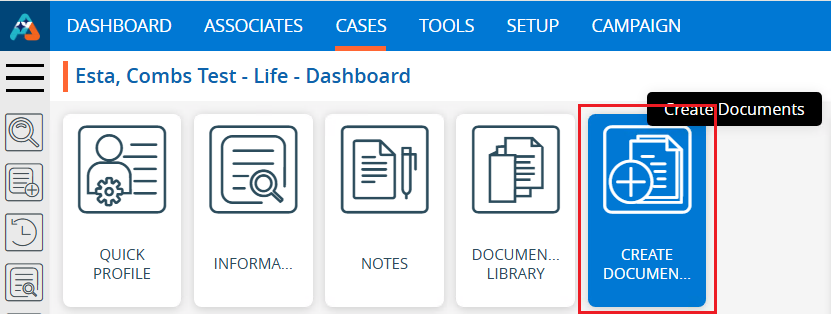
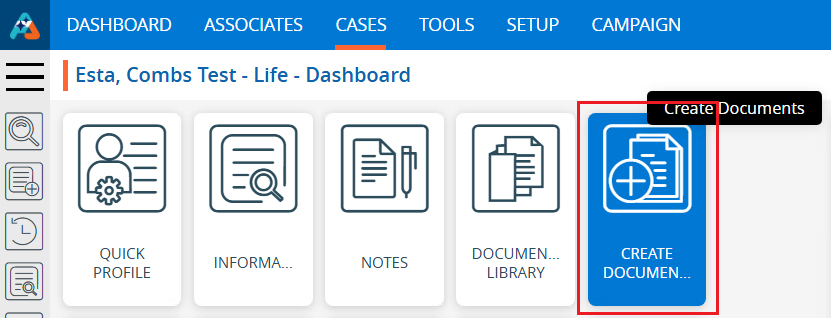
4. Click on the ‘CREATE DOCUMENTS’ option.
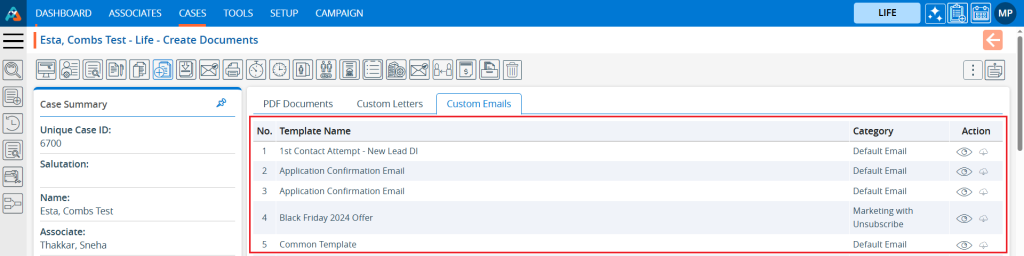
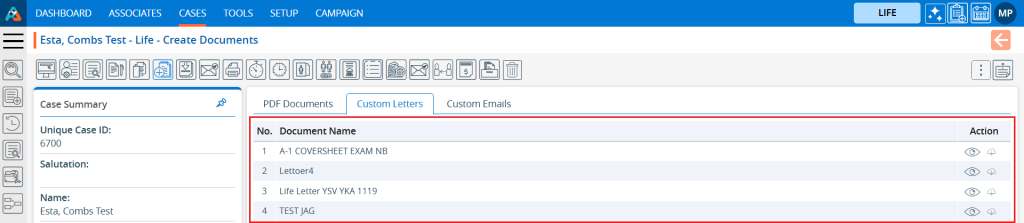
5. The Create Document page will open, with the ‘PDF Documents’ tab selected by default.
6. Click on the ‘Custom Emails’ tab.
7. The Custom Emails page will open, displaying the available custom emails. There are two options for each email: a. View b. Download
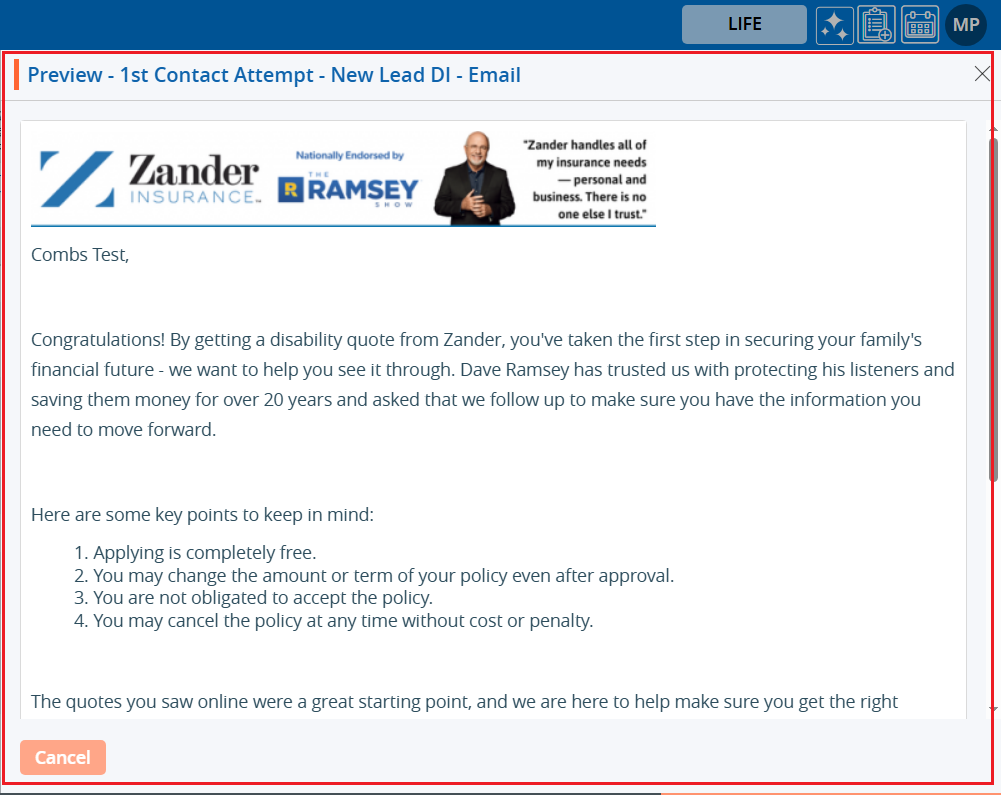
8. Click on the ‘View’ icon to view the Custom Emails.
9. A new pop-up will open, allowing the user to view the custom email. Click the ‘Cancel’ button to close the pop-up.
10. By clicking on the ‘Download’ button the user can download the custom email.
11. Click on the Download button.
12. The doc file will be downloaded and saved to a temporary location.
Custom Letters – refers to viewing personalized or uniquely designed letters, fonts, or typography, often created for specific projects, branding, or communication purposes.
The following are the steps to view Custom Letters in the system for a case: 1. Navigate to the ‘CASES’ tab where you’ll find the Cases List – All Cases. 2. Click on a case to proceed.
3. After clicking on the case, the profile’s ‘Dashboard’ will open. Click on the ‘CREATE DOCUMENTS’ option.
4. The Create Document page will open, with ‘PDF Documents’ selected by default. Click on the ‘Custom Letters’ icon.
5. A Custom Letters page will open, displaying the available custom letters. There are two options for each custom letter: a. View b. Download
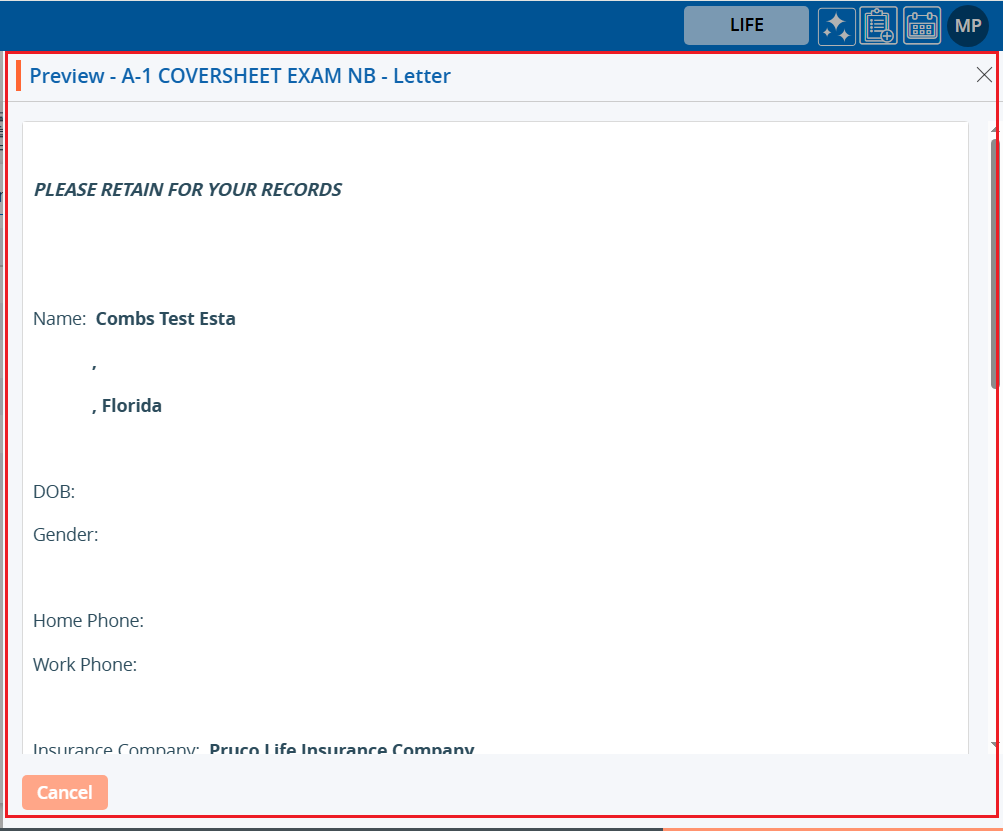
6. Click on the View icon to view the Custom Letter.
7. A new pop-up will open, allowing the user to view the custom letter. Click the ‘Cancel’ button to close the pop-up.
8. By clicking on the ‘Download’ button the user can download the custom letter. Click on the Download button.
9. The doc file will download, and doc file will be saved on temporary location.
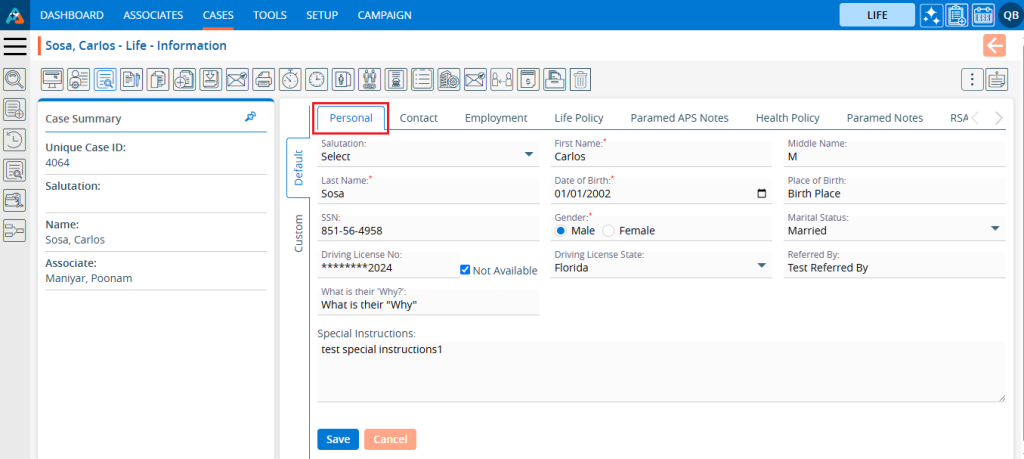
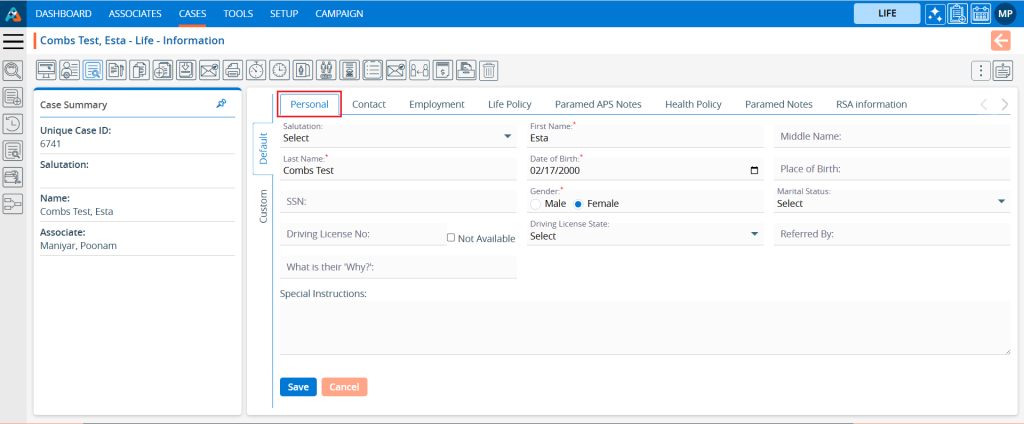
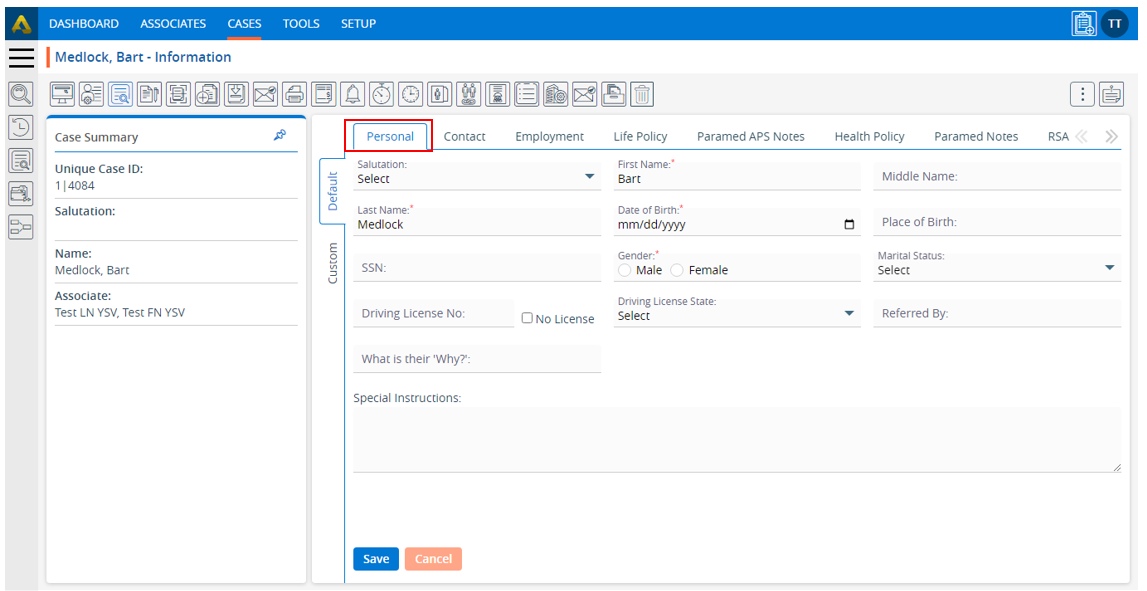
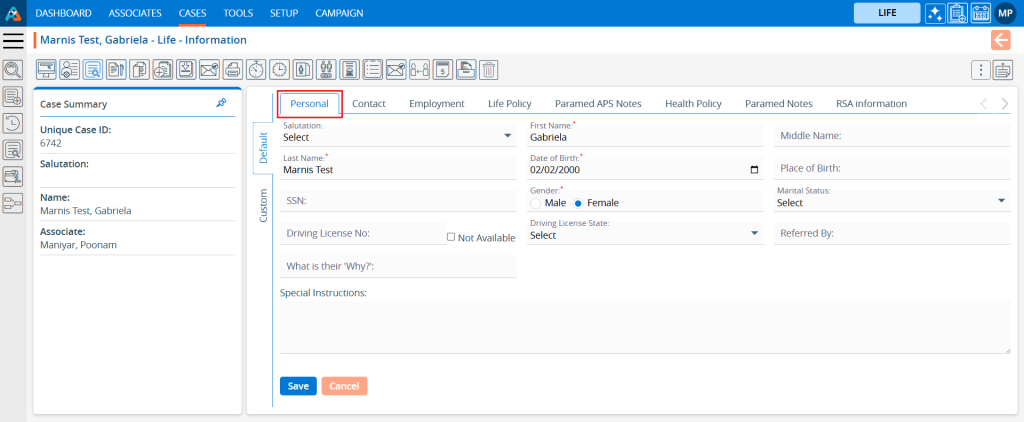
Information – The Information feature is utilized for adding and updating information related to cases within the system. The following are the steps to add and update information for a case using the Information feature:
1. Navigate to the ‘CASES’ tab, where you’ll find the Cases List – All Cases.
2. Click on a case to proceed.
3. After clicking on the contact, the profile’s ‘Dashboard’ will open. 4. Click on the ‘INFORMATION’ option.
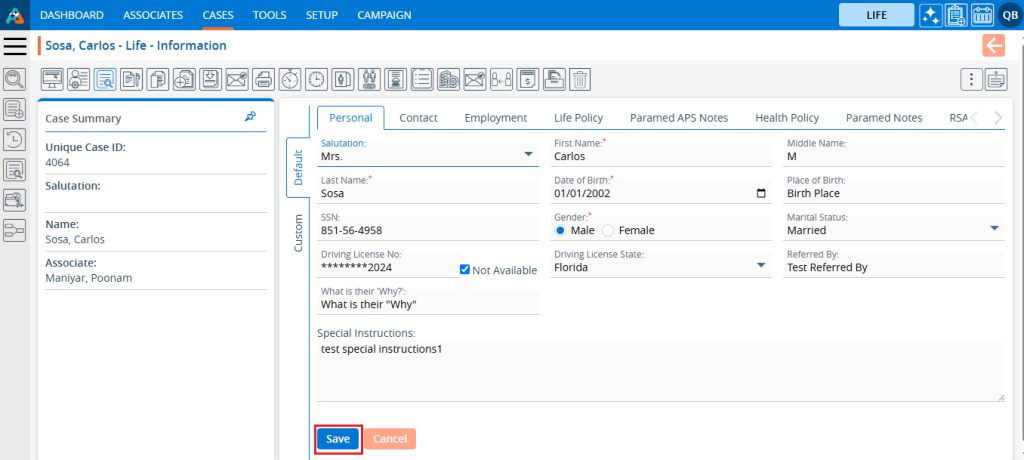
5. The INFORMATION page will open, displaying personal information on the ‘Personal’ page. Users can add or update personal information from this page.
6. There will be two options available on the ‘Personal’ page.
Save
Cancel
7. After personal information is added or updated, click on the “Save” button.
8. The system will generate a confirmation message that the Personal Information has been updated successfully, and the updated information will be displayed.
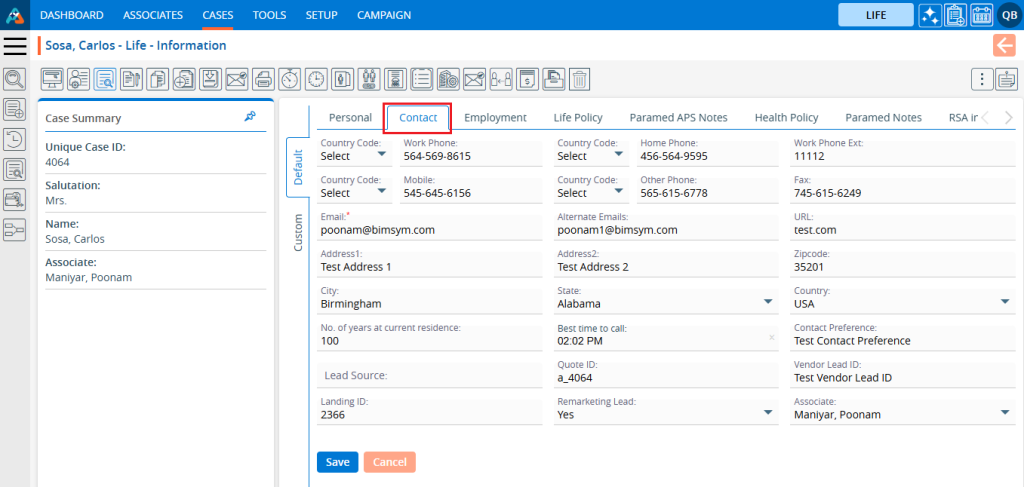
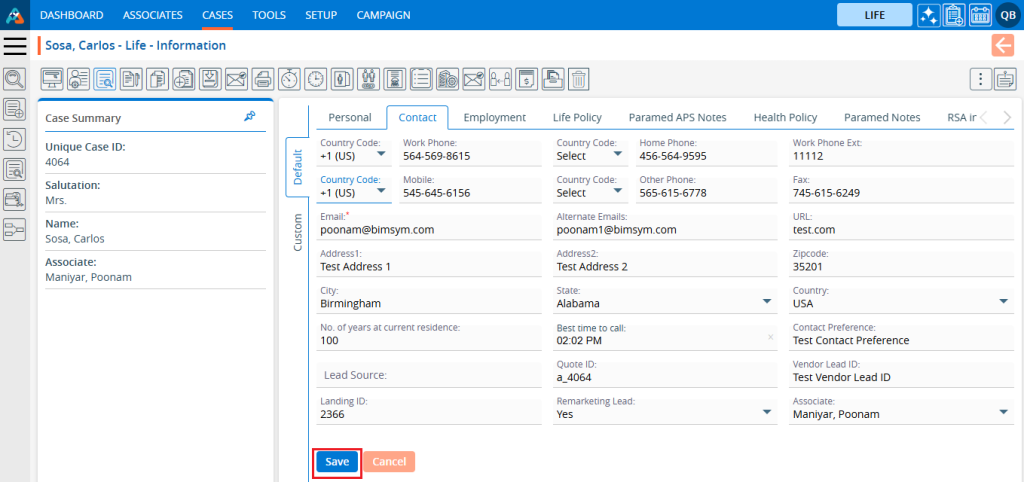
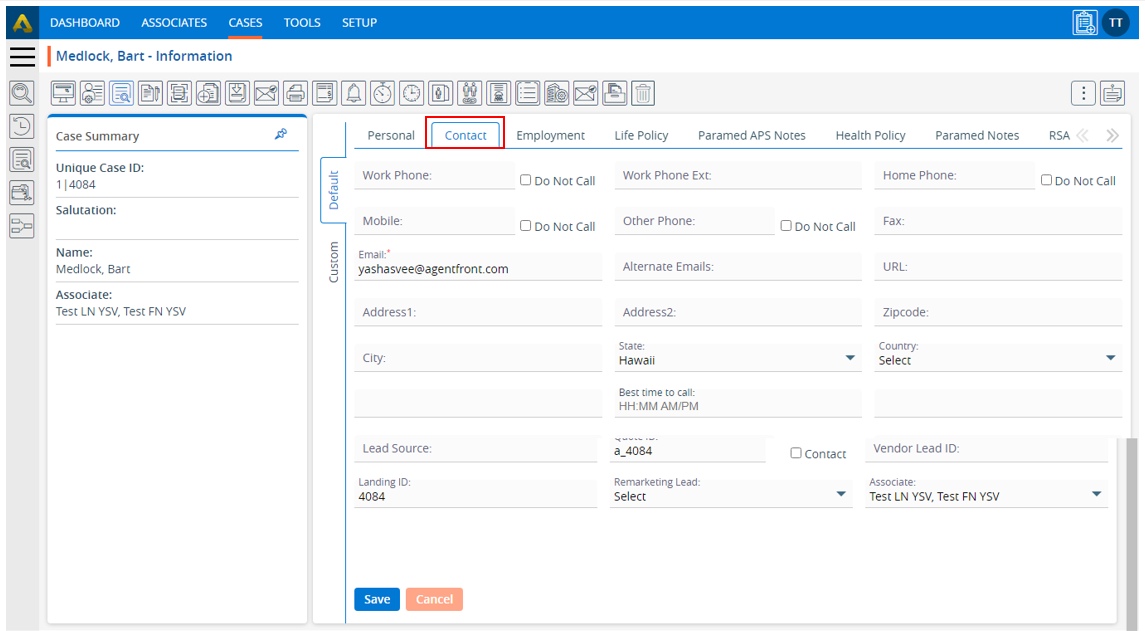
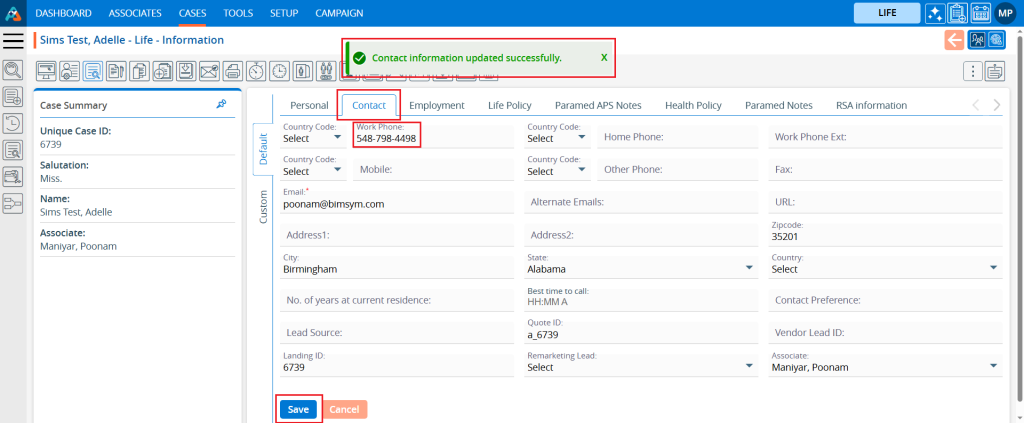
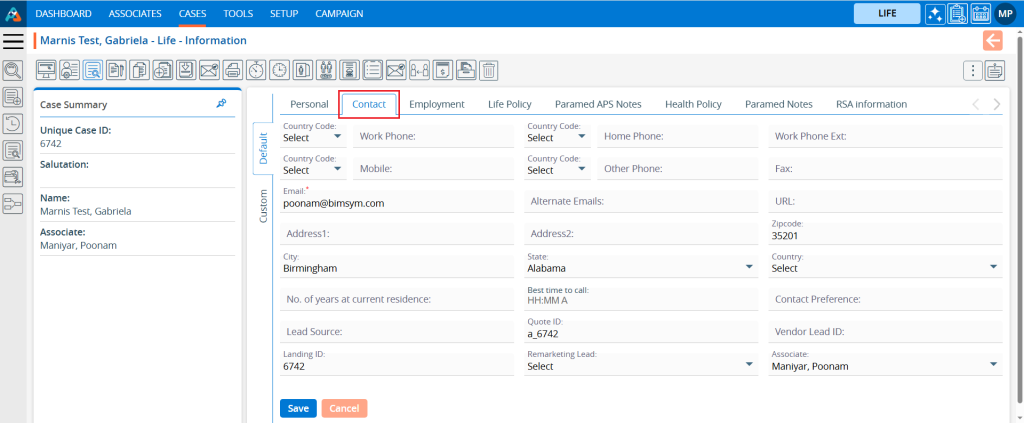
9. Click on ‘Contact’, and the contact page will open. The system will display contact information on this page. From here, users can add and update contact information.
10. There will be two options available on the Contact page.
Save
Cancel
11. After contact information is added or updated, click on the “Save” button.
12. The system will generate a confirmation message that the Contact Information has been updated successfully, and the updated information will be displayed.
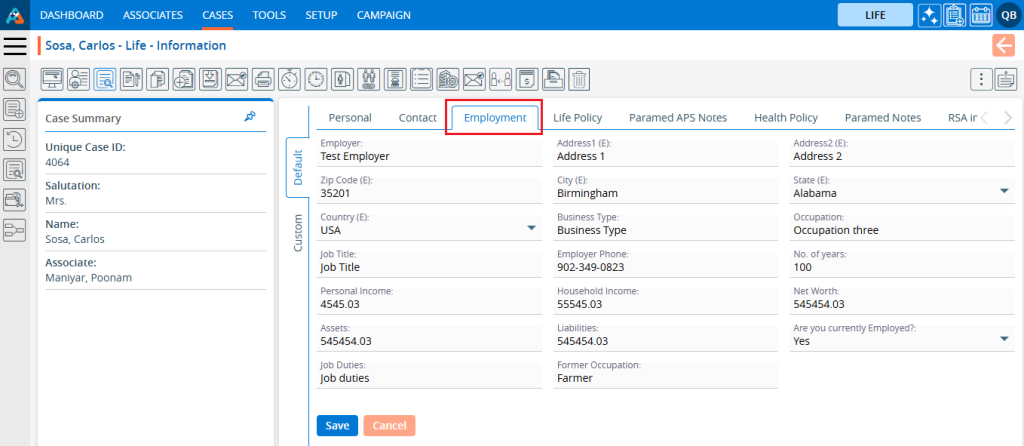
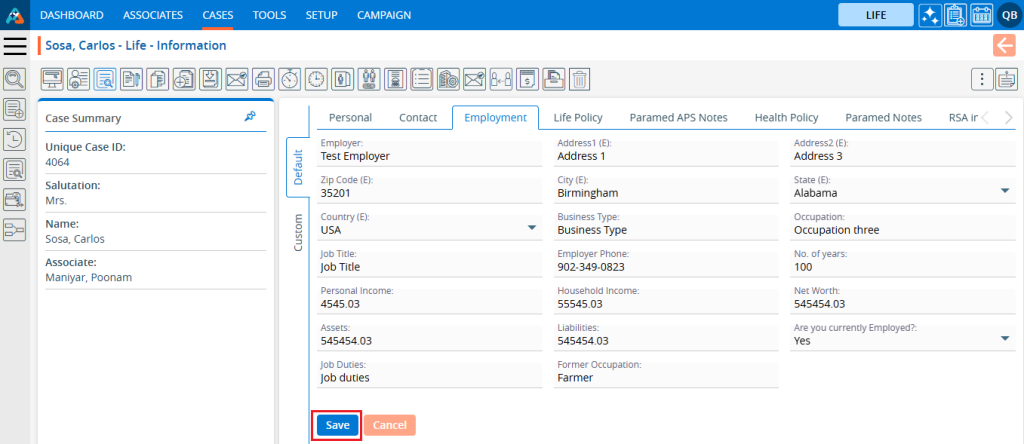
13. Click on the ‘Employment’ page, and ‘Employment’ page will open. The system will display employment-related information on this page. From here, users can add and update their employment-related information.
14. There will be two options available on the Employment page.
Save
Cancel
15. After employment-related information is added or updated, click on the “Save” button.
16. The system will generate a confirmation message that the Employment Information has been updated successfully, and the updated information will be displayed.
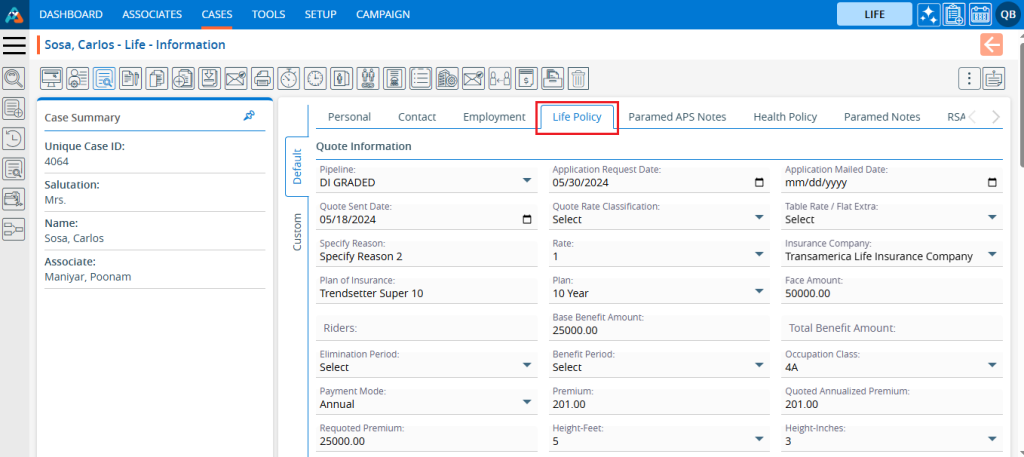
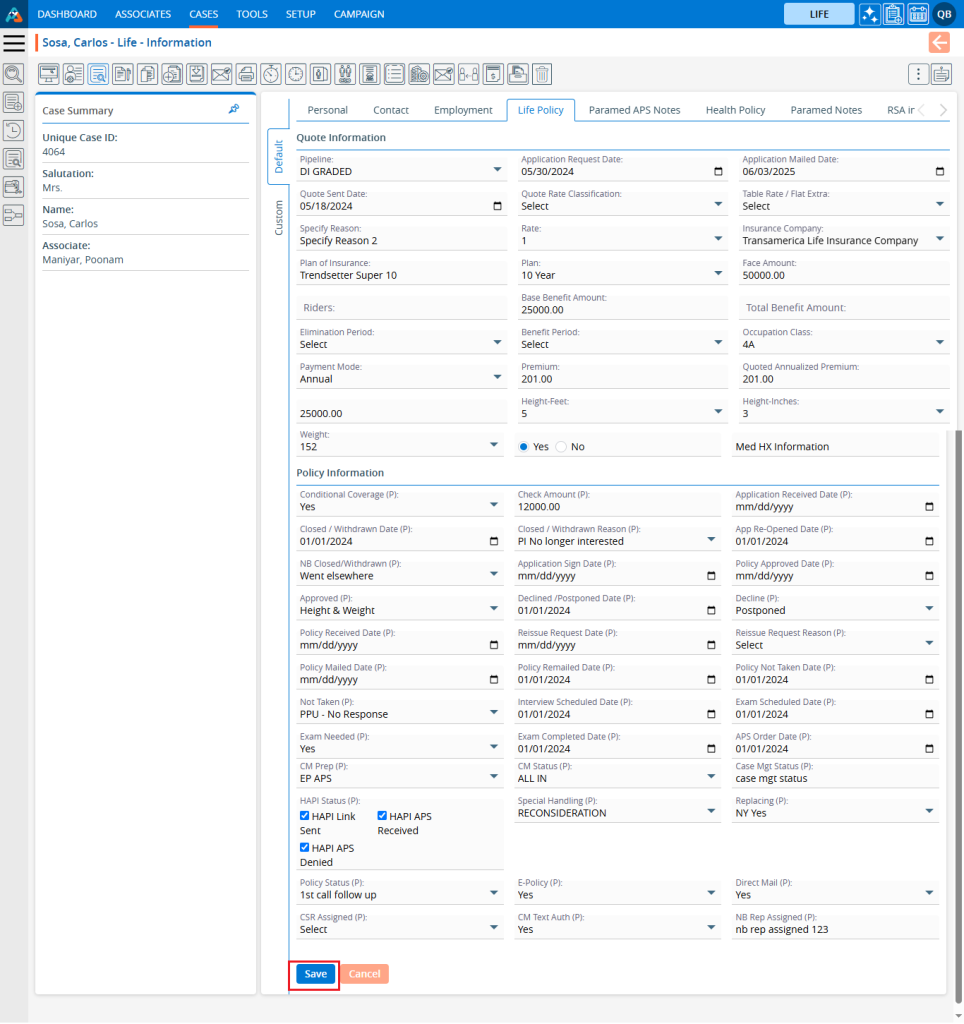
17. Click on the ‘Life Policy’ tab, and the ‘Life Policy’ page will open. The system will display life policy information of the case on this page. From here, users can add and update life policy information.
18. There will be two options available on the Life Policy page.
Save
Cancel
19. After Life Policy information is added or updated, click on the “Save” button.
20. The system will generate a confirmation message that the Life Policy Information has been updated successfully, and the updated information will be displayed.
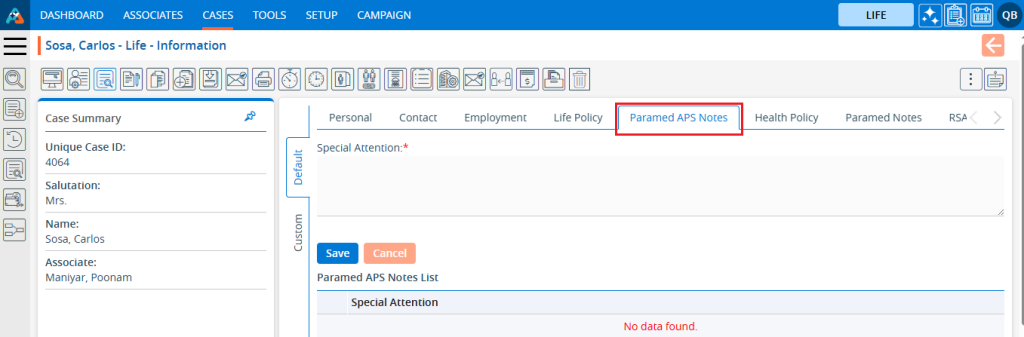
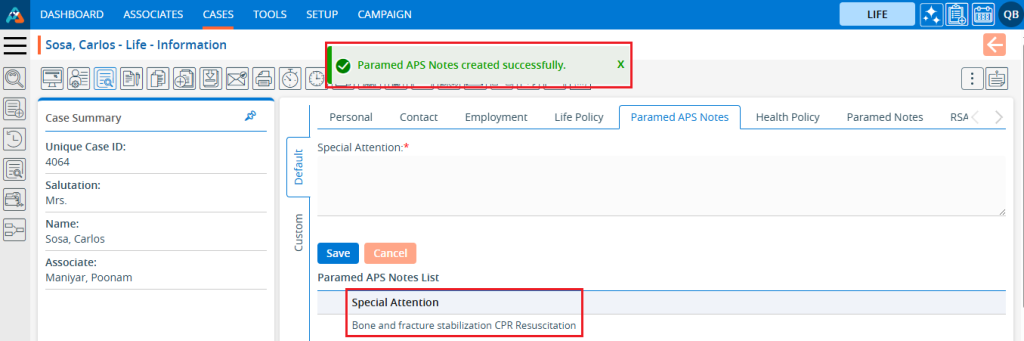
21. Click on the ‘Paramed APS Notes’ tab, and the Paramed APS Notes page will open. The system will display APS notes of the case on this page. From here, users can add and update ‘Paramed APS Notes’.
22. There are two options available on the Paramed APS Note tab.
Save
Cancel
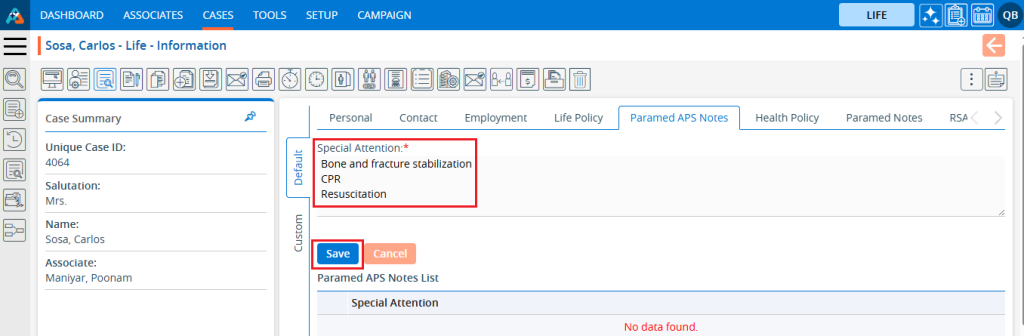
23. Add a note in the Special Attention section and click on the ‘Save’ button.
24. A message will appear confirming that the Paramed APS Note has been added successfully, and the note will be displayed in the Paramed APS Notes List.
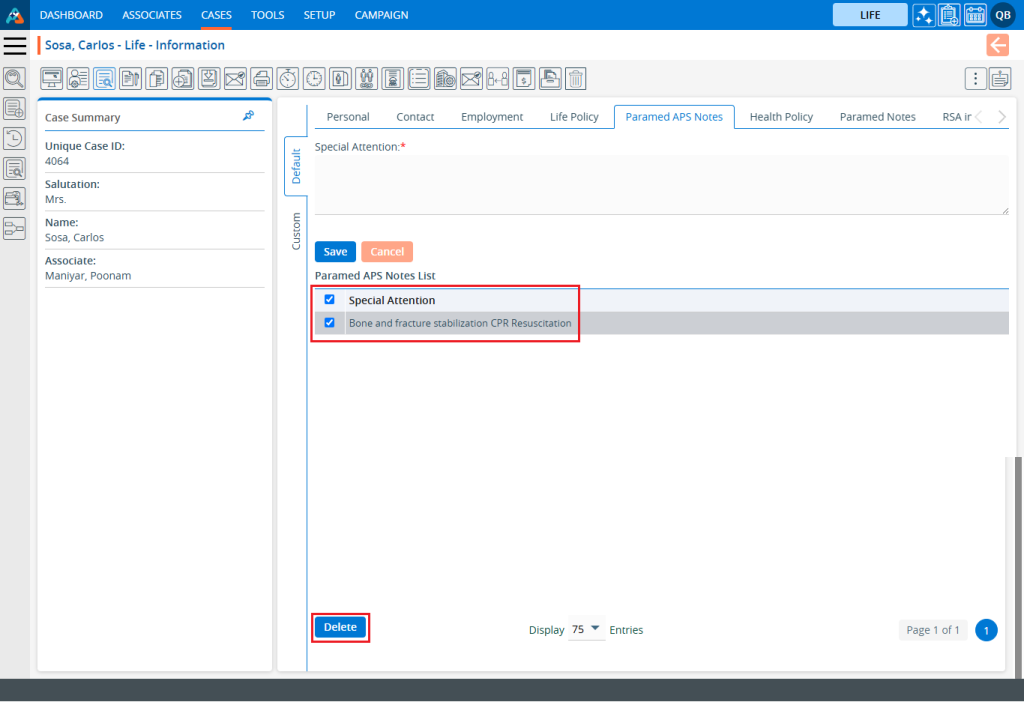
25. Users can also delete existing notes. Select the checkbox next to the desired note in the ‘Paramed APS Notes List’ and click on the ‘Delete’ option.
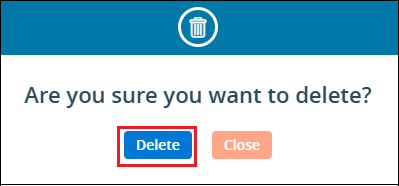
26. The system will ask for confirmation. Click on ‘Delete’ to proceed.
27. The system will generate a confirmation message for the successful deletion of the Paramed APS Note, and the note will be removed from the ‘Paramed APS Notes List’.
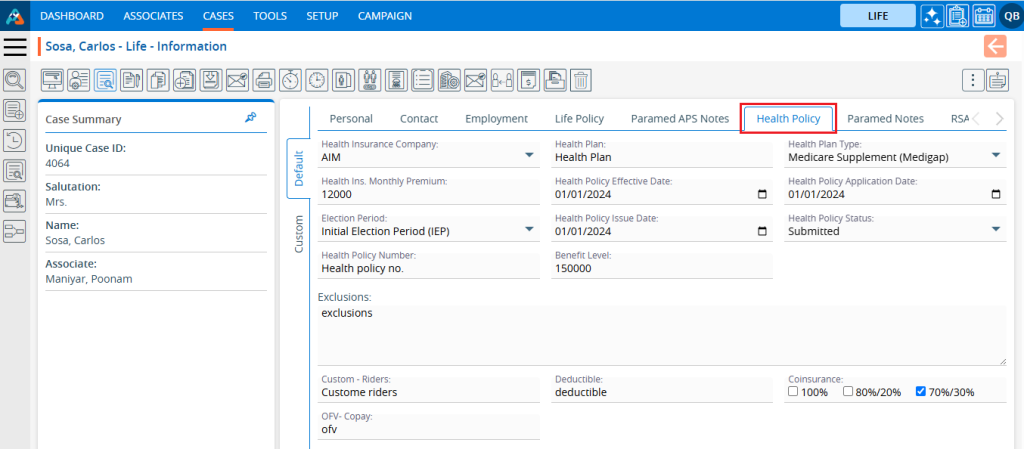
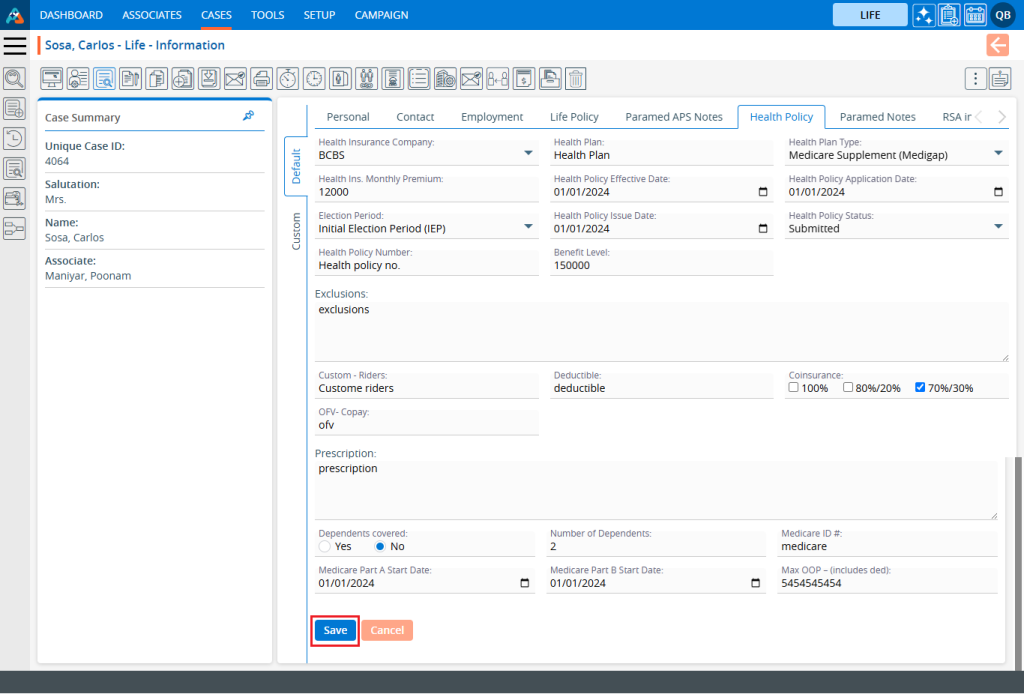
28. Click on the ‘Health Policy’ tab, and the page will open. The system will display health policy-related information of the case on this page. Users can add and update ‘Health Policy’ information from this page.
29. There will be two options available on the Health Policy page.
Save
Cancel
30. After adding or updating Health Policy information, click on the ‘Save’ button.
31. The system will generate a confirmation message that the health policy information has been updated successfully, and the updated information will be displayed.
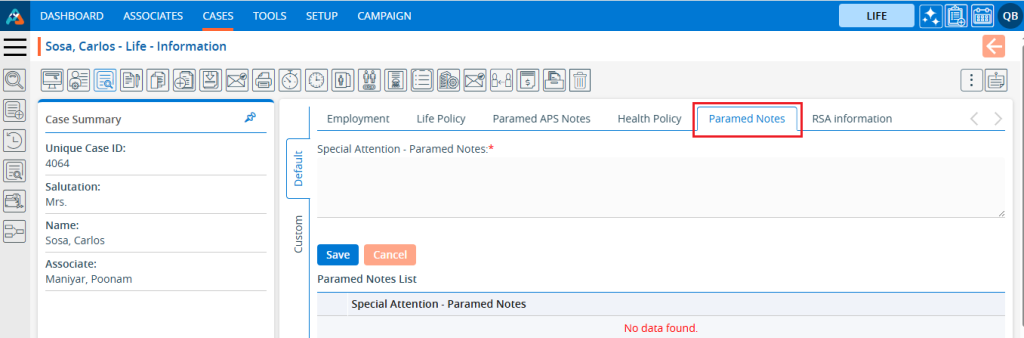
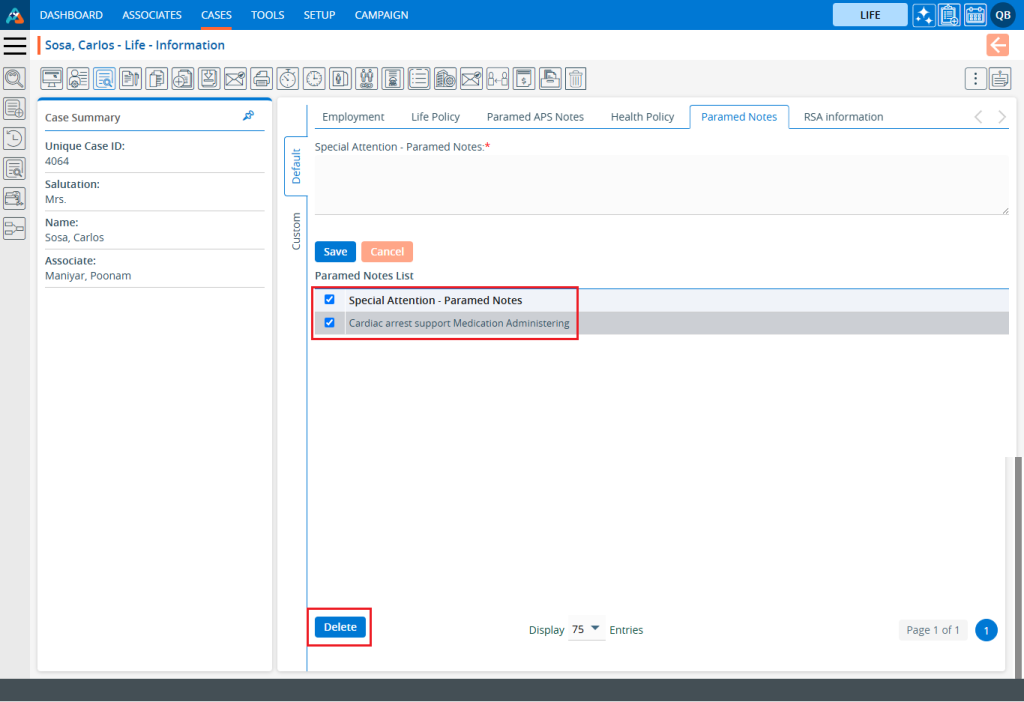
32. Click on the ‘Paramed Notes’ tab, and the page will open. Users can add and update Paramed Notes on this page.
33. There are two options available in the ‘Paramed Notes’ tab.
Save
Cancel
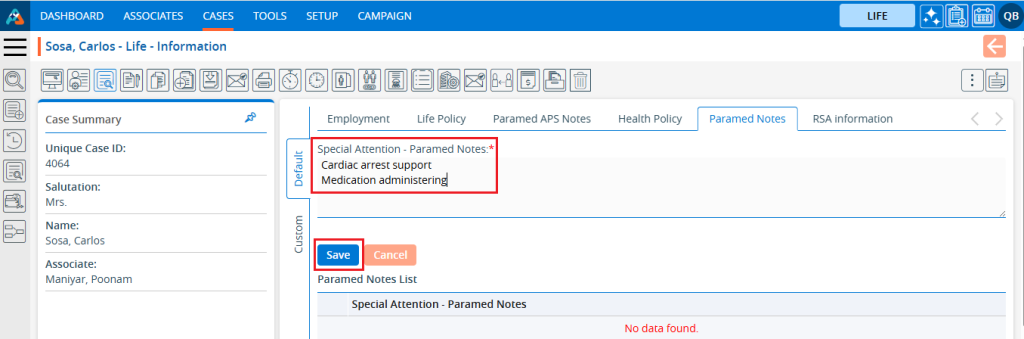
34. Add a note in the Special Attention section and click on the ‘Save’ button.
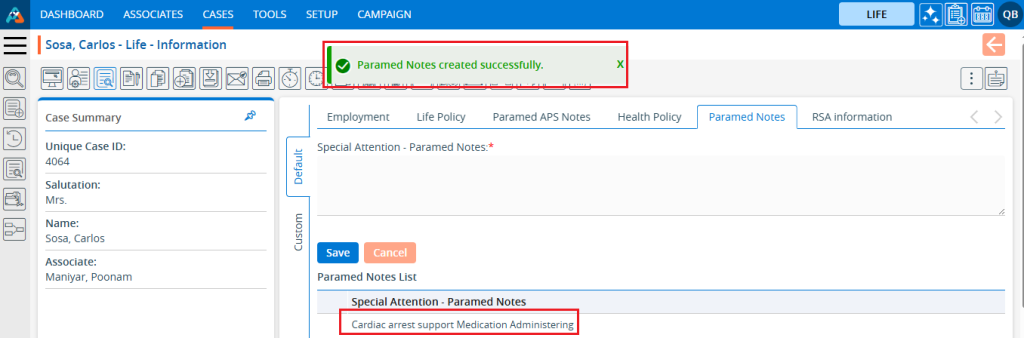
35. The system will generate a confirmation message that the Paramed Notes were created successfully, and the added ‘Paramed Notes’ will be displayed in the Paramed Notes list.
36. Users can also delete existing ‘Paramed Notes’. Select the note from the Paramed Notes List, check the checkbox next to it, and click on the delete button.
37. The system will ask for confirmation. Click on the ‘Delete’ option.
38. The system will generate a confirmation message that the ‘Paramed Note’ has been deleted successfully, and the note will be removed from the ‘Paramed Notes List’.
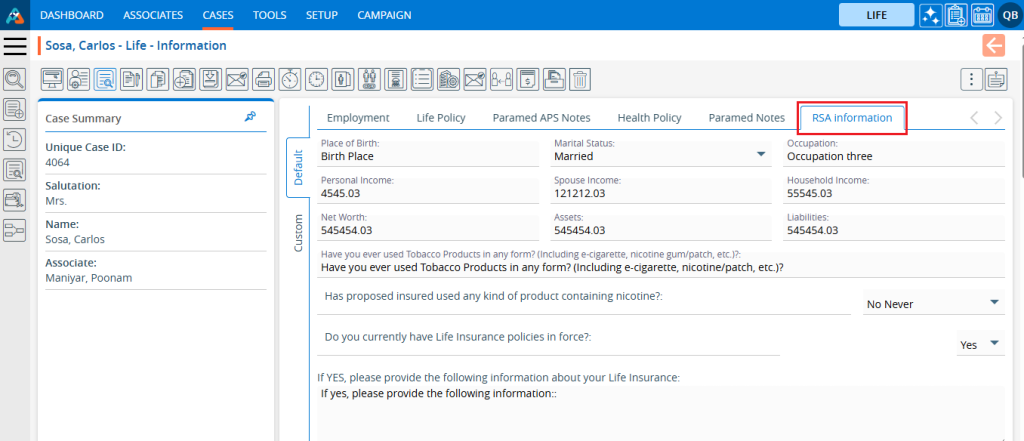
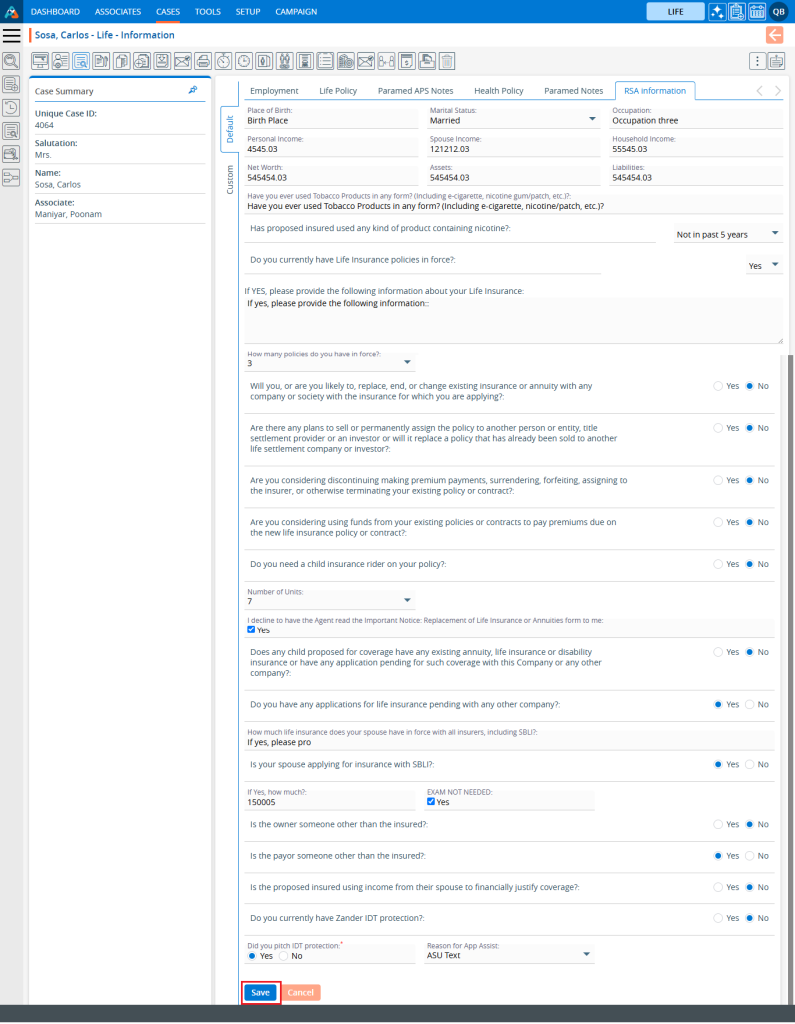
39. Click on the ‘RSA Information’ tab, and the page will open. The system will display RSA information for the cases on this page. Users can add and update ‘RSA information’ from this page.
40. There are two options available on the ‘RSA Information’ tab.
Save
Cancel
41. After adding or updating ‘RSA information’, click on the ‘Save’ button to save the information.
42. The system will generate a confirmation message that the RSA Information has been updated successfully, and the updated information will be displayed.
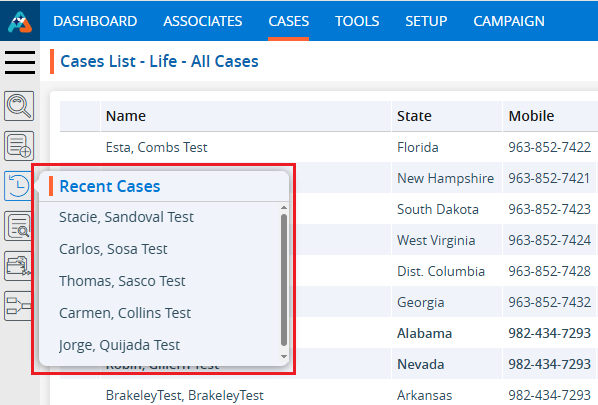
The Recent Cases link is used to view the last 5 recent cases from the left side menu. Here are the steps to view Recent Cases: 1. Navigate to the ‘CASES’ tab where you’ll find the Cases List – All Cases.
2. Click on the ‘Recent Cases’ link from the left-side panel. Five recently opened cases will be displayed in this listing.
3. Click on any case from Cases List – All Cases (other than those listed in Recent Cases).
4. The Dashboard will be opened.
5. Now, click on the ‘CASES’ tab to view all cases.
6. Click on the Recent Cases option. The case you just opened will now be listed first.
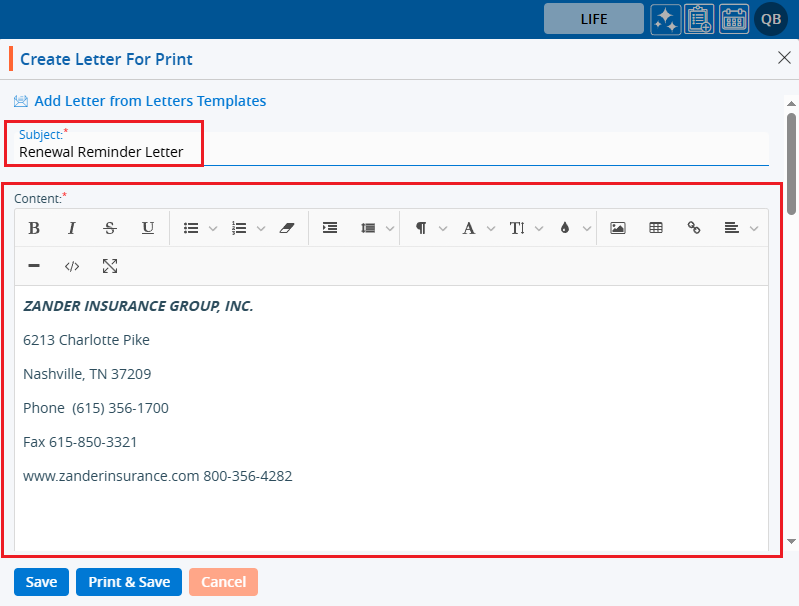
Create and print letters to customers, as well as save them to the customer’s profile. Here are the steps to print a letter: 1. Navigate to the ‘CASES’ tab where you’ll find the Cases List – All Cases. 2. Click on a case to proceed.
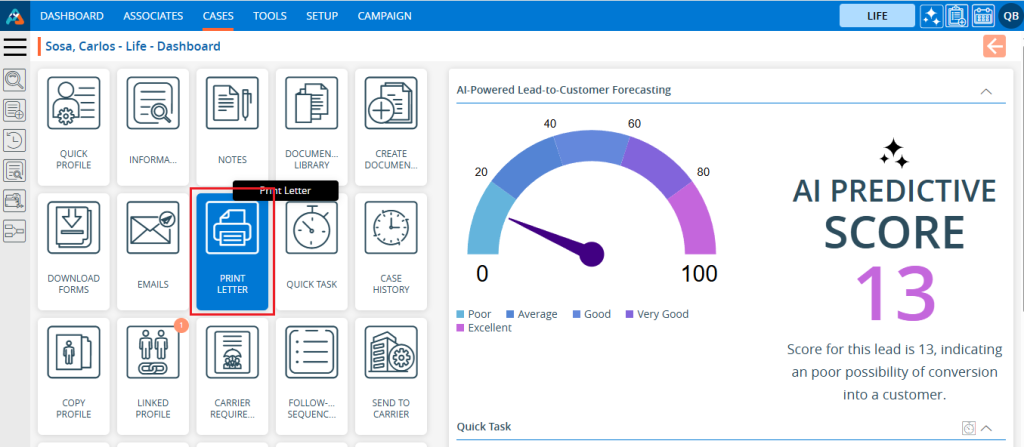
3. After clicking on the case, the profile’s ‘Dashboard’ will open. 4. Click on the ‘PRINT LETTER’ option.
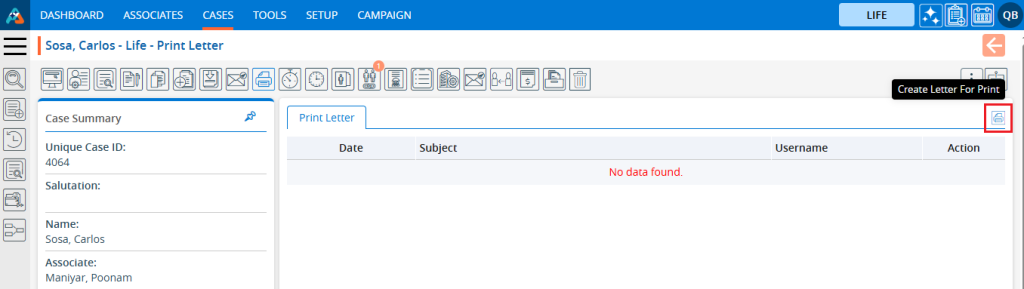
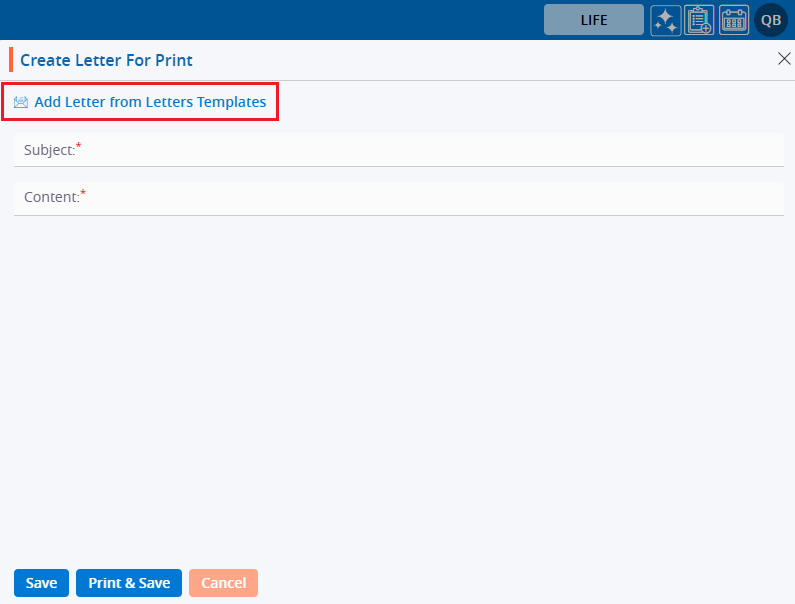
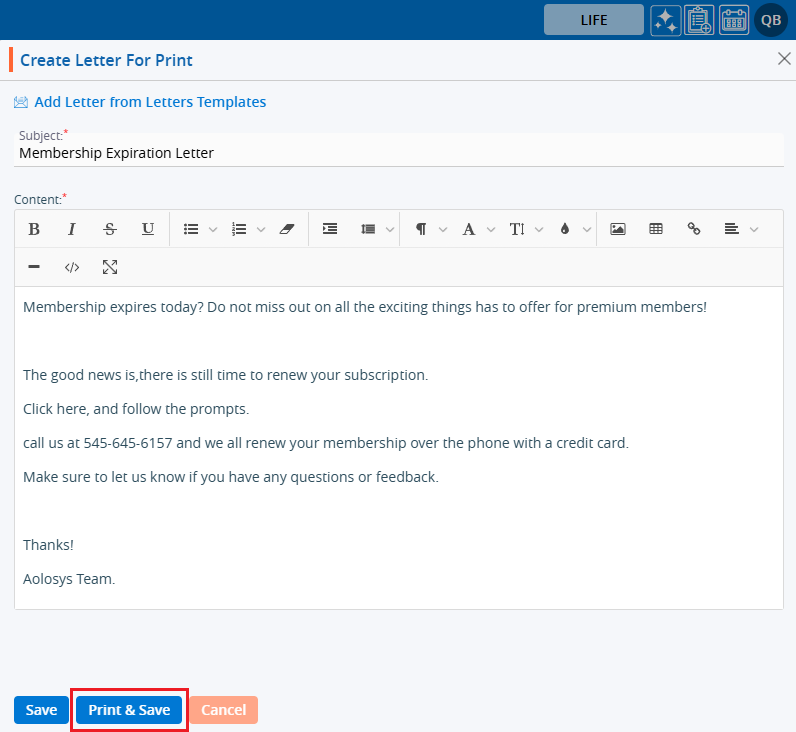
5. The Print Letter page will open. 6. Click on ‘Create Letter for Print’.
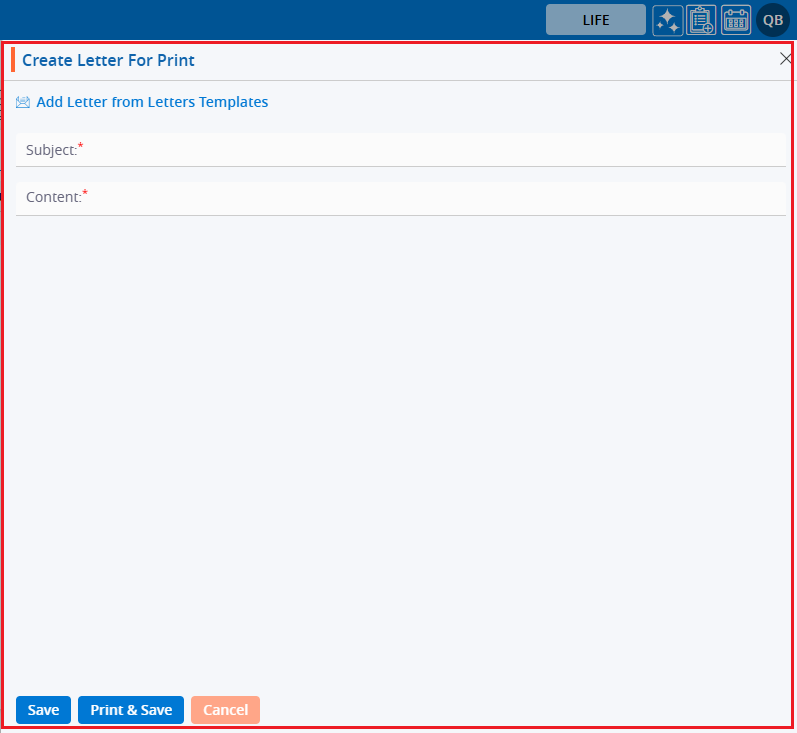
7. A new pop-up window will open.
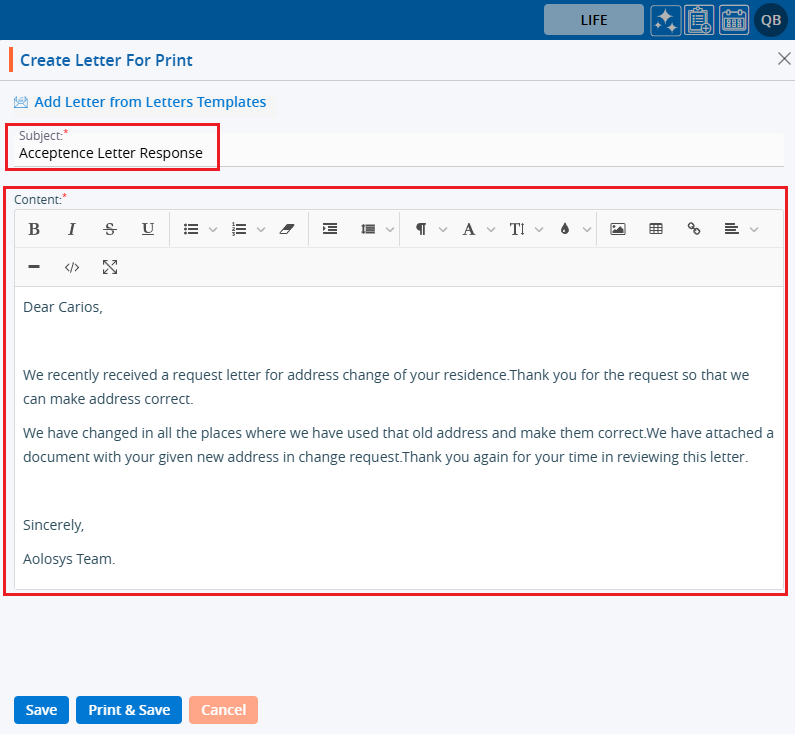
8. Add the Subject and Content for the letter.
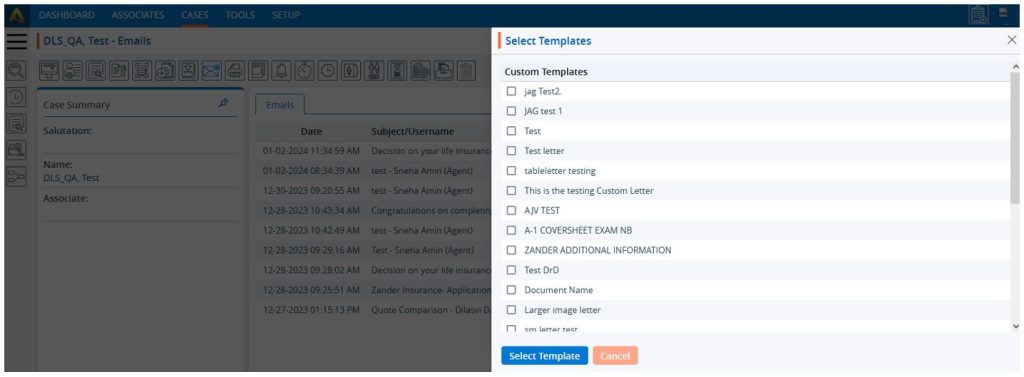
9. Users can also utilize ready-made templates by selecting the ‘Add Letter from Letters Templates’ option.
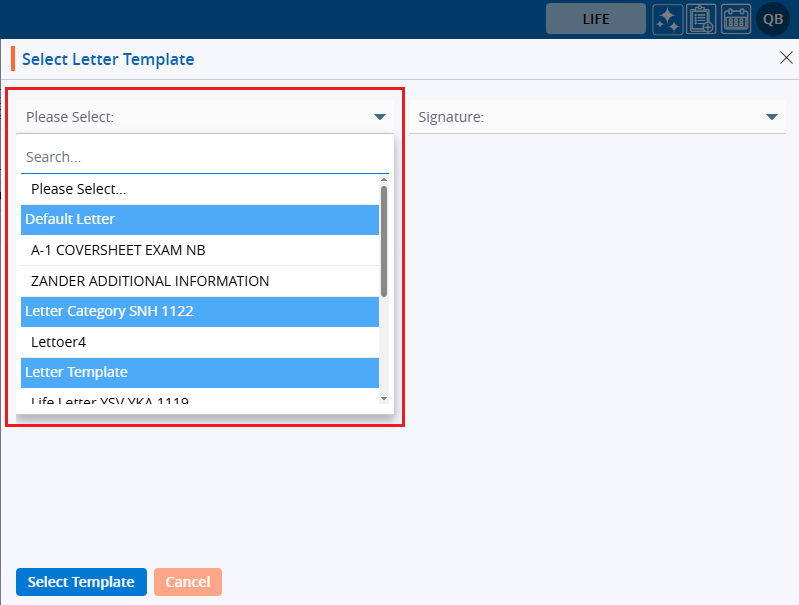
10. A new pop-up window will open.
11. Search and select the required template from the dropdown menu.
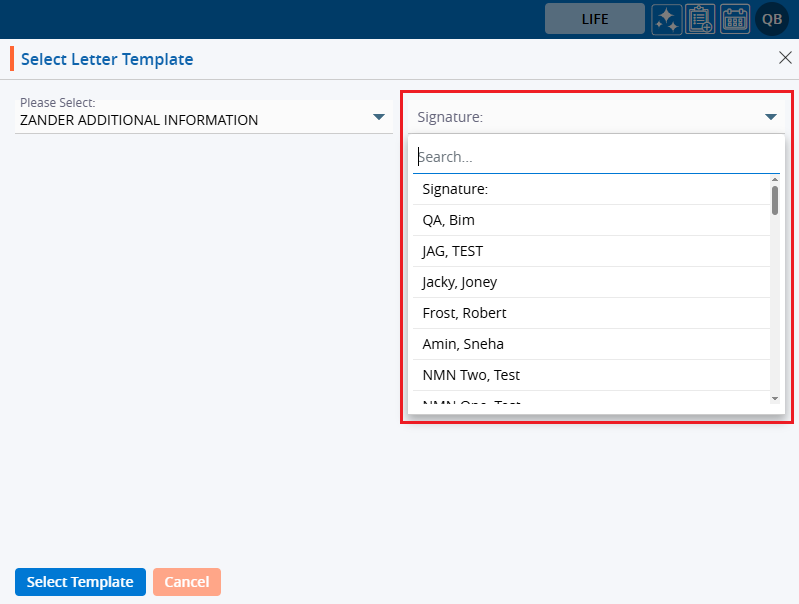
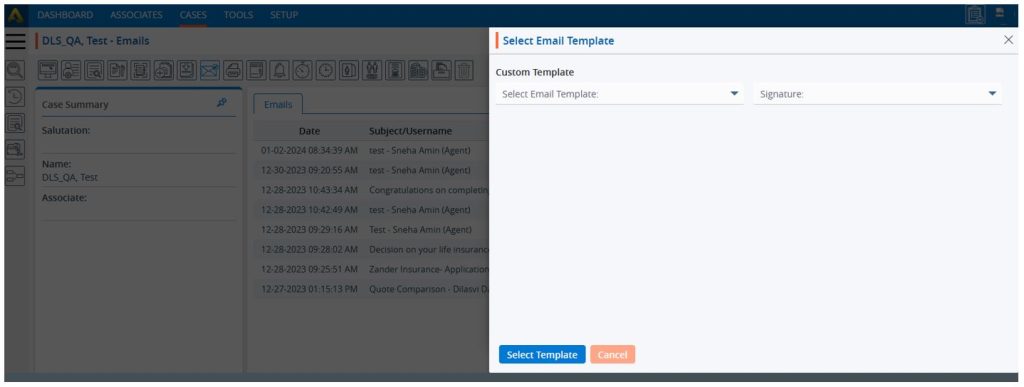
12. Select the name of the signatory from the ‘Signature’ dropdown menu.
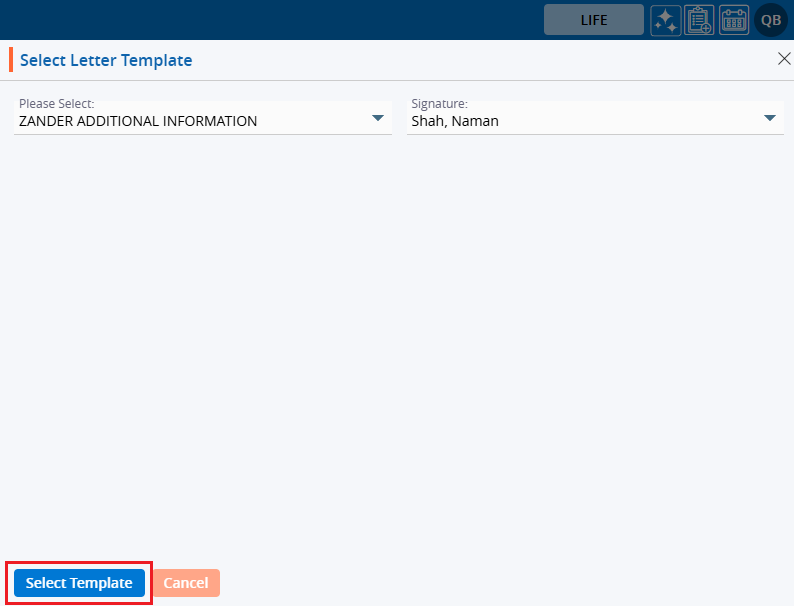
13. Click on the ‘Select Template’ button.
14. The Subject and Content fields will be filled in according to the selected template.
15. Three options are available:
a. Save
b. Print & Save
c. Cancel
16. Click on the ‘Save’ button to save the created letter.
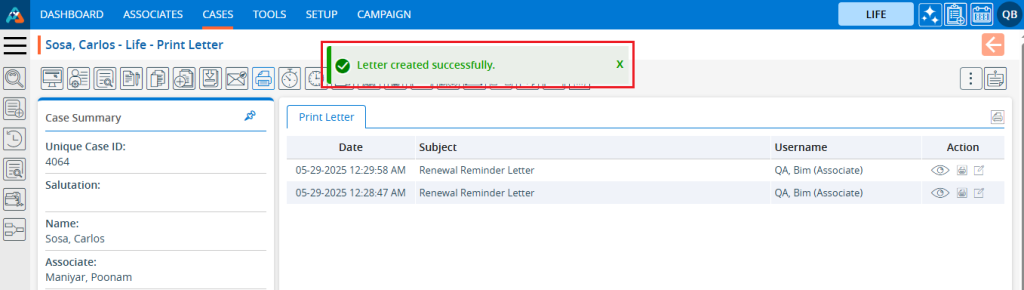
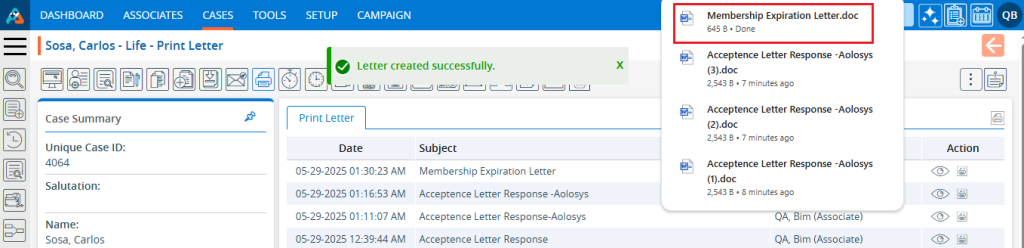
17. The system will generate a confirmation message that the letter has been created successfully.
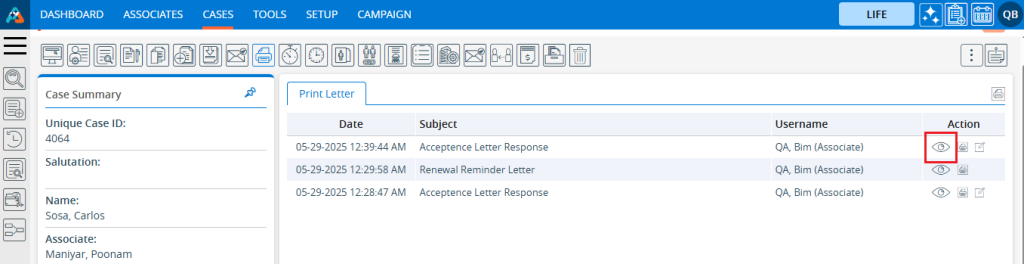
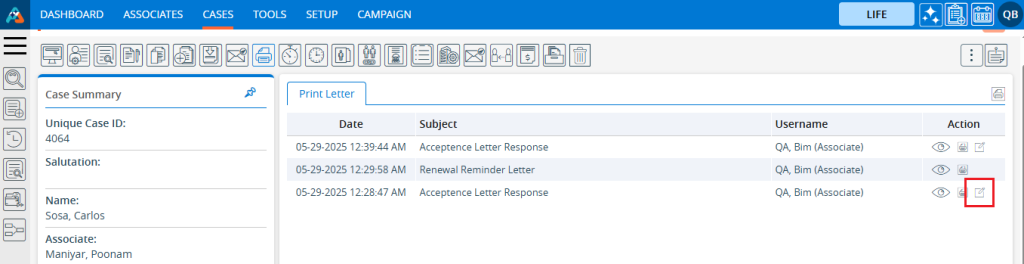
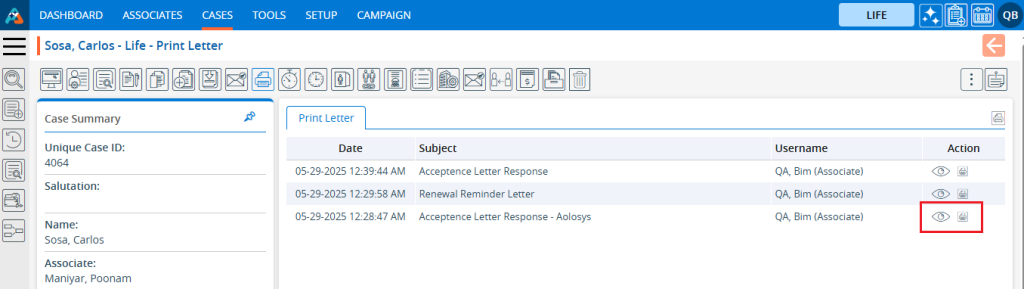
18. There are three options for the letters created: a. View b. Print c. Edit
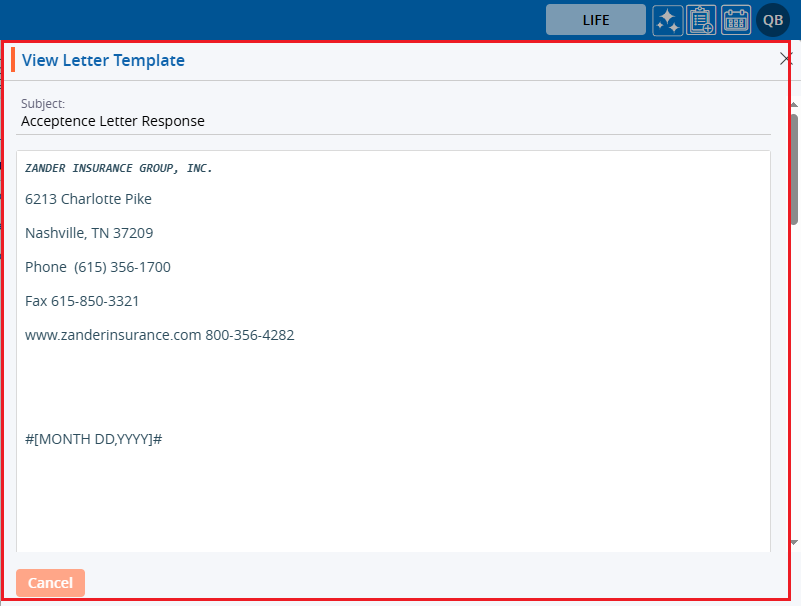
19. Click on the ‘View’ icon.
20. The letter will open, and the user can review it but cannot make any changes.
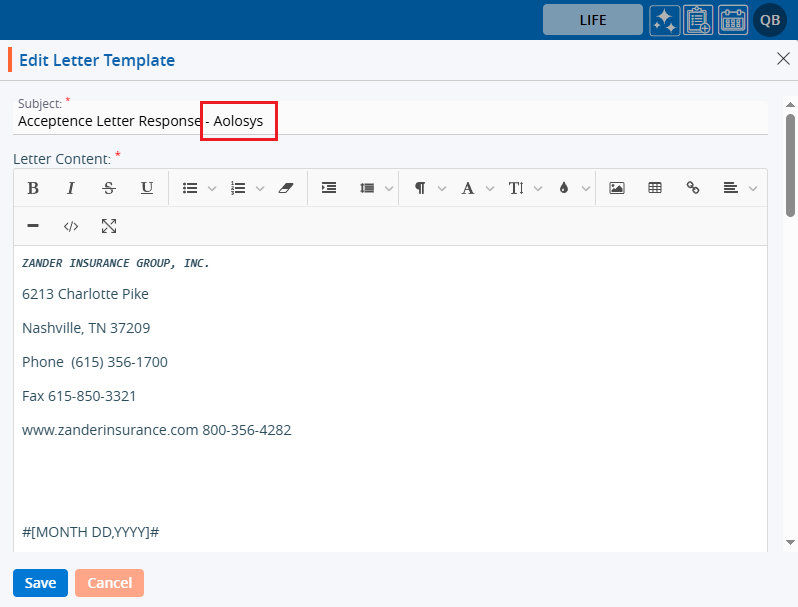
21. Click on the ‘Edit’ button to make changes to the existing letter.
22. The selected letter will open in a pop-up window. Apply the required changes to the existing letter and click on the ‘Save’ button. Changes are applied to the letter.
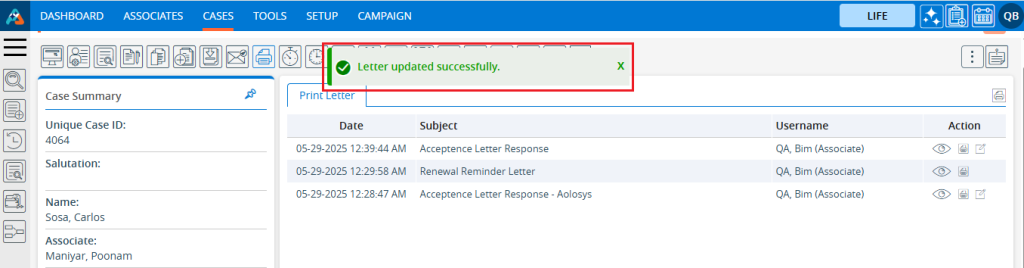
23. The system will generate and display a confirmation message that the letter is updated successfully.
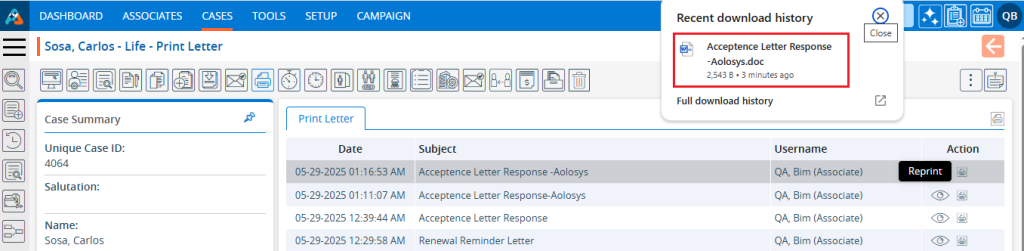
24. Click on the ‘Print’ icon.
25. The letter will be downloaded, and the button name will be changed to ‘Reprint’.
26. If the letter is printed once, the Edit button will disappear. Only the View and Reprint buttons will be displayed. If you need to download the letter again, click on the ‘Reprint’ option.
27. The letter will be downloaded again.
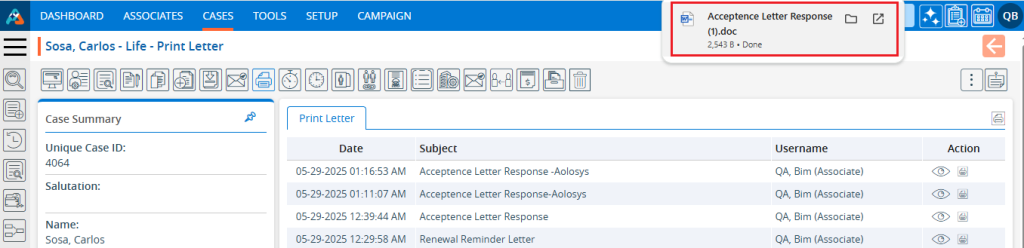
28. Click the ‘Print and Save’ option.
29. Two actions will be carried out simultaneously with this option: the letter will be printed and will be saved in the case’s profile. Here, the letter is added as below.
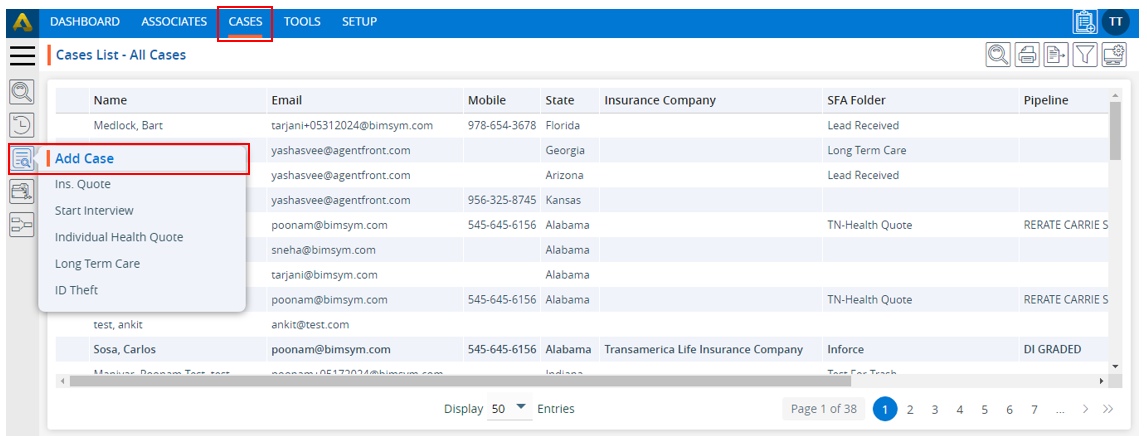
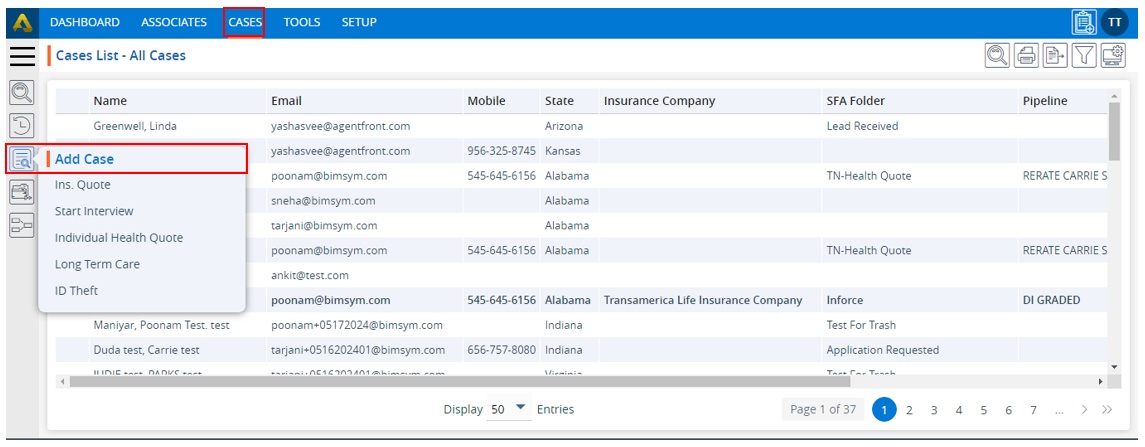
The Start Interview link is used to create a new case. The following are the steps to create a case using Start Interview: 1. Go to the ‘CASES’ tab and click on ‘Add Case’ from the left side panel.
2. Click on ‘Start Interview’.
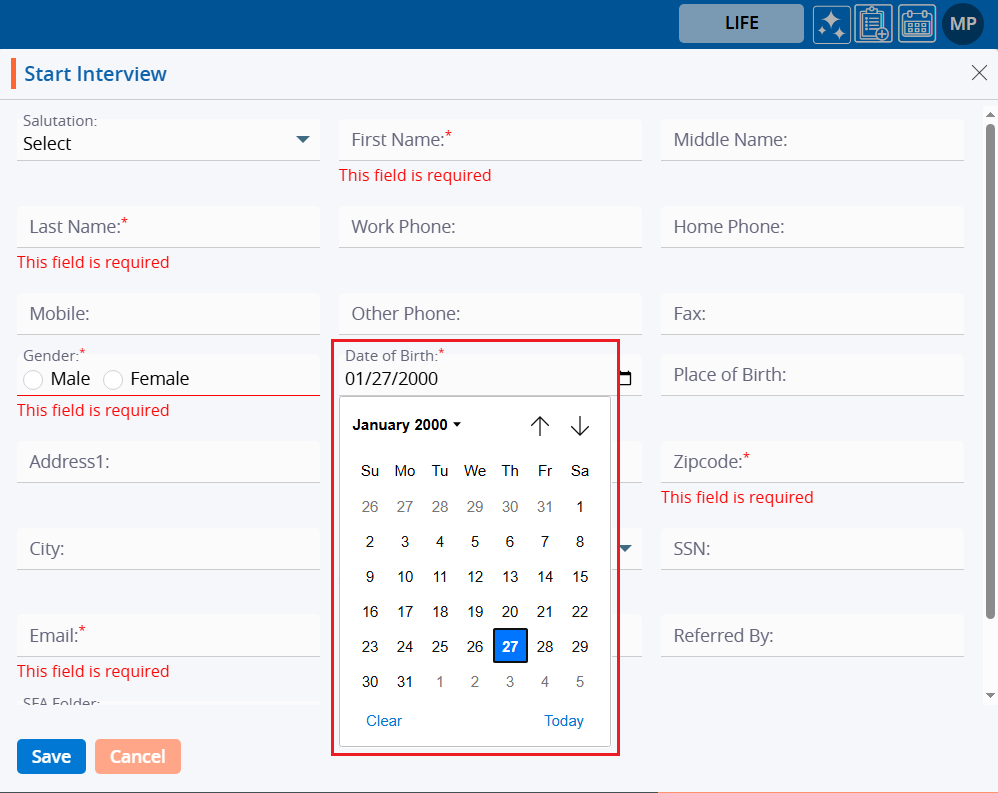
3. A Pop-up window to ‘Start Interview’ will open.
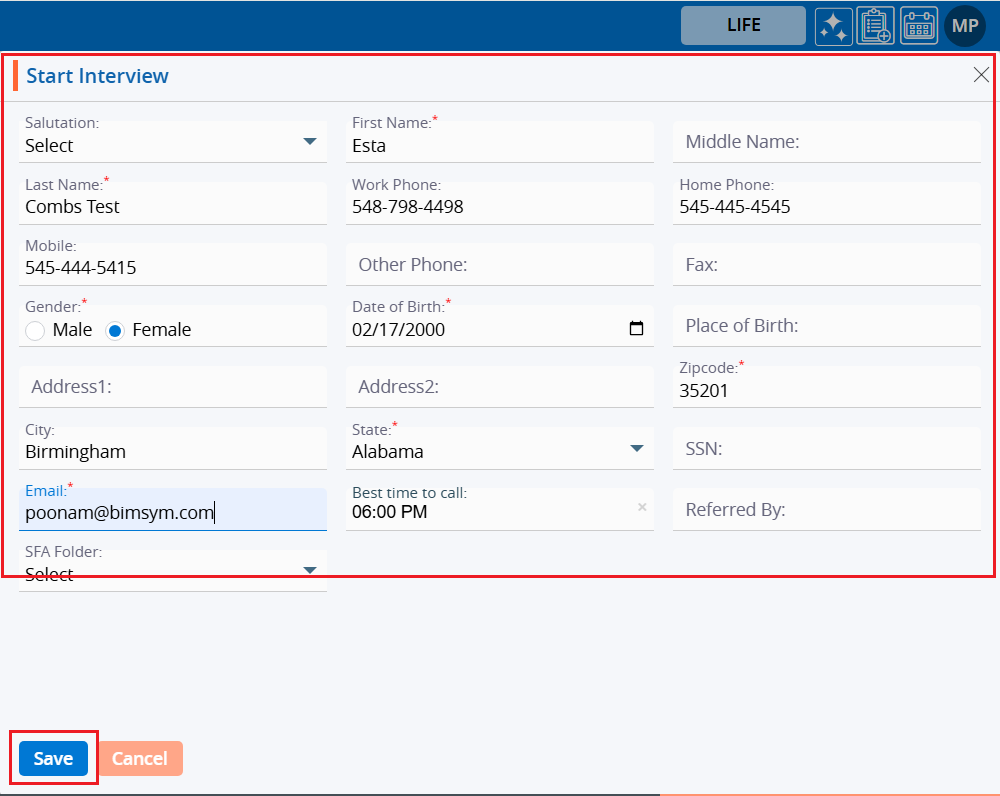
4. Fields marked with an asterisk (*) are mandatory.
5. Fill in all the information.
6. The Salutation’ field has a drop-down menu for selecting the value.
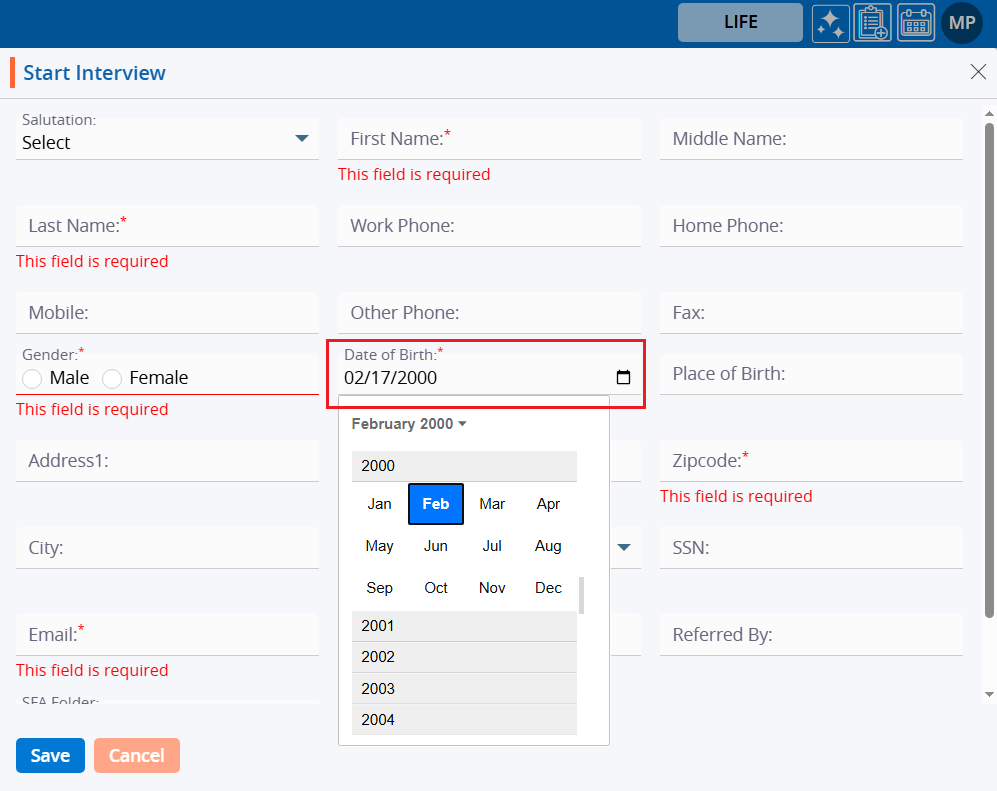
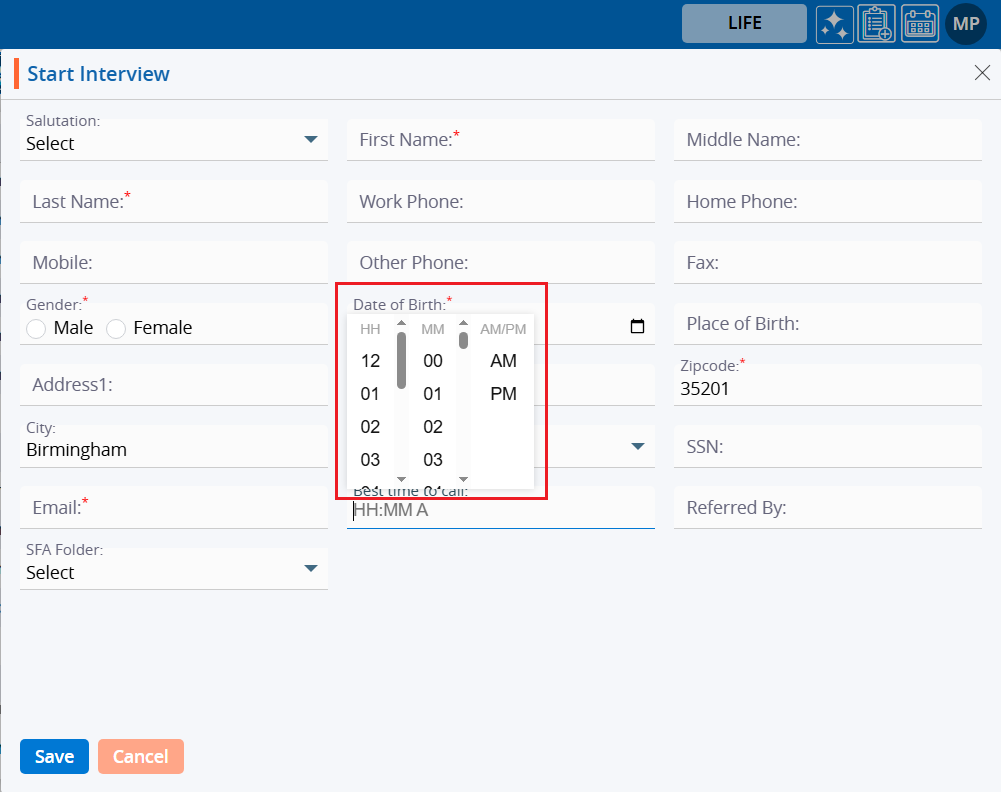
7. Select the ‘Date of Birth’ from the calendar option.
8. The system will display years and months for selecting the ‘Date of Birth’.
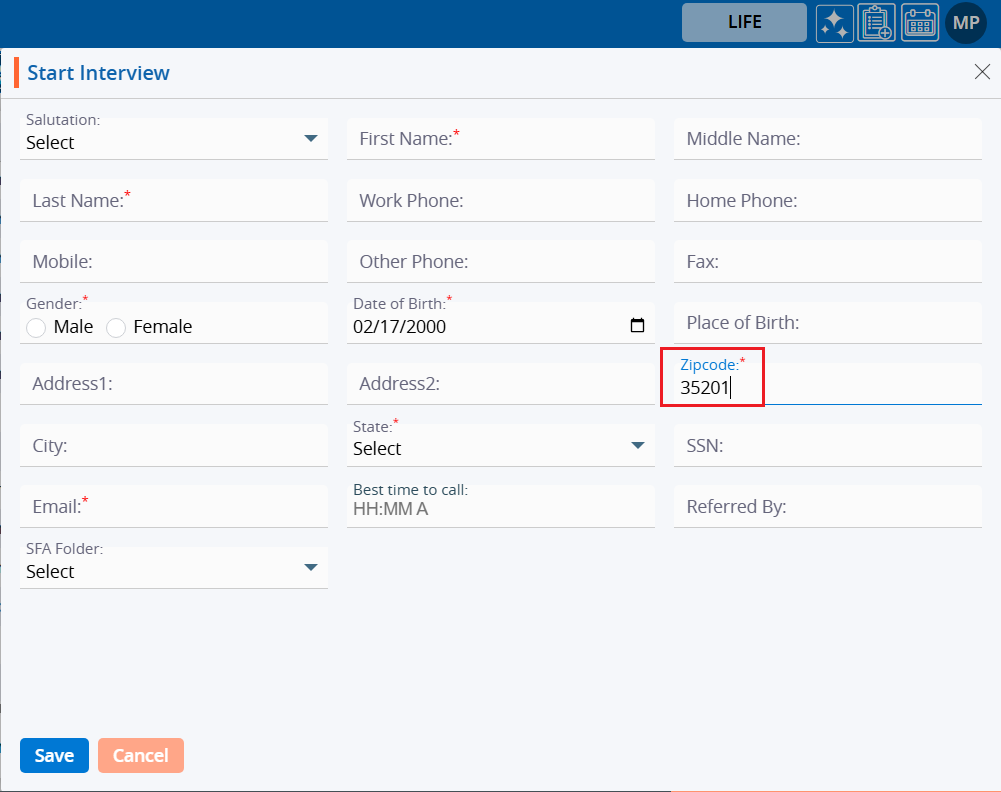
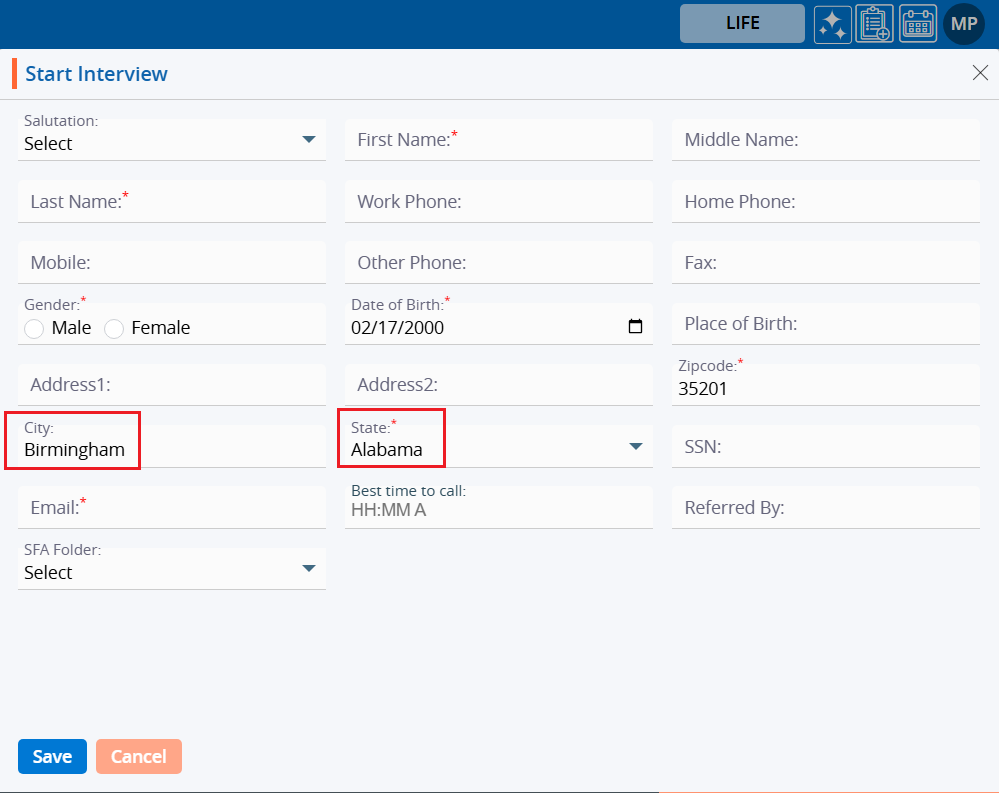
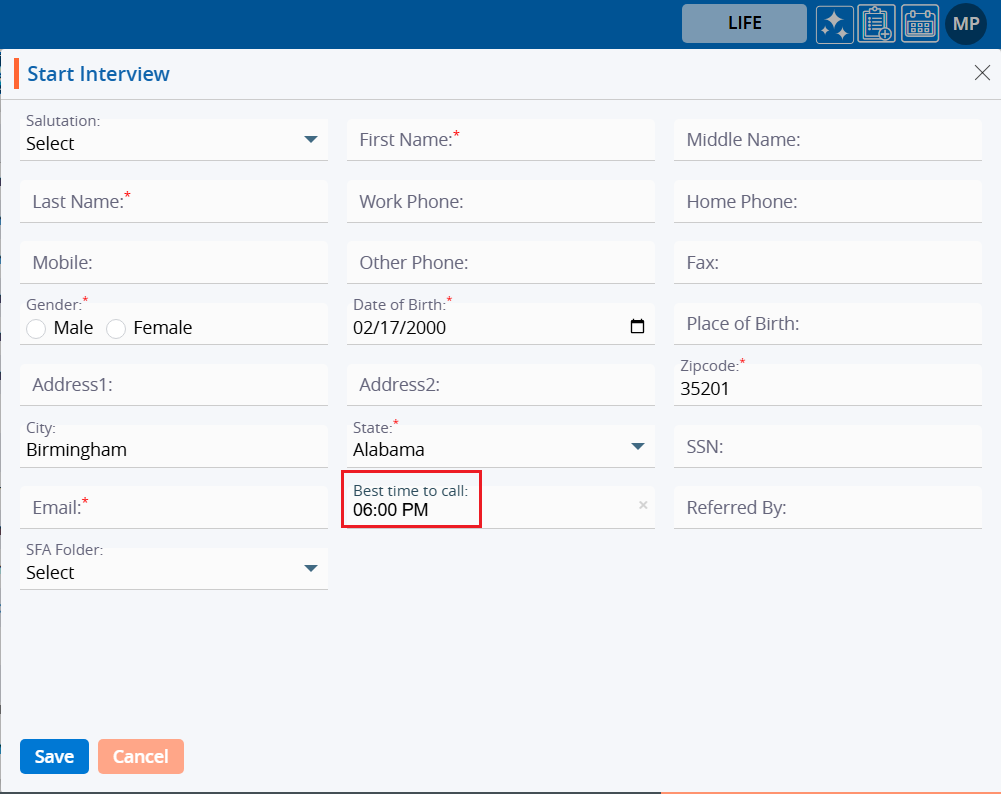
9. Enter the ‘Zip code’.
10. After entering the ‘Zip code’, the system will automatically add the ‘City’ and ‘State’.
11. When you click ‘Best time to call’, the system will show timing options in the format of HH:MM with AM/PM.
12. Select the time.
13. The user needs to fill in the rest of the fields manually. After filling in all the details, click on the ‘Save’ button.
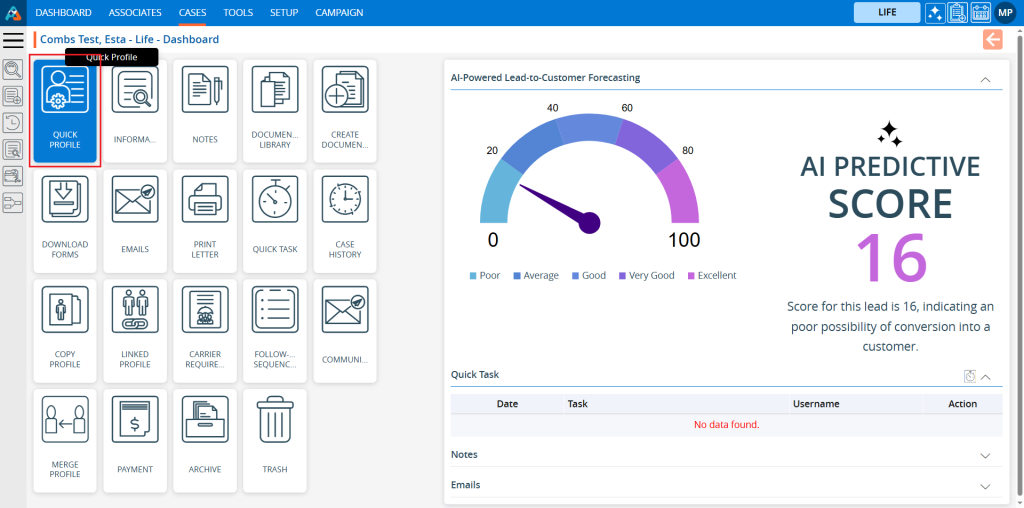
14. The system will generate a confirmation message that ‘Record has been created successfully’, and the record will appear at the top of the ‘Cases List – All Cases’. 15. Click on the newly created case.
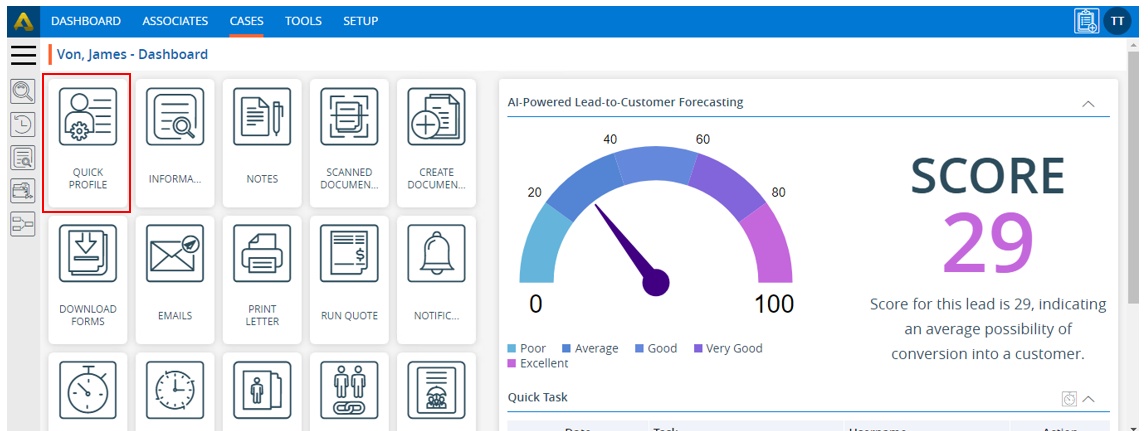
16. The member’s ‘Dashboard’ will open. Click on ‘QUICK PROFILE’.
17. The system will display the ‘Quick Profile’ information that we filled in during the creation of the case.
18. Return to the Dashboard and click on the ‘Information’ tab.
19. The system will display personal information in the ‘Personal’ tab.
20. Click on the ‘Case’ tab, and the system will display case details in that tab.
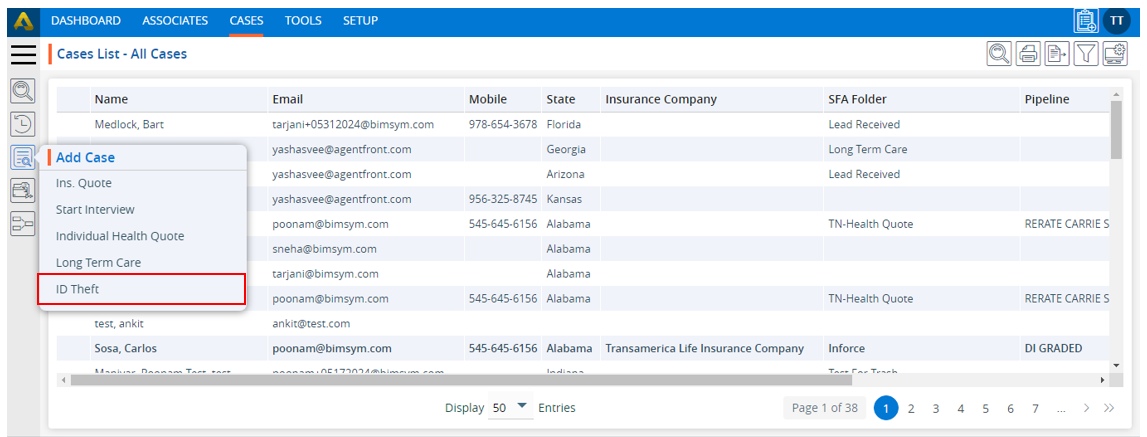
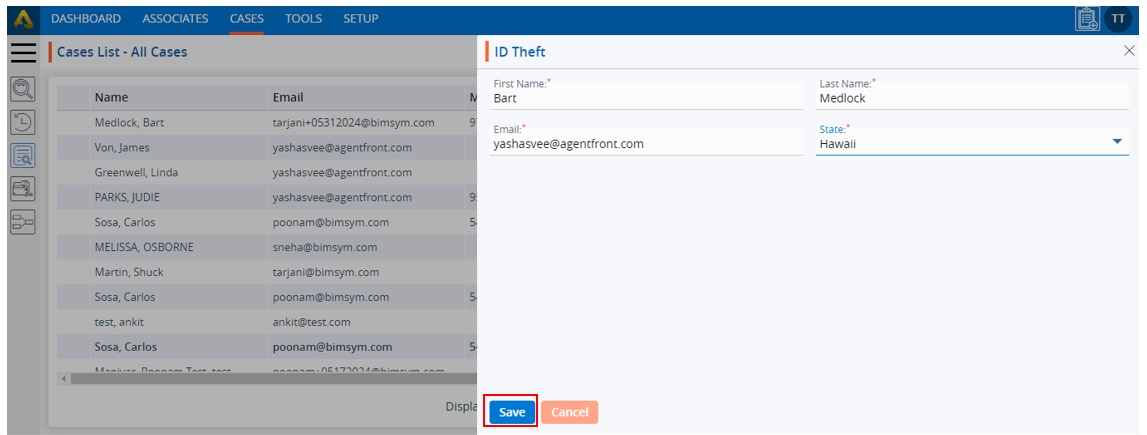
The ID Theft link is used to create a new case. Here are the steps to create a case using the ID Theft link: 1. Go to the ‘CASES’ tab and click on ‘Add Case’ from the left side panel.
2. Click on ‘ID Theft’.
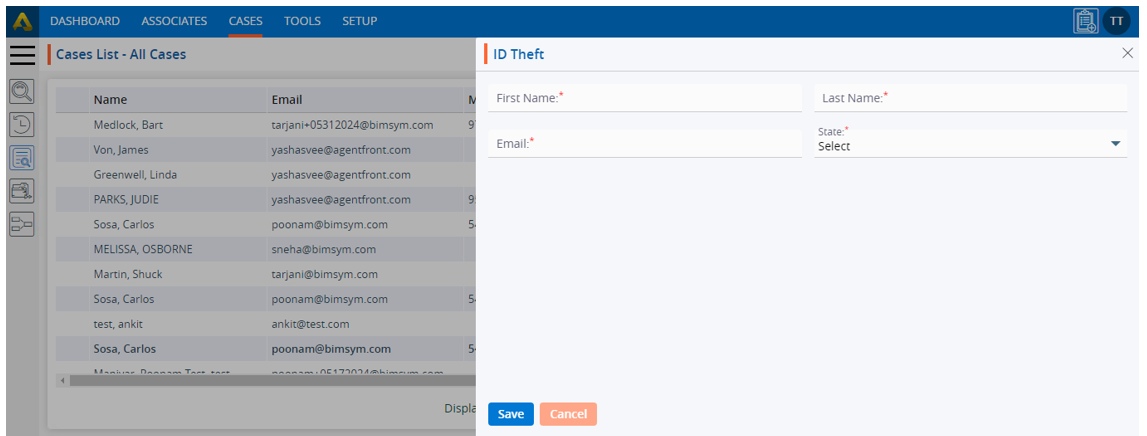
3. A pop-up window of ‘ID Theft’ form will open.
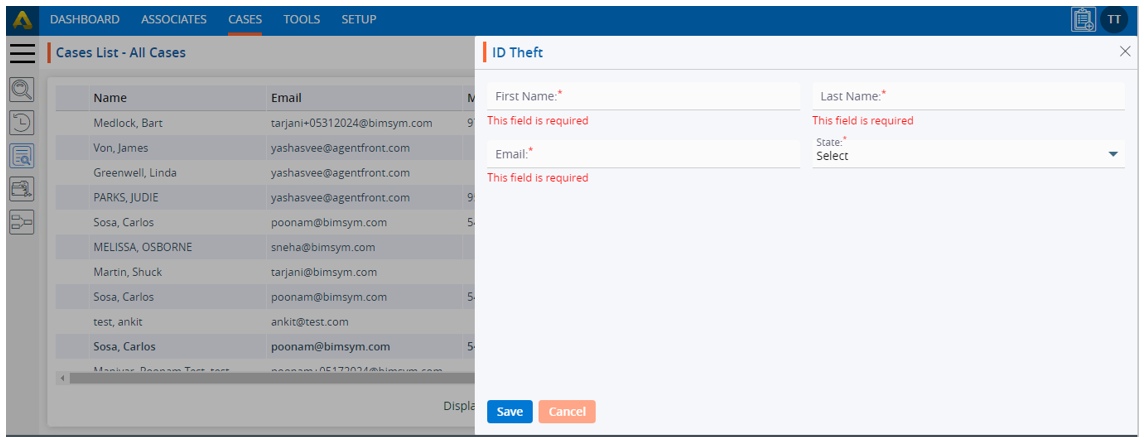
4. Fields marked with an asterisk (*) are mandatory.
5. Fill in all the information.
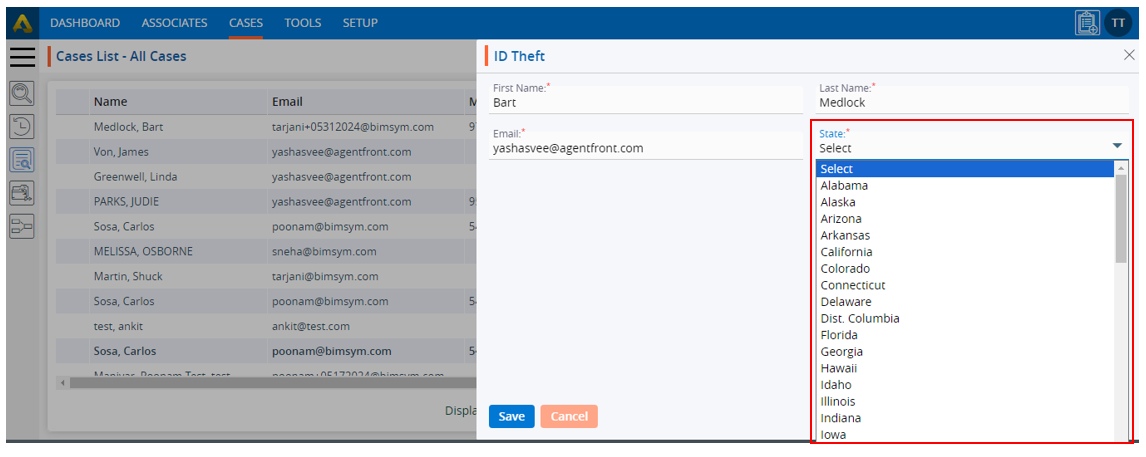
6. The ‘State’ field has a dropdown menu to select the state from.
7. Except for the ‘State’ field, the values for all other fields should be entered manually.
8. Once all the details are entered, click on the ‘Save’ button.
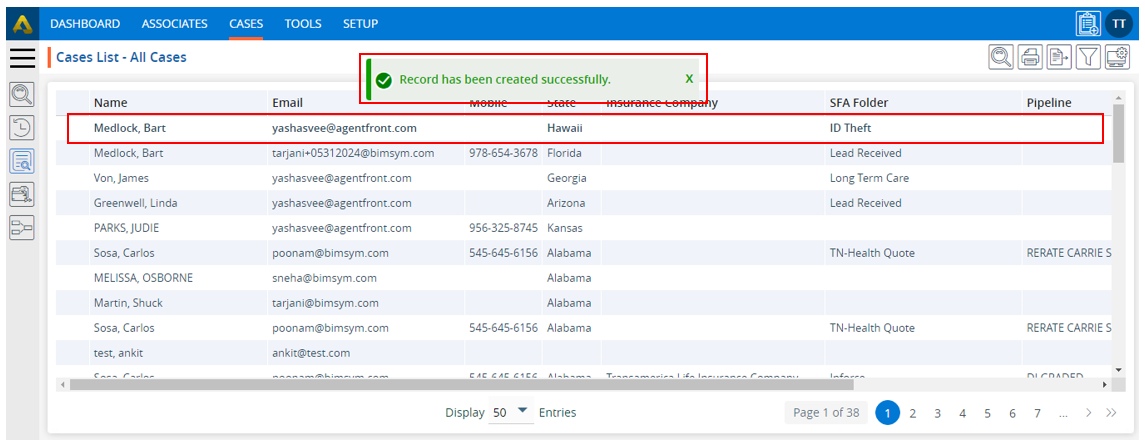
9. The system will display a confirmation message that the record has been created successfully, and the record will appear at the top of the case list. Click on the newly created case.
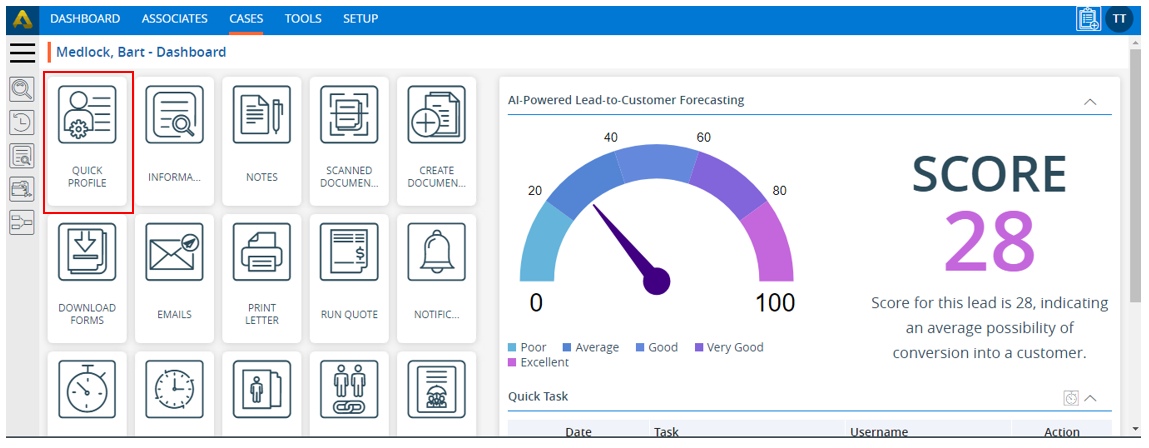
10. The case’s dashboard page will be opened. Click on the ‘Quick Profile’ option.
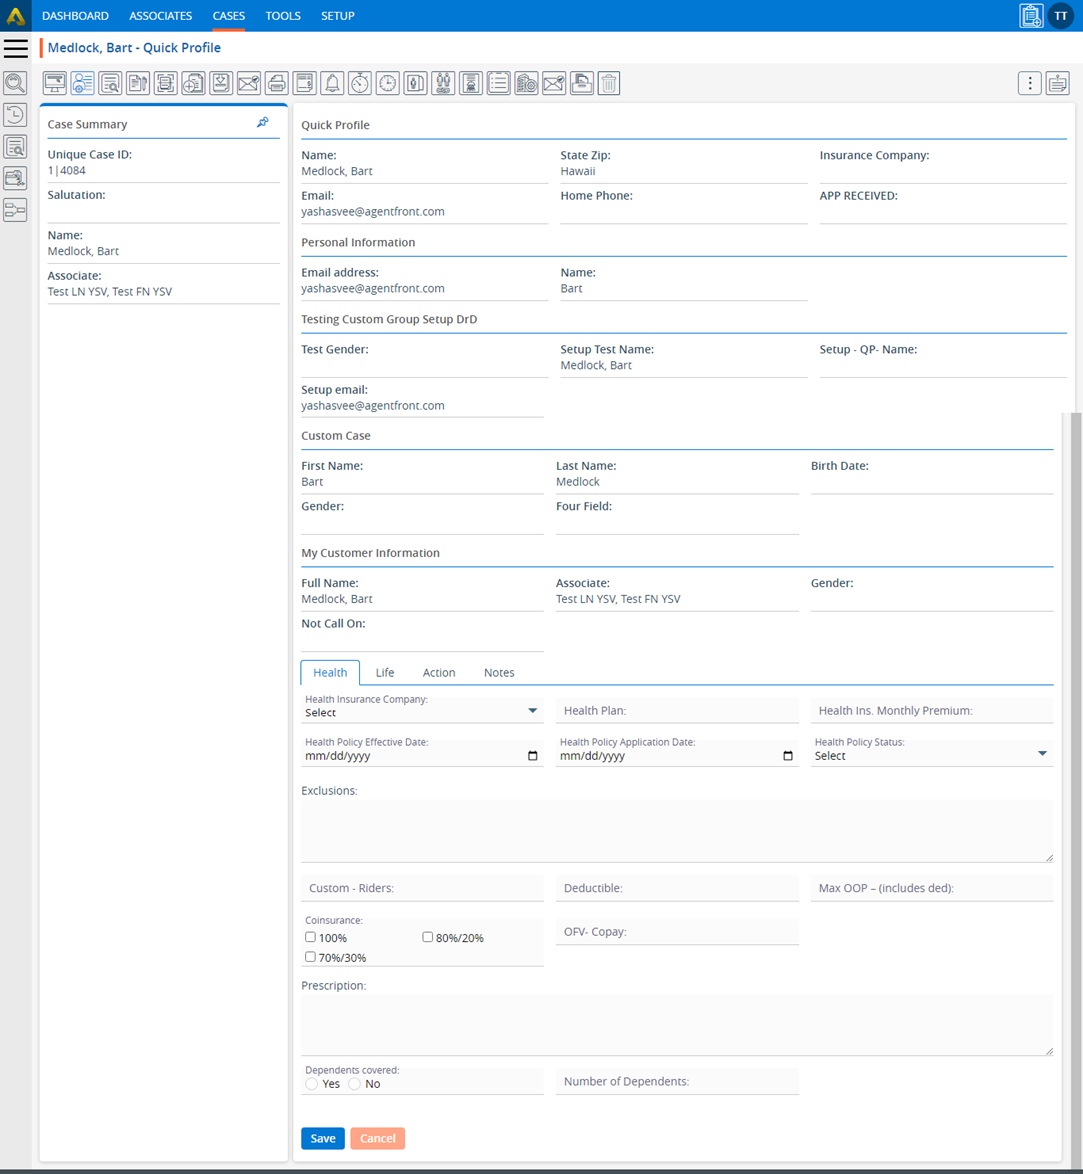
11. The system will display the information in the Quick Profile that we filled in during the creation of the case.
12. Go back to the ‘Dashboard’ page and click on the ‘INFORMATION’ tab.
13. The system will display personal information in the ‘Personal’ tab
14. Click on the ‘Case’ tab, and the system will display case details in the ‘Case’ tab.
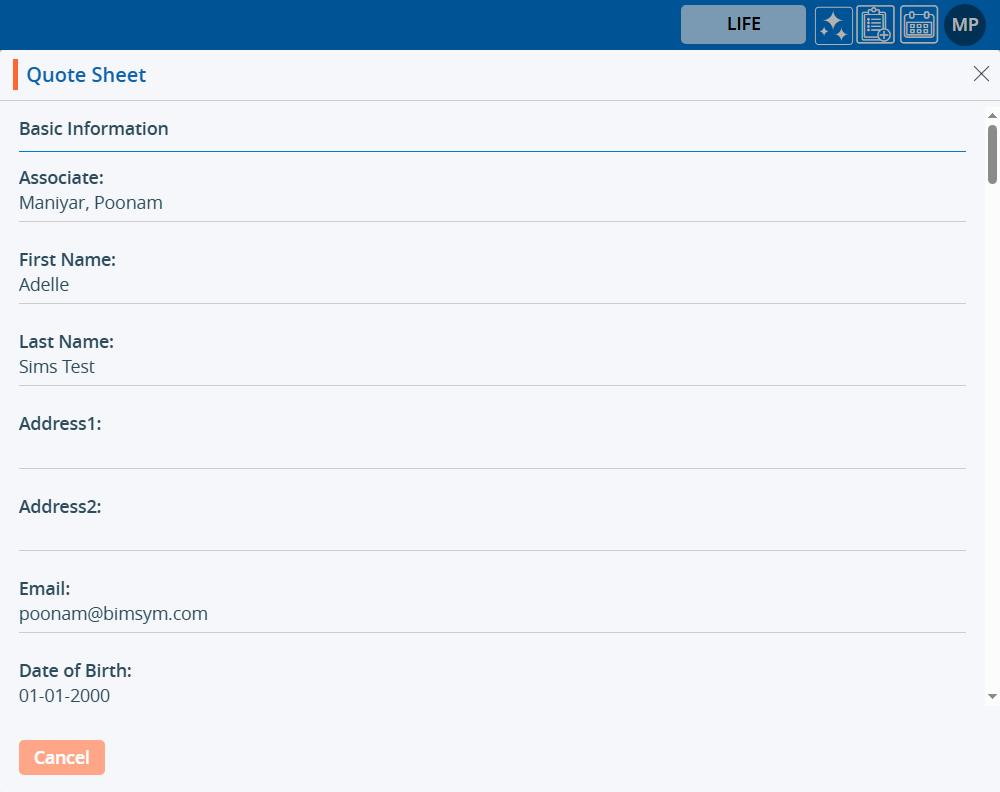
Quote Sheet is used to view the information of the case regarding the quote. The following are the steps to access the Quote Sheet: 1. Navigate to the ‘CASES’ tab where you’ll find the Cases List – All Cases. 2. Click on any case to proceed.
3. The profile’s ‘Dashboard’ will open. Click on the ‘INFORMATION’ option.
4. The Information page will open. Hover the cursor over the option icon located on the left side of Quick Notes, which has three dots.
5. There will be three options displayed:
a. Full Profile
b. Quote Sheet
c. Ins. Quote
6. Click on the ‘Quote Sheet’ option.
7. The Quote Sheet pop-up window will open. The information on this page is read-only; users cannot update the information from this page. This page will display the Basic Information of the case.
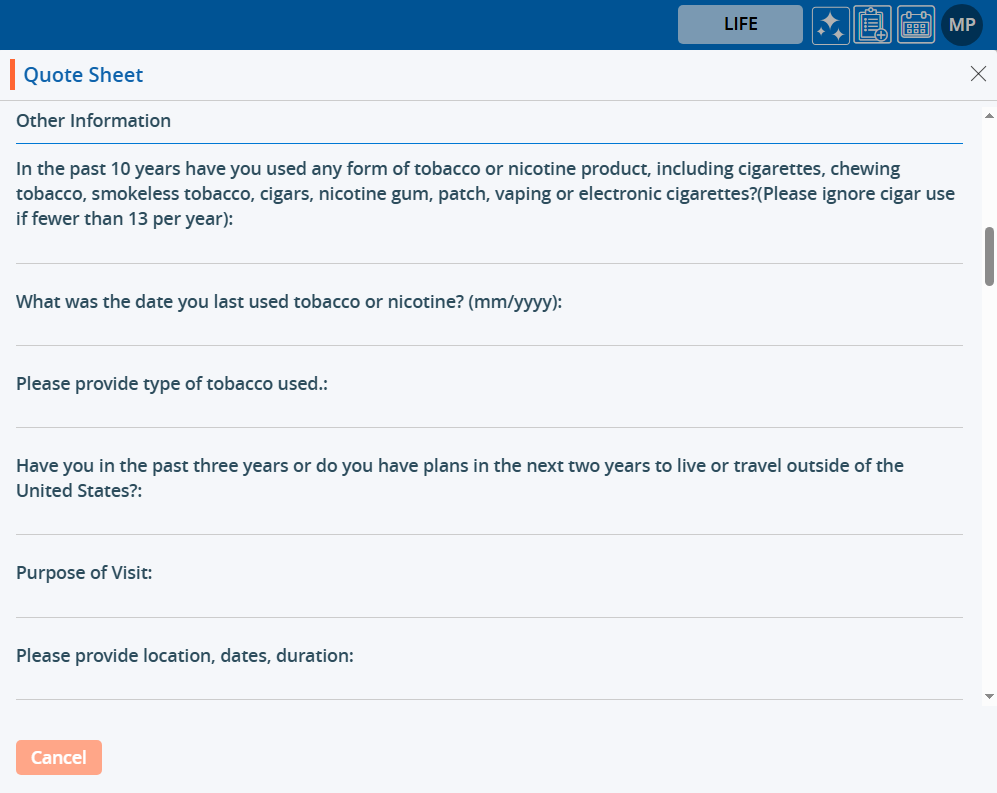
8. This page also displays the ‘Other Information’ section. Click on the ‘Cancel’ button to close this page.
Quick search finds the required data as characters are entered in the search box, displaying relevant results instantly. This allows users to quickly locate information without completing or submitting the full search term.
Sign in to AgentFront CRM.
From the top menu, choose Cases.
From the top right-side menu, Click on Quick Search.
Quick search will search for the case based on the fields set up under Setup > System Setup > Quick Search > Case Quick Search.
Enter at least 3 characters in the search box, then click the search icon.
Quick search results should be displayed based on the characters entered in the quick search bar.
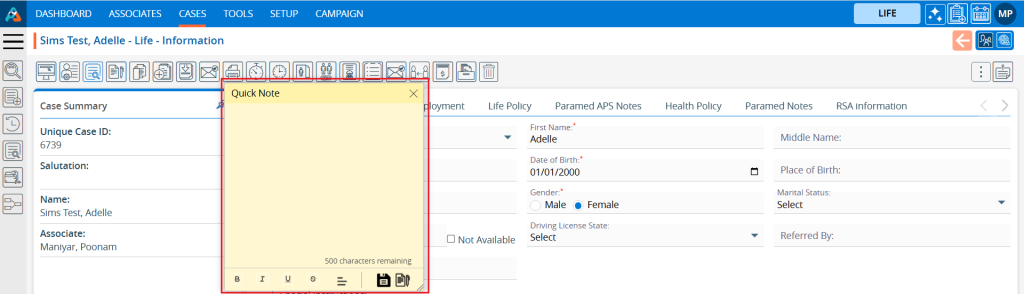
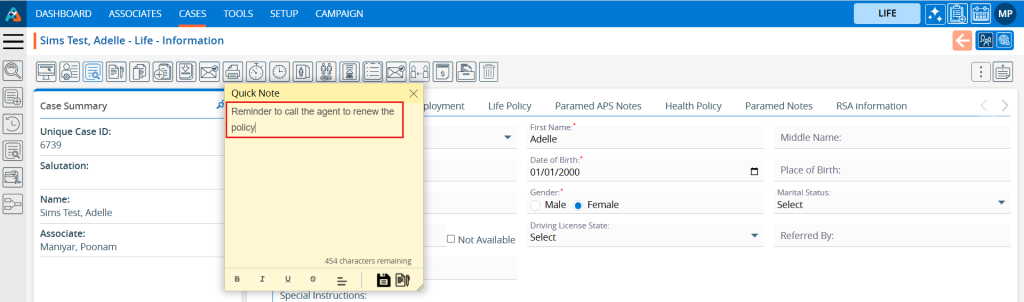
The Quick Note feature allows you to write and save notes easily without opening the Notes app for individual profiles. If a Quick Note is available for an individual profile, it will pop up whenever the user opens that profile.
Here are the steps to add a Quick Note: 1. Navigate to the ‘CASES’ tab where you’ll find the Cases List – All Cases. 2. Click on any case to proceed.
3. After clicking on a case, the profile’s ‘Dashboard’ will open. Click on the ‘INFORMATION’ option.
4. The Information page will open. Click on the ‘Quick Note’ option.
5. The quick note will open.
6. Up to 500 characters can be added to the Quick Note. To add or edit the Quick Note, there are editing tools available such as Bold, Italic, Underline, Strikethrough, and Alignment.
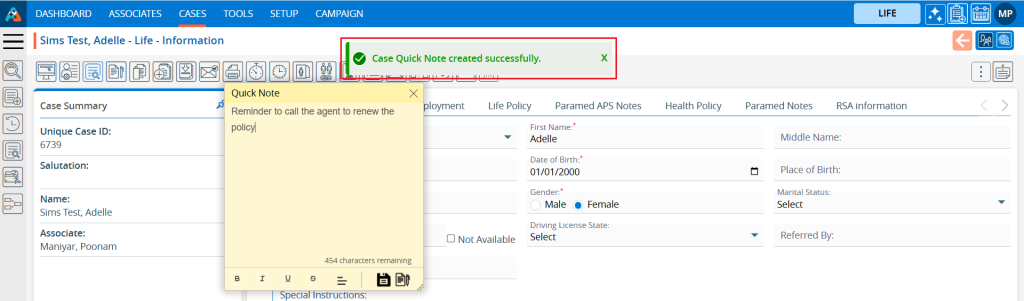
7. Add the content to the Quick Note and click on the ‘Save’ icon.
8. The Quick Note will be created successfully, and the system will generate a confirmation message.
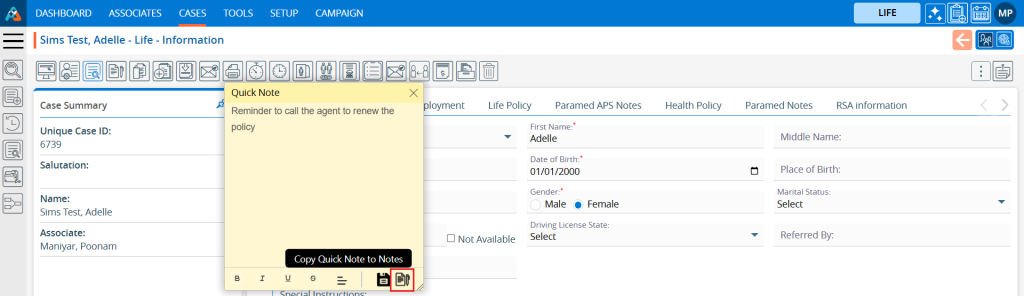
9. Users can also save this quick note under the Notes tab. To add the Quick Note to the Notes, click on the ‘Copy Quick Note to Notes’ button.
10. The note will be created successfully, and the system will generate a confirmation message.
11. Click on the ‘Notes’ button.
12. The note will be displayed in the notes tab listing as well.
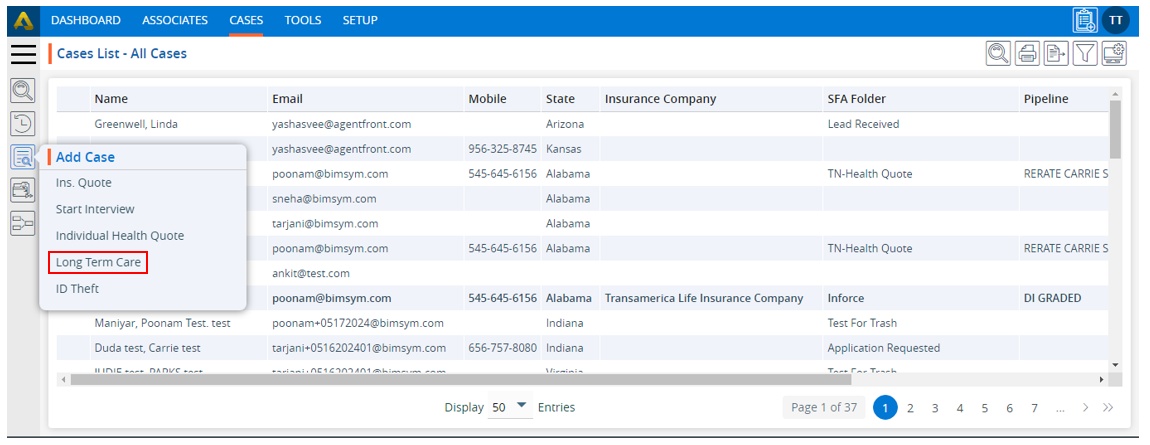
Long Term Care – The Long Term Care link is used to create a new case. Here are the steps to create a case using the Long Term Care link: 1. Navigate to the ‘CASES’ tab and click on ‘Add Case’ in the left-side panel.
2. Click on ‘Long Term Care’.
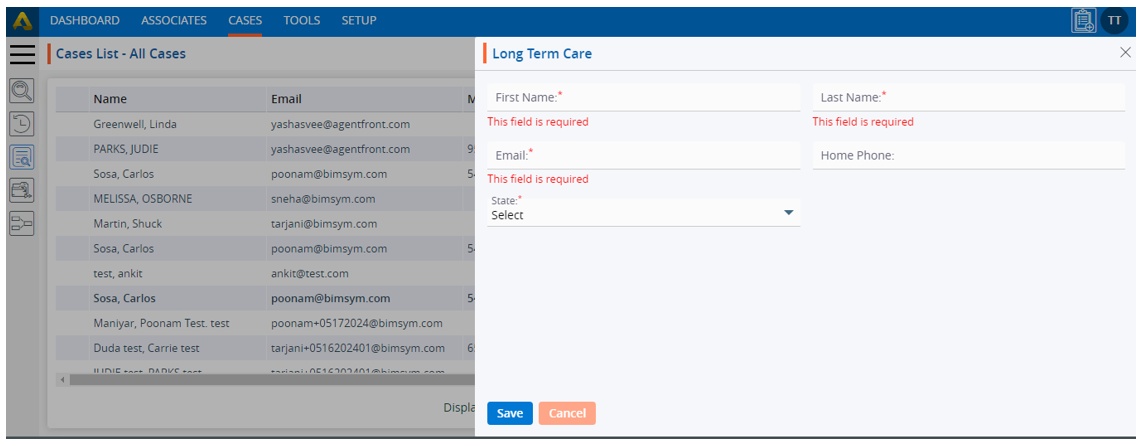
3. A pop-up window for ‘Long Term Care’ form will open.
4. Fields marked with an asterisk (*) are mandatory. Users are required to fill in all the information.
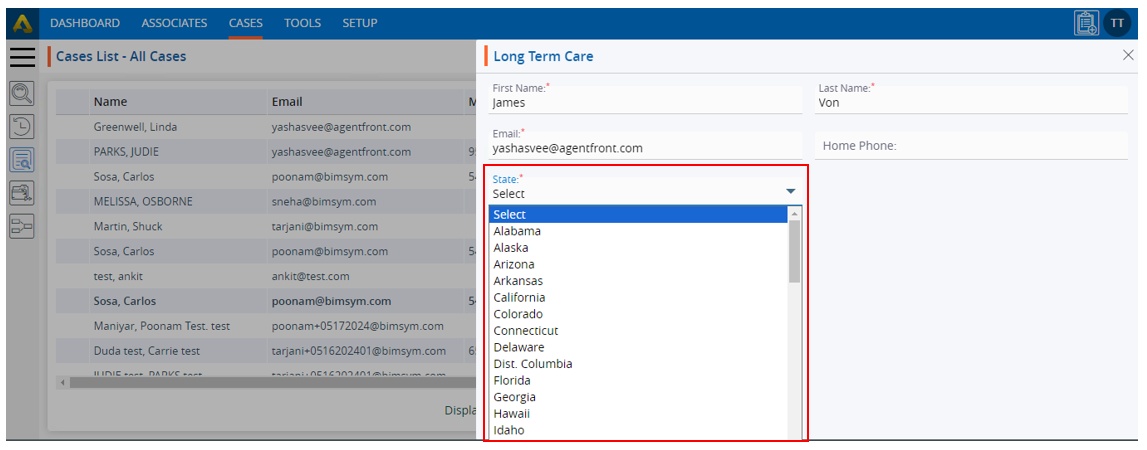
5. The State field has a drop-down menu for selecting the ‘State’.
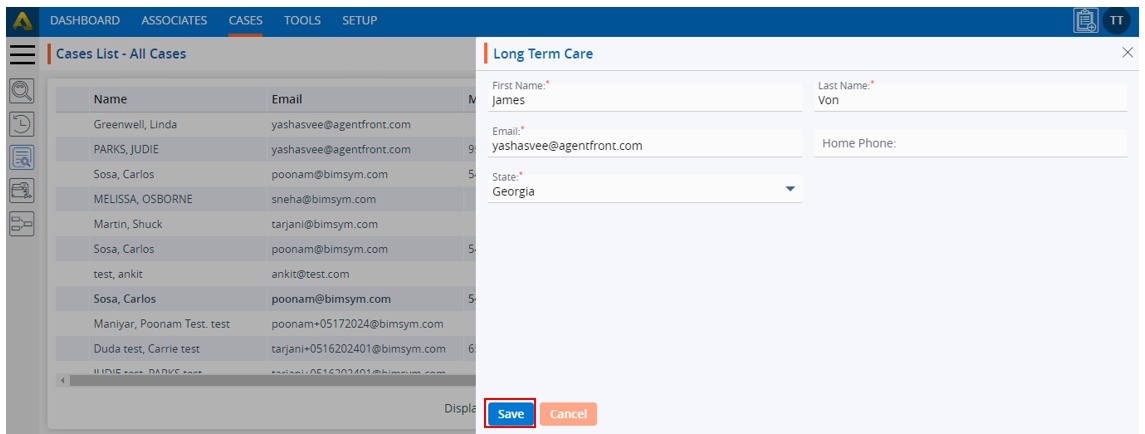
6. Once all the details are entered, click on the ‘Save’ button.
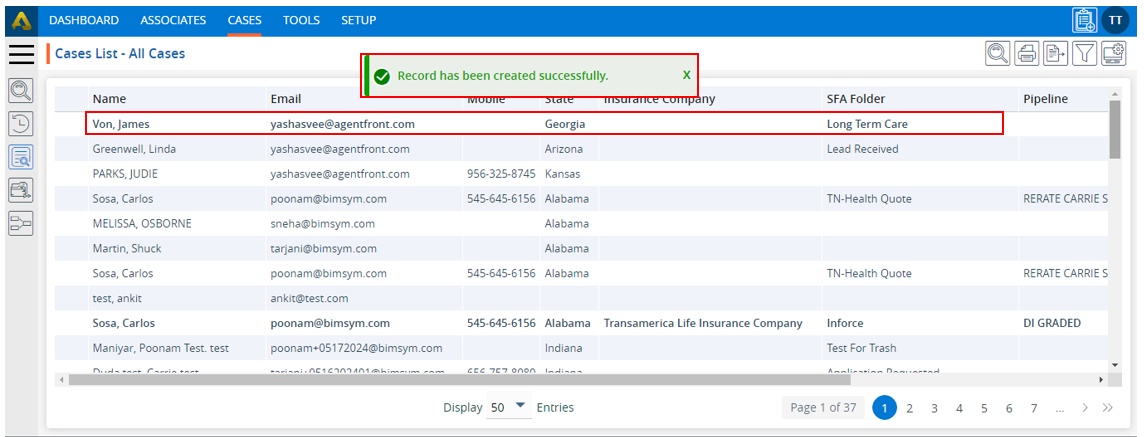
7. The system will display a confirmation message that the ‘Record has been created successfully’, and the record will appear at the top of the case list. Click on the newly created case.
8. The ‘Dashboard’ page will open. Click on ‘Quick Profile’.
9. The system will display the ‘Quick Profile’ information that we filled in during the creation of the case.
10. Return to the ‘Dashboard’ page and click on the ‘Information’ tab.
11. The system will display personal information in the ‘Personal’ tab.
12. Click on the ‘Case’ tab, and the system will display case details in that tab.
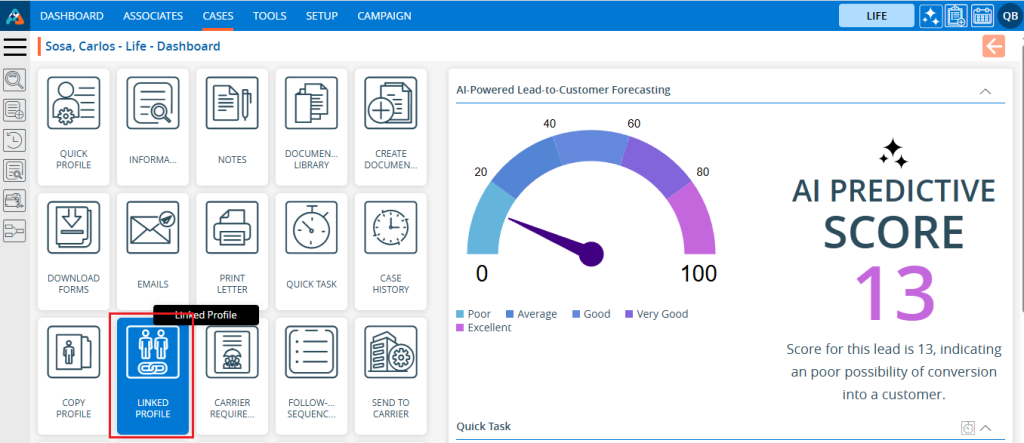
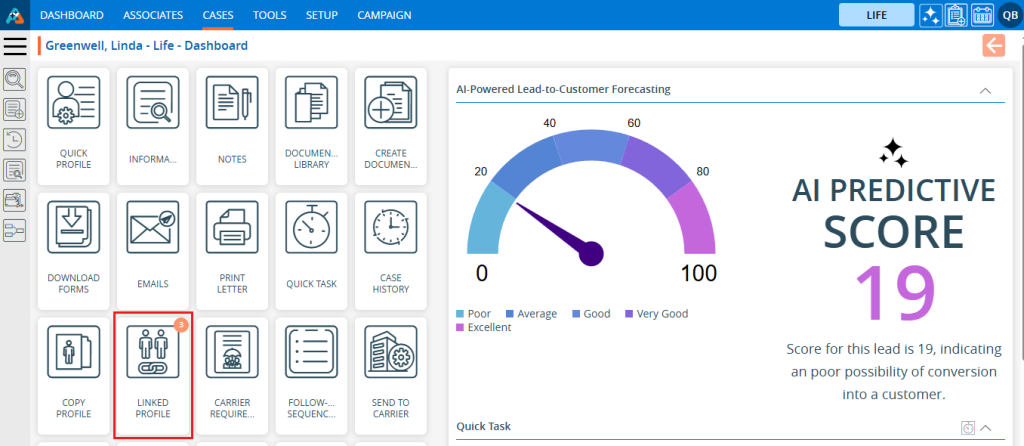
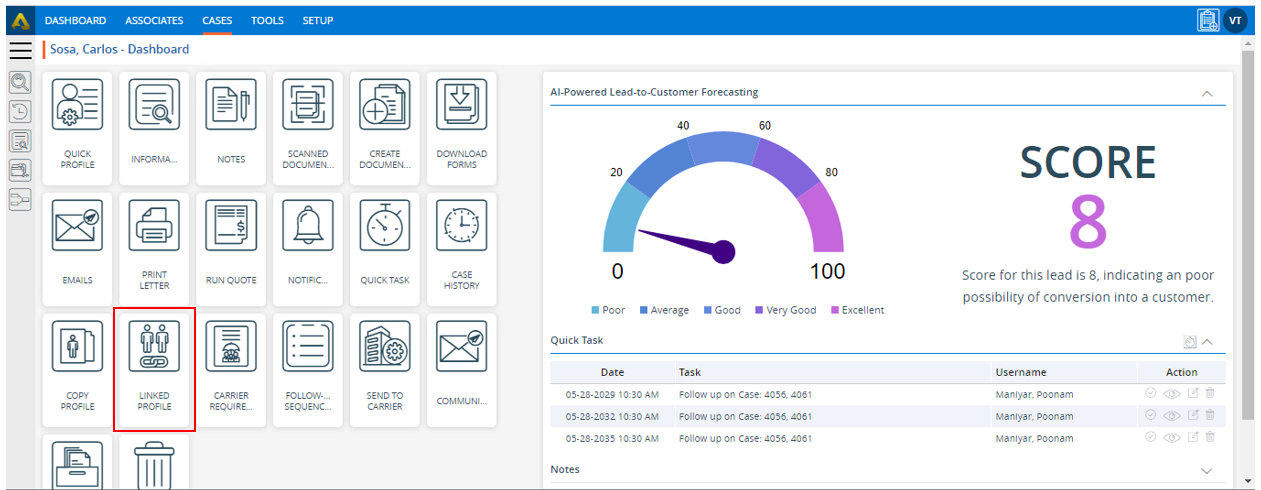
Linked Profile – Create a link between profiles by establishing relationships.
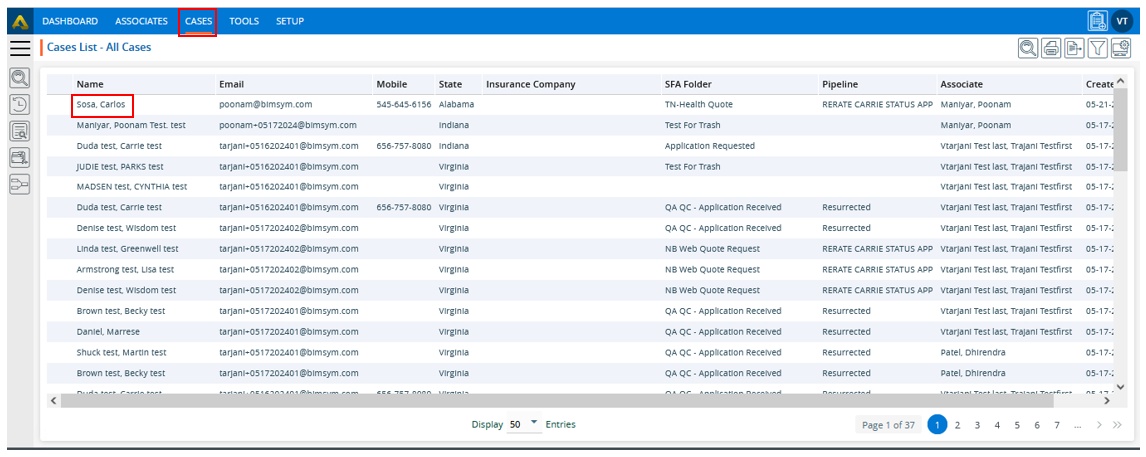
Here are the steps to linking profiles: 1. Navigate to the ‘CASES’ tab where you’ll find the Cases List – All Cases.
2. Click on a case to proceed.
3. After clicking on a case, the ‘Dashboard’ will open. 4. Click on the ‘LINKED PROFILE’ option.
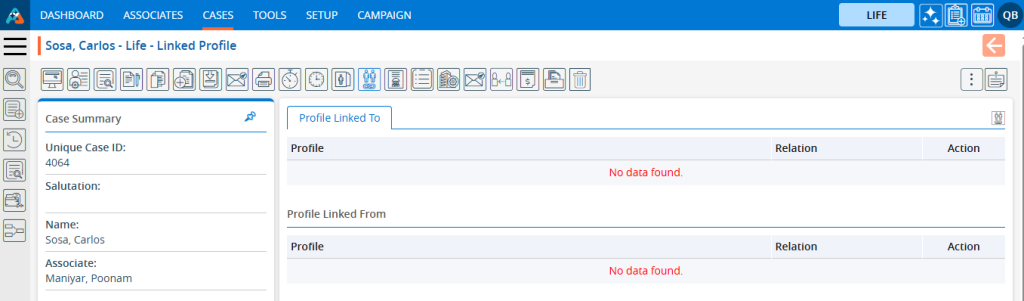
5. The Link Profile page will open.
6. Click on the ‘Link Profile’ icon.
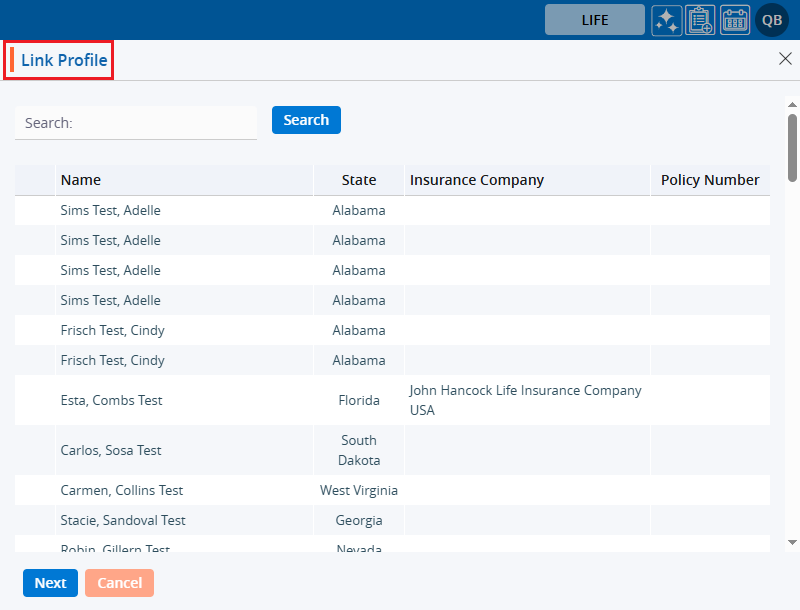
7. A new pop-up window to Link Profile will open.
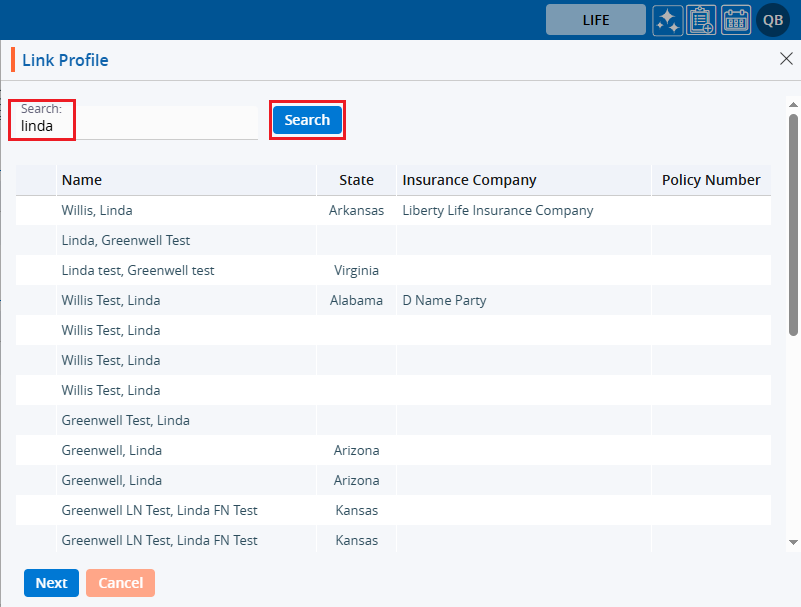
8. The user can search for any specific case by entering the value from the fields ‘Name’, ‘State’, ‘Insurance Company’ and ‘Policy Number’. Enter the value and click on the ‘Search’ button.
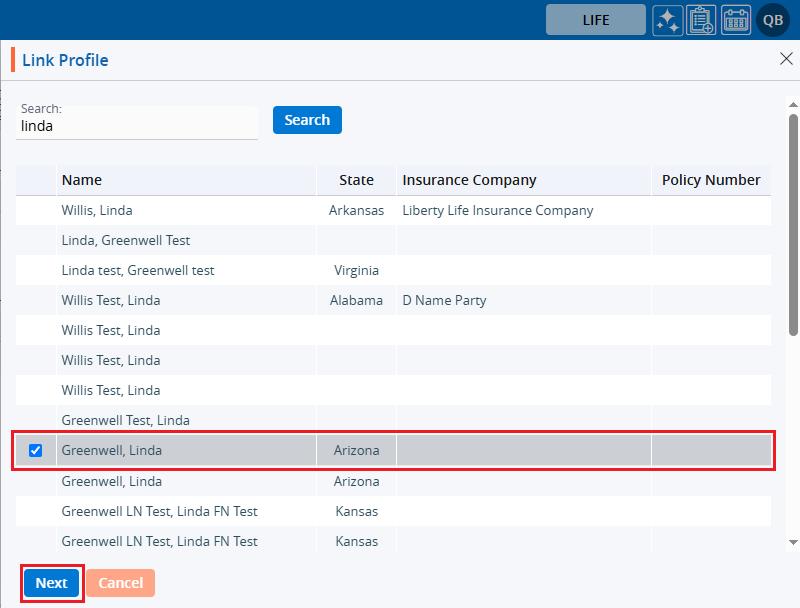
9. Select the case from search results and then click on the ‘Next’ button.
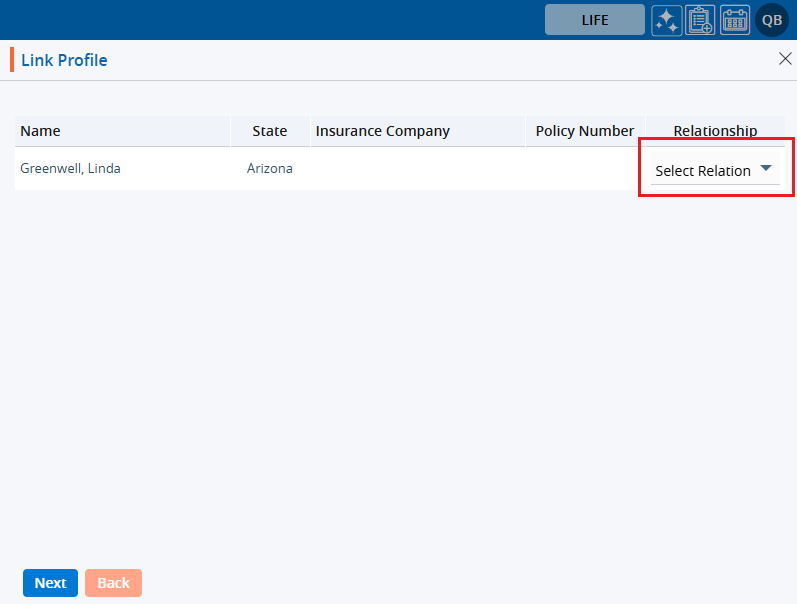
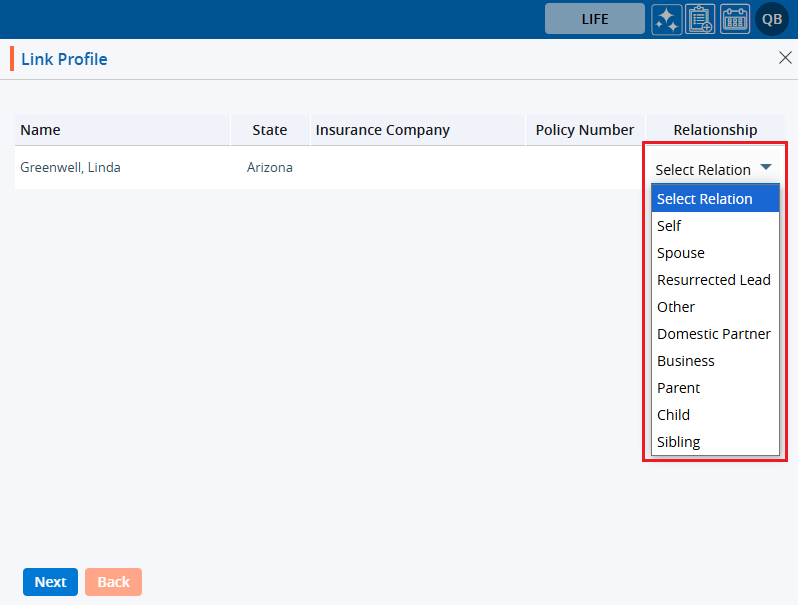
10. A pop-up window will open. 11. Click on the ‘Select Relation’ drop down.
12. The dropdown menu will display options.
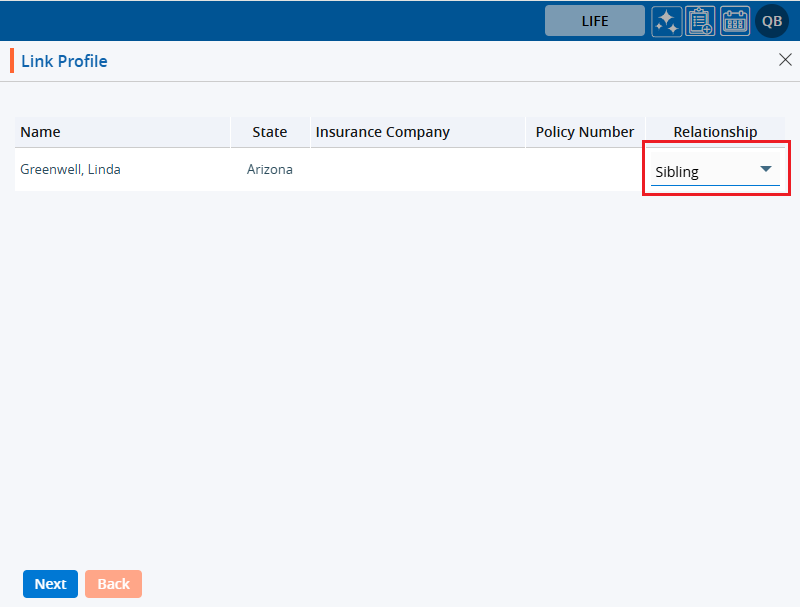
13. Select the desired relation from the dropdown menu. 14. Click on the ‘Next’ button.
15. The profile is linked, and the system will generate a confirmation message. Click on the ‘Close’ button.
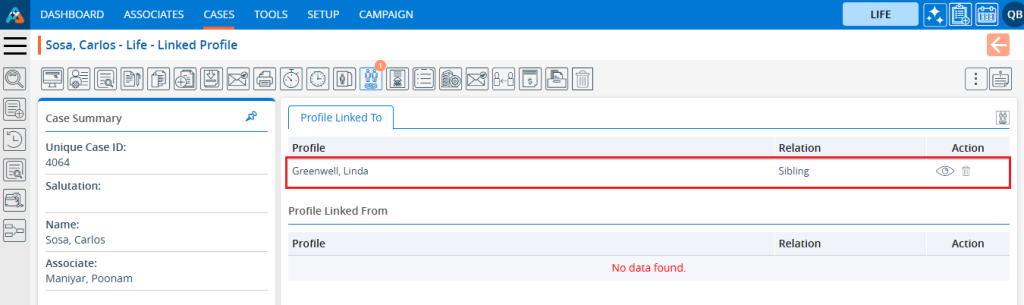
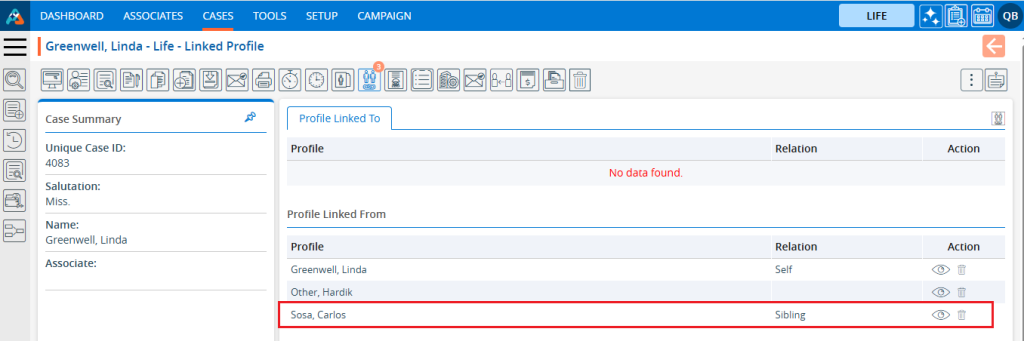
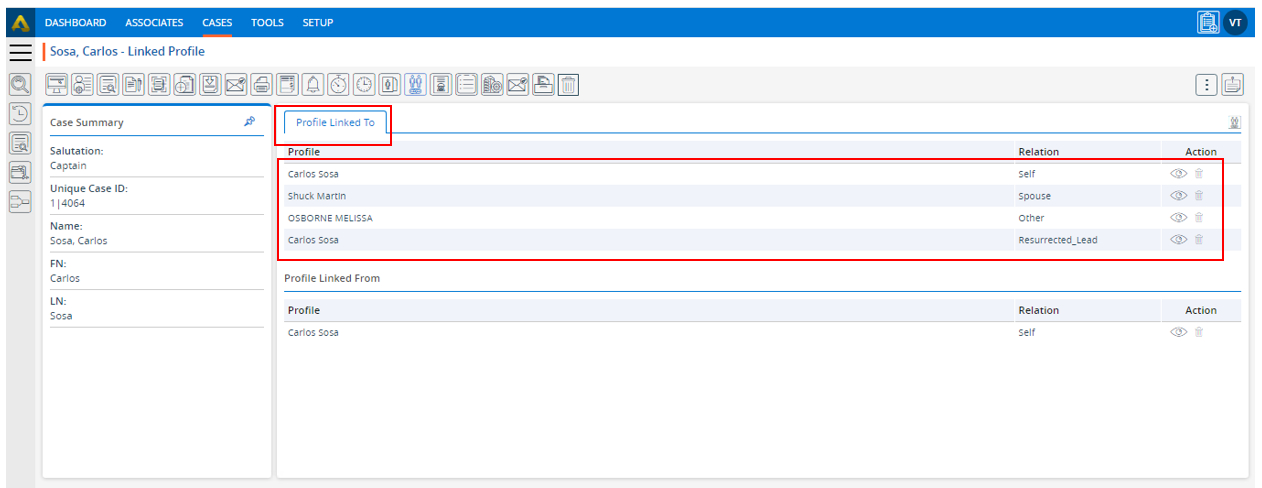
16. The linked profile will be displayed in the listing in the ‘Profile Linked To’ section.
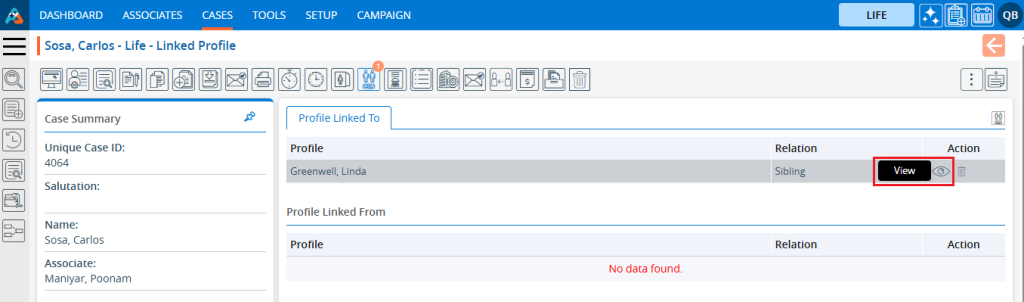
17. To view the linked profile, click on the ‘View’ button.
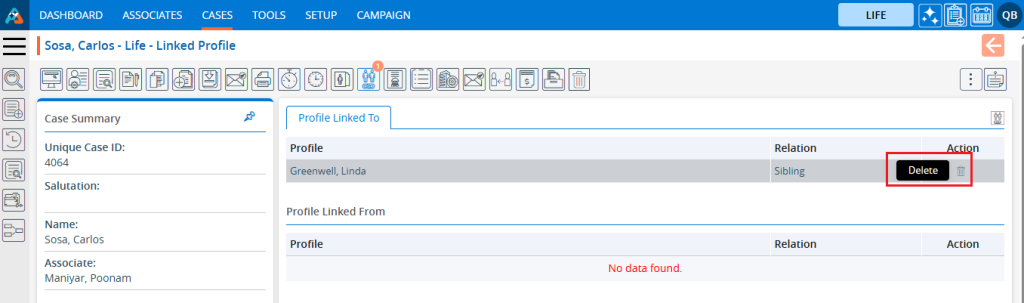
18. The linked profile will open. Click on the ‘LINKED PROFILE’ option.
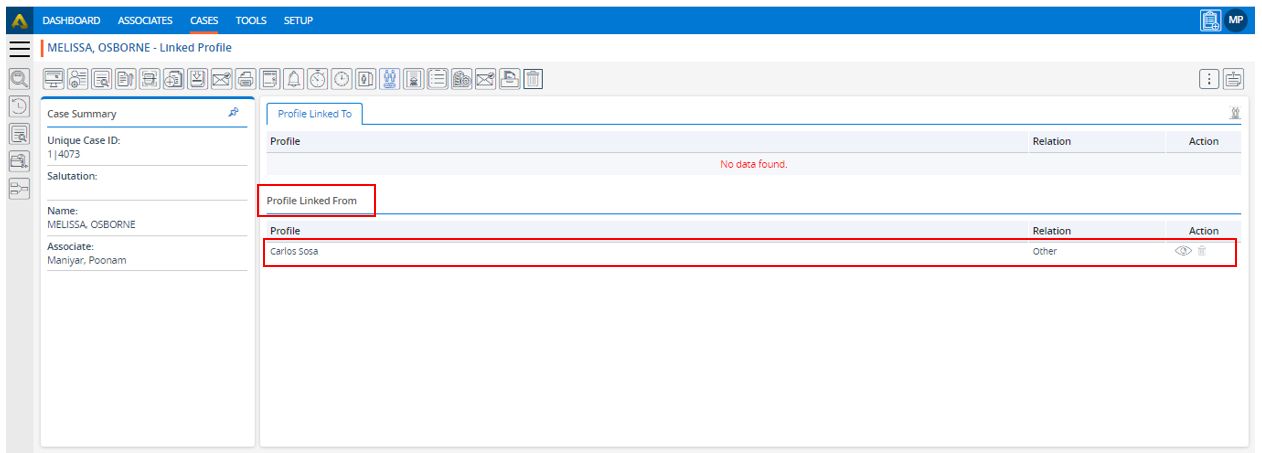
19. In the ‘Profile Linked To’ the original profile will be displayed in the ‘Profile Linked From’ section.
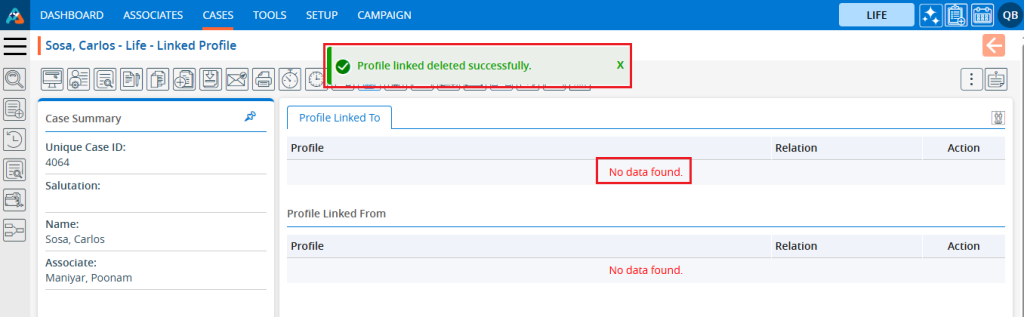
20. Navigate to the linked profile option from the original profile the user used to create the linked profile. Users can delete the linked profile by clicking ‘Delete’. 21. Click on the ‘Delete’ icon.
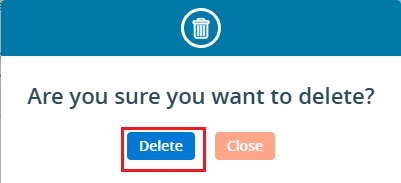
21. The system will ask for confirmation before deleting. 22. Click on ‘Delete’ to confirm.
24. The linked profile is deleted, and the system will generate a confirmation message. The profile will be removed from the listing and unlinked from each other.
Cases – History allows the user to view the timeline of events and actions associated with a specific case, providing insight into past activities, updates, and changes. The following are the steps to access Cases History: 1. Navigate to the ‘CASES’ tab where you’ll find the Cases List – All Cases. 2. Click on a case to proceed.
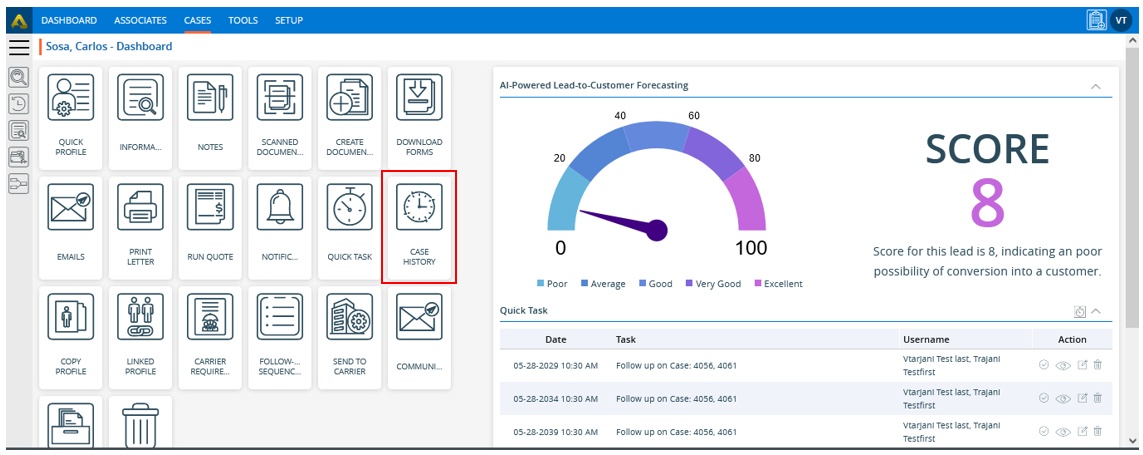
3. After clicking on the case, the ‘Dashboard’ will open. 4. Click on the ‘CASE HISTORY’ option.
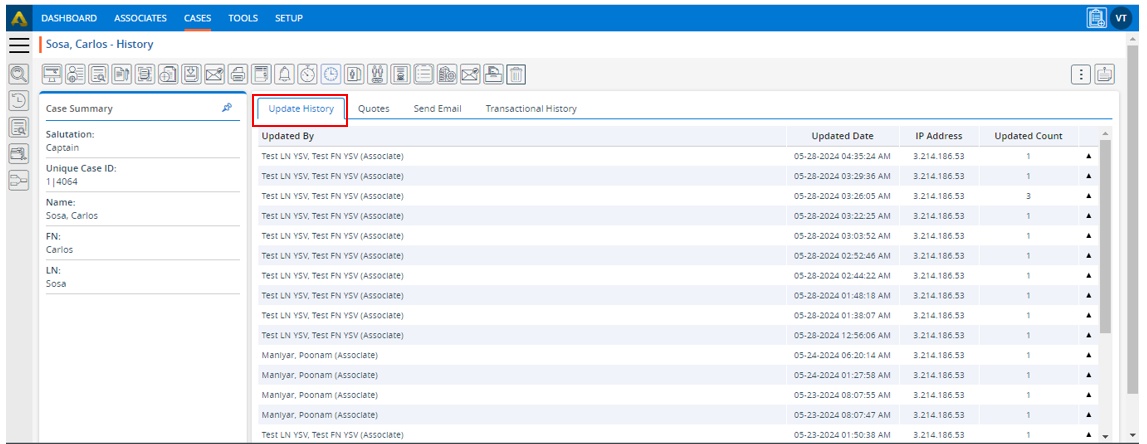
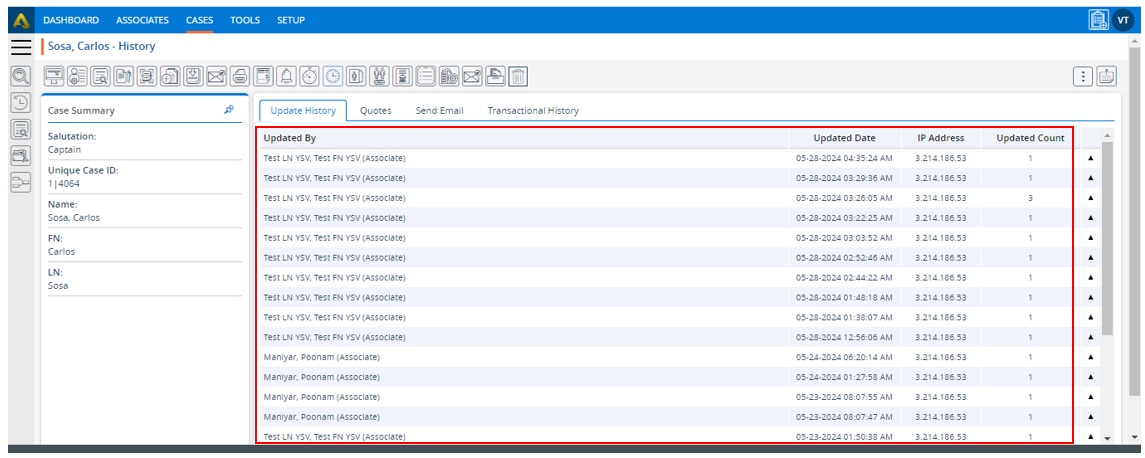
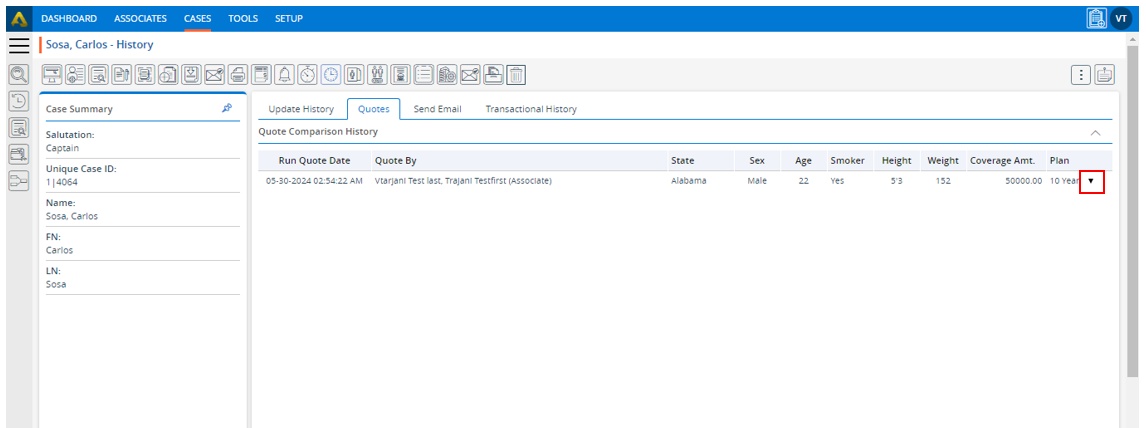
5. The Case History page will open, consisting of four sections: a. Update History b. Quotes c. Send Email d. Transactional History 6. By default, the ‘Update History’ section will be open. This section displays the history of the case’s information tab.
7. Fields in this section, such as ‘Updated By’, ‘Updated Date’, ‘IP Address’, and ‘Updated Count’, pertain to case details.
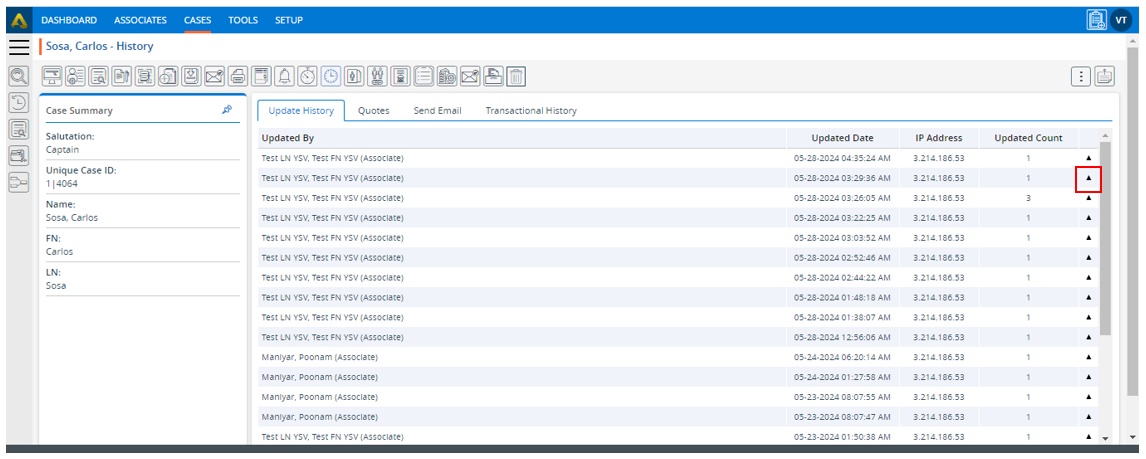
8. Click on the drop-down icon in the case history to view the updated details.
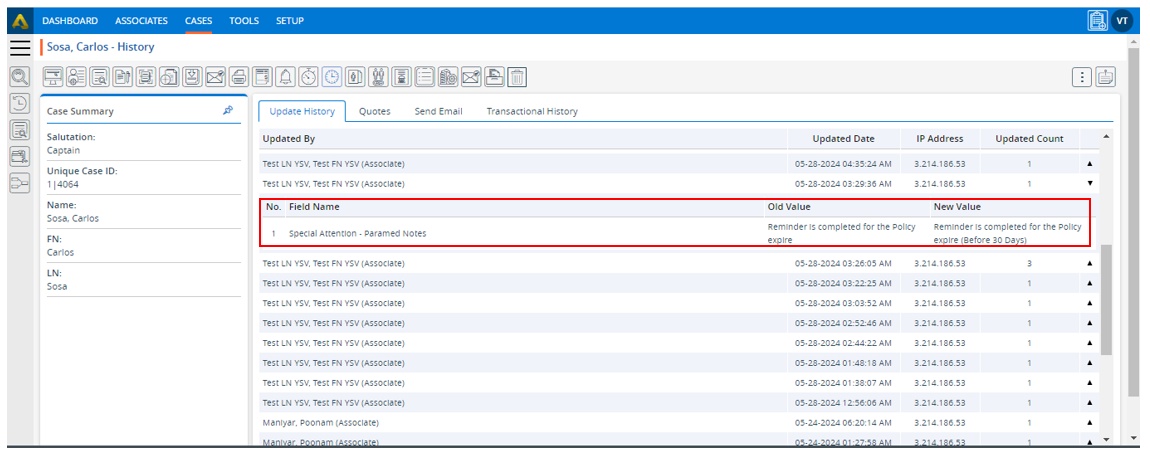
9. The details of the history will open, showing the values of the fields ‘No.’, ‘Field Name’, ‘Old Value’, and ‘New Value’. These fields are related to member details. This section will display the case’s information that has been updated.
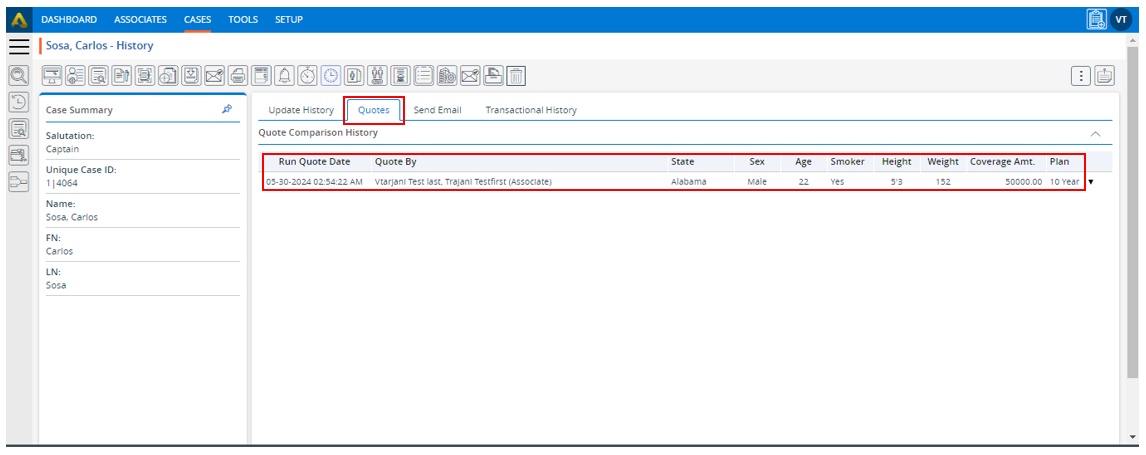
10. Click on the Quotes Tab to view the history of related quotes. This section saves the action history when users compare insurance company details on the run quote result page after running the quote.
11. The history displays the values of the fields ‘Run Quote Date’, ‘Quote By’, ‘State’, ‘Sex’, ‘Age’, ‘Smoker’, ‘Height’, ‘Weight’, ‘Coverage Amt.’, and ‘Plan’.
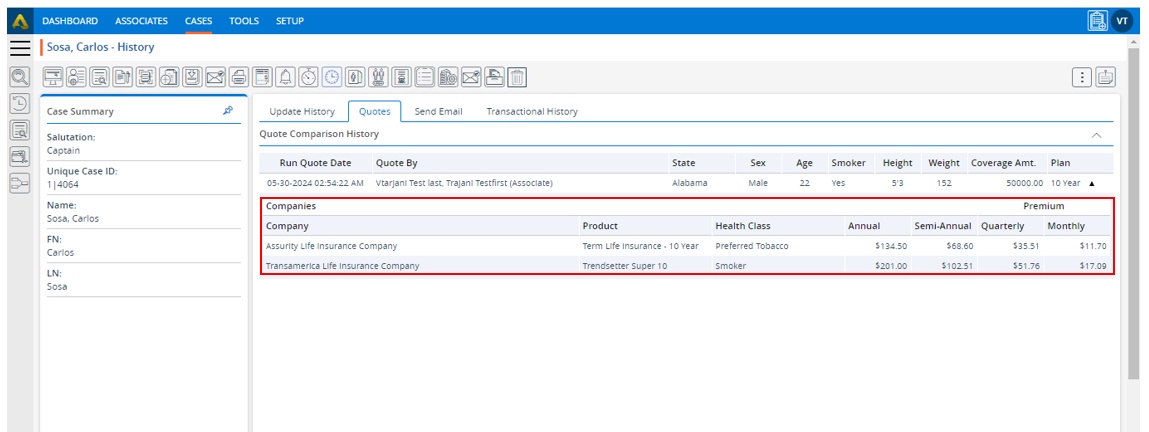
12. Click on the drop-down icon in the case history to view the updated details.
13. The history will display the values for the fields including ‘Company’, ‘Product’, ‘Health Class’, ‘Annual’, ‘Semi-Annual’, ‘Quarterly’ and ‘Monthly’ sections.
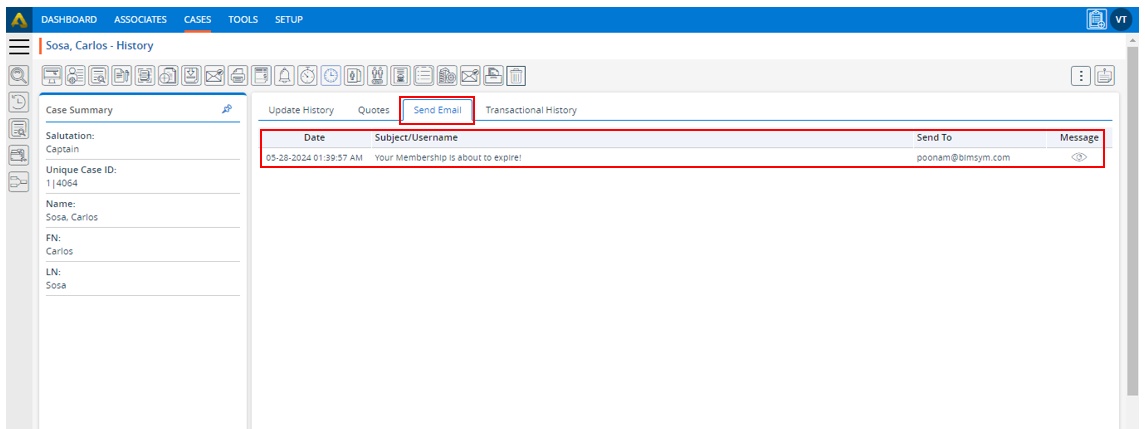
14. Click on the ‘Send Email’ section to view the history of sent emails.
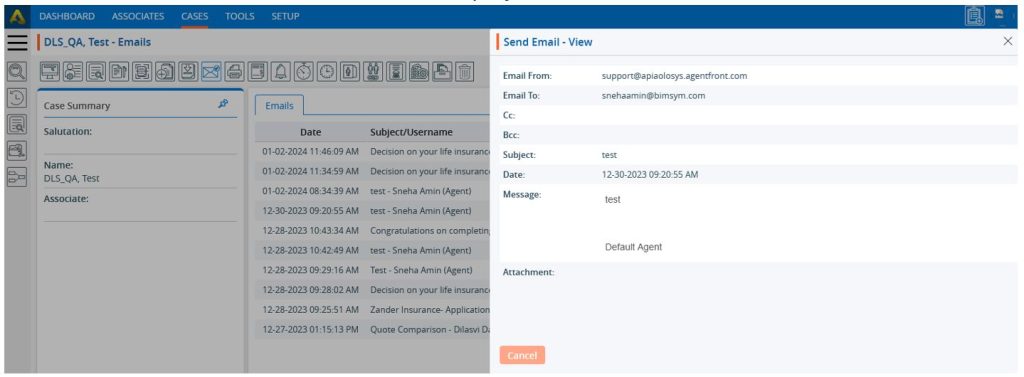
15. This section will display the values of the fields: ‘Date’, ‘Subject/Username’ and ‘Send To’.
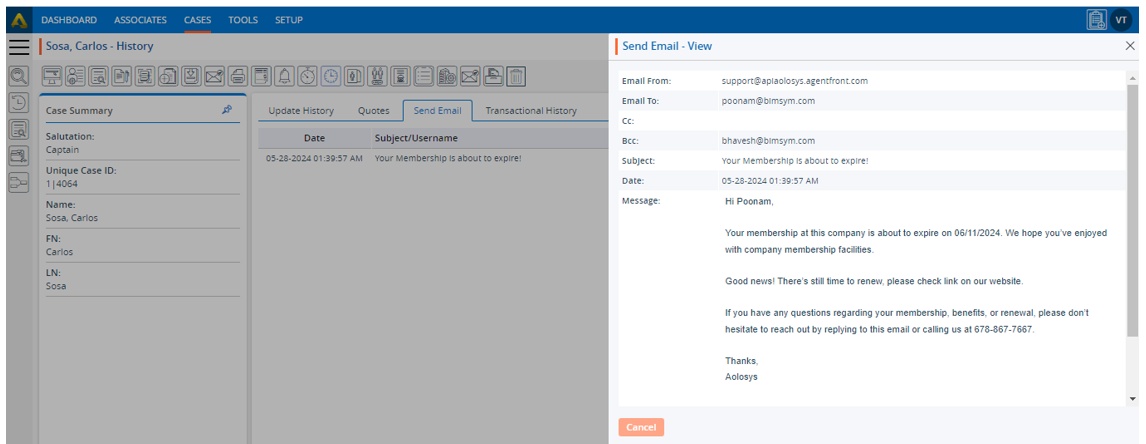
16. With the help of option ‘Message’, represented by an eye icon, the user can view the email details. 17. Click on the ‘View’ icon to check the details of the email history.
18. A pop-up ‘Send Email – View’ will open, displaying the details of the sent email.
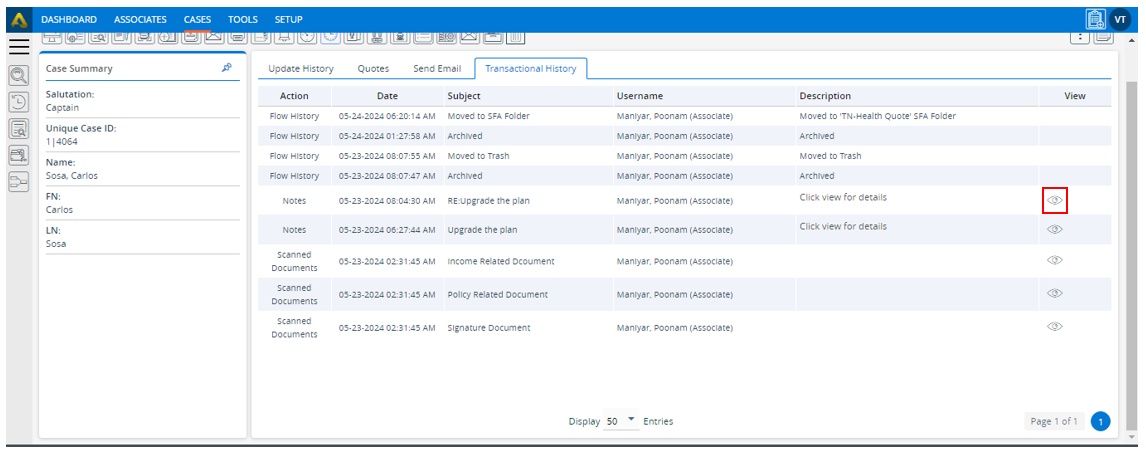
19. Click on the ‘Transactional History’ section to view transaction-related history. This section will display the flow history for cases, such as if one case is moved to another SFA or another pipeline.
20. It will also display the history of any notes that were added for this case, or if any documents were scanned and saved for this case.
21. History will include values for fields such as ‘Action’, ‘Date’, ‘Subject’, ‘Username’ and ‘Description’.
22. Additionally, there will be an option to view details represented by an eye icon under the ‘View’ header for entries other than flow history.
23. Click on the View button to see the Transaction History in detail.
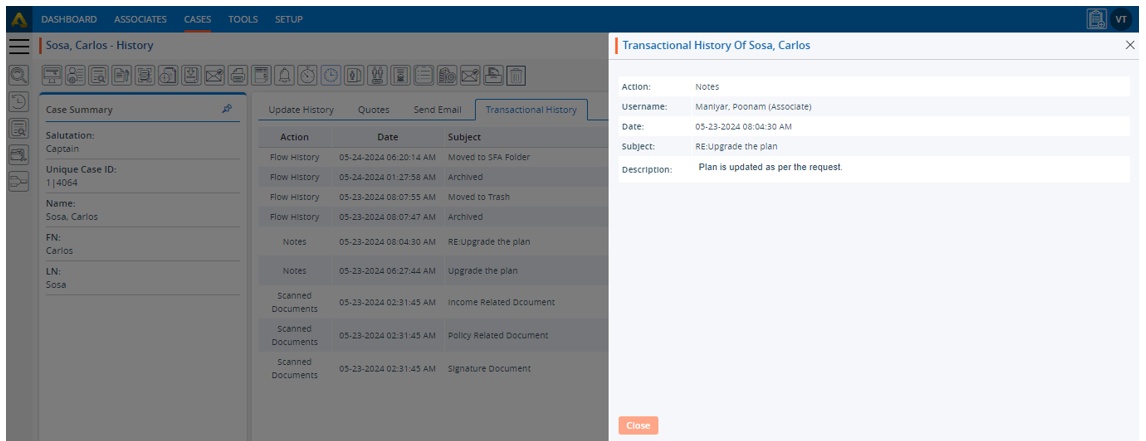
24. A new pop-up ‘Transaction History of #Name of the Applicant#’ will open, displaying the details for the selected transaction entry.
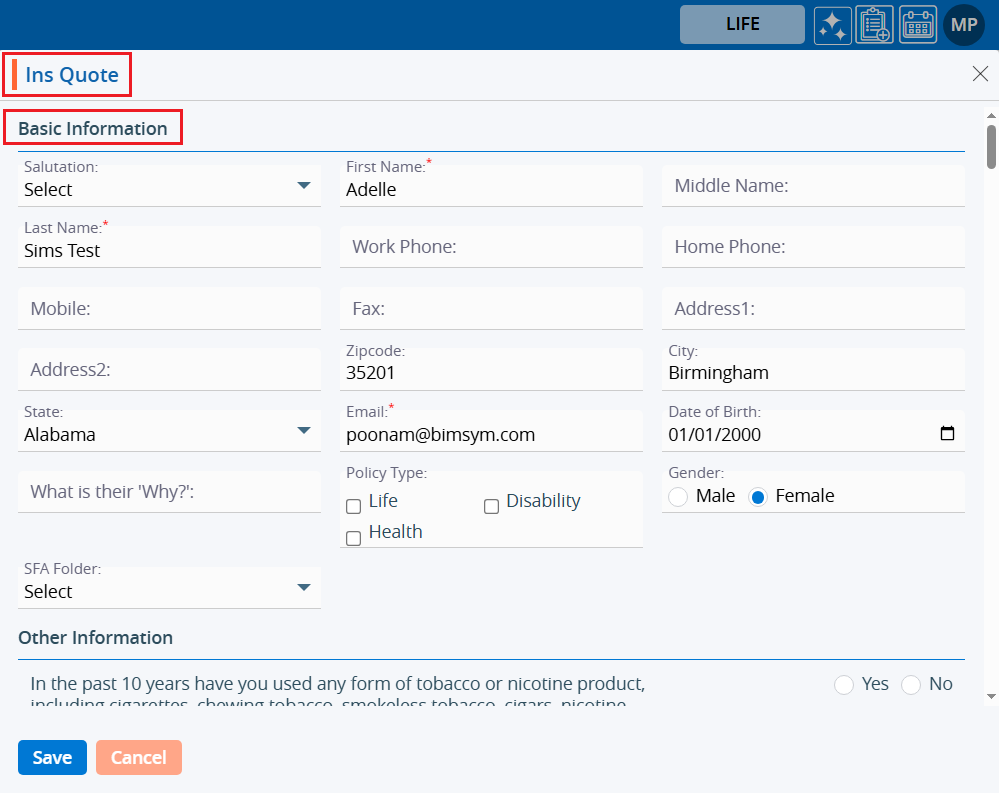
Ins Quote is used to manage the information related to the case regarding the insurance quote. The following are the steps to Ins Quote: 1. Navigate to the ‘CASES’ tab where you’ll find the Cases List – All Cases. 2. Click on a case to proceed.
3. After clicking on a case, the profile’s ‘Dashboard’ will open. 4. Click on the ‘INFORMATION’ option.
5. The Information page will open. Hover the cursor over the option icon located on the left side of Quick Notes.
6. Three options will be displayed: a. Full Profile b. Quote Sheet c. Ins. Quote
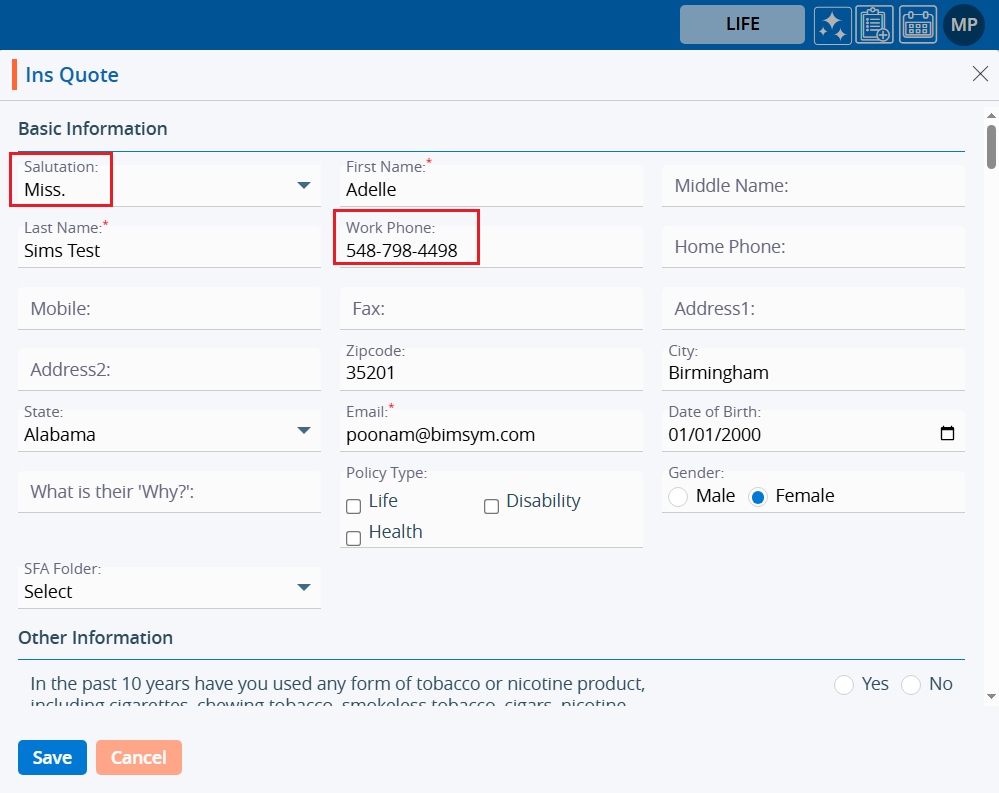
7. Click on the ‘Ins Quote’ option.
8. The Ins Quote pop-up window will open. By default, the Basic Information of the case will be displayed. The information on this page is editable, allowing users to update the details.
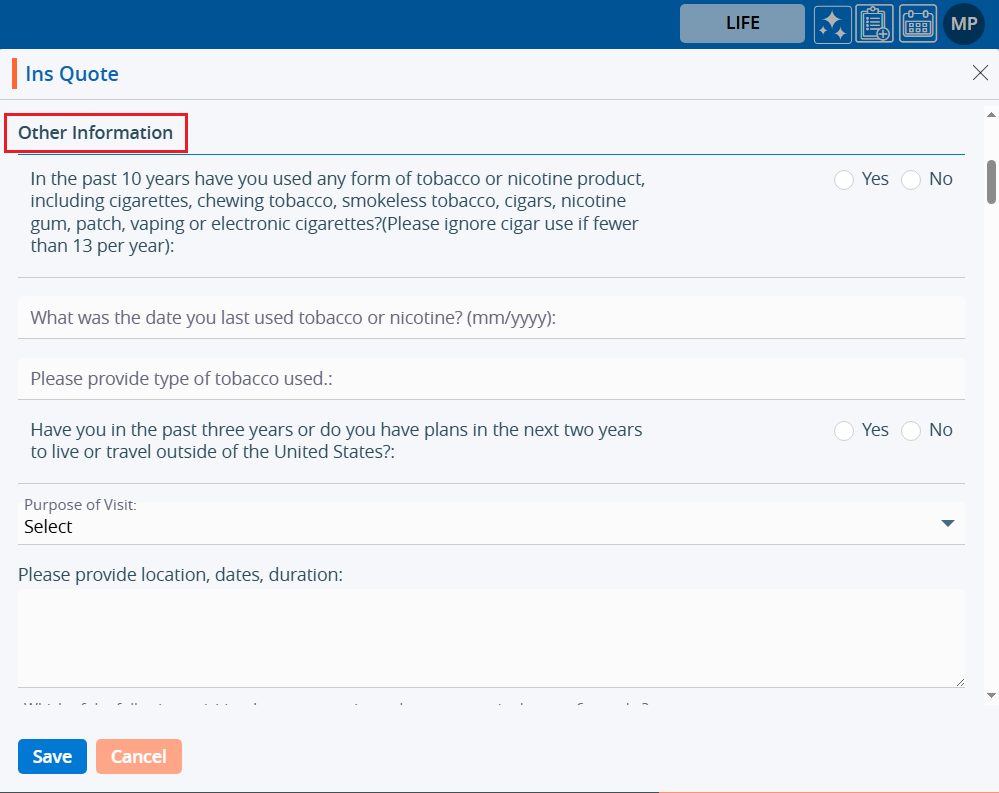
9. Scroll down to this page to view the ‘Other Information’ section.
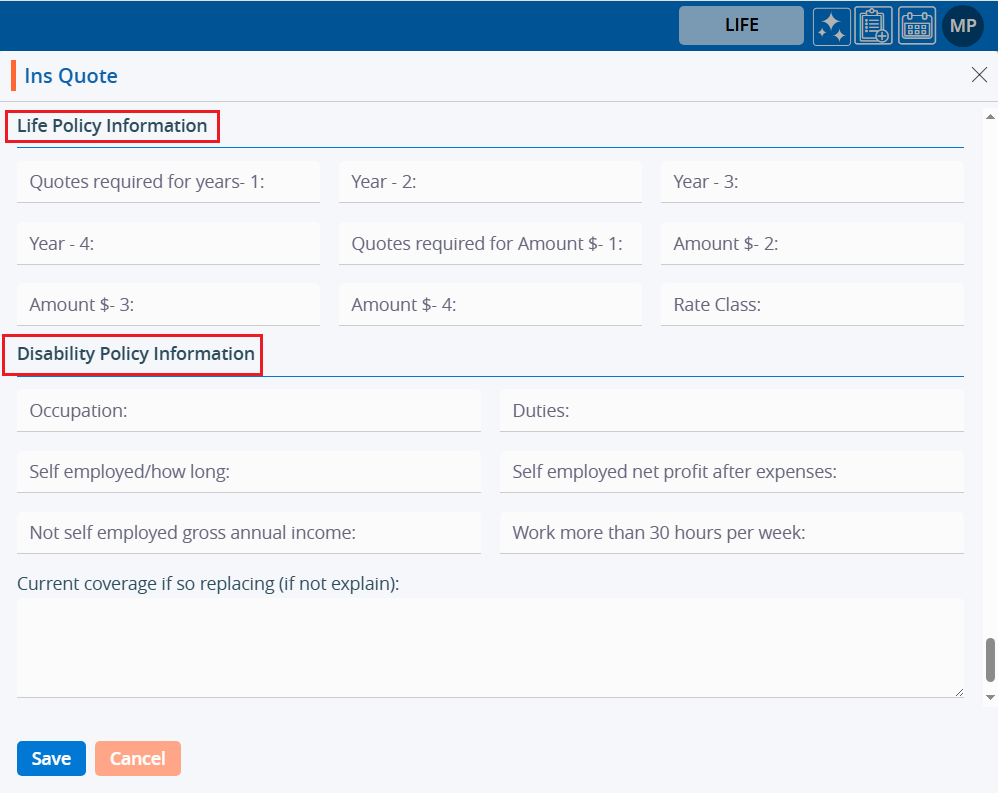
10. Continue scrolling to view the Life Policy Information and Disability Policy Information section. Click on the ‘Cancel’ button to close the window..
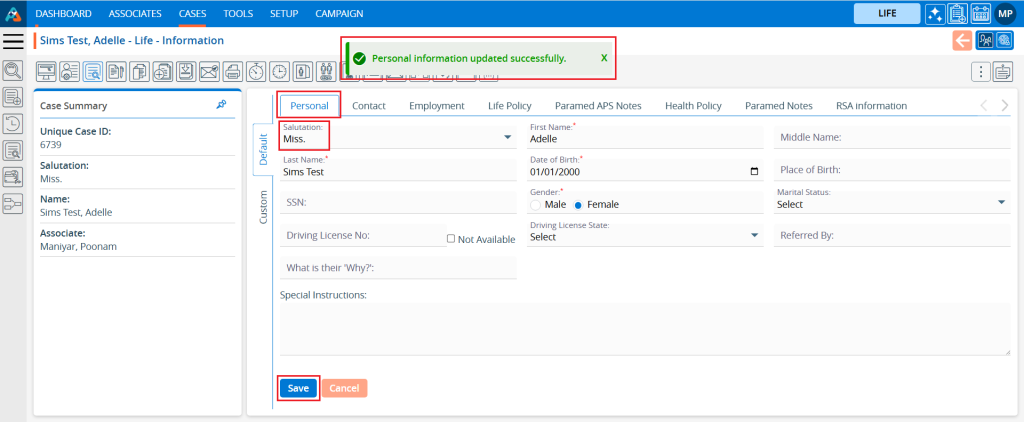
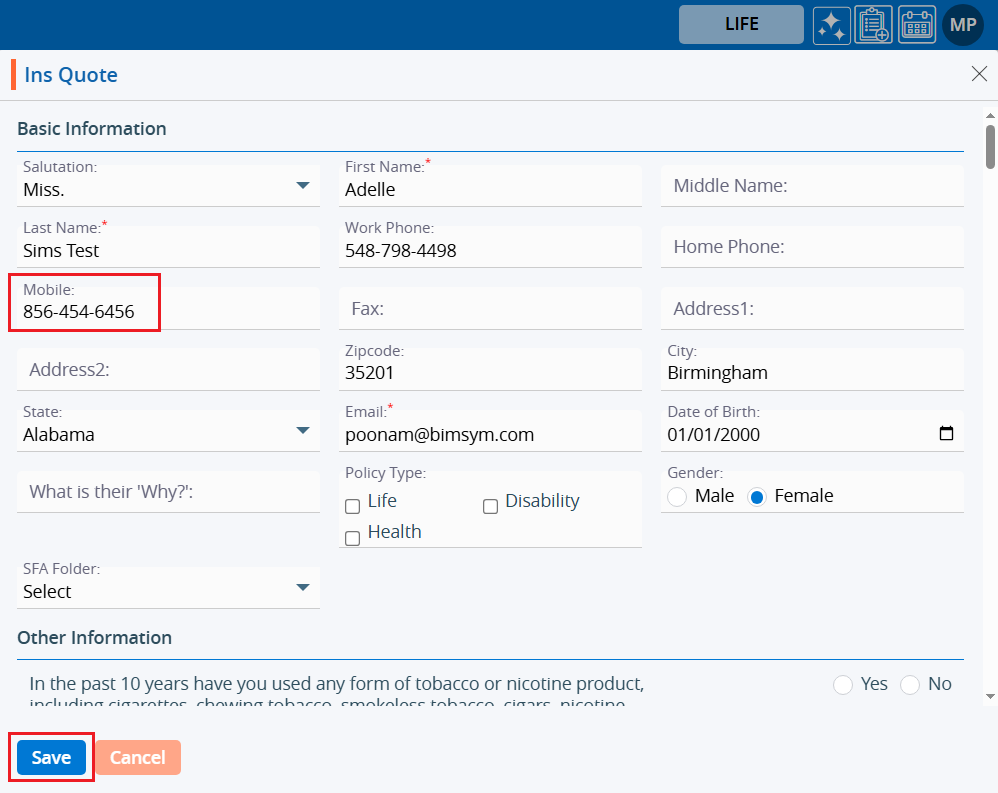
11. Update the case’s information on the Information page and click the ‘Save’ button.
12. Navigate to the ‘Contact’ page, update the information, and click the ‘Save’ button.
13. Reopen the Ins Quote section, and the updated information will be displayed.
14. Update the information as needed in this window and click the ‘Save’ button.
15. A message will appear confirming that the record has been updated successfully.
16. Reload the Information page, and the updated information will now be displayed.
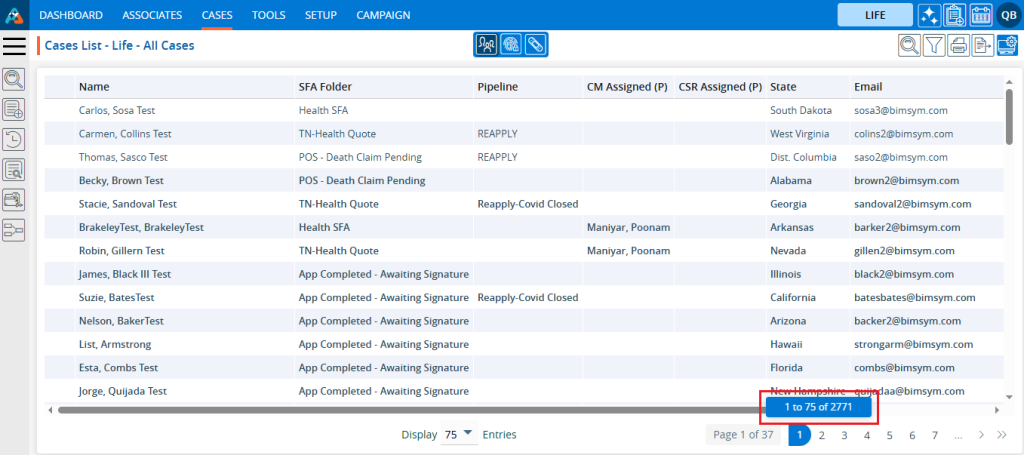
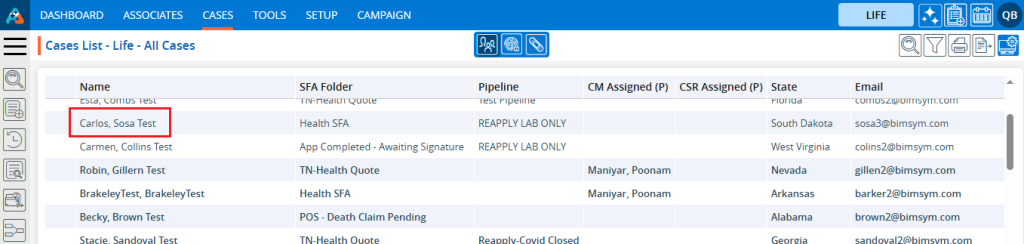
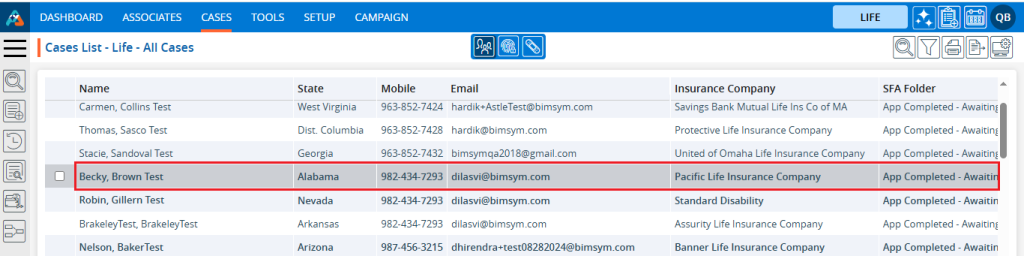
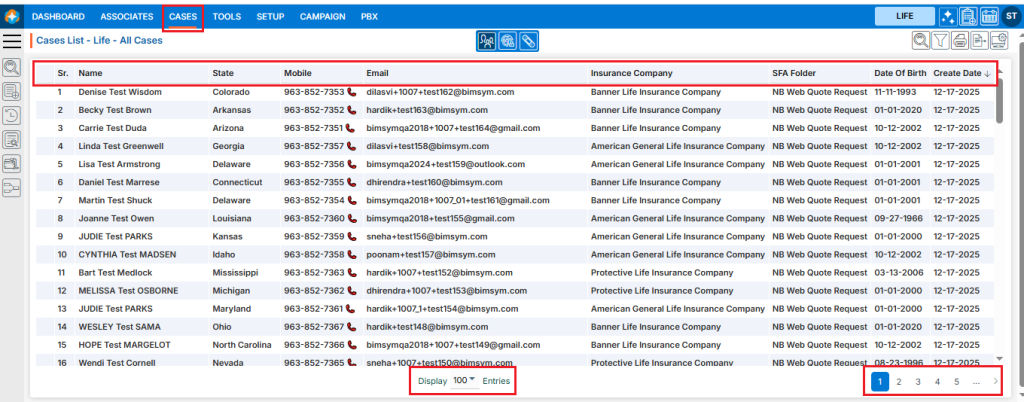
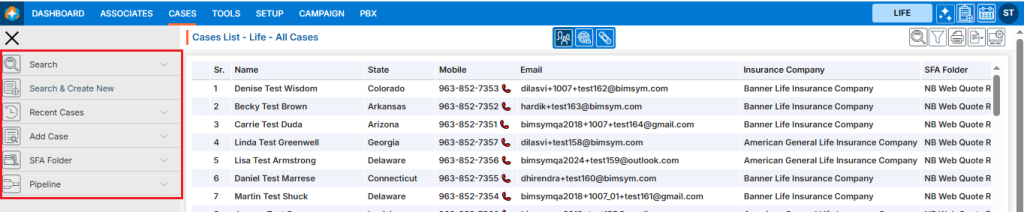
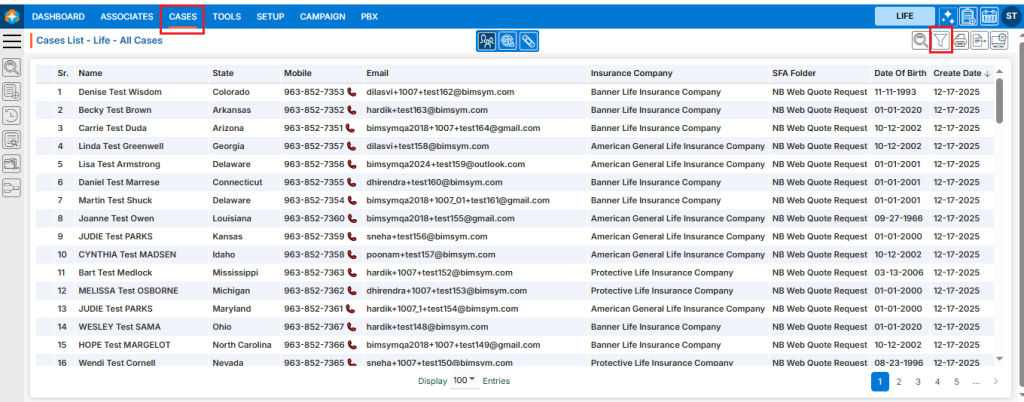
Cases List – All Cases – The cases list provides a comprehensive overview of all cases available in the system, excluding those found in the Trash and Archive SFA folders.
All Cases – Cases List
Sign in to AgentFront CRM
From the top menu, choose CASES
Cases list will open by default
The cases list will be displayed in descending order based on the Create Date
Data can be sorted in ascending or descending order by clicking on the column header
The ‘Display’ dropdown menu offers different options to set the number of entries for the Display List; the system will arrange and display the entries on one page according to the user’s selection
Additionally, the pagination of the cases list will be adjusted by the system according to the selected option
Left Side View
The left-side panel contains links for quick and easy access to different sections
Search – The ‘Search’ option allows users to search for cases based on various criteria
Search & Create New – The ‘Search & Create New’ option allows users to search and create new case directly
Recent Cases – Using ‘Recent Cases’ link, users can view the five most recently opened cases
Add Case – The ‘Add Case’ option offers multiple forms with various field types, allowing users to submit a case by filling out the appropriate form
SFA Folders – There is an option to view the list of available SFA Folders in the system. By clicking on the ‘SFA Folder’ option, the system will display all SFA Folder lists along with the total number of case available in each SFA Folder. Additionally, users can search for specific SFA Folders using the search feature
Pipelines – There is also an option to view the list of available Pipelines in the system. By clicking on the ‘Pipeline’ option, the system will display all pipeline lists along with the total number of cases available in each pipeline. Additionally, users can search for specific pipelines using the search feature
Right-Side View
On the right side at the top, there are additional icons for cases list
Quick Search – Using ‘Quick Search‘ feature users can search for data across all cases
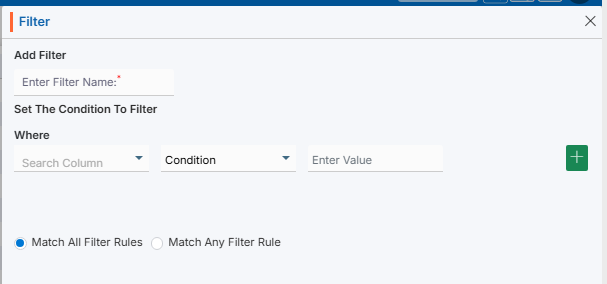
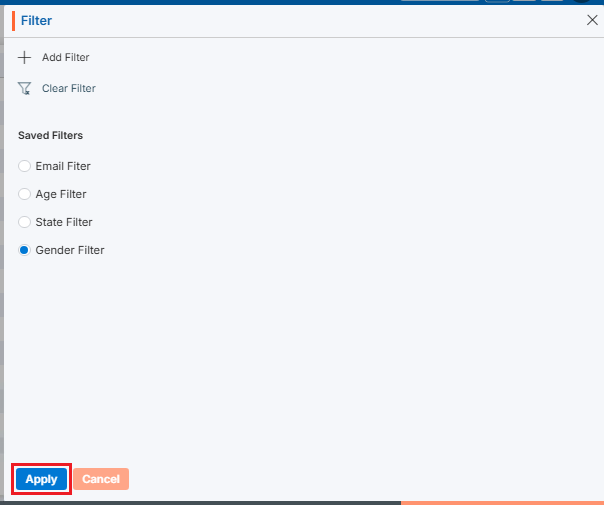
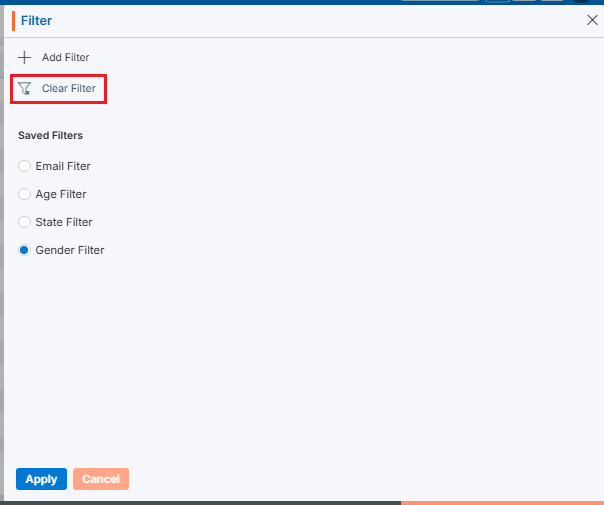
Filter – Using ‘Filter‘ feature users can refine the displayed data by filtering specific information from all cases
Print – ‘Print’ option allows users to print the current page according to the selected display settings
Export – Users can export specific data by using the ‘Export‘ option based on the date range selection
Display – Users can customize the fields and arrange the specific display of the page using the ‘Display‘ option
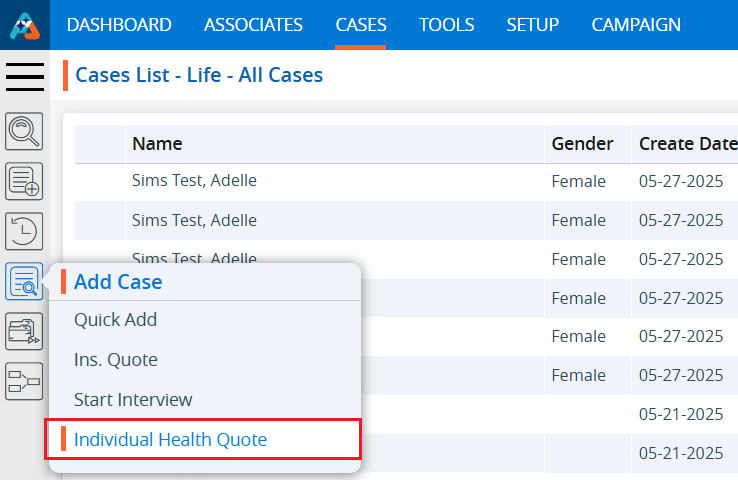
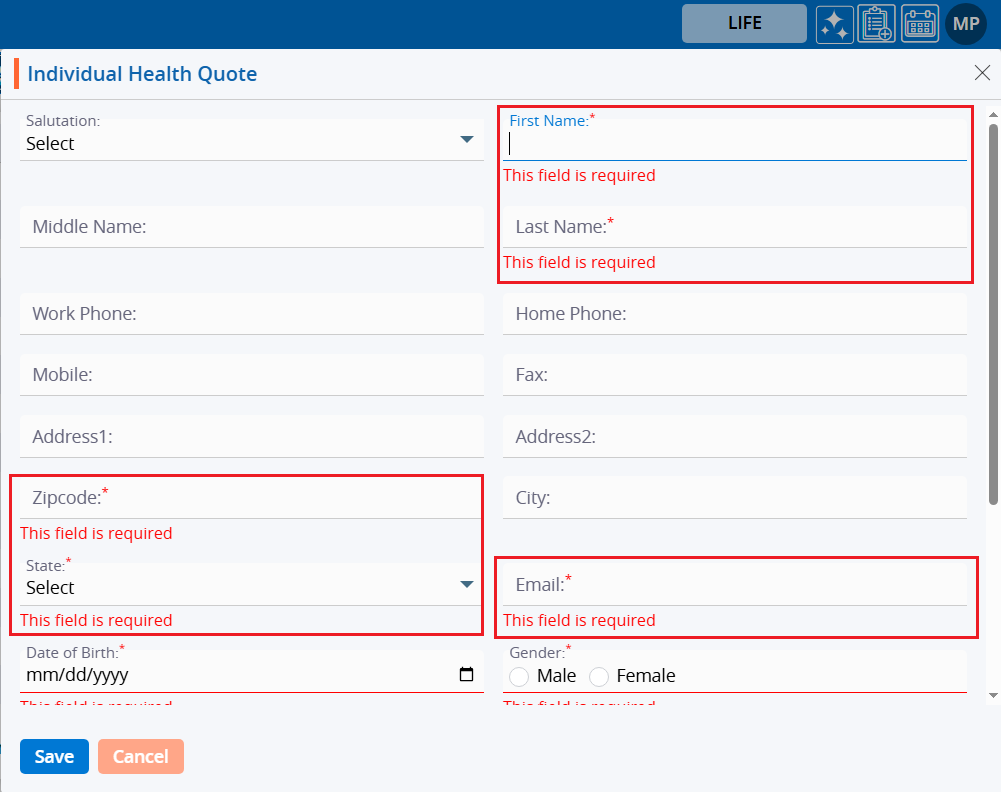
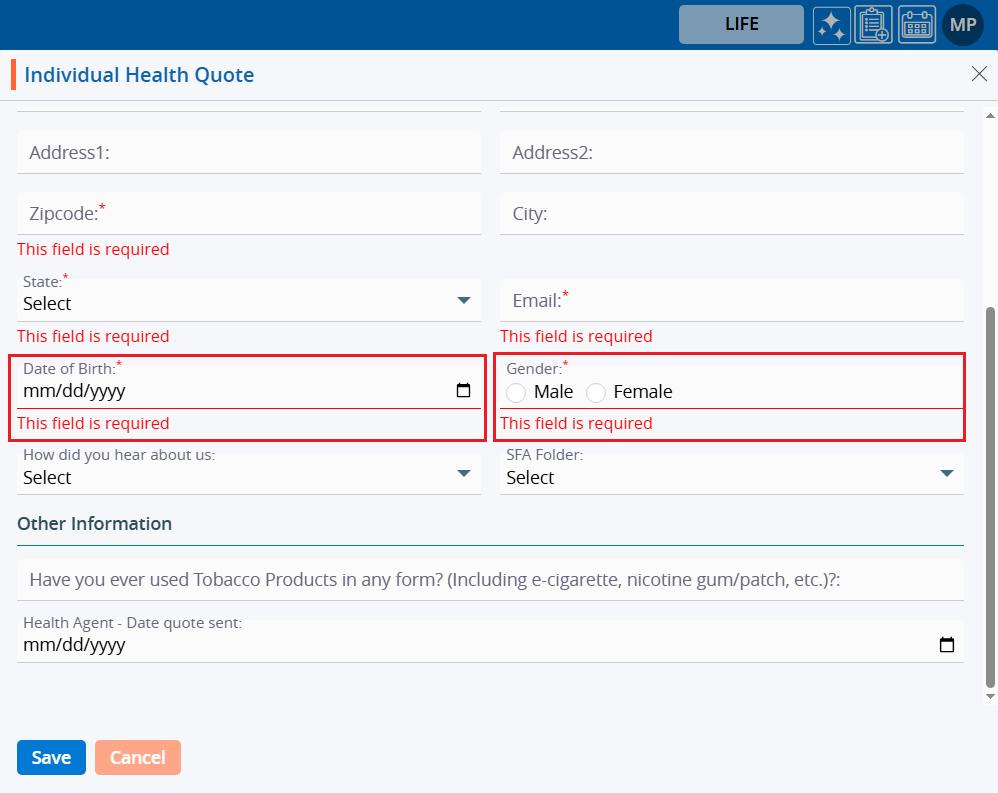
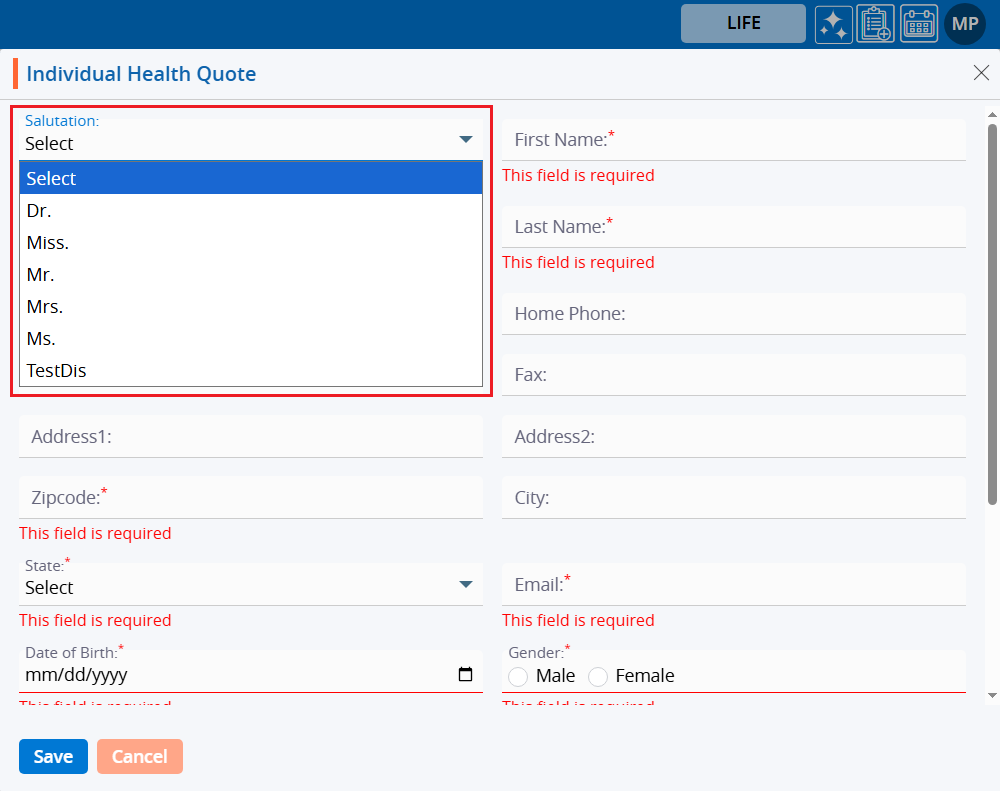
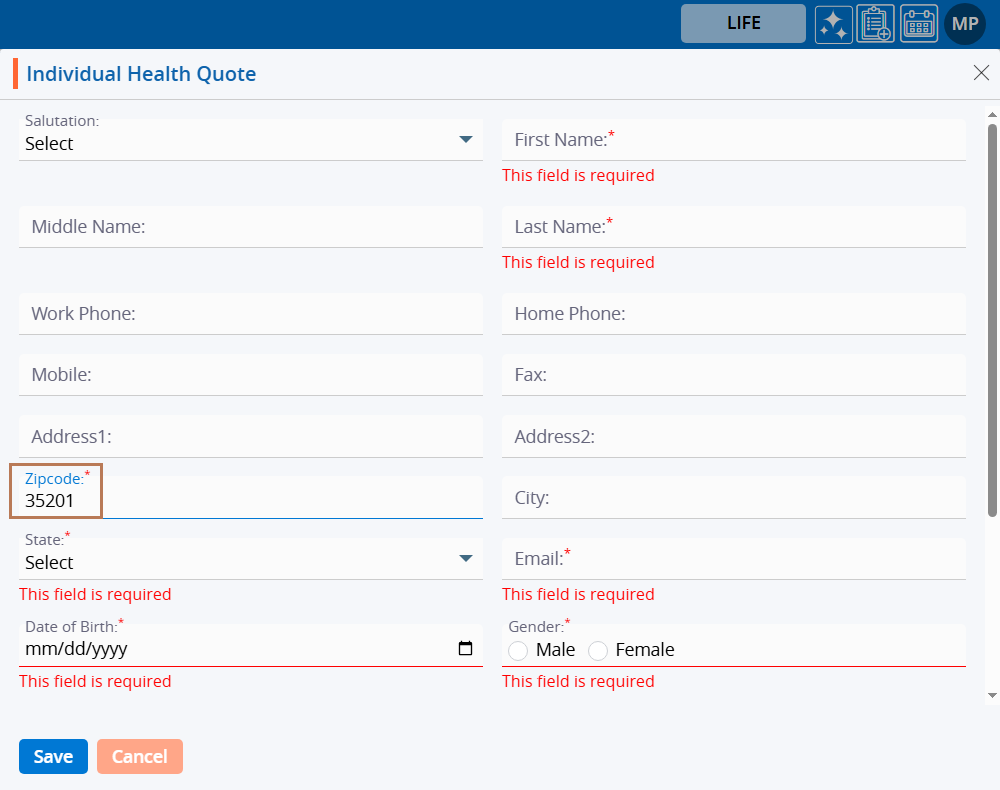
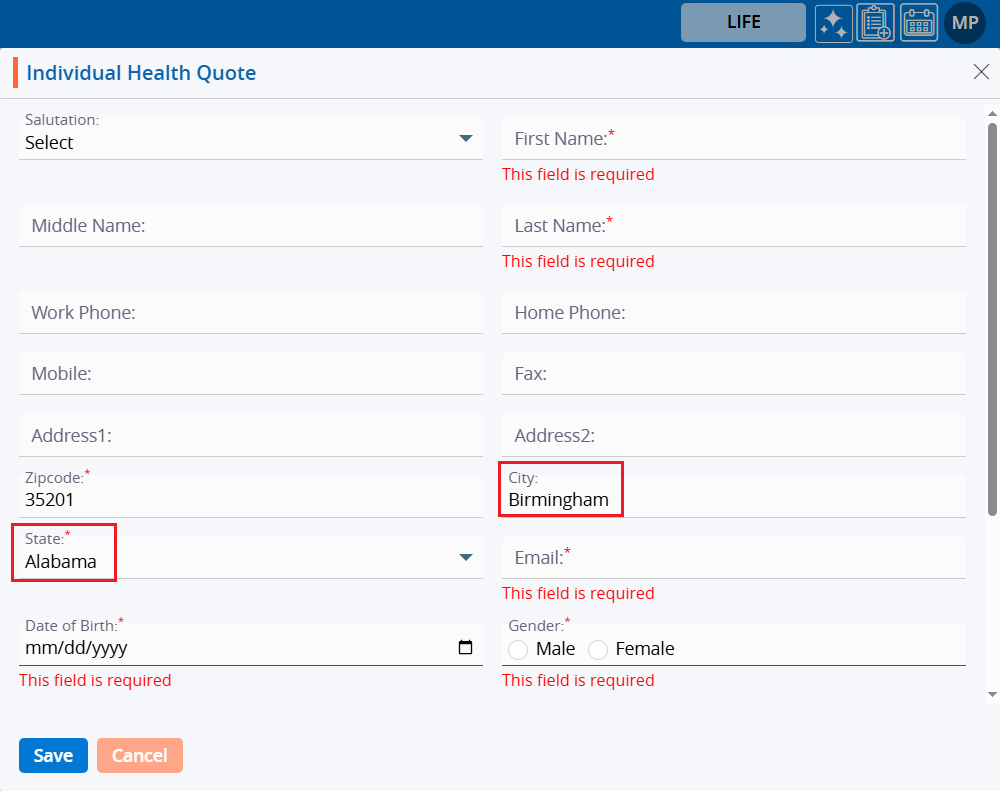
The Individual Health Quote link is used to create a new case. Here are the steps to creating a case using the Individual Health Quote link: 1. Navigate to the ‘CASES’ tab and click on ‘Add Case’ from the left-side panel.
2. Click on the ‘Individual Health Quote’ option.
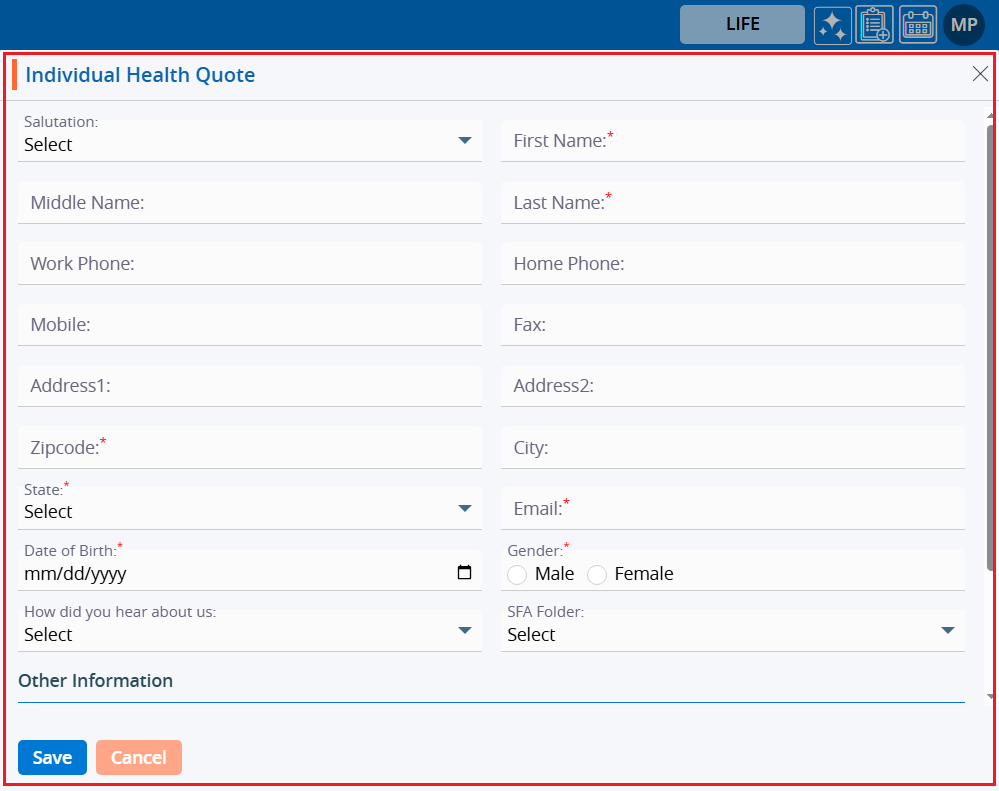
3. A pop-up window for the Individual Health Quote form will appear.
4. Fields marked with an asterisk (*) are mandatory.
5. The ‘Salutation’ field features a dropdown menu to select an option from.
6. Enter the ‘Zip Code’. The system allows entry of 5 digits in this field.
7. After entering the ‘Zip Code’, the system will automatically enter the corresponding ‘City’ and ‘State’.
8. Select ‘Date of Birth’ using the calendar.
9. When you click on the up and down arrows, the system will display options to select the year and month for the ‘Date of Birth’.
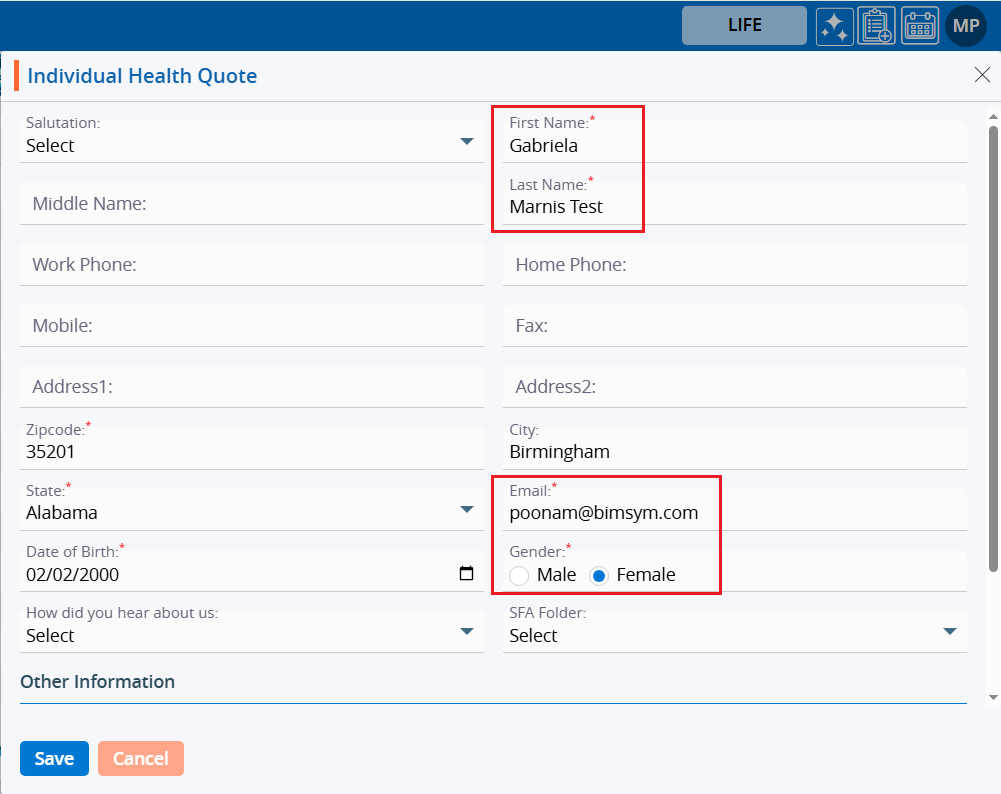
10. The user must manually enter all other required information.
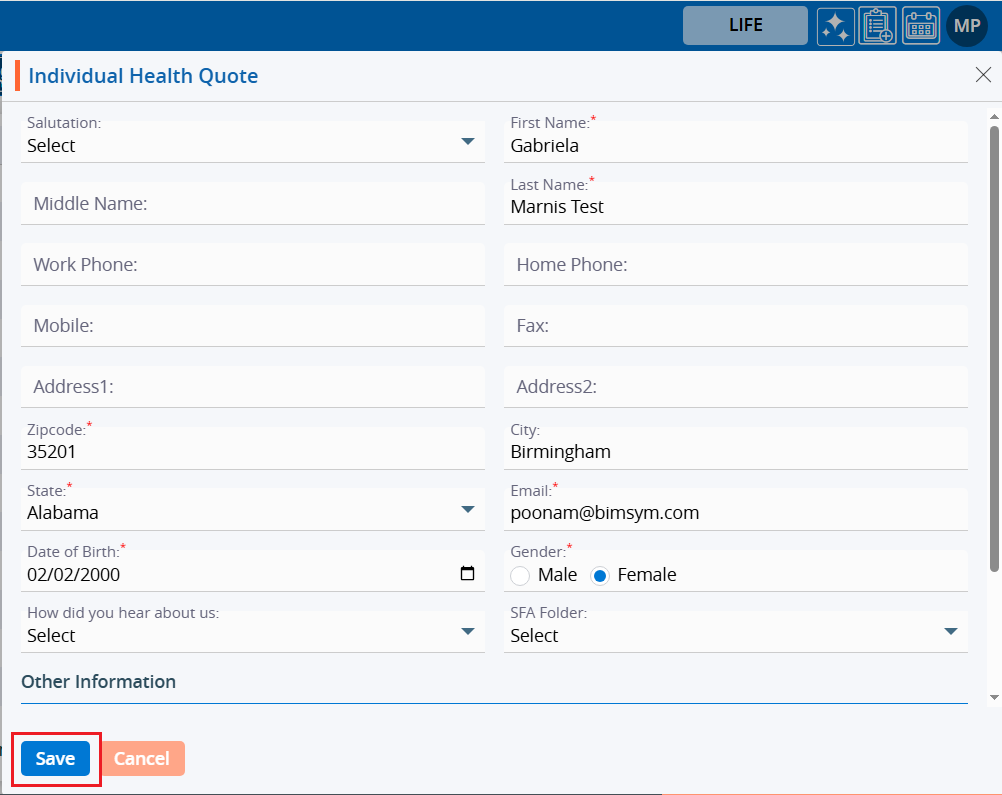
11. After filling in all the required information, click on the ‘Save’ button.
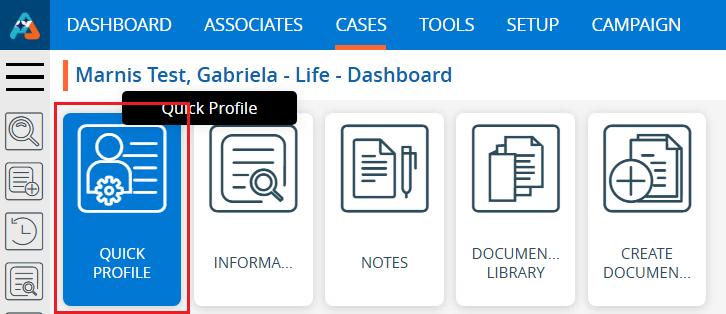
12. The system will generate a confirmation message for successful record creation, and the record will be displayed at the top of the Cases List. Click on the newly created case to view it.
13. Once you click on the newly created case, the dashboard page will open. From there, click on the ‘Quick Profile’ option.
14. The system will display the information filled in during the creation of the case in the ‘Quick Profile’ section.
15. Return to the Dashboard page and click on the ‘Information’ tab.
16. The system will display personal information in the ‘Personal’ tab.
17. Click on the ‘Contact’ tab, and the system will display case details in the ‘Contact’ tab.
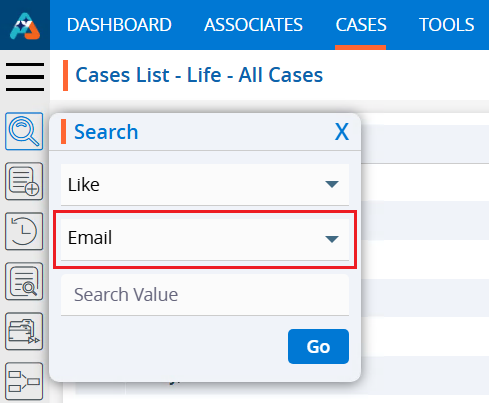
The Left Search feature is used to locate specific cases based on selected criteria, utilizing the available fields in the interface.
The following are the steps to search for the data:
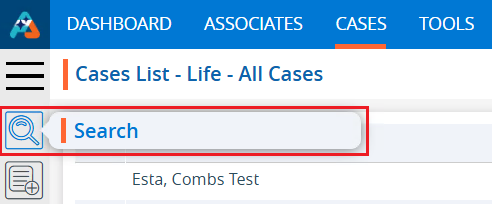
1. Navigate to the ‘CASES’ tab and click on the ‘Search’ option in the left pane.
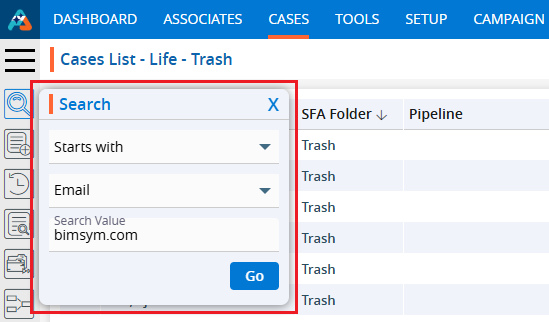
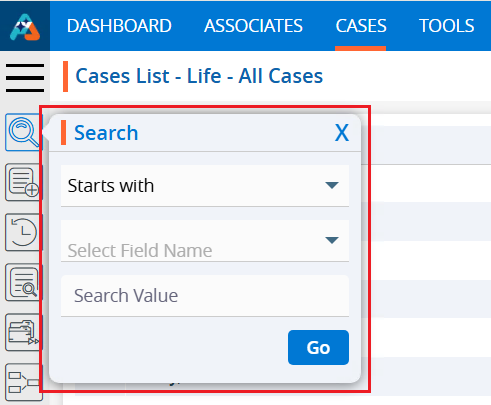
2. Upon clicking on Search, a popup will open with the following criteria: a. ‘Starts With’ dropdown b. ‘Select Field Name’ dropdown c. ‘Search Value’ field
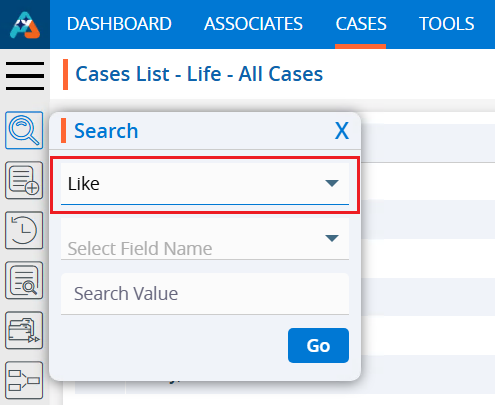
3. Click on the ‘Starts With’ dropdown and the following options will be displayed: a. Starts with b. Ends with c. Equals d. Like e. Not equal
4. Select a search option. For example, we have chosen the ‘Like’ option.
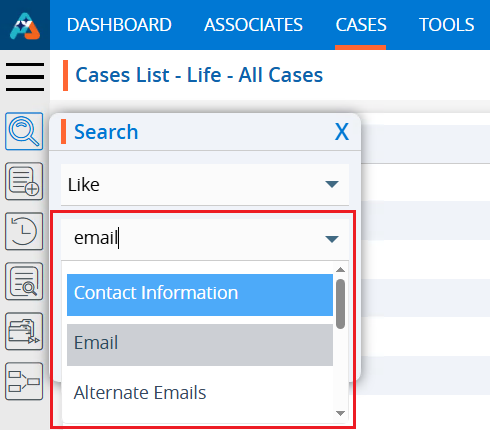
5. Click on the ‘Select Field Name’ dropdown menu and fields from the cases will be displayed.
6. Select the field you would like to search. You can either scroll through the field names or type characters. For example, here we have typed ’email’ and it displays the list of available fields containing the entered word.
7. Select the field the user wishes to search. In this example we have selected the Email Field.
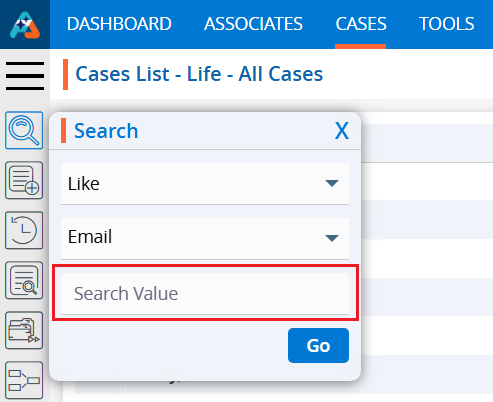
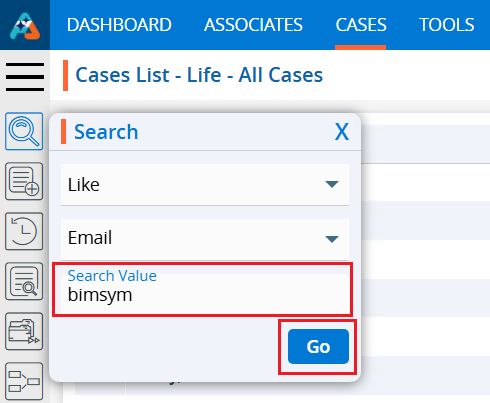
8. Click on the ‘Search Value’ field.
9. Enter the criteria in the ‘Search Value’ option. For example, we added ‘bimsym’ as the search value and clicked on ‘Go’.
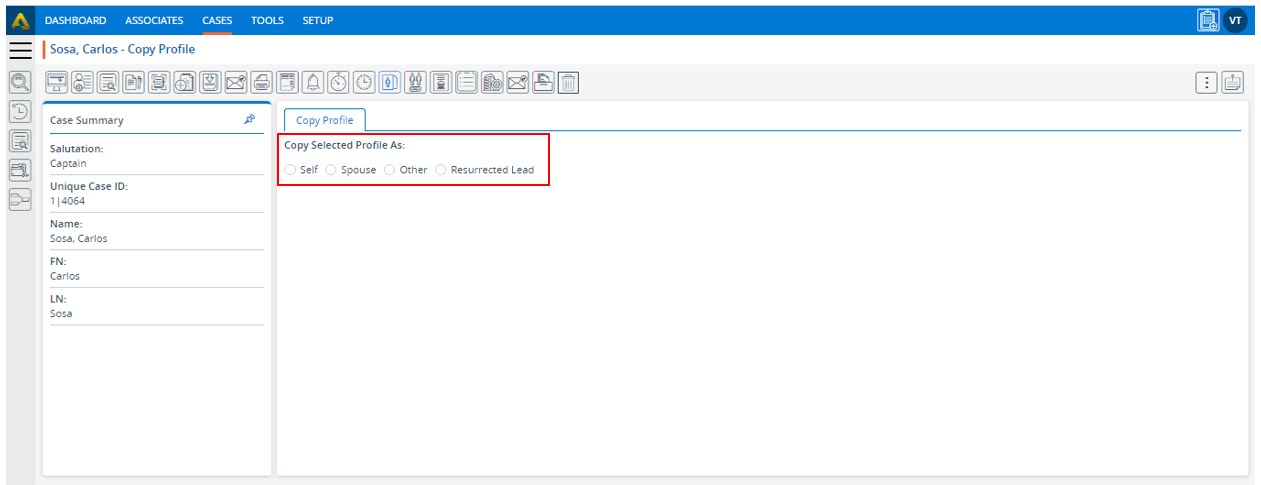
Create a duplicate of an existing profile for the purpose of issuing a new policy. The following are the steps to copy a profile: 1. Navigate to the ‘CASES’ tab where you’ll find the Cases List – All Cases. 2. Click on a case to proceed.
3. After clicking on a member, the member’s ‘Dashboard’ will open. 4. Click on ‘COPY PROFILE’.
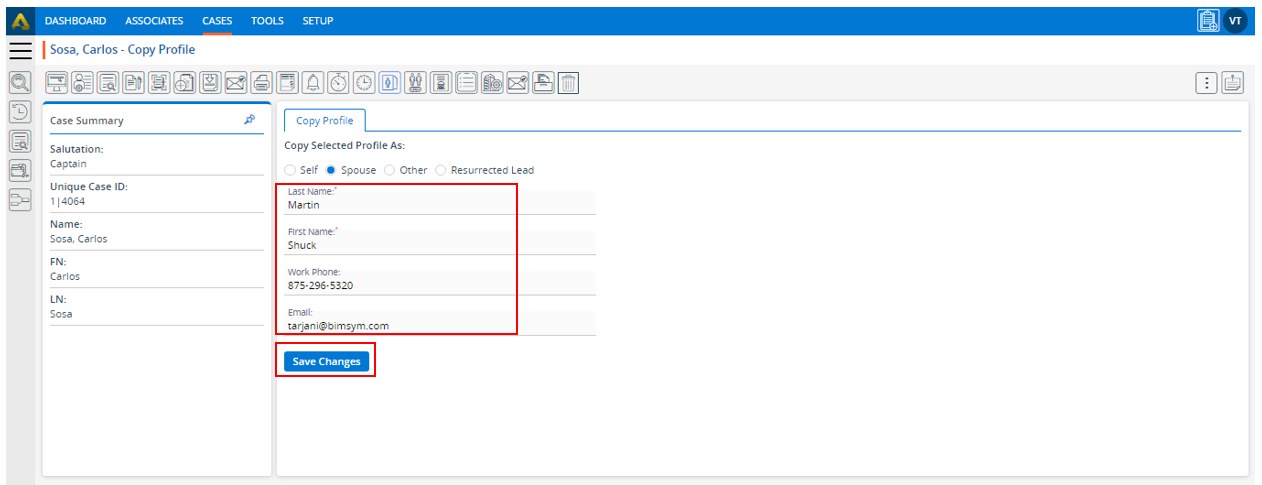
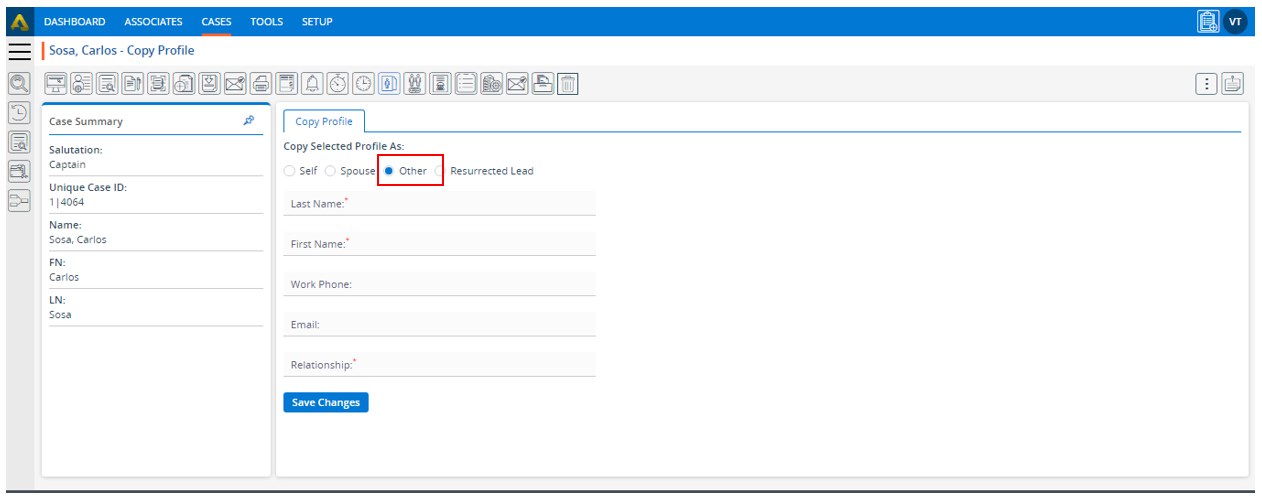
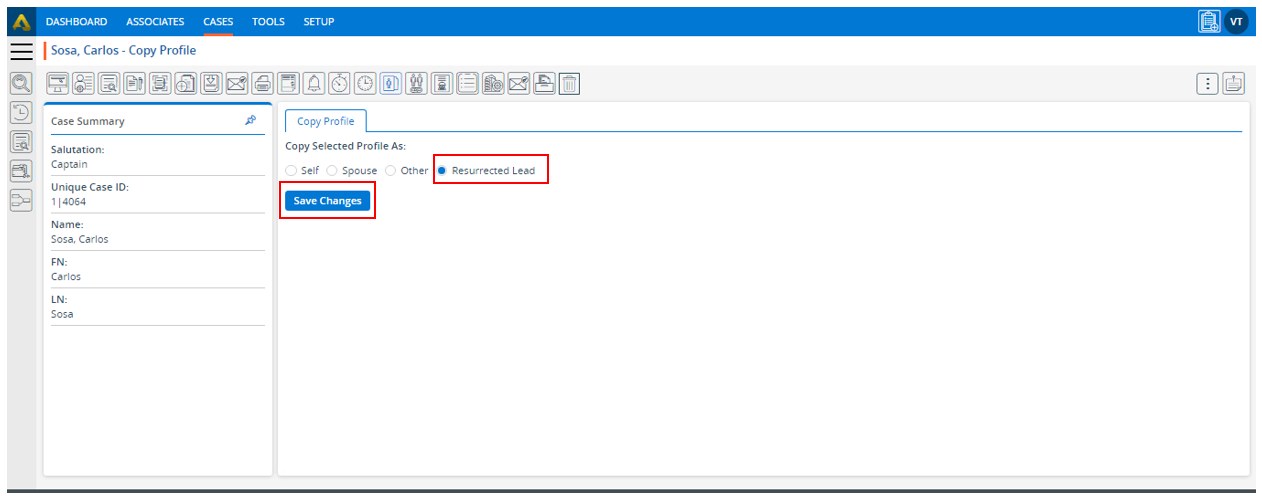
5. The Copy Profile page will open, presenting you with four options: a. Self – The user can create the same profile for themselves and link it to their own profile. b. Spouse – This option allows the user to create a profile for their spouse and link it to their own profile. c. Other – With this option, the user creates a profile for any other relationship and links it to their profile. d. Resurrected Lead – This option creates a profile for a resurrected lead and links it to their profile.
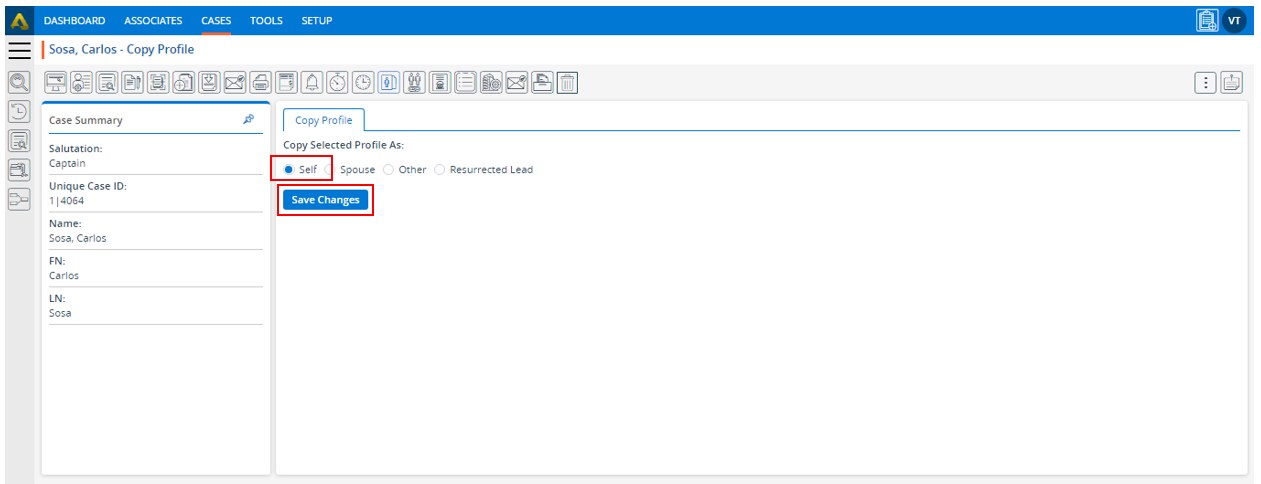
6. Select the ‘Self’ option and then click the ‘Save Changes’ button.
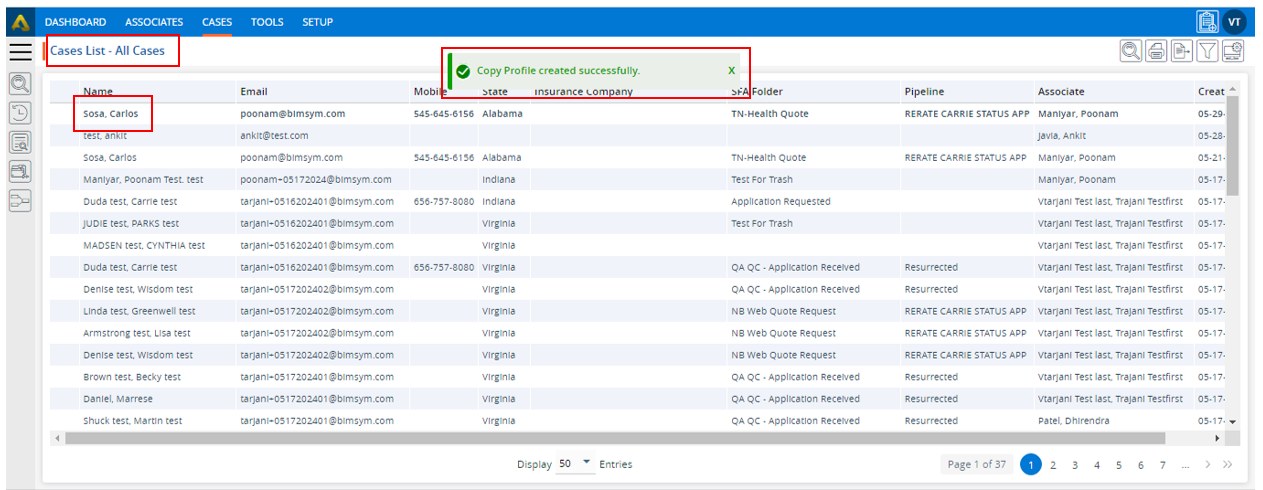
7. The profile will be copied, and the system will generate a confirmation message. 8. You will be redirected to the All-Contacts page, where the recently copied profile will be displayed at the top of the listing. 9. Click on that profile.
10. Click on the ‘INFORMATION’ option.
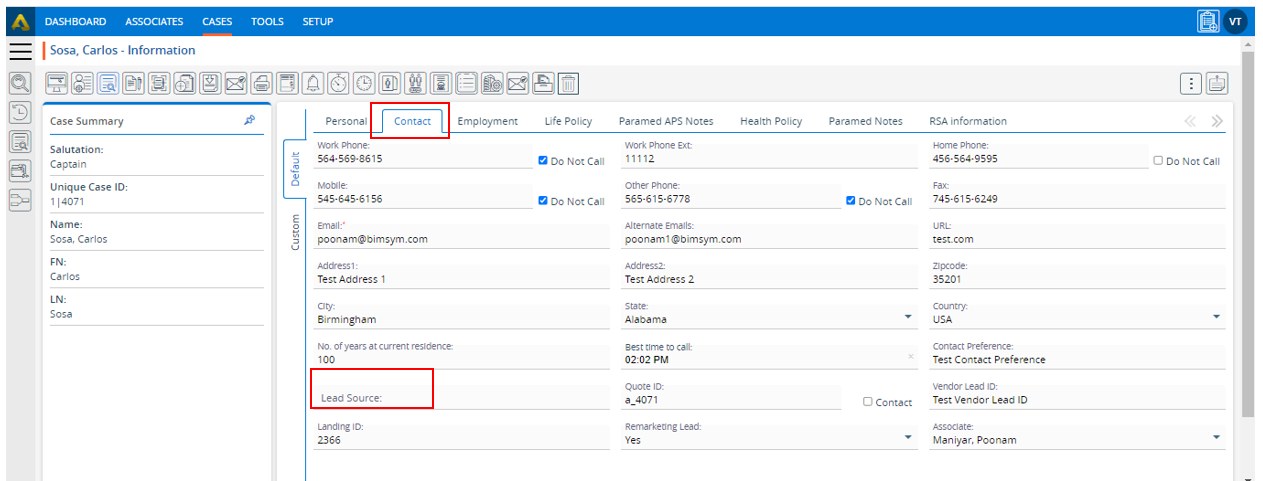
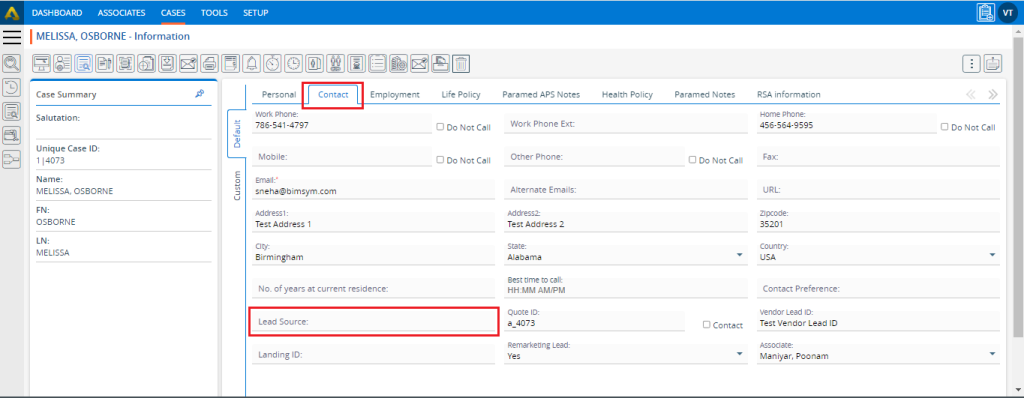
11. Click on the ‘Contact’ page. The ‘Lead Source’ field will remain blank because it was copied as ‘Self’.
12. Return to the Copy Profile page and select the ‘Spouse’ option. The following fields will be displayed:
13. Fill in the details in the fields and click on the ‘Save Changes’ button.
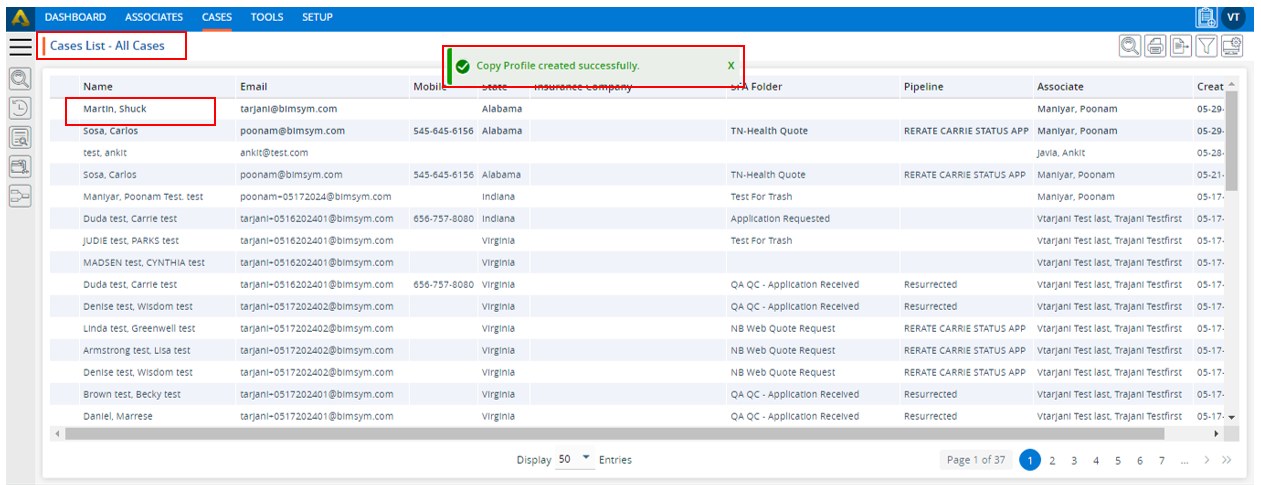
14. The profile will be copied, and the system will generate a confirmation message. After that, you will be redirected to the All-Cases page, where the recently copied profile will be seen at the top of the listing. 15. Click on the recent profile from the listing.
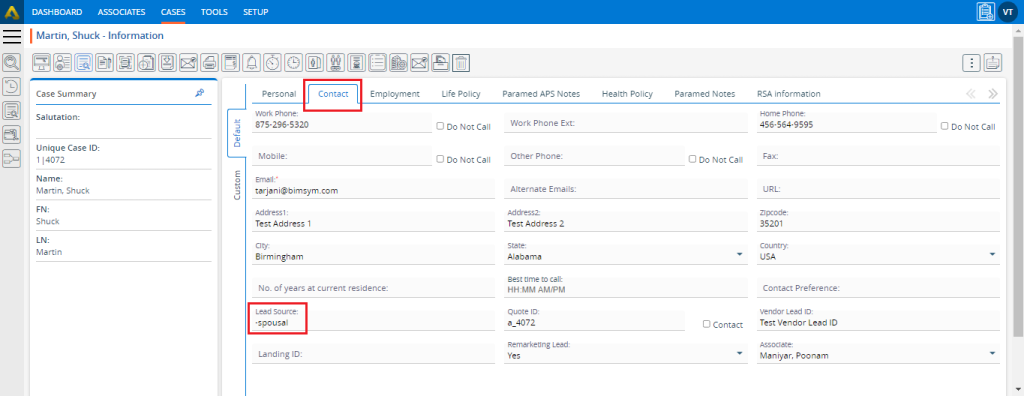
16. Click on the ‘INFORMATION’ option.
17. Click on the ‘Contact’ page. The Lead Source field will show the value as ‘-spousal’ because this profile was copied as ‘Spouse’. The information available in the main profile will be saved in this profile as well.
18. Go back to the Copy Profile page and select the ‘Other’ option. The relevant fields will be displayed.
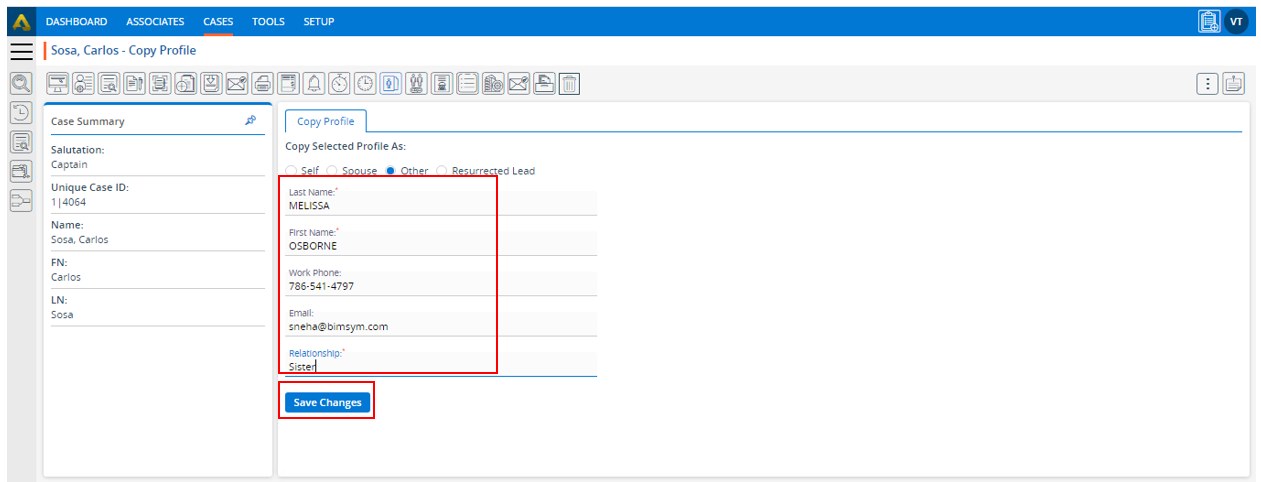
19. Fill in the details in all fields and click on the ‘Save Changes’ button.
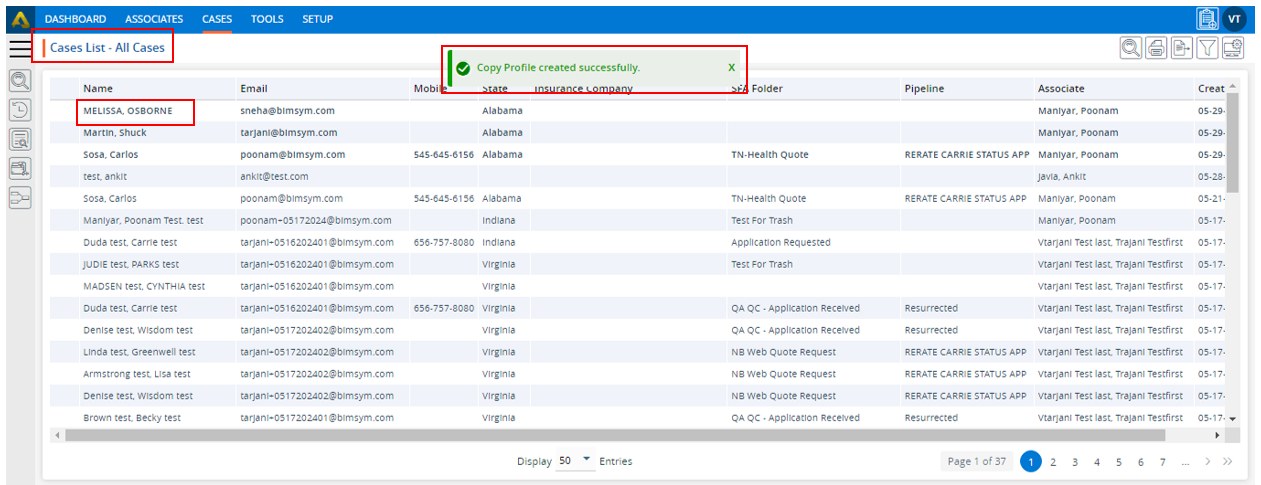
20. The profile will be copied, and the system will generate a confirmation message. You will be redirected to the All-Cases page, where the recently copied profile will be seen at the top of the listing. 21. Click on the profile.
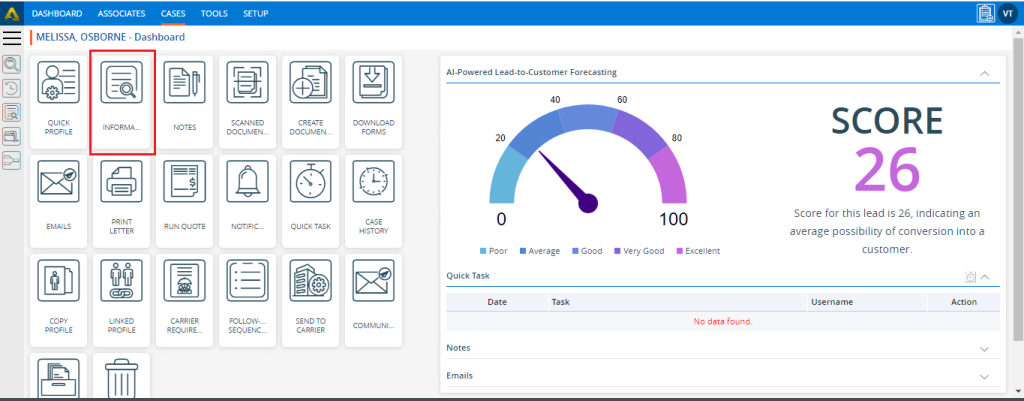
22. Click on the ‘INFORMATION’ option.
23. Click on the ‘Contact’ page. The Lead Source field will remain blank because this profile was copied as ‘Other’.
24. Return to the Copy Profile page and select the ‘Resurrected Lead’ option. Then click on the ‘Save Changes’ button.
25. The profile will be copied, and the system will generate a confirmation message. You will be redirected to the All-Cases page, where the recently copied profile will be seen at the top of the listing. Click on the profile.
26. Click on the ‘INFORMATION’ option.
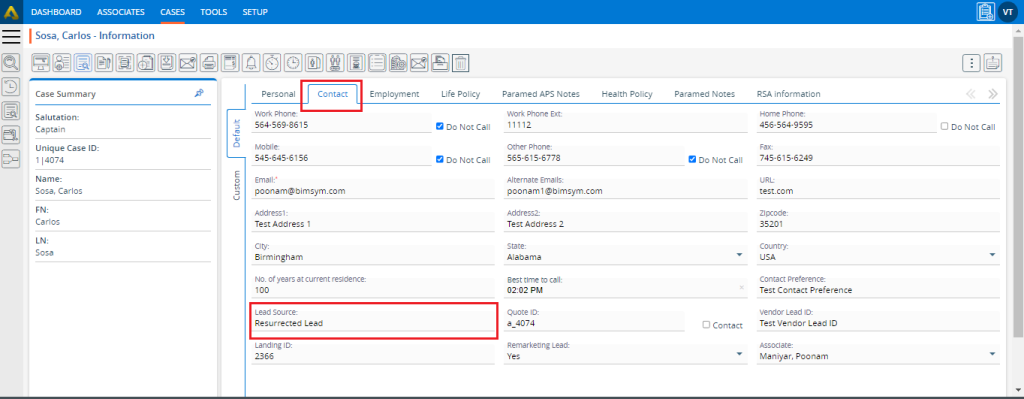
27. Click on the ‘Contact’ page. The Lead Source field will show the value as ‘Resurrected Lead’ because this profile was copied as ‘Resurrected Lead’.
28. Go back to the main profile and click on the ‘LINKED PROFILE’ option.
29.The page will display all the copied profiles under the title ‘Profile Linked To’.
30. In the copied profile, the original profile will be displayed under the title ‘Profile Linked From’.
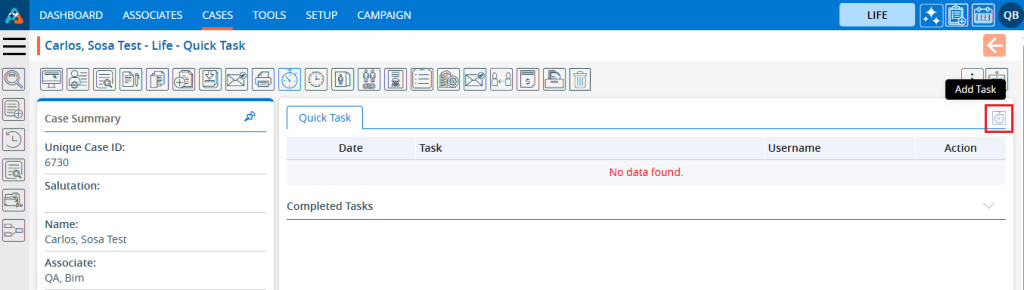
Quick Task manages tasks that need to be done on a routine basis. The following are the steps to perform a Quick Task: 1. Navigate to the ‘CASES’ tab where you’ll find the ‘Cases List – All Cases’. 2. Click on a case to proceed.
3. After clicking on a case, the ‘Dashboard’ will open. Click on the ‘QUICK TASK’ option.
4. The Quick Task page will open. Click on the ‘Add Task’ icon.
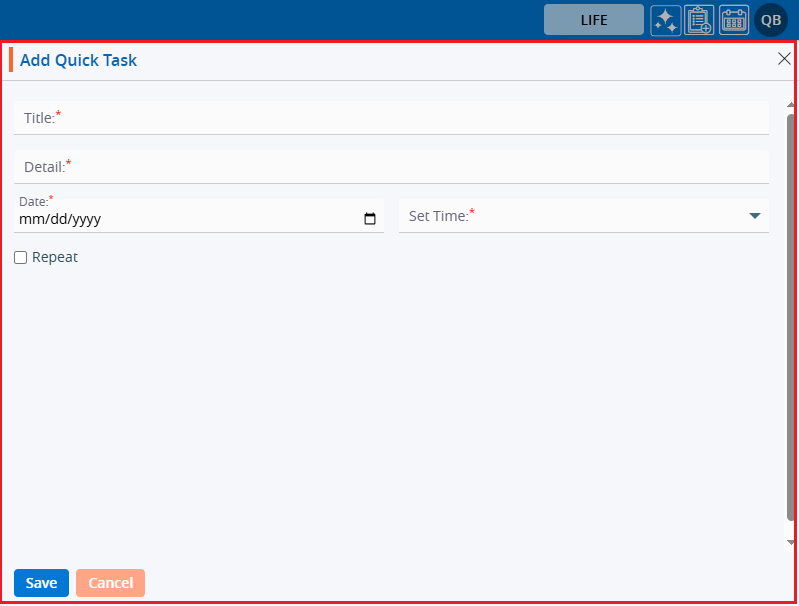
5. A new pop-up window ‘Add Quick Task’ will open.
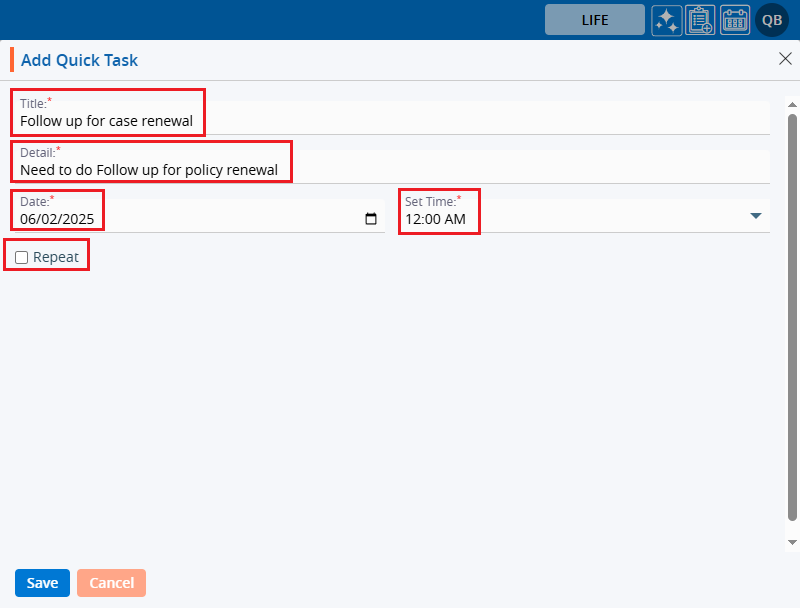
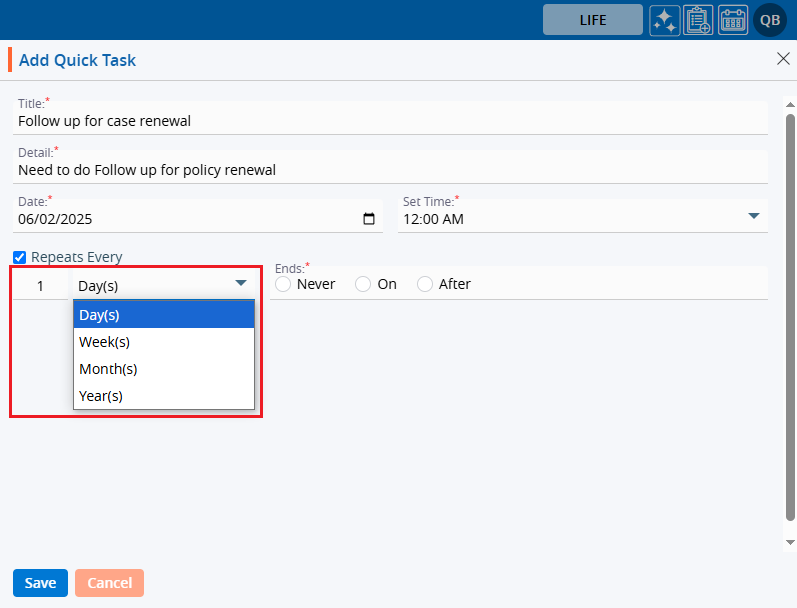
6. Fill in the values for Title and Details. Select the date from the date picker. Set the time from the dropdown. There is a Repeat option where users can set the same task to occur multiple times.
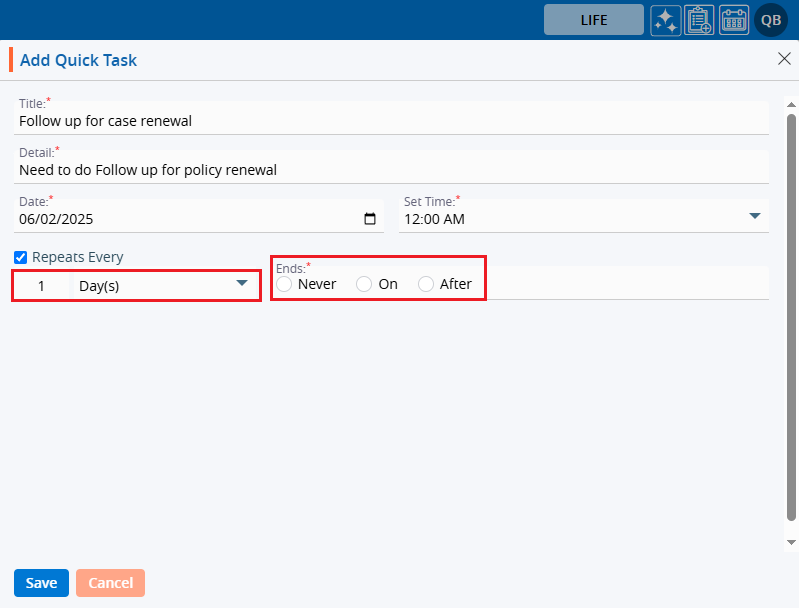
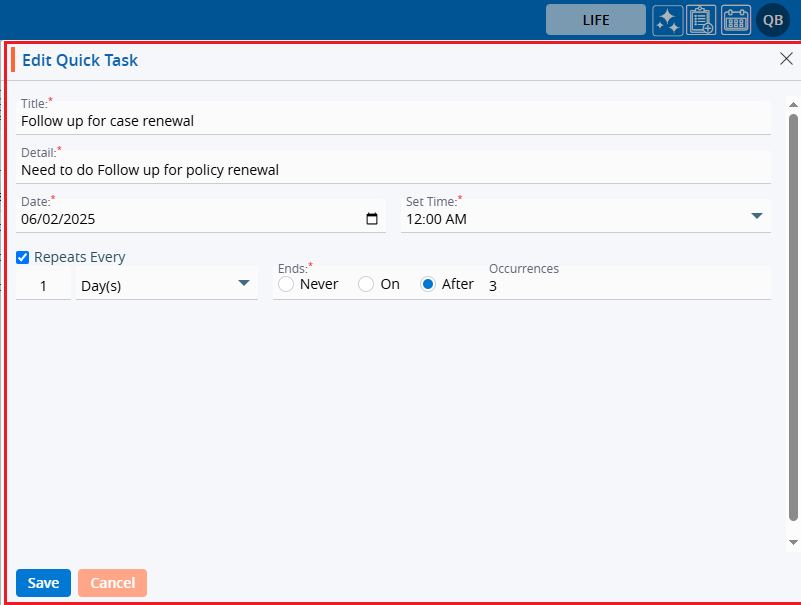
7. Select the checkbox for Repeat, and two additional fields appear: a. Repeats Every b. Ends
8. For the Repeat Every feature, there are four options available: a. Day(s): How often should the task be repeated, in days. b. Week(s): How often should the task be repeated, in weeks. c. Month(s): How often should the task be repeated, in months. d. Years(s): How often should the task be repeated, in years.
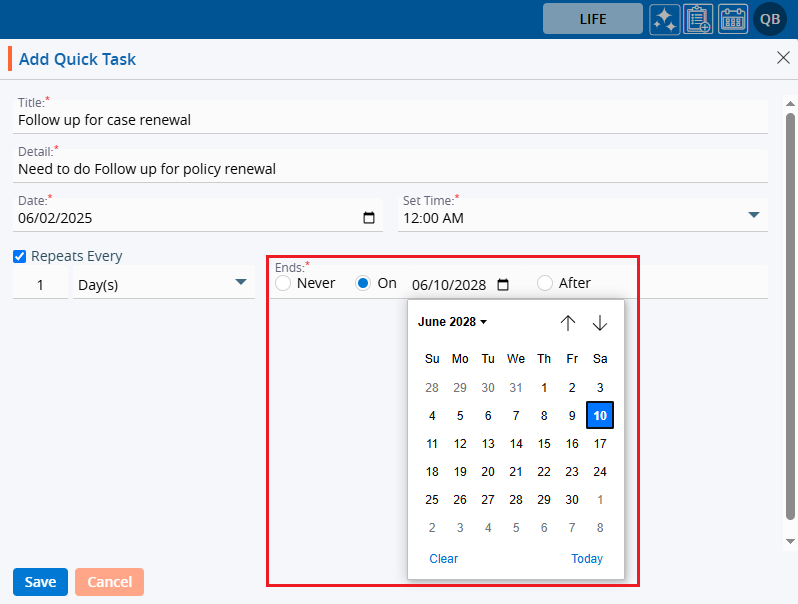
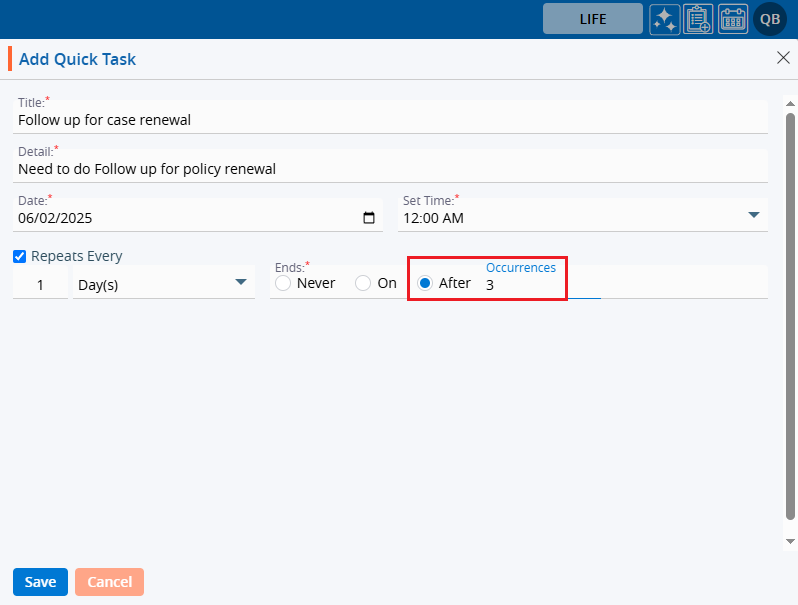
9. Ends ends work is to end the task when one of the following options is selected: a. Never: This means the task added by the user will never end. b. On: This means the task will be completed on the selected date. c. Occurrences: This means the task will be completed after the selected number of occurrences.
10. After filling in all the fields, click on the ‘Save’ button.
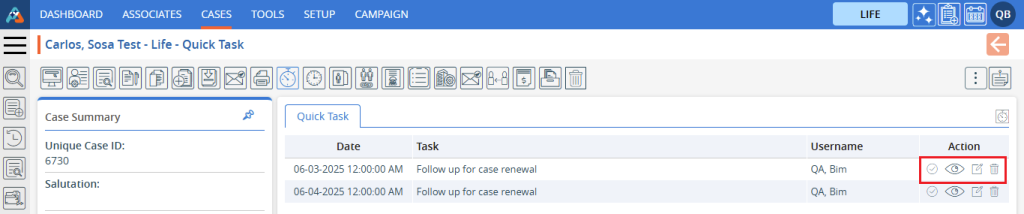
11. Here, the user has selected 3 occurrences, so the task is created 3 times. Quick tasks will be created, and the system will generate a message. The quick task will be shown in the listing.
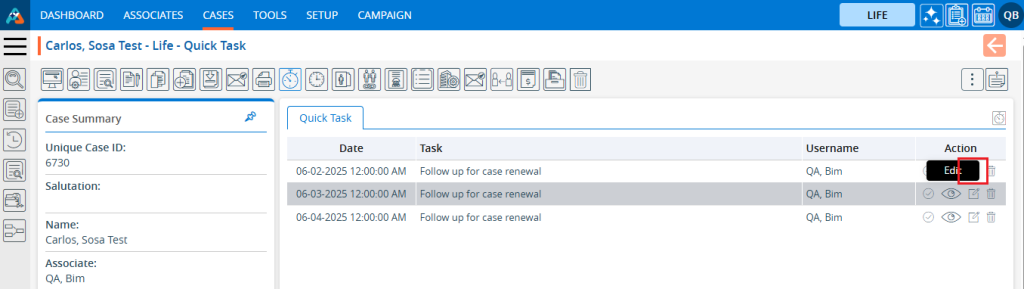
12. There are the following options for tasks: a. Completed b. View c. Edit d. Delete
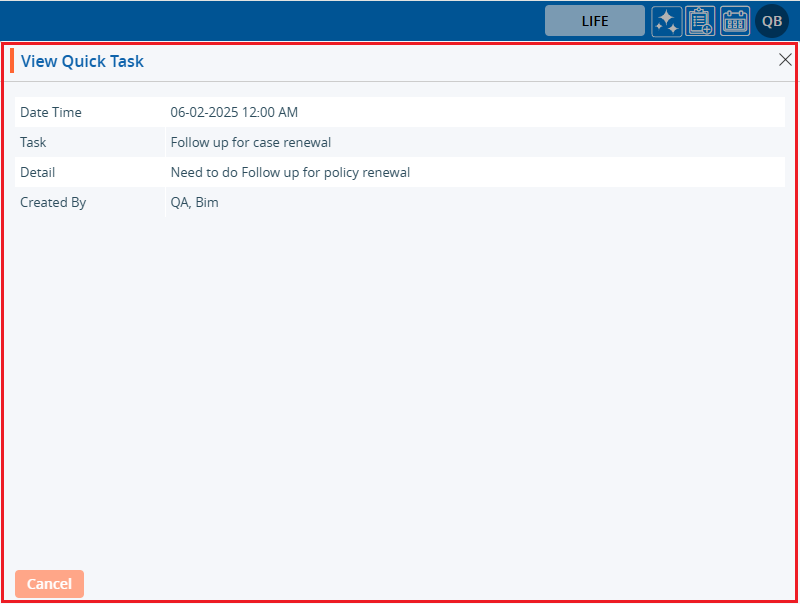
13. To view the quick task, click on the ‘View’ icon.
14. The Quick Task will be open read-only. Check the Quick Task and click on the ‘Cancel’ button.
15. To edit the existing task, the user can use the Edit functionality. Click on the ‘Edit’ icon.
16. A pop-up window will open for editing the selected quick task.
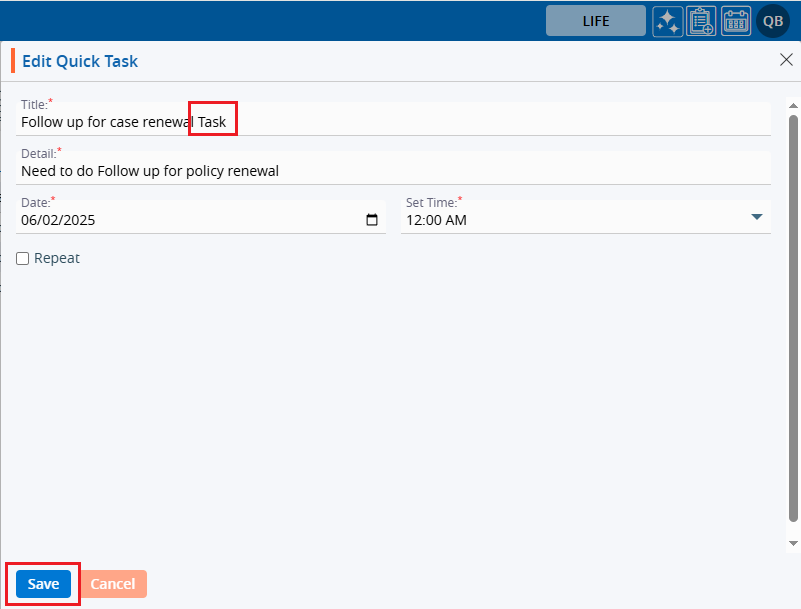
17. Update the quick task and click on the ‘Save’ button.
18. The quick task is updated successfully, and the system will generate a confirmation message.
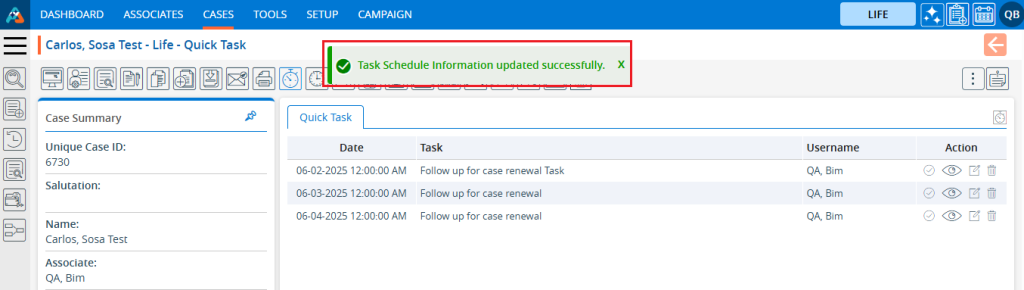
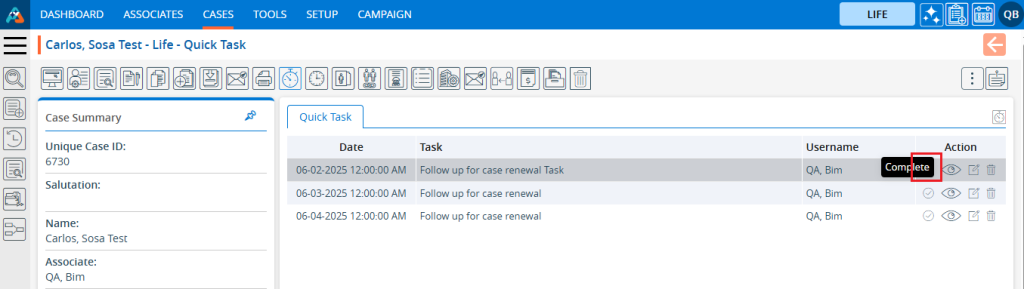
19. To complete the task, click on the ‘Completed’ icon.
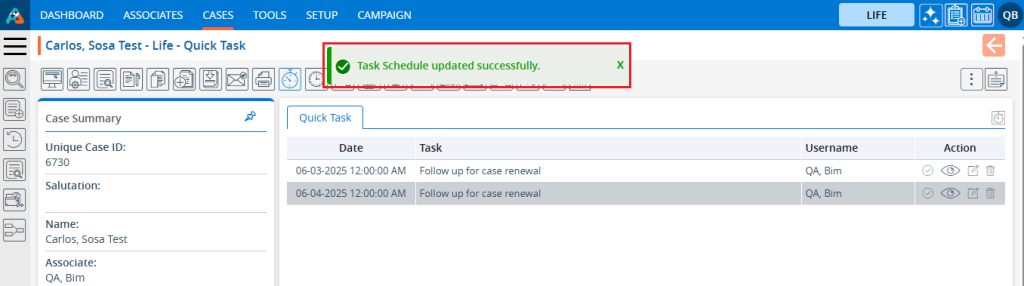
20. The task schedule is updated, and the system will generate a confirmation message.
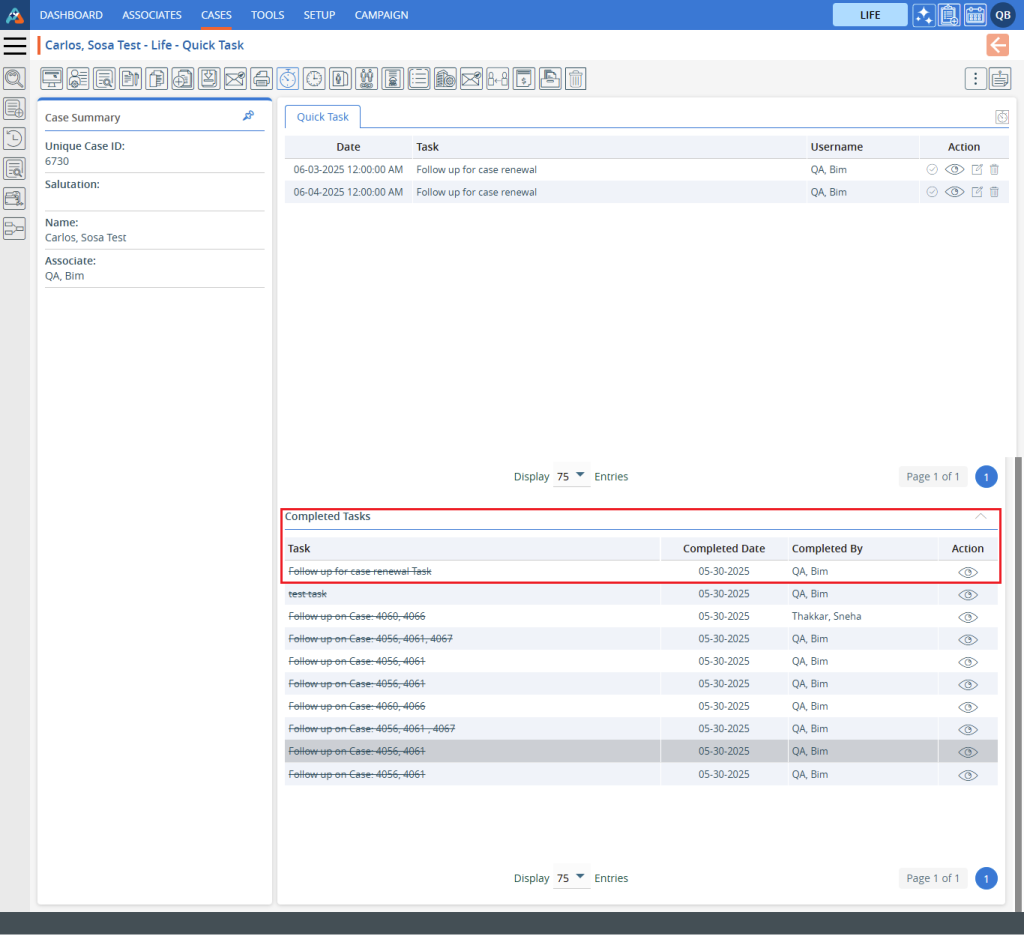
21. The completed task will be moved to the ‘Completed Tasks’ list.
22. Tasks can be removed using the ‘Remove’ feature. Click on the ‘Remove’ icon.
23. The system will ask for confirmation to remove the task. Click on the ‘Delete’ button.
24. The system will generate a confirmation message for the deletion of the task.
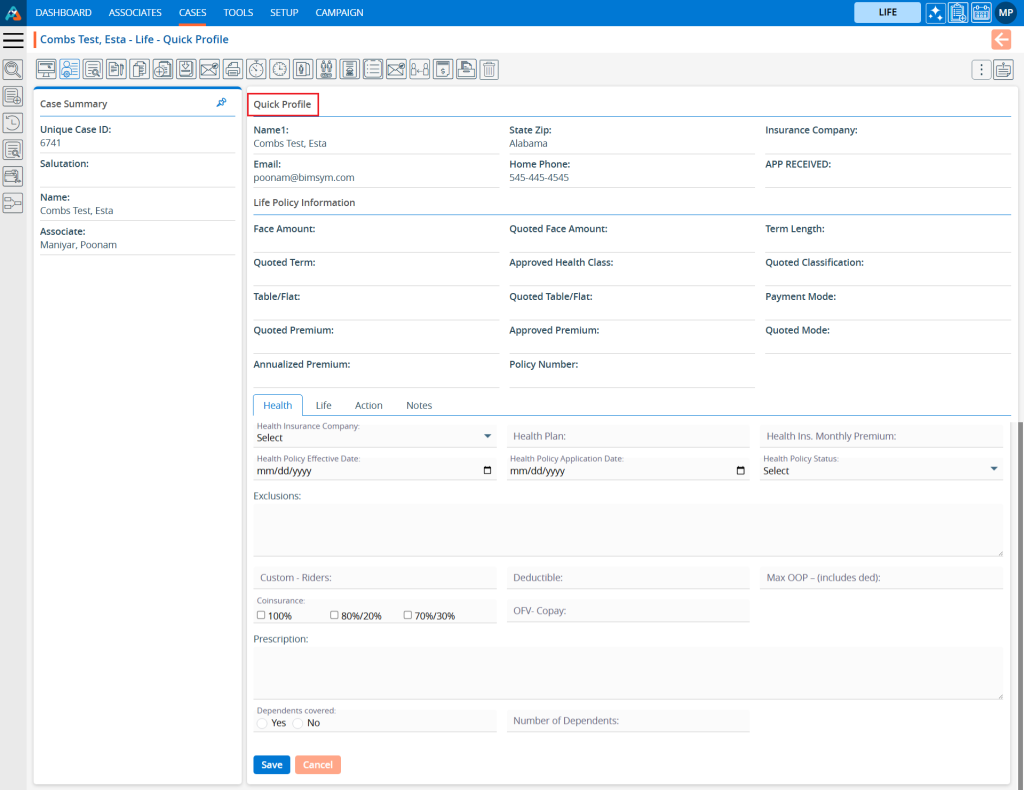
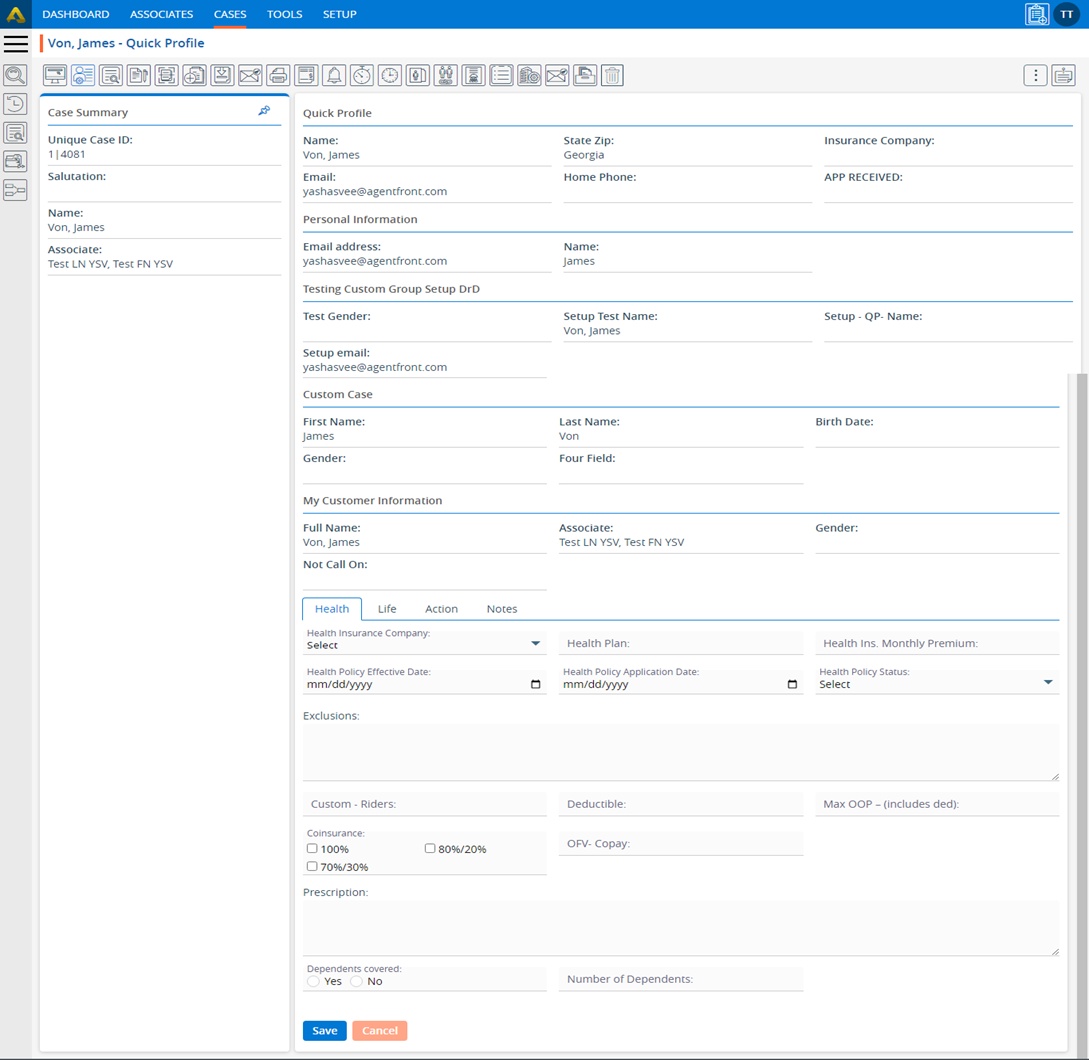
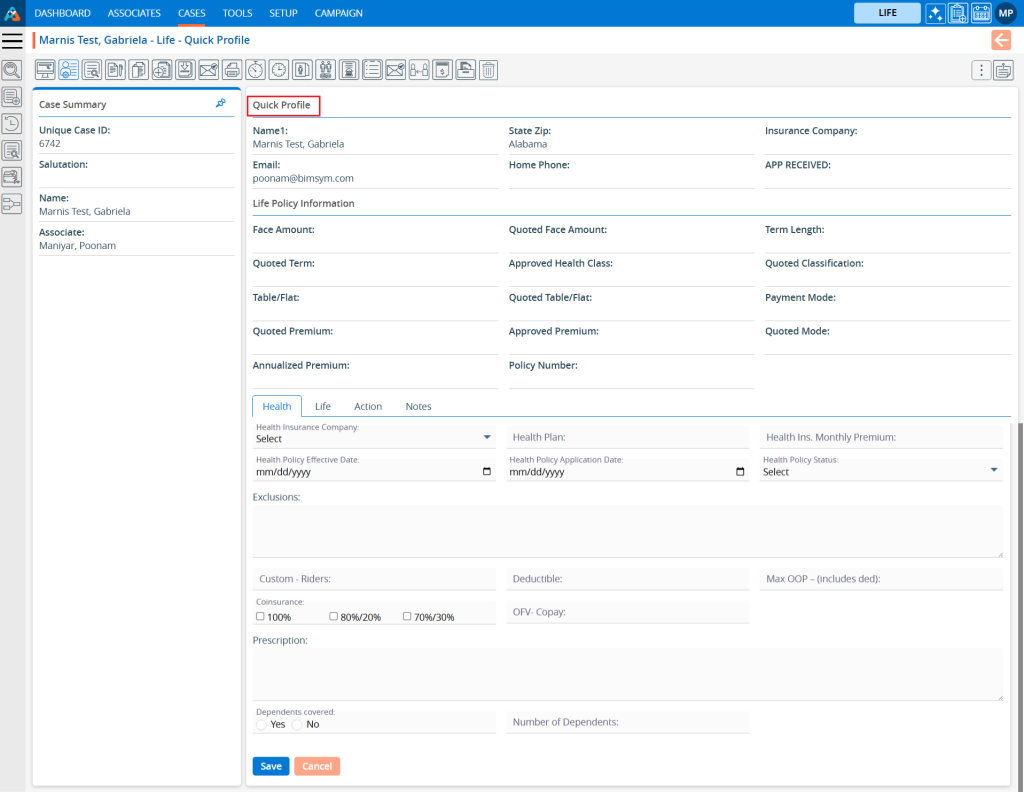
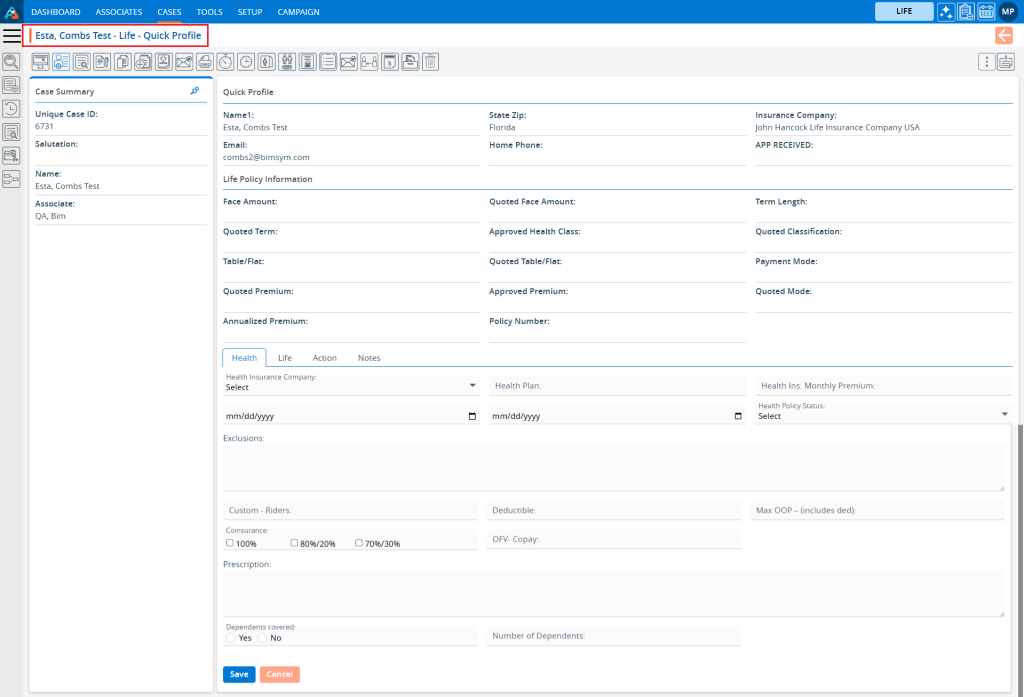
The Quick Profile link displays a concise overview of the user’s profile. Here are the steps to access a Quick Profile: 1. Naviagate to the ‘CASES’ tab where you’ll find the Cases List – All Cases. 2. Click on a case to proceed.
3. After clicking on a case, the ‘Dashboard’ will open. Click on the ‘QUICK PROFILE’ option.
4. The Quick Profile page will open, displaying the user’s information.
5. The view of the Quick Profile page can be set from SETUP > Quick Profile > Case.
There are three categories on this page:
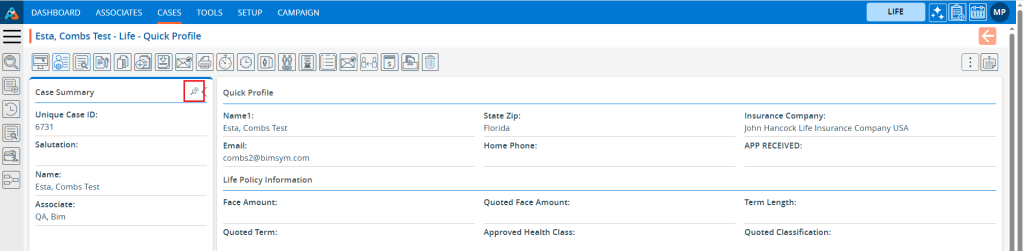
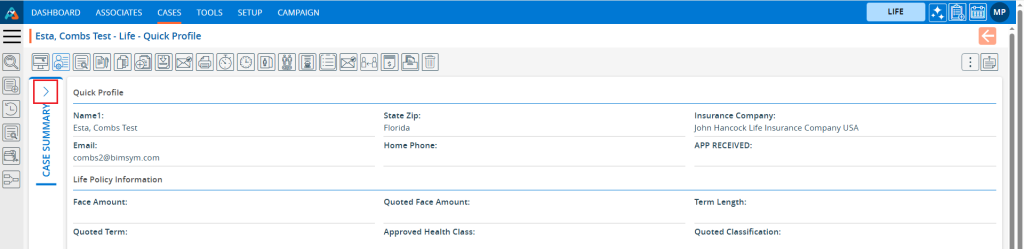
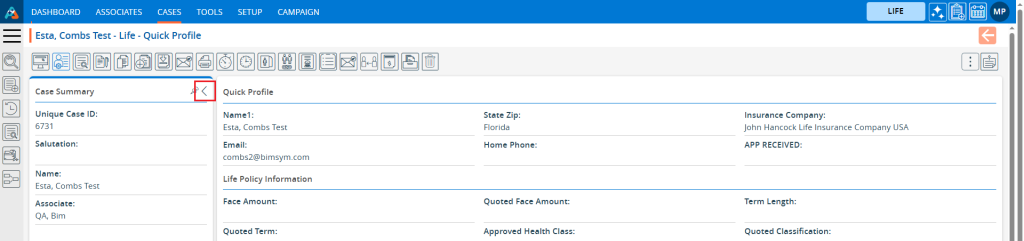
Case Summary (Left side of the page)
Quick Profile (Right side of the page)
Custom (Right side of the page below the Quick Profile section)
6. The Quick Summary section is pinned by default. If Quick Summary is pinned, it cannot be collapsed.
7. When the user clicks on the Pin, it will be unpinned.
8. If the user clicks on the arrow button to the right of the pin, Quick Summary will collapse.
9. If the user clicks on the Arrow button again, the Quick Summary will be shown again.
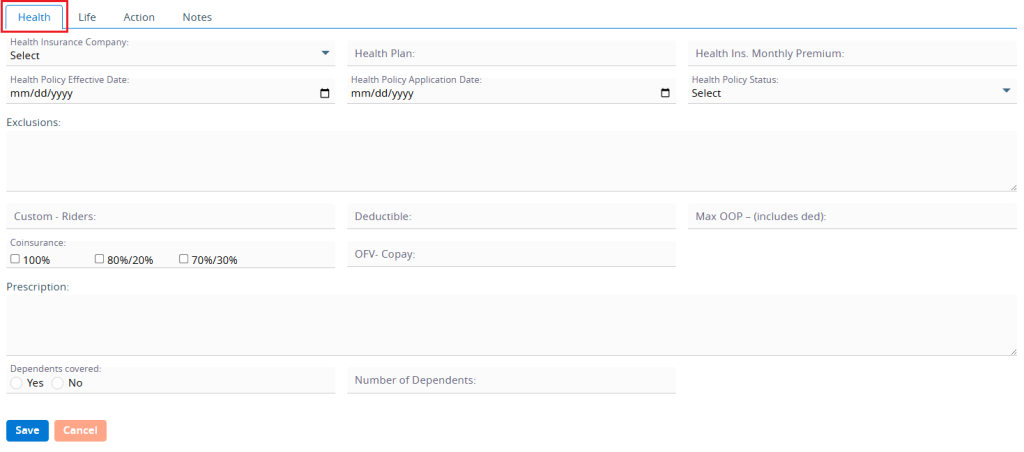
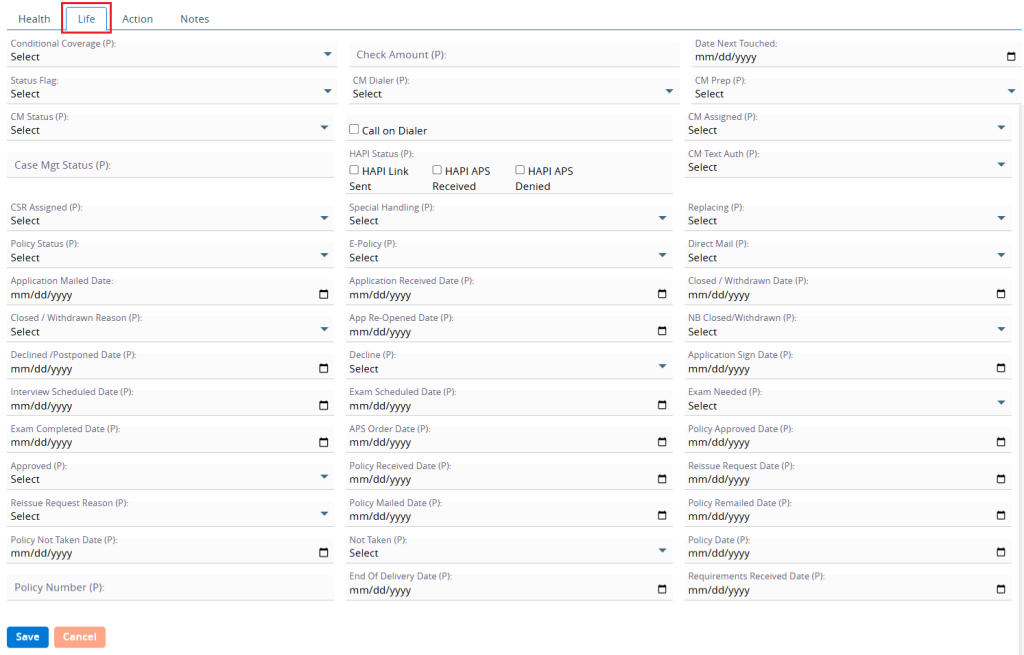
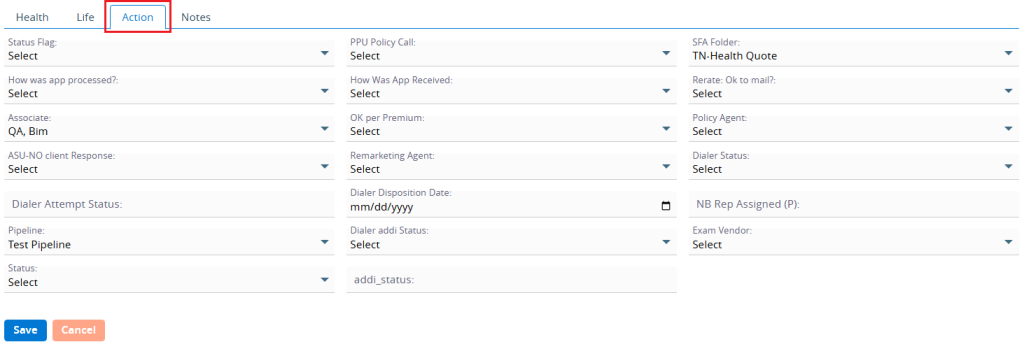
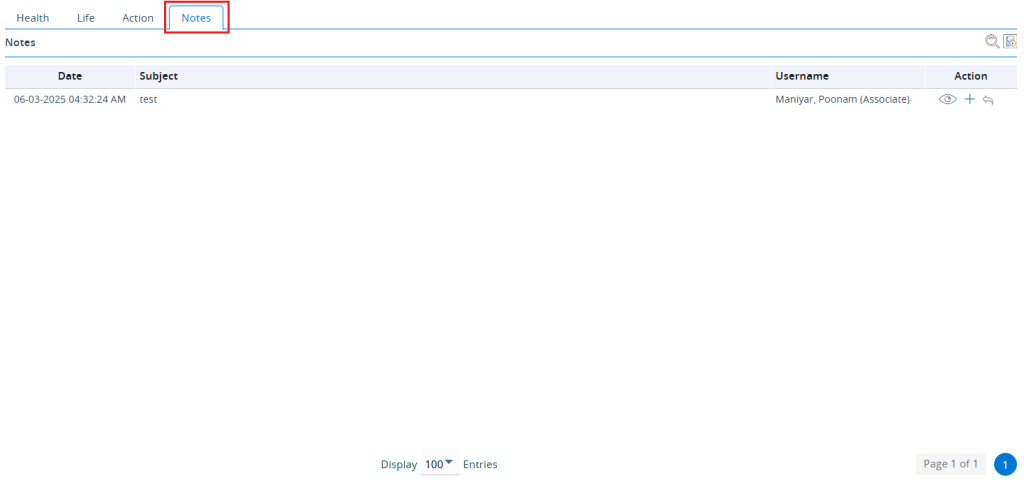
10. There are four default tabs below the Quick Profile page: a. Health b. Life c. Action d. Notes
11. The first option is Health, and it is opened by default. Users can add/edit the health information from here.
12. The on the second option ‘Life’, and it will open. Users can add/edit Life Information from here as well.
13. Click on the third option ‘Action’, and it will open. Users can act for this profile, such as moving to another SFA, updating the pipeline, etc. and can add/edit other information on this Action tab.
14. Click on the fourth option ‘Notes’ and it will open. Notes will work the same as they do inside the profile.
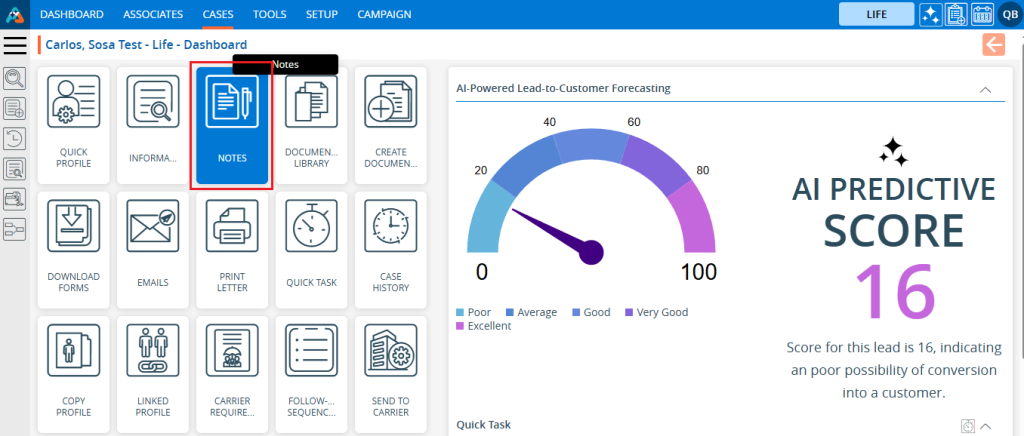
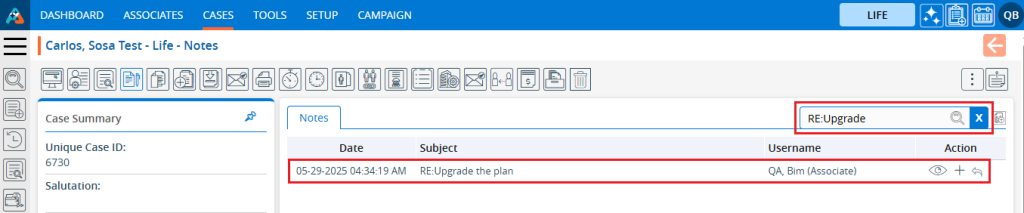
The Notes feature allows users to add and view notes in a member’s profile.
The following are the steps to using the Notes feature: 1. Navigate to the ‘CASES’ tab, where you’ll find the Cases List – All Cases. 2. Click on the member.
3. After clicking on the member, the ‘Dashboard’ will open. Click on ‘NOTES’.
4. The Notes page will open. Click on the ‘Add Note’ icon to add a note.
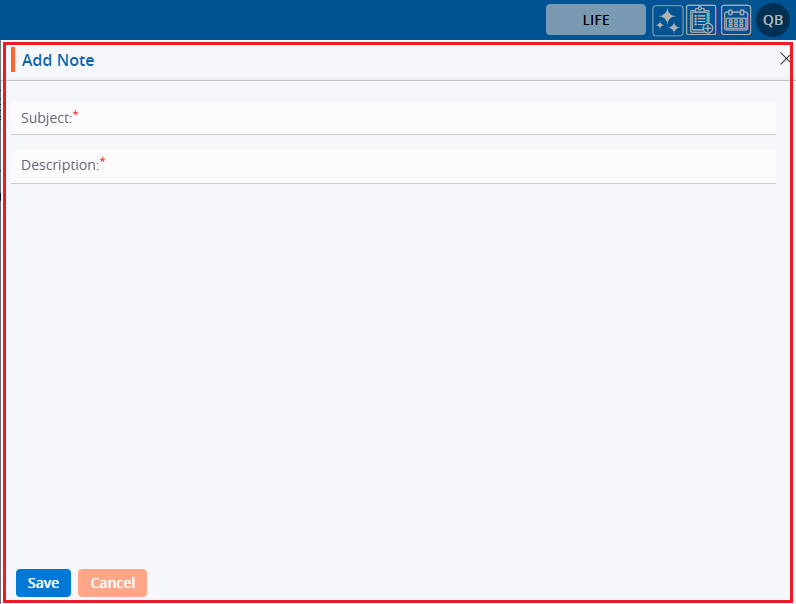
5. A pop-up ‘Add Note’ will open.
6. Enter the subject and description, then click the ‘Save’ button.
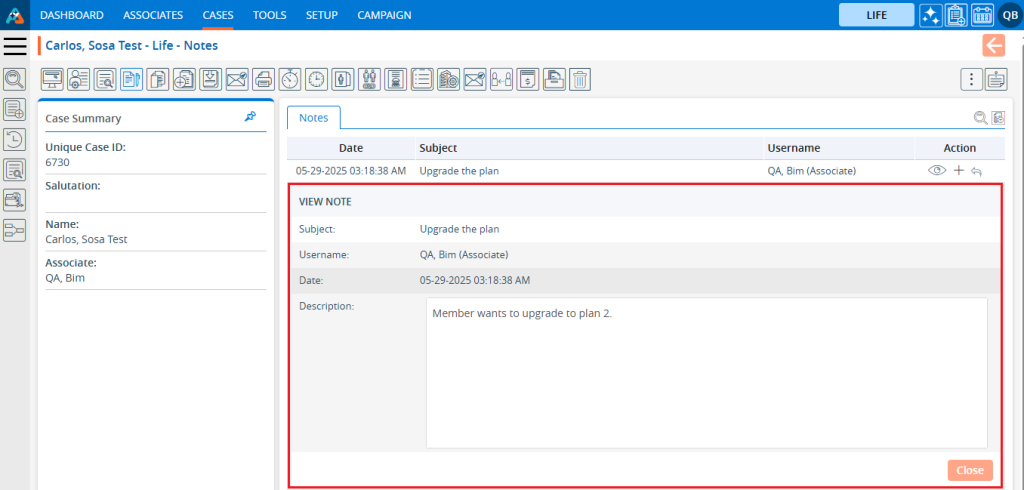
7. The note has been saved successfully, and the system will display a confirmation message. Notes will be displayed in the list of notes.
8. To view the notes, click on the ‘View’ icon.
9. Note will be opened. Check the note, then click on the ‘Close’ icon.
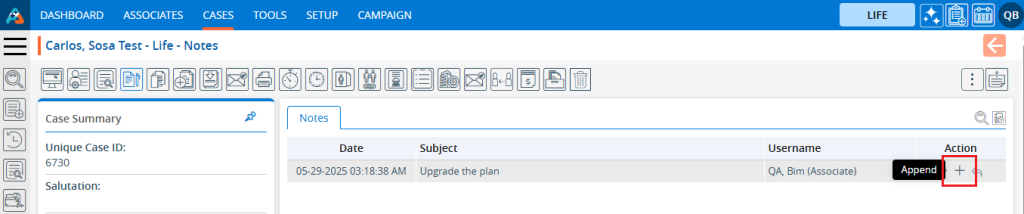
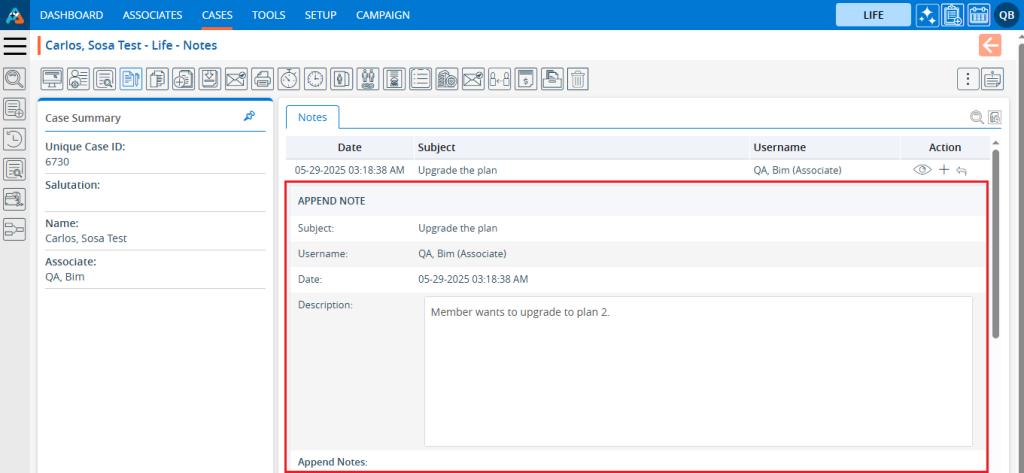
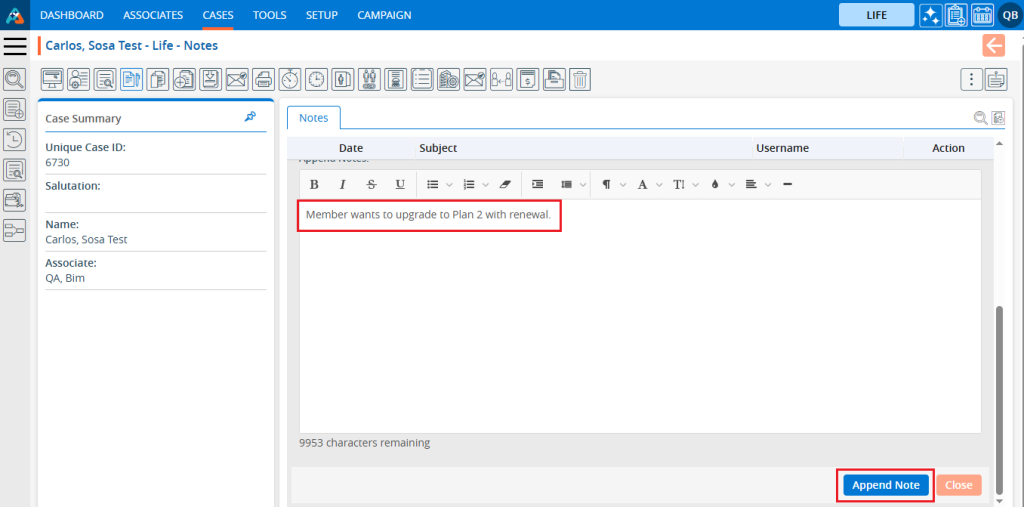
10. By clicking on ‘Append’, users can add information to the existing note. Click on the ‘Append’ icon.
The Append page will open.
11. Add an additional note, then click on ‘Append Note’.
12. Note note has been successfully appended, and the system will display a confirmation message.
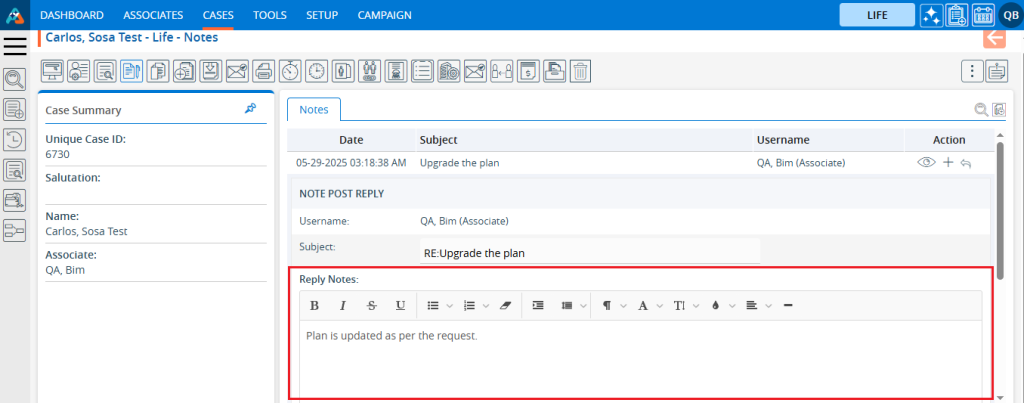
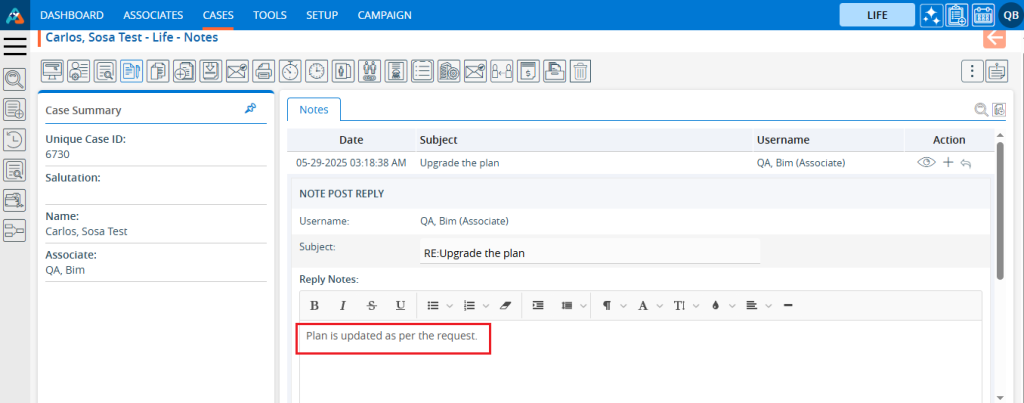
13. Users can post a reply by clicking on the ‘Post Reply’.
14. The Post Reply pop-up will open.
15. Add the note and click on Save it..
16. The reply will be posted successfully, and the system will display a confirmation message.
17. If there are many messages, users can find the required message using the Search functionality. Click on the ‘Quick Search’ icon.
18. Enter the keyword and click on the Search icon. The search results will be shown.
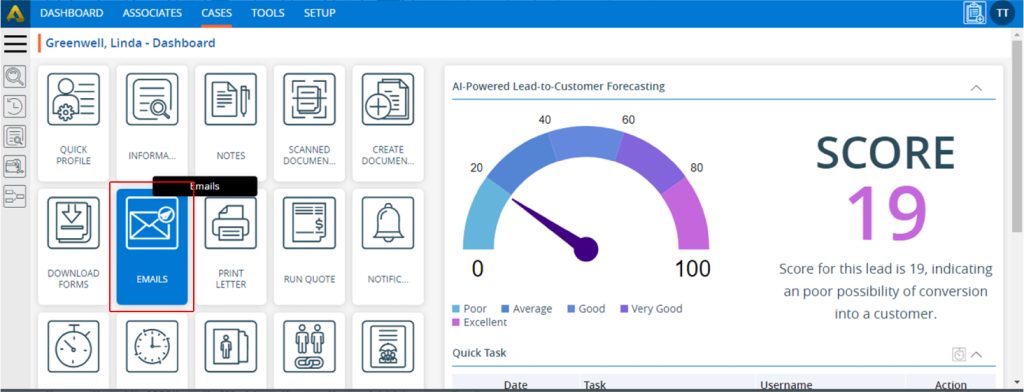
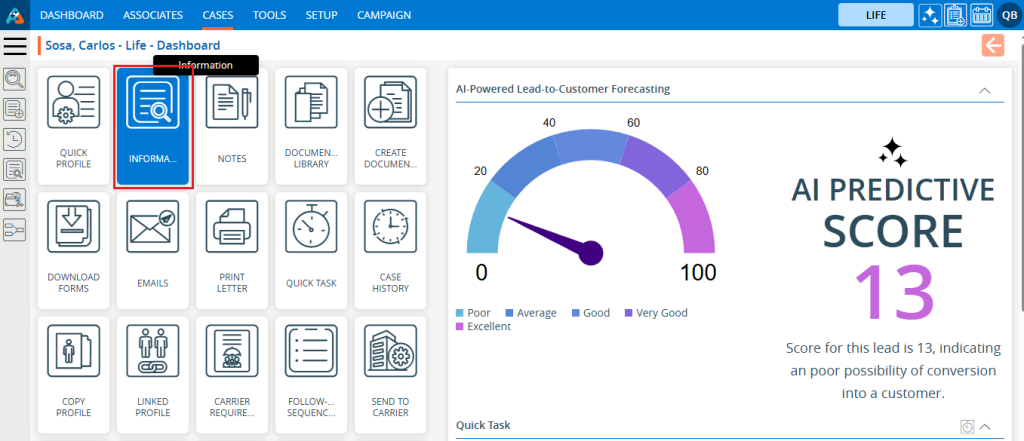
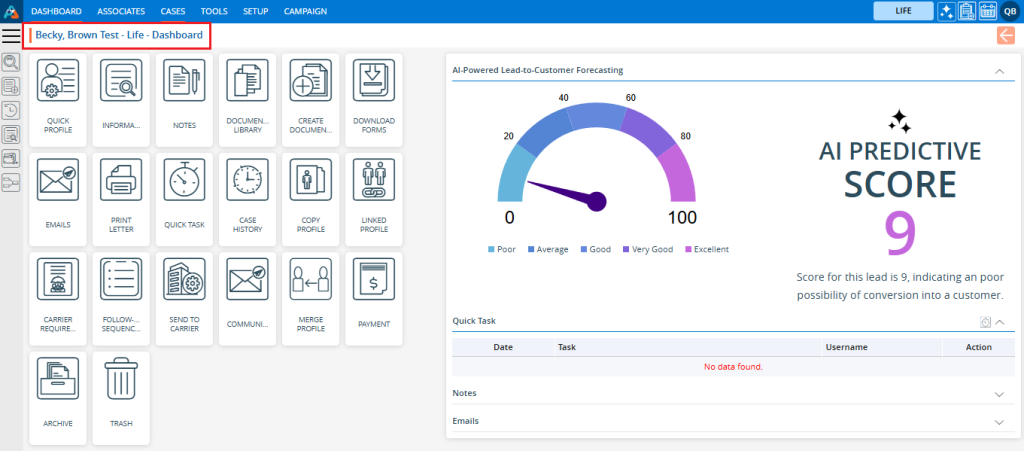
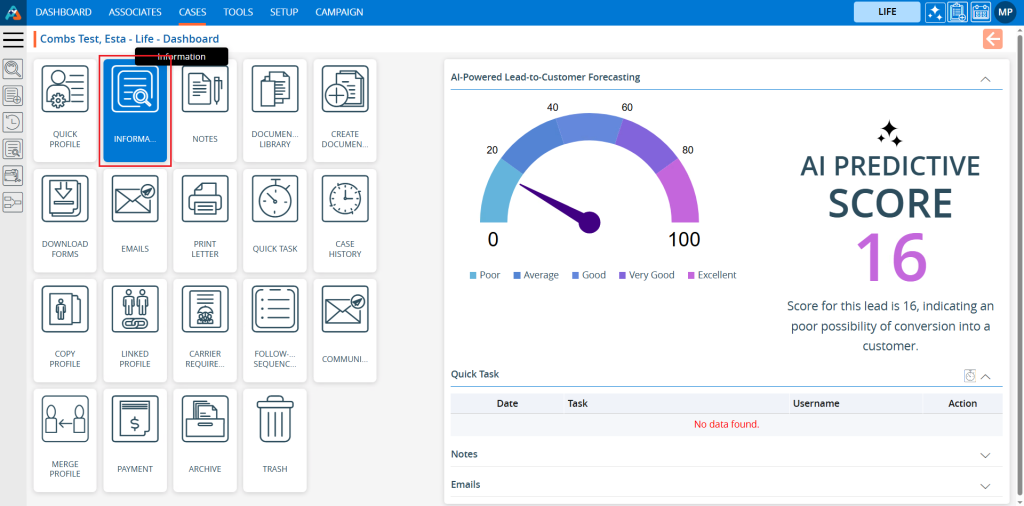
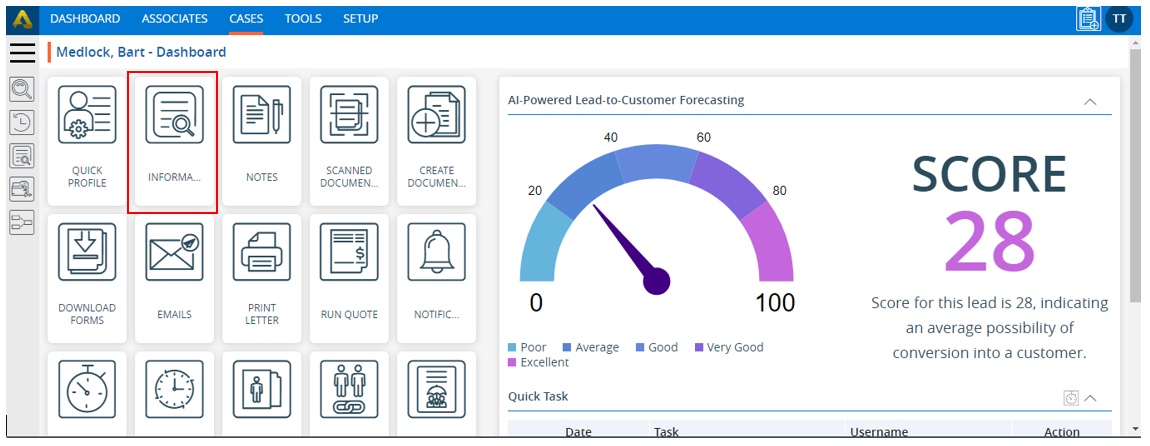
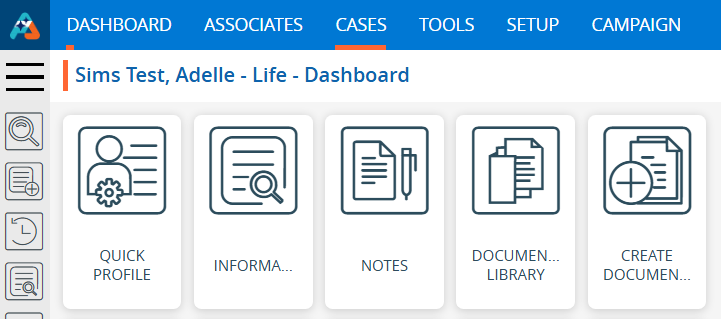
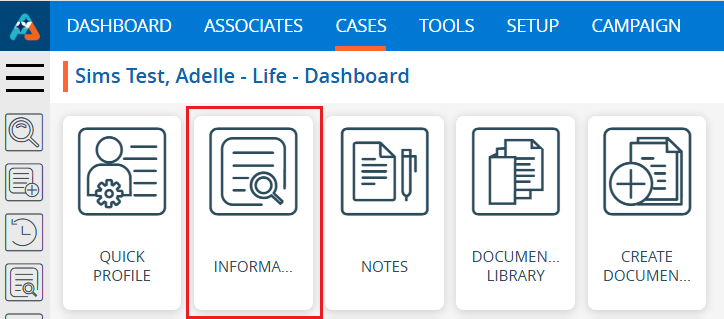
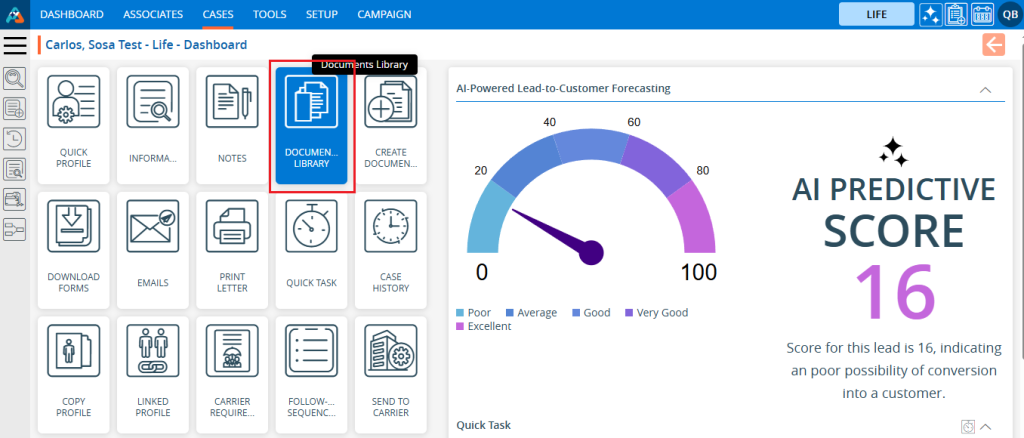
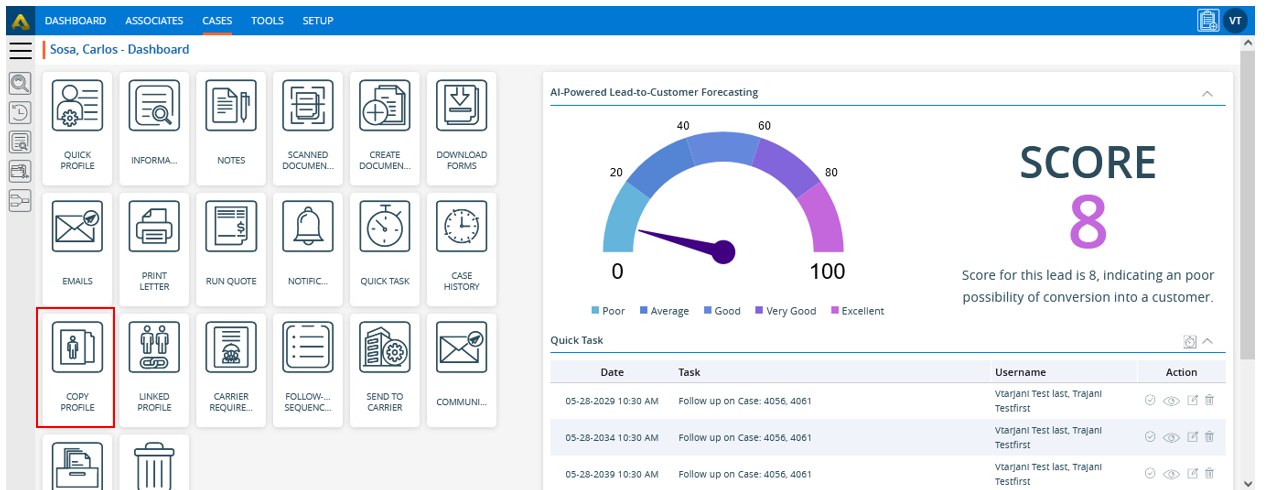
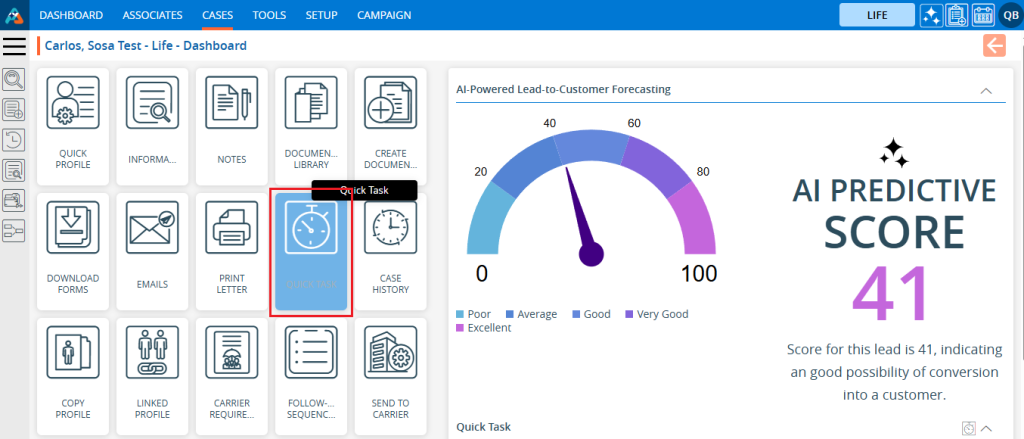
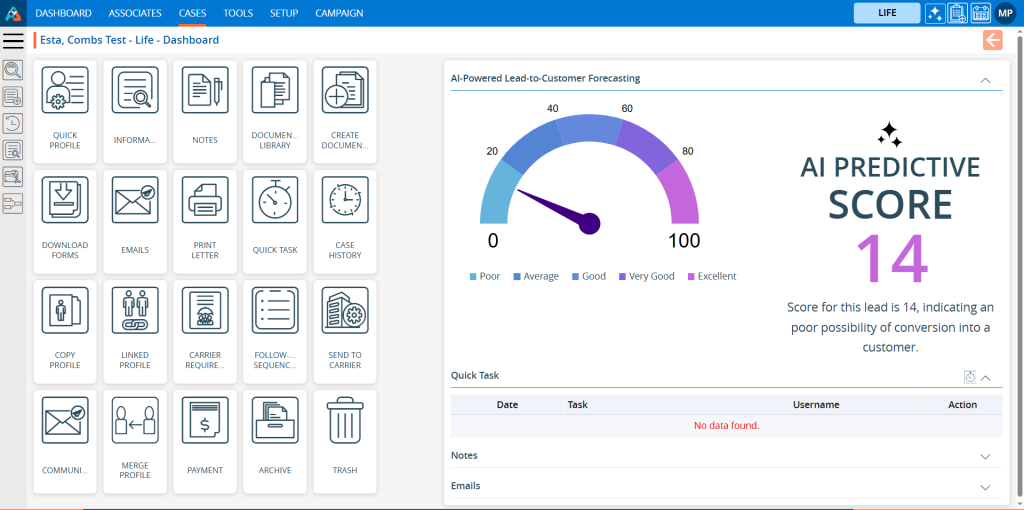
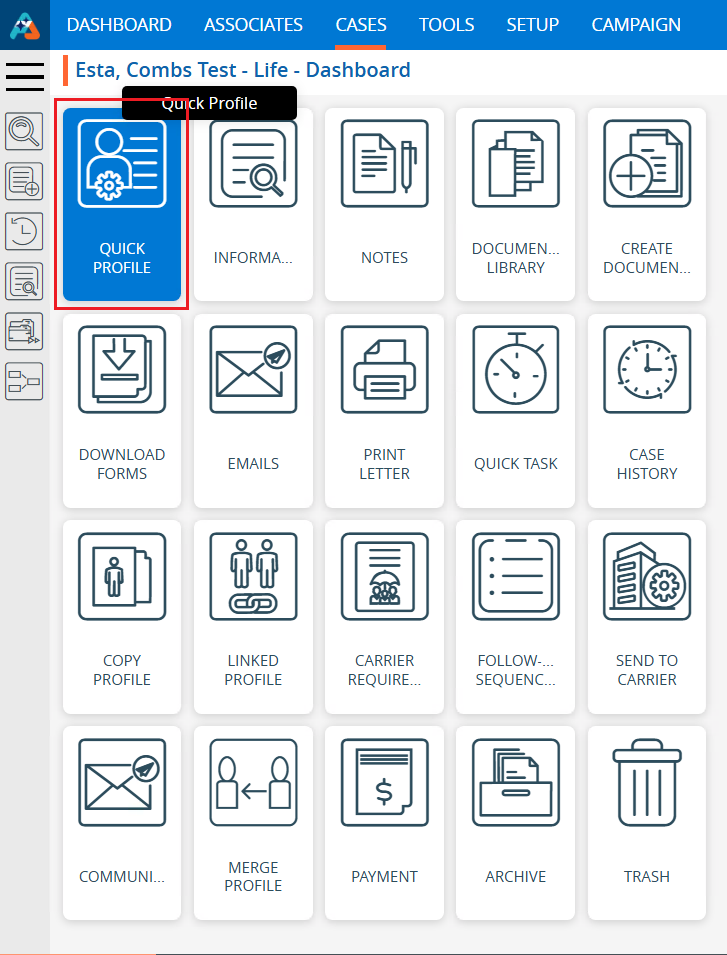
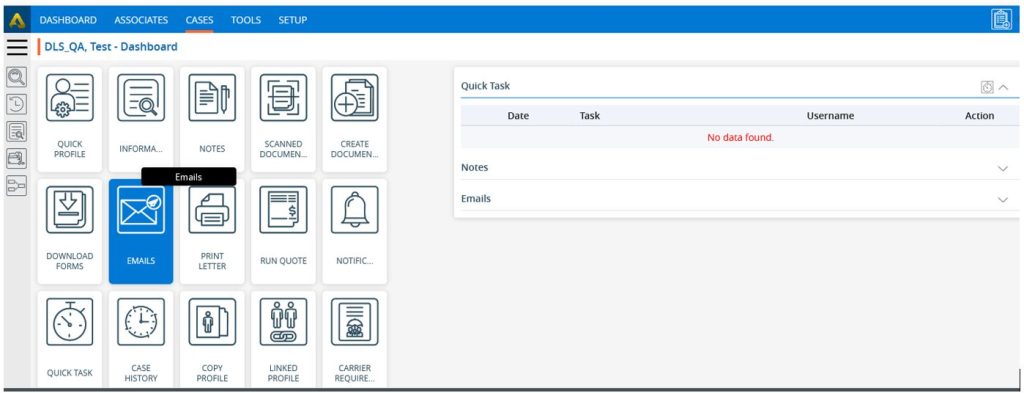
The dashboard serves as a summary page, showcasing all available functions, information, and features accessible to the user. The following are the steps to access the Dashboard: 1. Navigate to the ‘CASES’ tab where you’ll find the Cases List – All Cases. 2. Click on a case to proceed.
3. A new page will open, displaying the available features on the ‘Dashboard’ of the member.
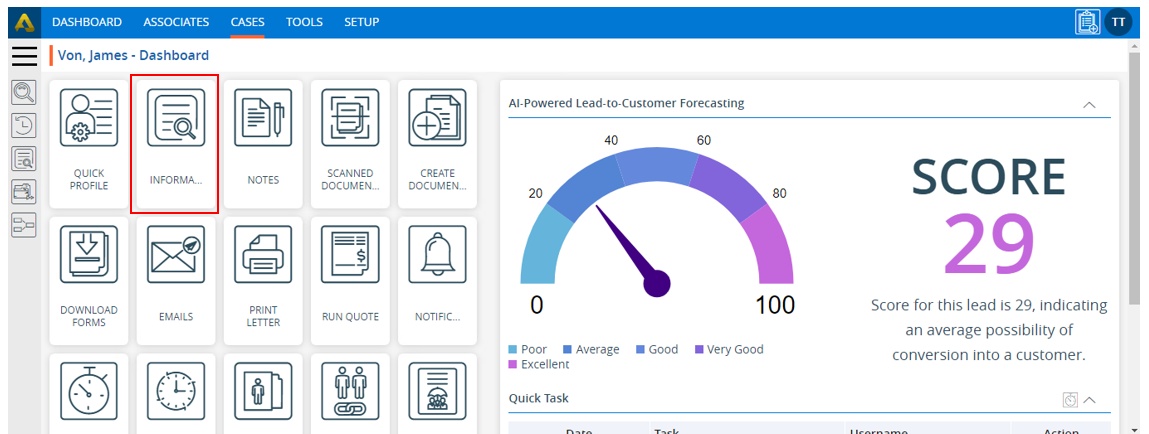
4. All the features of the case, available on the left side. To explore a feature, simply click on it. For example, to quickly view your profile, click on the ‘QUICK PROFILE’ feature.
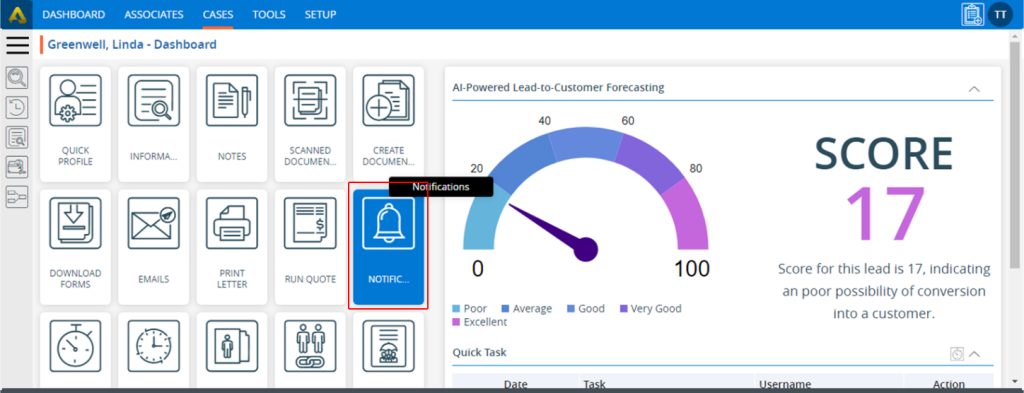
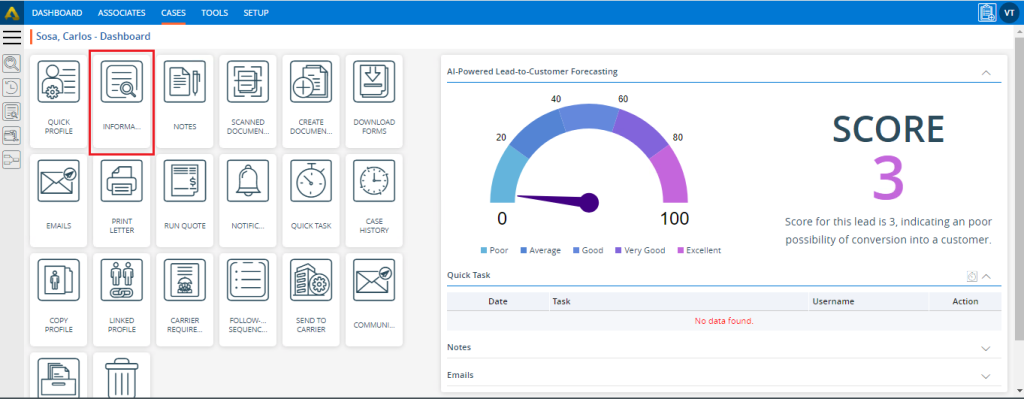
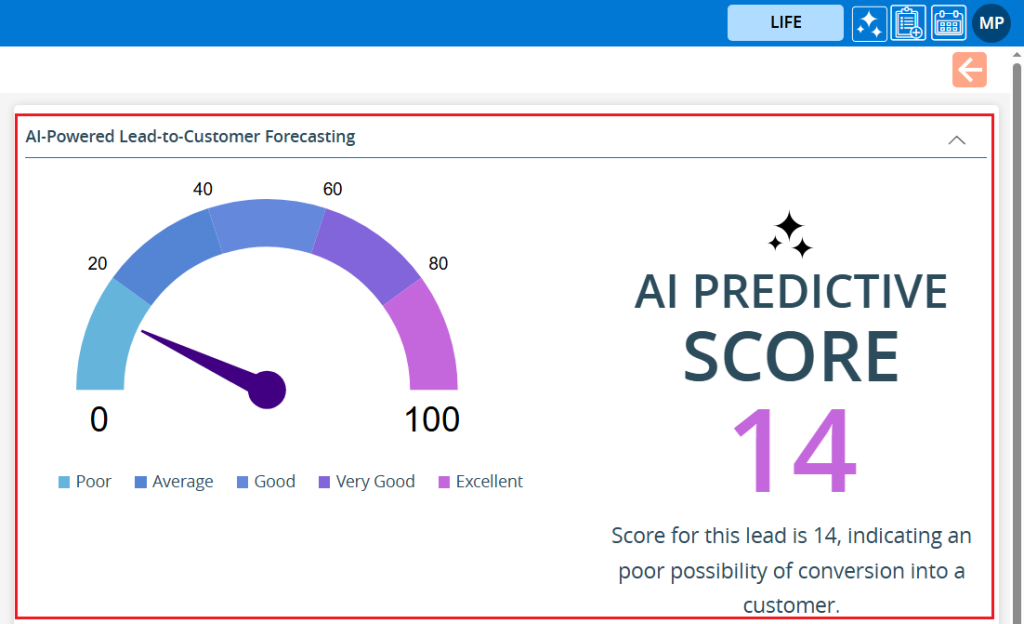
5. On the right side of the screen, ‘AI-Powered Lead-to-Customer Forecasting’ will be displayed, indicating the likelihood of the user becoming a future customer.
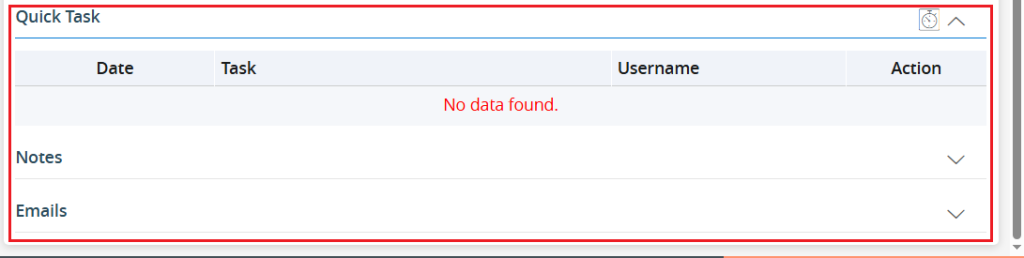
6. Below the AI-Powered Lead-to-Customer Forecasting, you’ll find shortcuts to the ‘Quick Task’, ‘Notes’, and ‘Emails’ sections. Only the five most recent updates will be shown for each. These features function similarly to how they work within a profile.
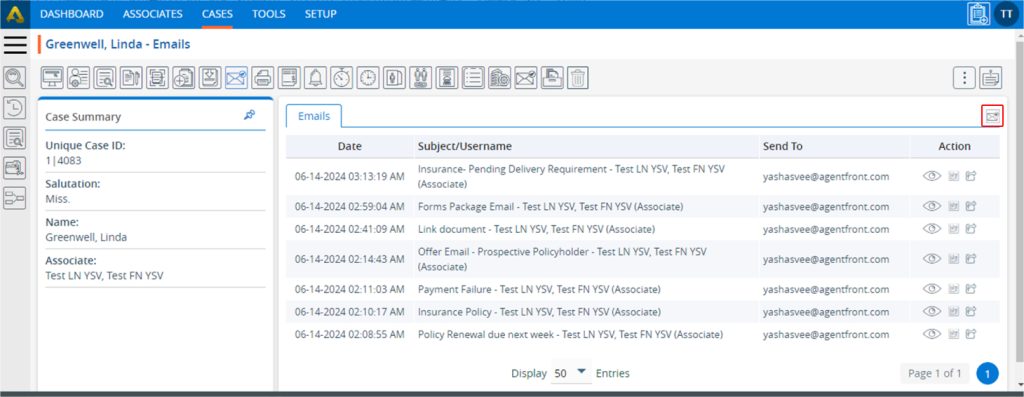
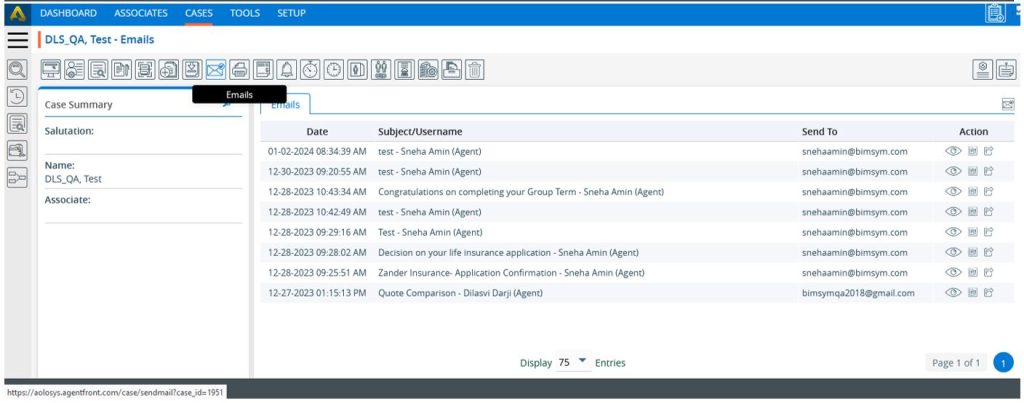
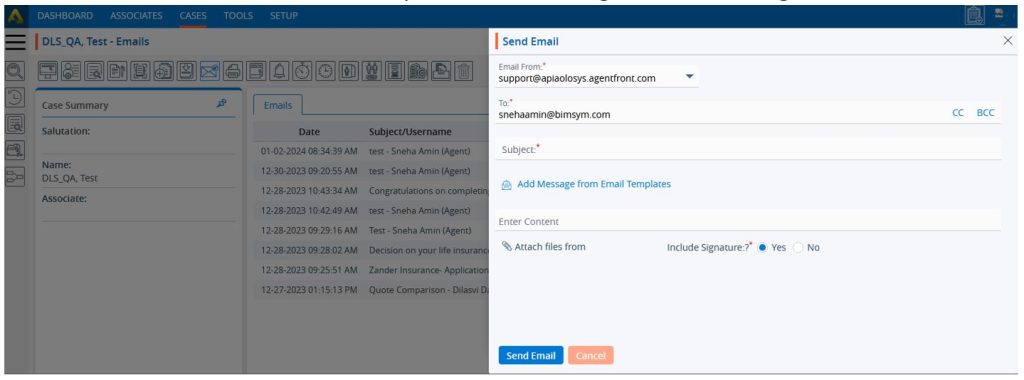
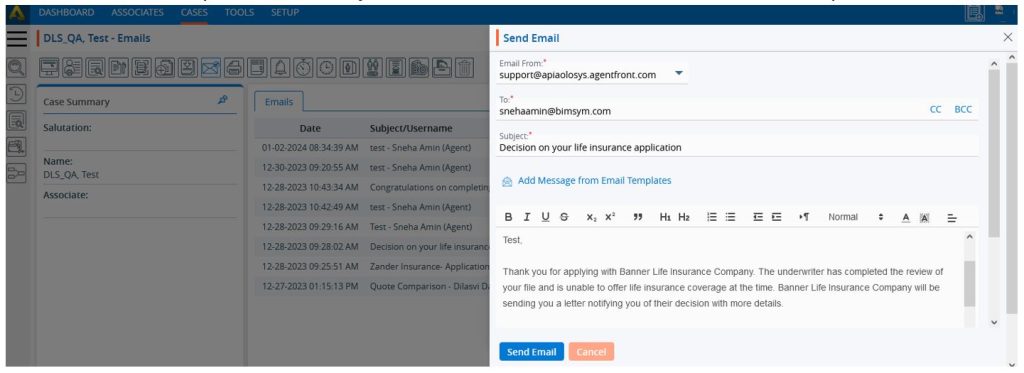
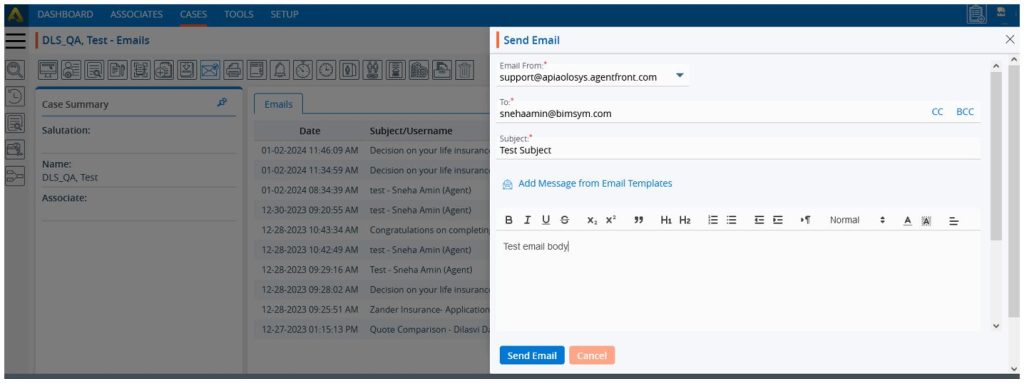
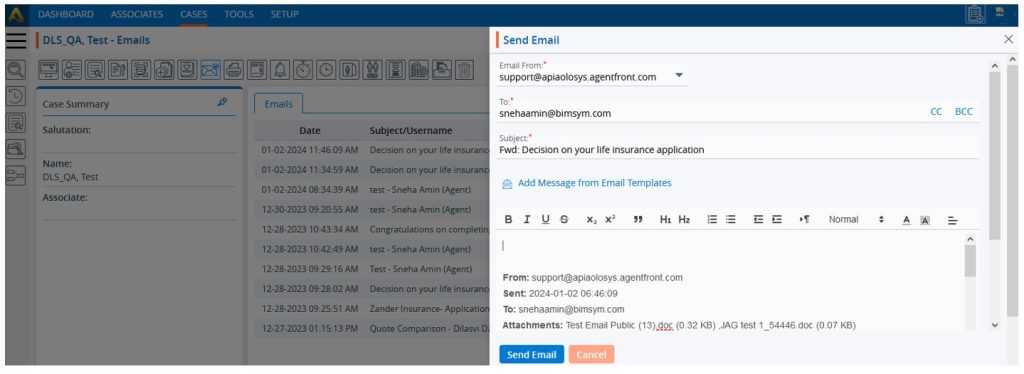
– This functionality is available in the cases tab and used to send email to any case.
– Click on the Send Email button which opens module having fields for sending email.
– Here Email From field contains listing of from email addresses available for that user login and admin login including default selected.
– To field is used for email address on which email need to send. For this case it is the email address of open case.
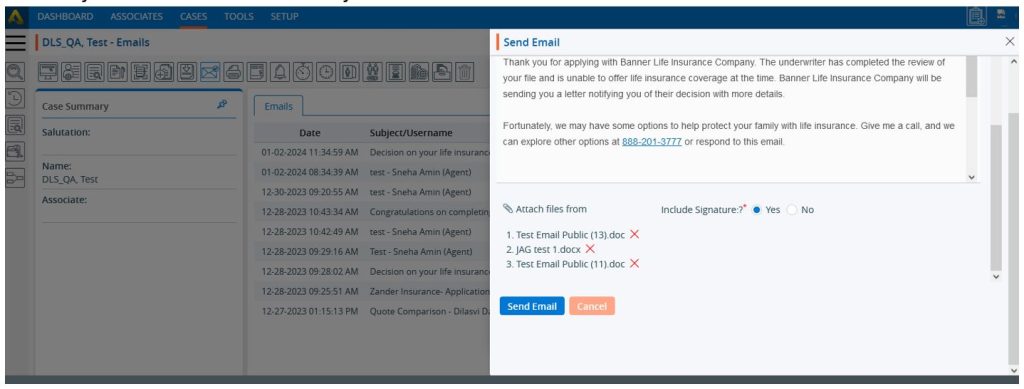
– ‘Add Message from Email Templates’ when you click this link it will open pop up with fields of custom template and user signature selection drop down.
– When template and user is selected then that template email detail is added in Subject and Email body with proper value of case for hash variable like #First_Name#. Signature hash variables also be replaced correctly with user’s name selection if available in template.
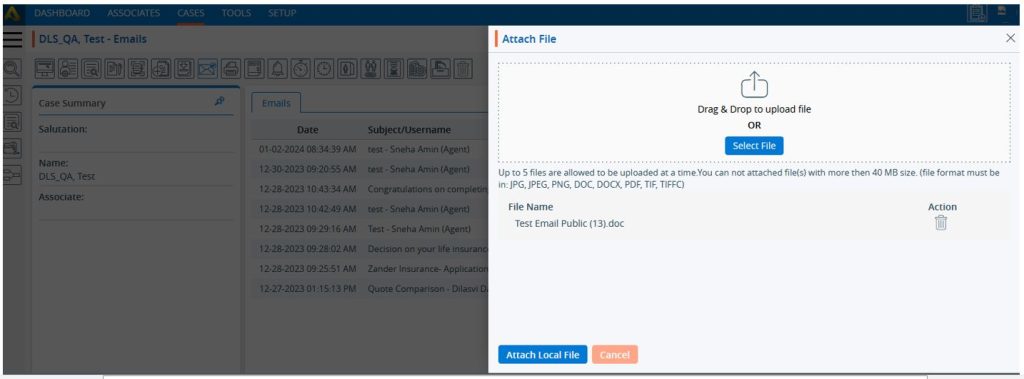
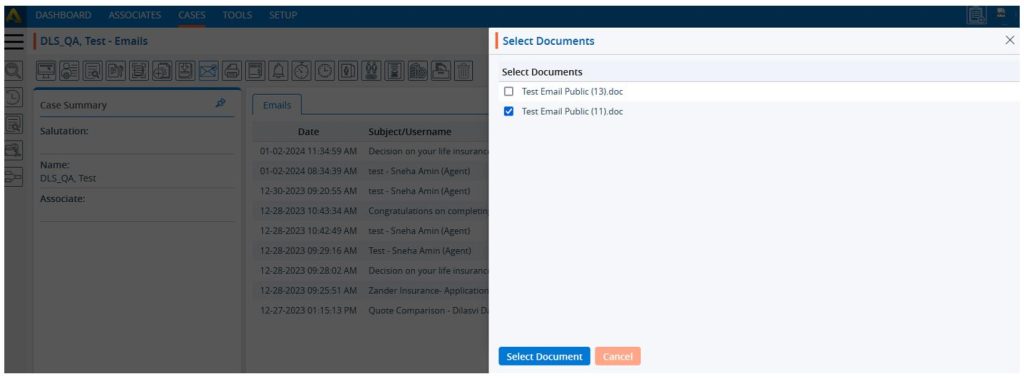
– ‘Attach files from’ when you click on this link it will open pop up for add different file attachment options to send in email.
– ‘Local Document’ is used for attaching local documents in sending email.
– ‘Template’ is used for attaching letter template in sending email.
– ‘Scan Document’ is used for attaching scan documents in sending email.
– Once all attachments are added it will list as following you can also delete attachment from there if you don’t what to send any.
– Include Signature field is used for attaching signature at last in email body while sending email. This signature is got from Setup > System Setup > Email Signature setup for specific user login. If the signature is not set for the user, then the system will take signature from admin login.
– When clicking on Send Email button the system will send email to that case.
– In Send Email, we can also add Subject and Email body manually instead of using email template and send email accordingly.
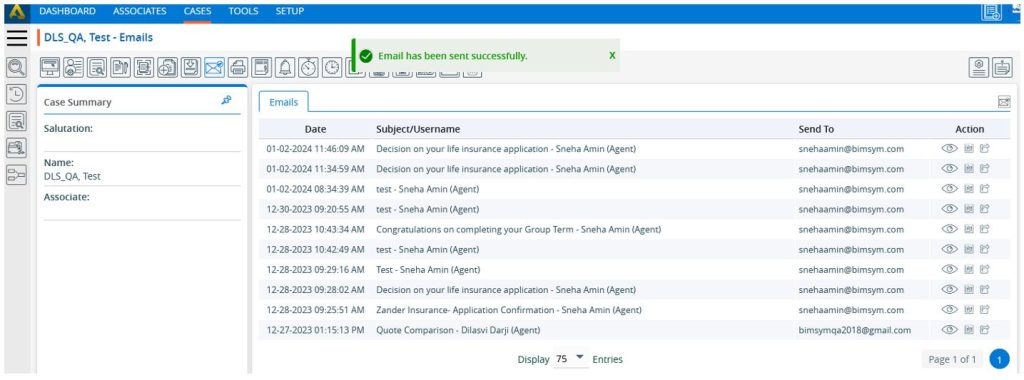
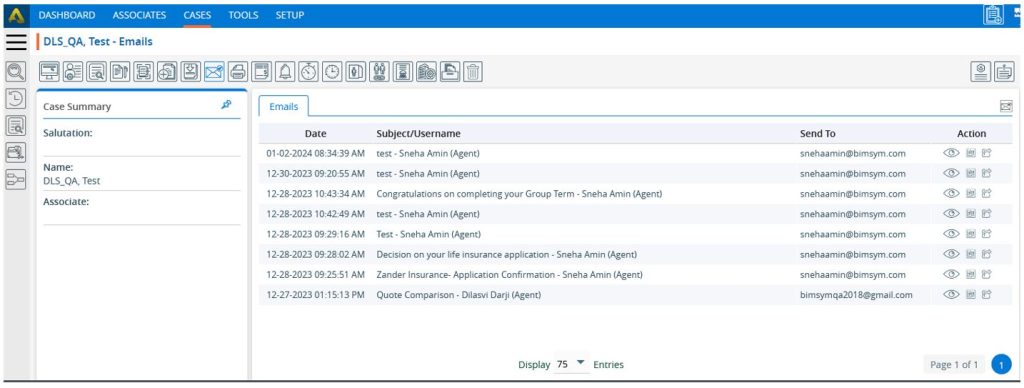
– Emails Listing:
– Once email sent to case its log will save in system and it is available in email listing.
– When we go to Emails section you can see emails listing sent to that particular case.
– ‘View’ icon from Action column is used for display details of send email.
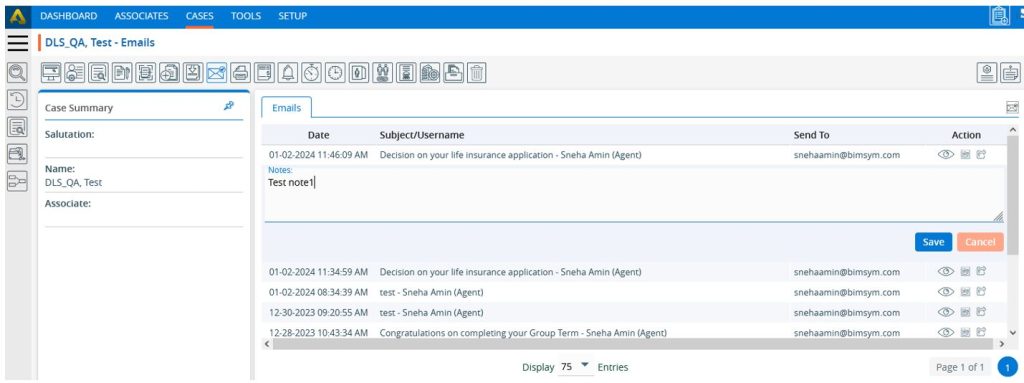
– ‘Notes’ icon from Action column is used for adding note for specific sent email.
– ‘Resend’ icon from Action column is used for resending sent email from email listing.
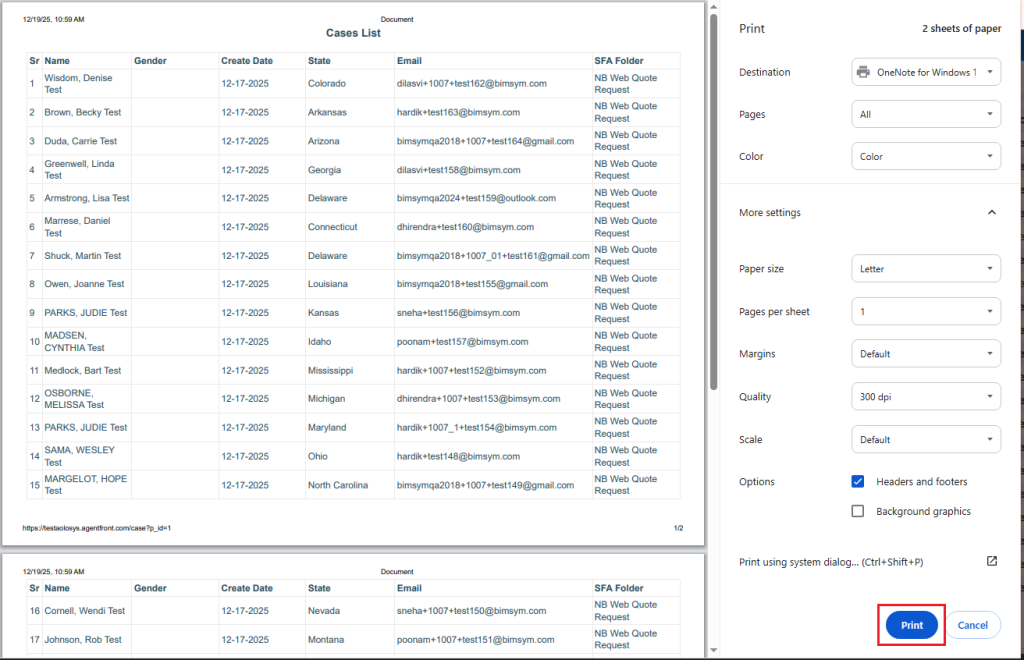
The Print feature allows users to print only the data displayed on the current page, based on the applied filters or search criteria. This ensures precise output and helps users generate focused and relevant printouts efficiently.
Sign in to AgentFront CRM.
From the top menu, select CASES.
From the top-right options, click on the Print button to initiate the printing process for the data currently displayed on the screen.
A new pop-up window will open, presenting a Print Preview of the selected data. This preview allows users to review the information before proceeding with printing.
Select the required print options as needed, and then click the Print button to complete the printing process.
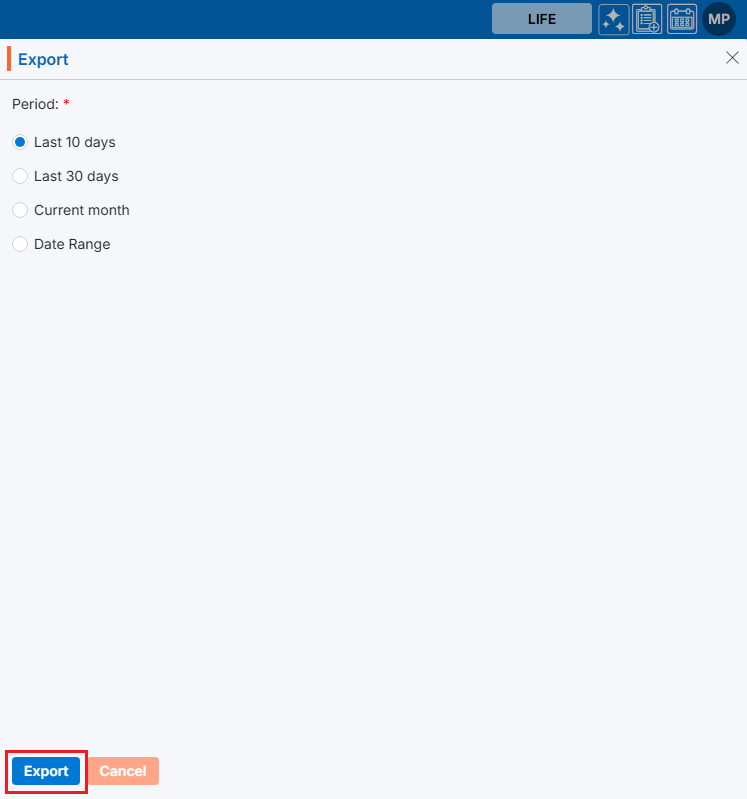
The Export feature in AgentFront CRM enables users to extract case data based on its creation date. This functionality ensures that only relevant records within a specified time period are included in the exported file, making reporting and data analysis more efficient.
Sign in to AgentFront CRM.
From the top menu, select CASES.
In the top-right corner of the screen, click the Export button.
A pop-up window will appear displaying the available export options.
From the pop-up, select the Period for which you want to export data. The following options are available:
Last 10 days – Exports case records created within the last 10 days from the current date
Last 30 days – Exports case records created during the past 30 days
Current month – Exports all case records created in the current calendar month.
Date Range – Allows you to manually select a custom start date and end date
The selected date range must not exceed 90 days
Data will be exported only for records created within the chosen range
After selecting the desired option, click the Export button to proceed.
The system will process your request and generate the export file.
The exported data will be downloaded as a CSV file and saved to designated download location.
Filter is used to create a listing with specific data. Users can set a maximum of 10 filters, selecting from available fields, and apply them to the listing as needed.
Sign in to AgentFront CRM
From the top menu, choose CASES
Cases list will open by default
Click the Filter icon in the top right corner
A new pop-up window named ‘Filter’ will open
Existing filters will be listed under Saved Filters
There is an Add Filter link with (+) icon on top of the page
Also, there are options to View (), Edit () and Delete () the existing filter for each one, to view those options hover over the filter name; the system will display the View (), Edit () and Delete () options
Add Filter
Click on ‘Add Filter’ to add a new filter to the system. (Maximum 10 filters can be created)
Clicking ‘Add Filter’ will open a new page where the user can set the filter criteria according to the requirements
To Add Filter, enter the following details:
Enter Filter Name: Enter the clear, descriptive name. This is what users can identify the purpose of the Filter
Set The Condition To Filter: Set the condition by defining the specific criteria the data must meet using the following fields:
Search Column: Select the field for which the filter needs to be applied
Condition: Set the appropriate condition for the selected column field
Enter Value: Enter or select the value according to the selected condition
Using plus sign (+) user can set multiple criteria simultaneously for a single filter
Match All Filter Rules or Match Any Filter Rule: Select any one of the given options
Once the ‘Where’ conditions are set, the ‘Save’ and ‘Save & Apply’ options will appear. The ‘Save’ option creates the filter only, while ‘Save & Apply’ saves the filter and applies it to the list
After setting all the conditions, click the ‘Save & Apply’ button
The new Filter will be saved in the system and applied to the listing
View Filter:
To view the existing filter, select the filter and click ‘View Filter’ () from the available options.
The filter criteria will be displayed. Only the ‘Back’ button will be shown. The selected fields and criteria will be greyed out and cannot be edited.
Edit Filter:
To update the existing filter, select the filter click ‘Edit Filter’ () from the available options
The filter window will open with the existing criteria, allowing the user to modify the filter options
Delete Filter:
To delete the existing filter, select the ‘Filter’ and click on the ‘Delete Filter’ () from available options
The system will ask for confirmation. Click Delete to proceed
Apply Filter:
To apply the filter from existing filters, select the filter and click ‘Apply’ button.
Selected filter will be applied to the listing
Clear Filter:
If any filter is already applied to the listing and user wants to clear the click the ‘Clear Filter’ link
Applied filters will be removed from the listing and all data will be displayed as is.