A campaign report is a detailed analysis that displays the performance of a campaign based on the communication methods used.
Sign in to AgentFront CRM.
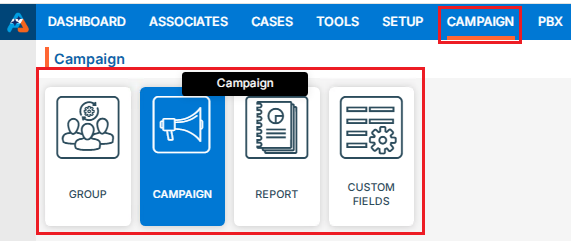
From the top menu, choose Campaign.
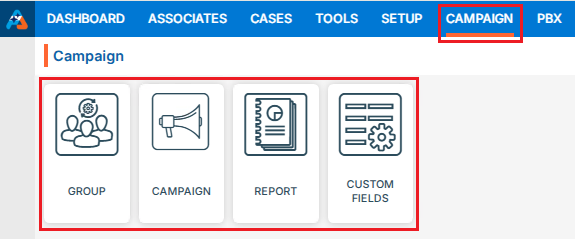
Campaign dashboard will open with multiple options (Based on the access rights).
Click on Report.
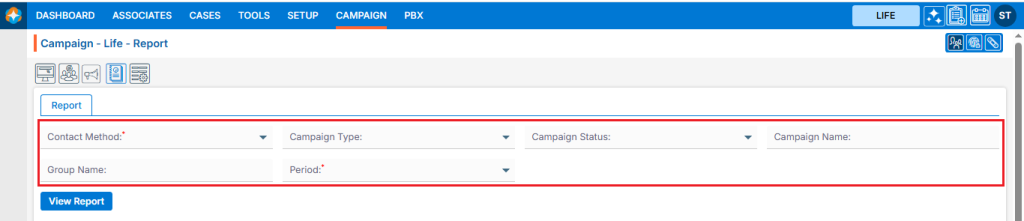
It displays the report page, which covers the following fields:
Contact Methods
Campaign Type
Campaign Status
Campaign Name
Group Name
Period
Select the required fields and click on View Report.
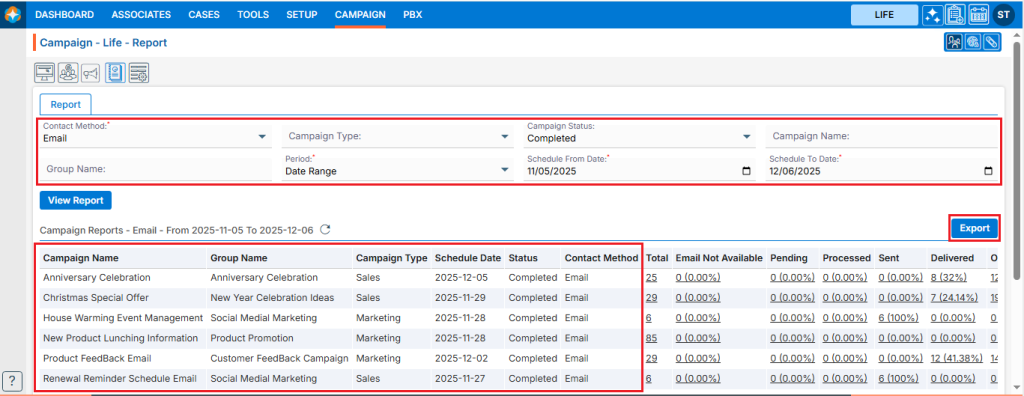
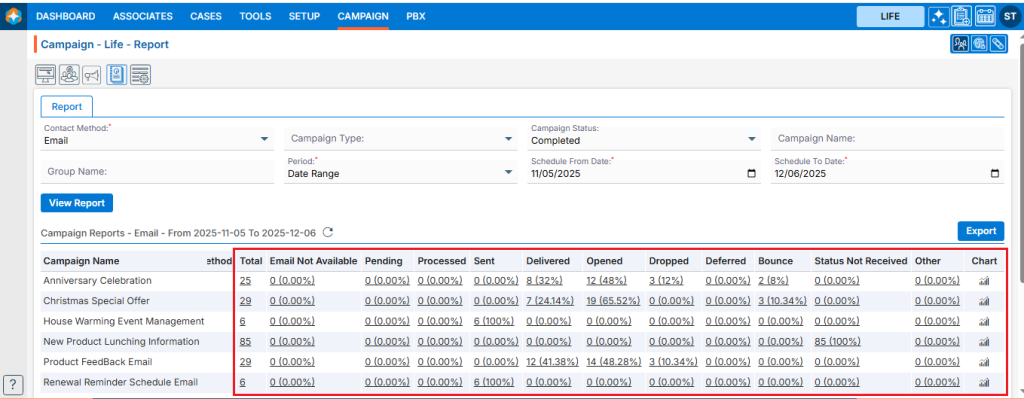
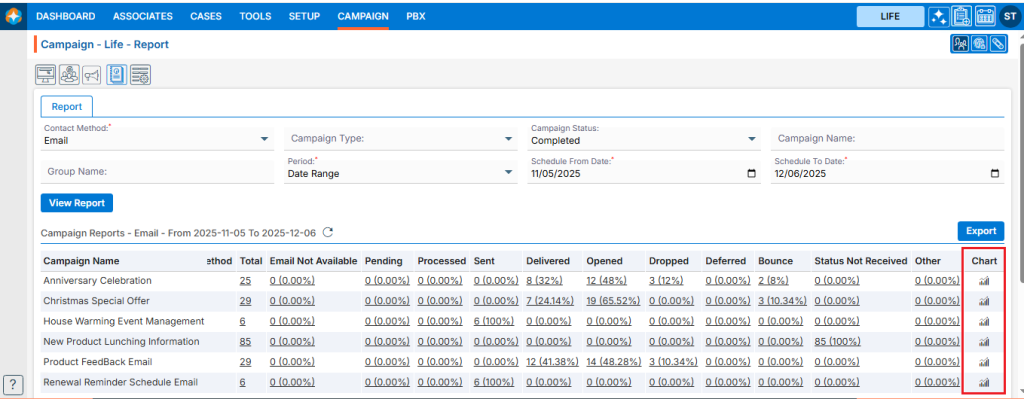
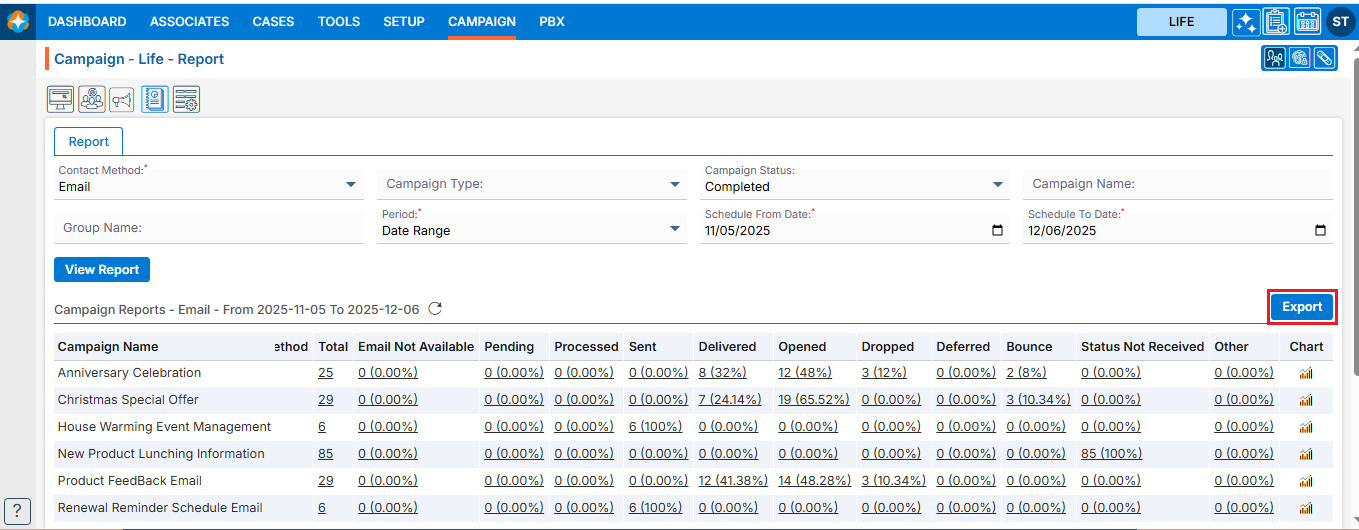
Based on the selected fields the campaign report results will be displayed, and Export button will be enabled on the right pane once report is generated. Below prints screen displays the details of the campaign.Below prints screens will display the stages of the campaign.
View Report Chart
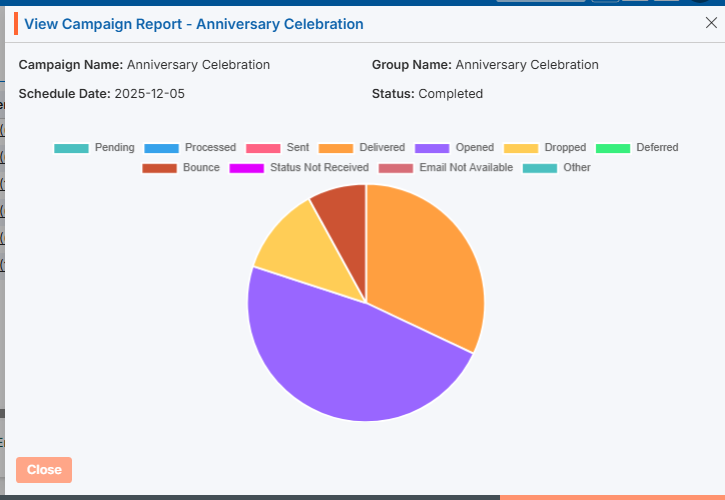
Click on the chart icon to view the report chart.
Clicking on chart will open popup window for selected campaign status.
Export Report
Click the Export button to export the report data. Clicking on ‘Export‘ will download the report for selected campaign criteria.
Custom fields in the Campaign tab of a system are additional user-defined fields. Using these fields, the user can import specific data for business needs.
Create Custom Fields
Sign in to AgentFront CRM.
From the top menu, choose Campaign.
Campaign dashboard will open with multiple options (Based on the access rights).
Click on Custom Fields.
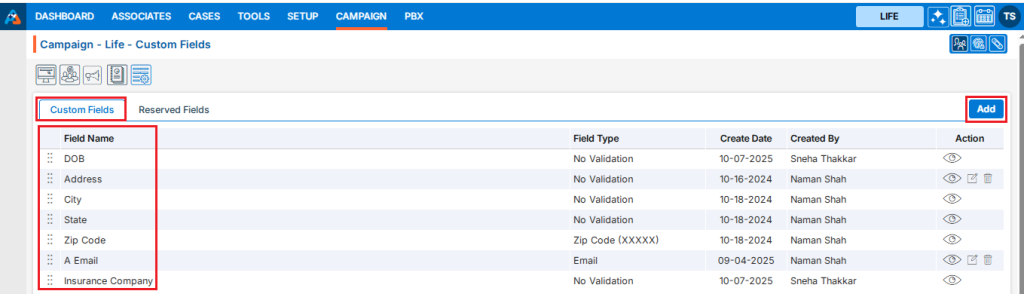
This will open with 2 tabs (Default will be Custom Fields):
Custom Fields
Reserved Fields
Custom Fields displays the list of available/created fields.
Click on ‘Add’ icon from the Top Right side of the list.
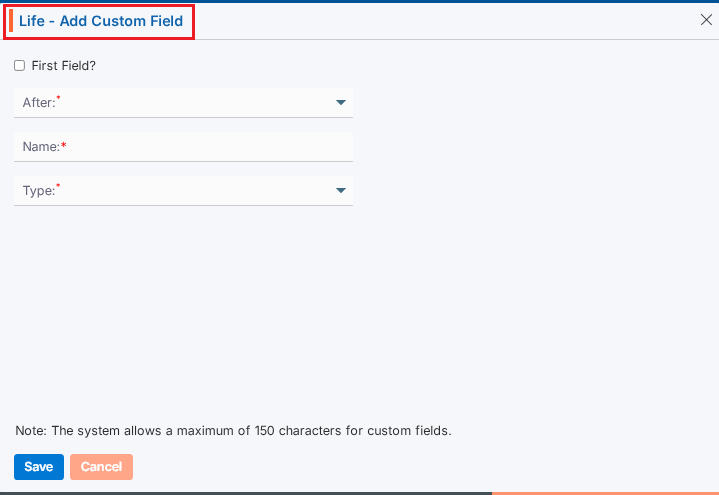
Add Custom Field
It will open page to add field with title Add Custom Field.
To add custom field, enter the following details:
First Field?: Select this option if you want this field to appear first in the display. When this checkbox is selected, field 2-b (After) will become uneditable.
After: To select a value for this field, the “First Field” checkbox must not be selected. Choose a value from the drop-down list to set the display order of the field.
Name: Enter a clear, descriptive name. This is what users will see while importing contacts to the campaign group.
Type: Choose an option from the drop-down list to set validation rules for this field.
Click Save. The custom field will now appear in the list.
Update Custom Field
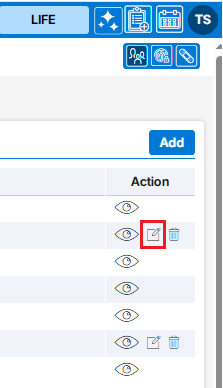
To update the existing field from the available list, click on Edit () icon from the Action Column for the field you want to edit/change. Note: If any field is used/assigned, editing and deleting options will not be enable for those fields.
Clicking the Edit icon will open the selected Custom Field in edit mode with title Edit Custom Field.
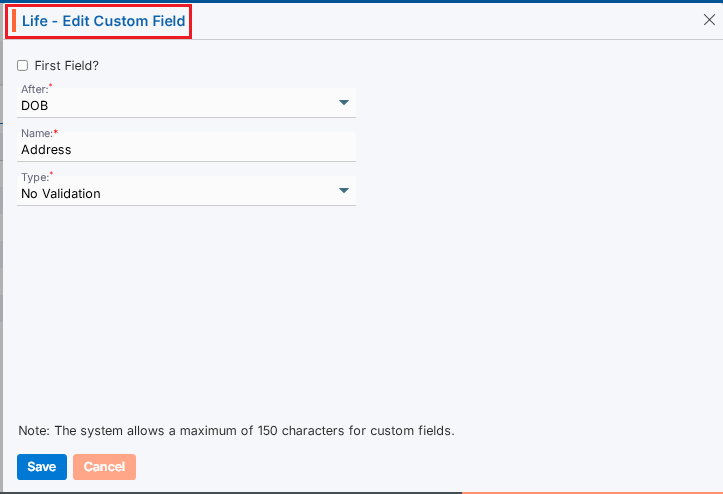
You can make the required editing in the below field’s values of the open Custom Field.
First Field?: Update this option if you want this field to appear first in the display. When this checkbox is selected, field 3-b (After) will become uneditable.
After: To select a value for this field, the “First Field” checkbox must not be selected. Choose a value from the drop-down list to set the display order of the field.
Name: Enter a clear, descriptive name. This is what users will see while importing contacts to the campaign group.
Type: Update an option from the drop-down list to set validation rules for this field.
Click Save. The custom field will now appear in the list.
Delete Custom Field
To delete the existing field from the available list, click on Delete () icon from the Action Column for the filed you want to delete.
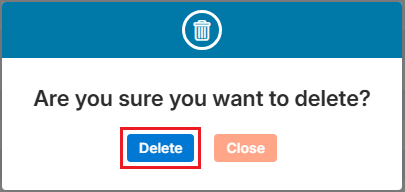
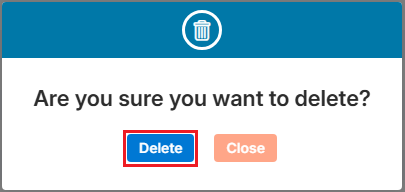
It will ask for confirmation popup, click on Deleted button to delete field otherwise click on Close button.
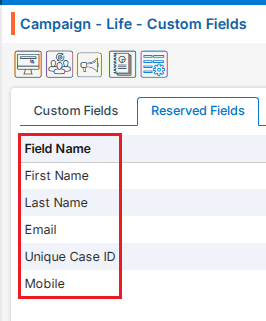
Reserved Fields
These fields are system generated fields and non-editable. These fields will be available in the drop down of the Campaign > Group > Import Contacts.
Multi-Product tip
If your login has access to multiple products, be sure to select the correct product from the product icons in the top-right corner before adding, editing, or deleting custom field.
A Campaign Group allows you to organize multiple contacts into a single, manageable group. Once the group is created and contacts are imported, it can be used to launch multiple campaigns efficiently. Campaign Groups can be created for individual contacts or based on existing cases in the CRM, enabling more targeted and organized campaign management.
Create Campaign Group
Sign in to AgentFront CRM.
From the top menu, choose Campaign.
Campaign dashboard will open with multiple options (Based on the access rights).
Click on Group.
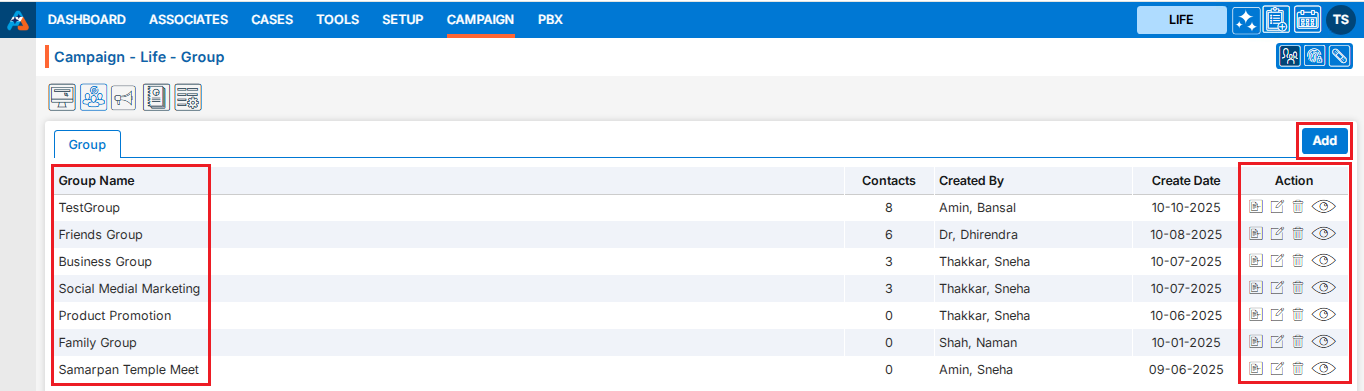
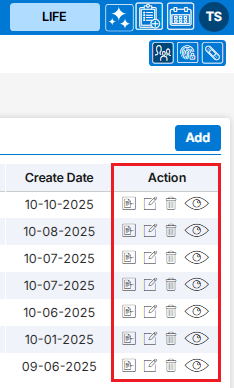
It displays the list of available/created Groups.
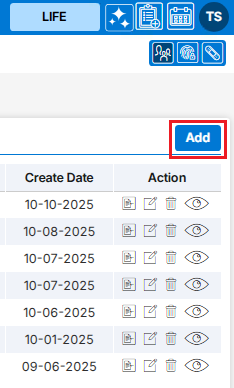
There is an Add button to add new group above the Action Column on the right pane.
Also, there are options to Edit (), Delete (), and View () the existing group and option to Import Contacts to the group under the Action Column on the right pane.
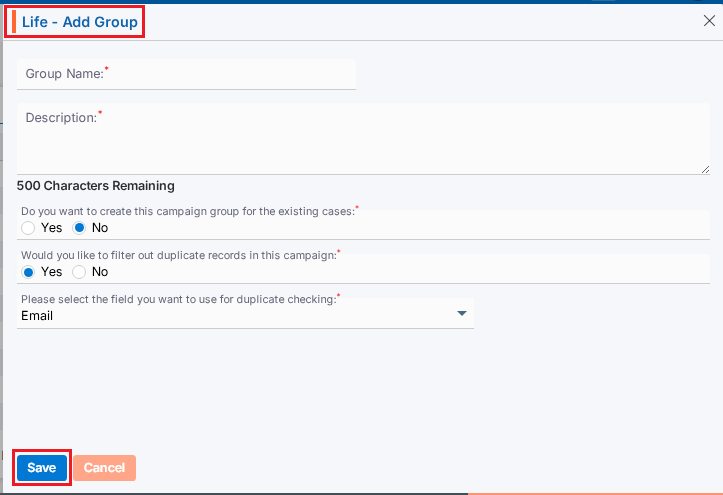
Add Campaign Group
Click the ‘Add’ button at the top right of the list.
It will open page to create new Campaign Group with title Add Group.
To add group, enter the following details:
Group Name: Enter the clear, descriptive name. This is what users will see when they select a group while creating campaign.
Description: Optional explanation of the group’s purpose.
Do you want to create this campaign group for the existing cases: Select Yes/No. If you want to create a group for the existing cases, select ‘Yes’. When ‘Yes’ is selected, the d and e options will not be available. Default option will be selected as ‘No’.
Would you like to filter out duplicate records in this campaign: Select Yes/No. When ‘Yes’ is selected, duplicate records will be filtered out while importing contacts into this group. Default option will be selected as ‘Yes’.
Please select the field you want to use for duplicate checking: Choose from the drop-down list (Default will be Email). Duplicate records will be filtered out based on selected field from drop-down and will remove those duplicate records while importing contacts into this group.
Click Save. The group is now listed and ready for use.
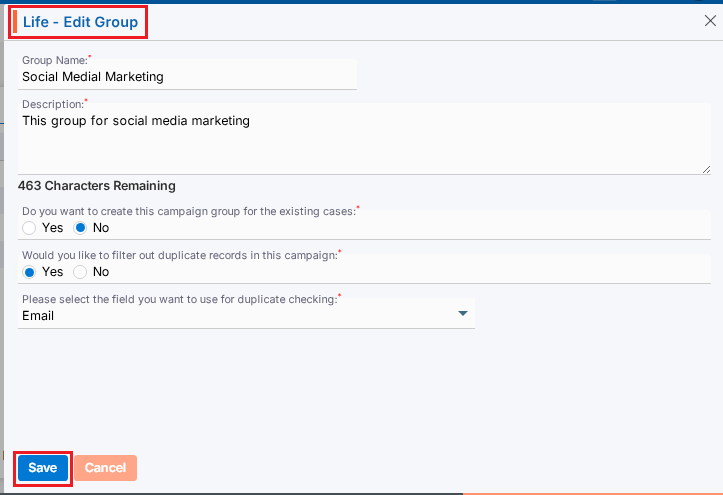
Update Campaign Group
To update the existing group from the available list, click on Edit () icon from the Action Column for the group you want to edit/change.
Clicking the Edit () icon will restrict editing if the group is referenced elsewhere (e.g., in a campaign), and the system will display appropriate popup message.
Clicking the Edit () icon will open the selected Campaign Group in edit mode with title Edit Group if the group is not referenced elsewhere.
You can make the required editing in the below field’s values of the open group.
Group Name: Enter the clear, descriptive name. This is what users will see when they select a group while creating campaign.
Description: Optional explanation of the group’s purpose.
Do you want to create this campaign group for the existing cases: Update Yes/No.When ‘Yes’ is selected, the d and e options will be disabled.
Would you like to filter out duplicate records in this campaign: Update Yes/No. When ‘Yes’ is selected, duplicate records will be filtered out while importing contacts into this group.
Please select the field you want to use for duplicate checking: Update from the drop-down list. Duplicate records will be filtered out based on selected field from drop-down and will remove those duplicate records while importing contacts into this group.
Click Save. The group is now updated.
Import Contacts in Group:
To import contact to the existing group from the available list, click on Import Contacts icon from the Action Column for the group you want to import contacts.
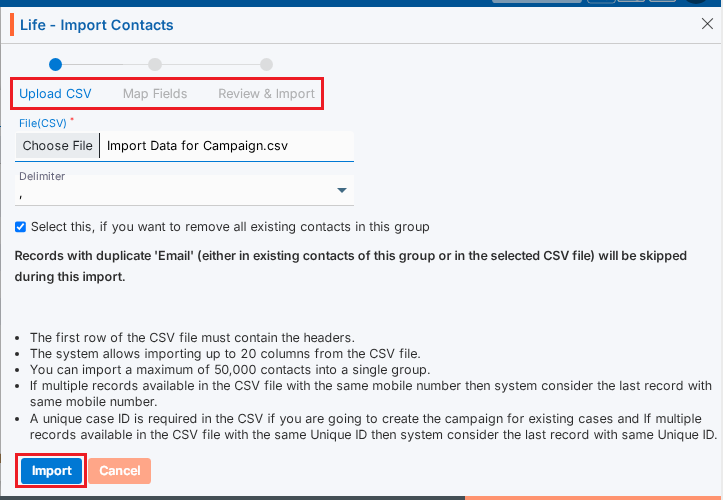
It will open the Import Contacts page for selected Campaign Group.
There will be 3 steps to Import Contacts:
Upload CSV
Map Fields
Review & Import
Upload CSV:
Choose File of the contacts which you want to import to this group.
Select Delimiter option from the drop-down. (The selected file format must match the selected delimiter option.)
If you want to remove all existing contacts from the Group, select the check box ‘Select this, if you want to remove all existing contacts in this group. Otherwise, new contacts will be added to this group keeping any available contacts.
You need to read all the bullets on this page to import contacts.
Click Import to add contacts in this group.
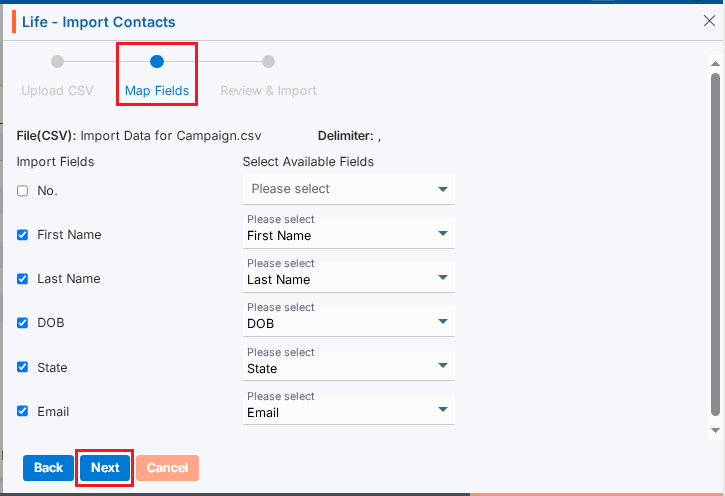
Map Fields:
On the same page next step is for Map Fields.
Under “Import Fields” on the left panel, the system shows the header row from the uploaded CSV file.
The “Available Fields” section displays all fields defined under Campaign > Custom Fields, including both Custom and Reserved fields.
You can deselect unwanted fields. (Here, we have deselected fields No.)
Map the appropriate fields for each field from the dropdown. (Unique Case ID field is required if you selected ‘Yes’ in field ‘Do you want to create this campaign group for the existing cases’ while creating Group)
Click Next.
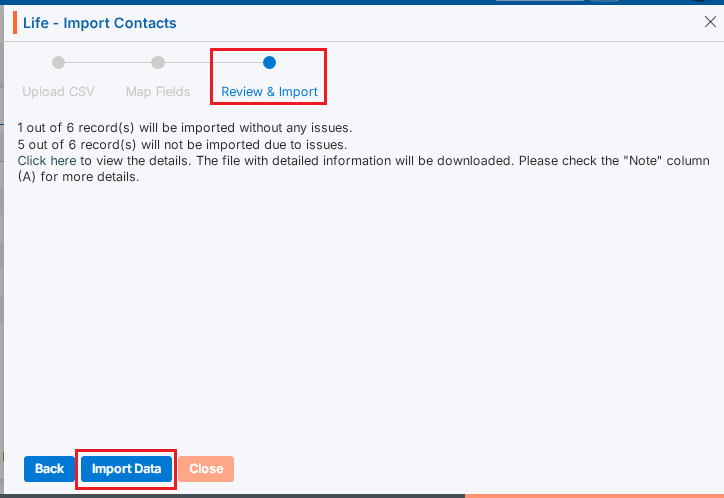
Review & Import:
On the same page next step is for Review & Import the contacts.
Review page will display the counts of contacts with issues and without issues.
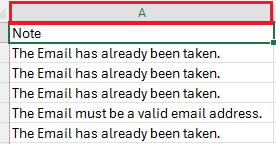
The system generates a CSV file link containing the records with issues. Click “Click here” to download and review the file.
System will check contacts with following criteria and display issue message in Column A:
Validation Check: Validation will be checked based on the settings configured under the Custom Fields tab for each field mapped in Step 2.
Duplicate Contacts: Duplicate contacts will be checked in the selected group and within the selected csv file and those records will be filtered out as issue. (This will apply only if ‘Yes’ is selected in field ‘Would you like to filter out duplicate records in this campaign’ while creating Group)
Click Import Data. Contacts without issues will be imported and shown in the selected group.
View Contacts
Contact counts will be shown for the selected Group in Group list.
Click View Contacts() icon from the Action Column for the group you want to view details of contacts.
Clicking on View() icon, New page will open with all contact which were successfully imported.
Clicking on View() icon system will generate popup message if any contact is not available for selected group.
Contact can be Add, Viewed, Edited or Deleted from this page.
Delete Campaign Group
To delete the existing group from the available list, click on Delete() icon from the Action Column for the group you want to delete.
It will ask for confirmation popup, click on Deleted button to delete group otherwise click on Close button. Note: If the group is referenced elsewhere (for example, in a campaign), deletion is restricted until those referenced are removed.
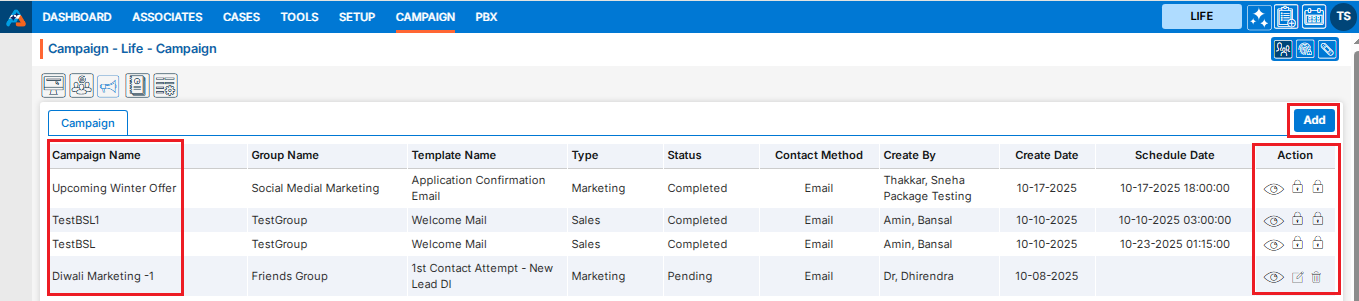
A campaign is a planned marketing effort or communication initiative aimed at reaching a specific group of customers or leads through channels such as email, SMS, or social media. Using this module, users can create multiple groups, set up various campaigns, and view reports for each one.
Sign in to AgentFront CRM.
From the top menu, choose Campaign.
Campaign dashboard will open with multiple options (Based on the access rights).
Click on Campaign.
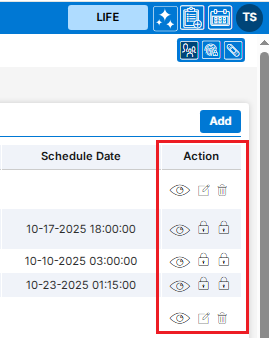
It displays the list of available/created Campaign.
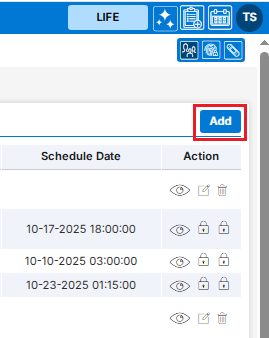
There is an Add button above the Action Column on the right pane to add new Campaign.
Also, there are options to Edit (), Delete (), and View () the existing campaign under the Action Column on the right pane.Note: If any campaign is used or implemented, the editing and deleting options will be locked for that campaign, meaning it cannot be edited or deleted.
Add Campaign
Click the ‘Add’ button at the top right of the list to add new campaign.
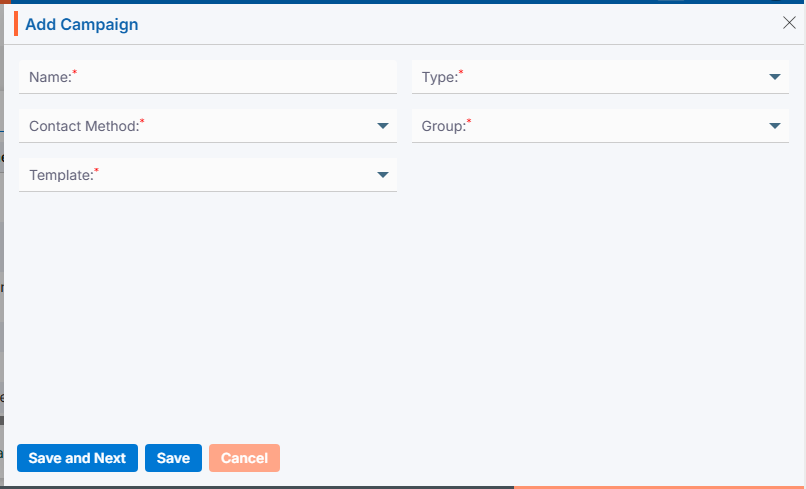
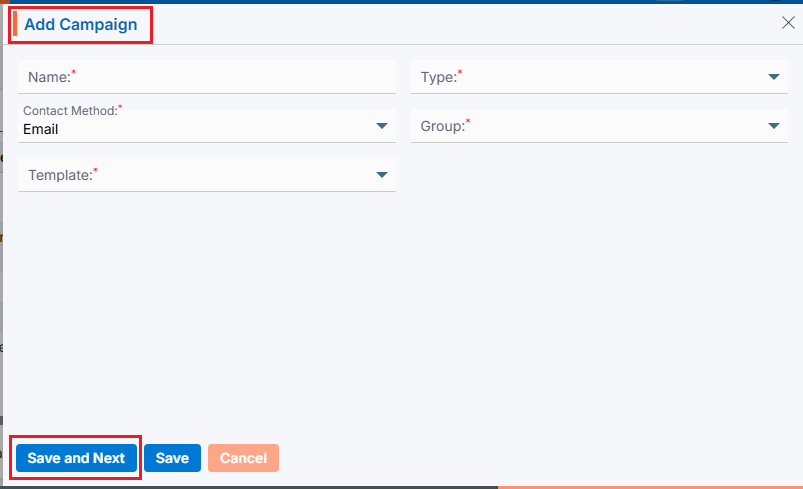
It will open page to add new Campaign with title Add Campaign.
Email Campaign
To add Email Campaign, enter the following details:
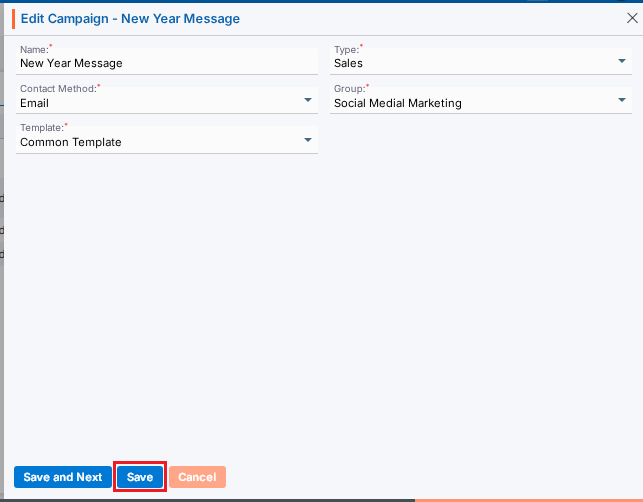
Name: Enter the clear, descriptive name. This is what users can identify the purpose of the campaign.
Type: Choose option from the Drop-Down. This option is for the purpose for which the campaign needs to be created.
Contact Methods: Choose Email option from the Drop-Down. This option is for the methods through which this campaign needs to be implemented.
Group: Choose group name from Drop-Down. This drop-down will list the groups created under ‘Campaign’ > ‘Group’. (Contacts must be available for selected group)
Template: Choose template from the drop-down list. The options in this drop-down will be enabled based on the selected Contact Methods: Email, SMS, and WhatsApp. You can view templates for each category as available in ‘Tools’ > ‘Template Creator’. This field will not be available if ‘Phone Call’ is selected as the Contact Method.
Click Save and Next.
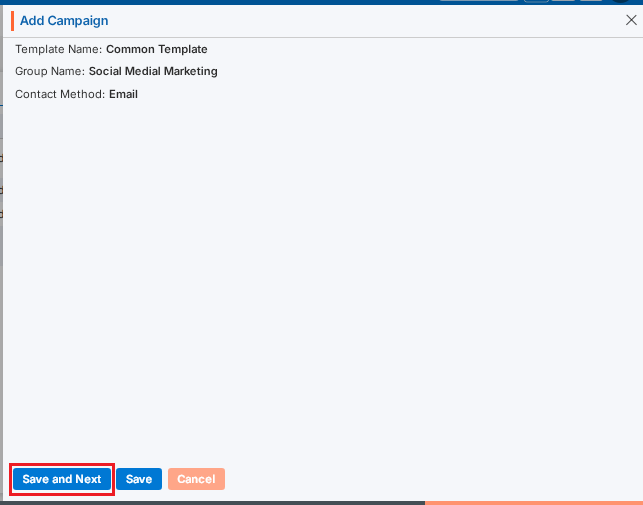
On the same page next step will display the details of the campaign created for Template Name, Group Name and Contact Method.
Click Save and Next.
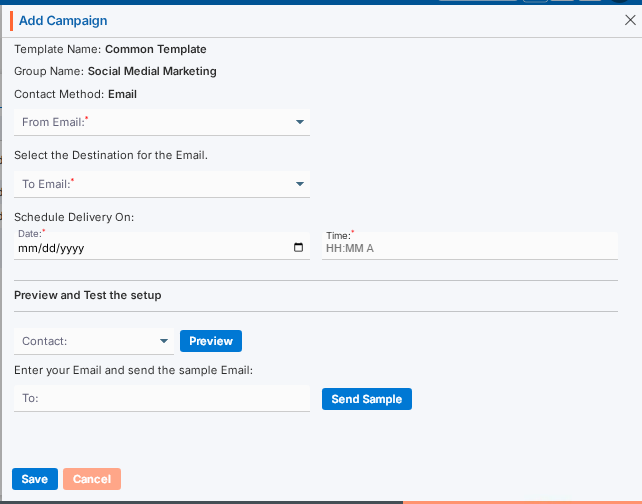
On the same page next step is for setup of selected Contact Methods. Template Name, Group Name and Contact Methods will display on the top of the page as per selected on first step.
Select the “From” and “To” email addresses from the dropdown.
Select the date for “Scheduled Delivery on”. The email will be sent on this date.
Set the Time. The email will be sent according to the time set in this field.
Preview and Test the setup:
You can preview the email and test before sending it.
You can also send a sample email to check how it looks.
Click “Save” once the setup is complete. The campaign is now listed and ready for use.
SMS Campaign
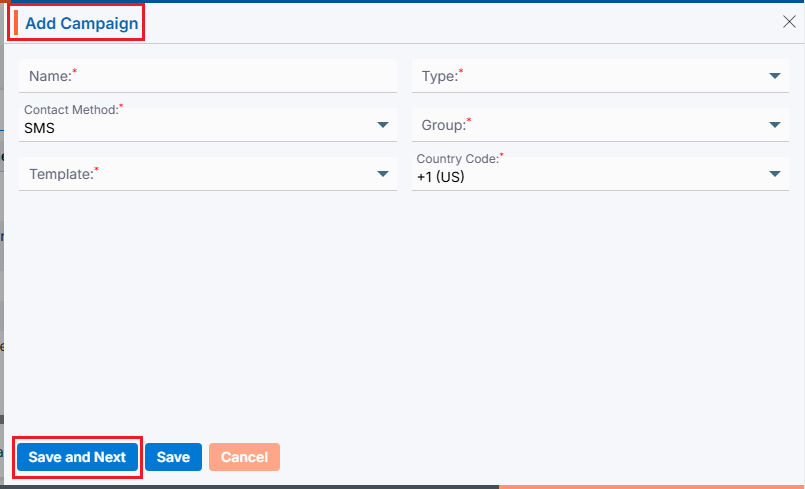
To add SMS Campaign, enter the following details:
Name: Enter the clear, descriptive name. This is what users can identify the purpose of the campaign.
Type: Choose option from the Drop-Down. This option is for the purpose for which the campaign needs to be created.
Contact Methods: Choose SMS option from the Drop-Down. This option is for the methods through which this campaign needs to be implemented.
Group: Choose group name from Drop-Down. This drop-down will list the groups created under ‘Campaign’ > ‘Group’. (Contacts must be available for selected group)
Template: Choose template from the drop-down list. The options in this drop-down will be enabled based on the selected Contact Methods: Email, SMS, and WhatsApp. You can view templates for each category as available in ‘Tools’ > ‘Template Creator’. This field will not be available if ‘Phone Call’ is selected as the Contact Method.
Country Code: Choose option from the drop-down list. This field will be enabled if the Contact Method selected is SMS, WhatsApp, or Phone Call. Default option will be +1 (US).
Click Save and Next.
On the same page next step will display the details of the campaign created for Template Name, Group Name and Contact Method.
Select the template mapping fields from your imported contacts.
The fields from the selected template will be displayed on the left side of the page.
The options for selecting the mapping will be displayed on the right side of the page:
Static Value: Select an option from the drop-down menu—either Dynamic or Static.
Imported Fields: With the Dynamic option, you can map the template field to the imported field. With the Static option, you must map a static value to the template field for all records.
Click Save and Next.
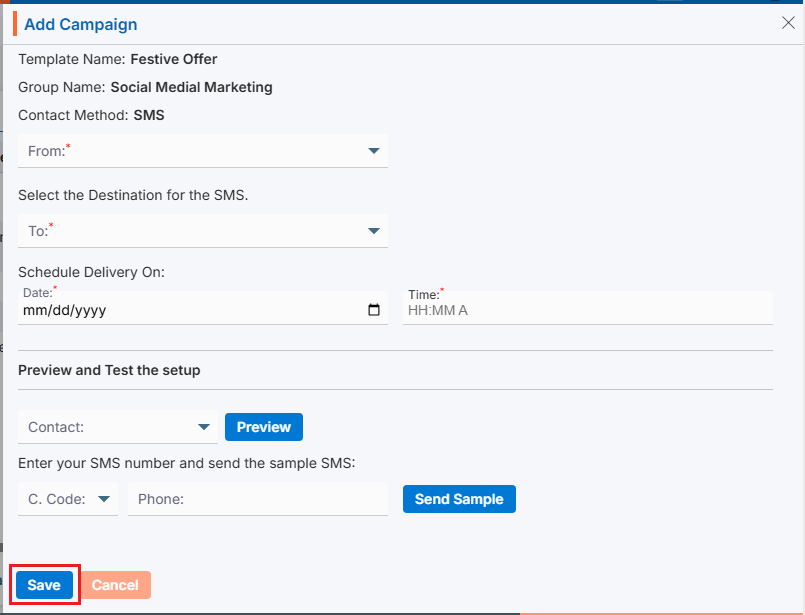
On the same page next step is for setup of selected Contact Methods. Template Name, Group Name and Contact Methods will display on the top of the page as per selected on first step.
Select the “From” and “To” contact from the dropdown.
Select the date for “Scheduled Delivery on”. The SMS will be sent on this date.
Set the Time. The SMS will be sent according to the time set in this field.
Preview and Test the setup:
You can preview the SMS and test before sending it.
You can also send a sample SMS to check how it looks. Select the country code and phone to send sample SMS.
Click “Save” once the setup is complete. The campaign is now listed and ready for use.
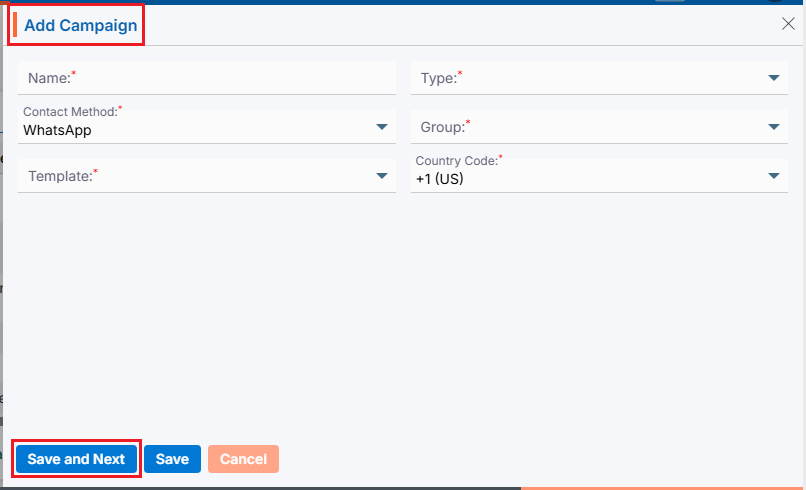
WhatsApp Campaign
To add WhatsApp Campaign, enter the following details:
Name: Enter the clear, descriptive name. This is what users can identify the purpose of the campaign.
Type: Choose option from the Drop-Down. This option is for the purpose for which the campaign needs to be created.
Contact Methods: Choose WhatsApp option from Drop-Down. This option is for the methods through which this campaign needs to be implemented.
Group: Choose group name from Drop-Down. This drop-down will list the groups created under ‘Campaign’ > ‘Group’. (Contacts must be available for selected group)
Template: Choose template from the drop-down list. The options in this drop-down will be enabled based on the selected Contact Methods: Email, SMS, and WhatsApp. You can view templates for each category as available in ‘Tools’ > ‘Template Creator’. This field will not be available if ‘Phone Call’ is selected as the Contact Method.
Country Code: Choose option from the drop-down list. This field will be enabled if the Contact Method selected is SMS, WhatsApp, or Phone Call. Default option will be +1 (US).
Click Save and Next.
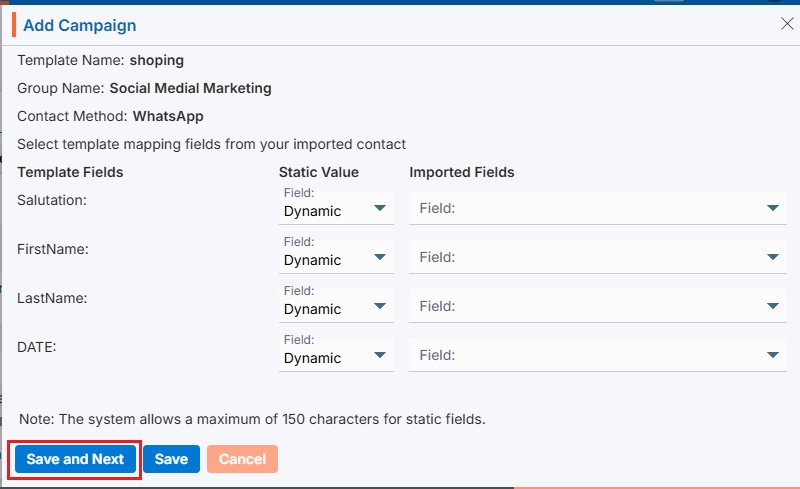
On the same page next step will display the details of the campaign created for Template Name, Group Name and Contact Method.
Select the template mapping fields from your imported contacts.
The fields from the selected template will be displayed on the left side of the page.
The options for selecting the mapping will be displayed on the right side of the page:
Static Value: Select an option from the drop-down menu—either Dynamic or Static.
Imported Fields: With the Dynamic option, you can map the template field to the imported field. With the Static option, you must map a static value to the template field for all records.
Click Save and Next.
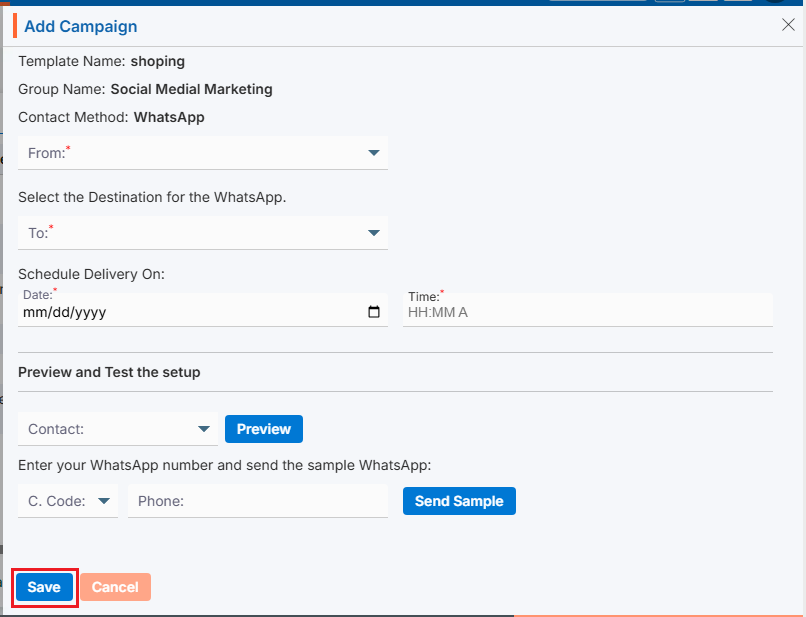
On the same page next step is for setup of selected Contact Methods. Template Name, Group Name and Contact Methods will display on the top of the page as per selected on first step.
Select the “From” and “To” contact from the dropdown.
Select the date for “Scheduled Delivery on”. WhatsApp will be sent on this date.
Set the Time. WhatsApp will be sent according to the time set in this field.
Preview and Test the setup:
You can preview the WhatsApp and test before sending it.
You can also send a sample WhatsApp to check how it looks. Select the country code and phone to send sample WhatsApp.
Click “Save” once the setup is complete. The campaign is now listed and ready for use.
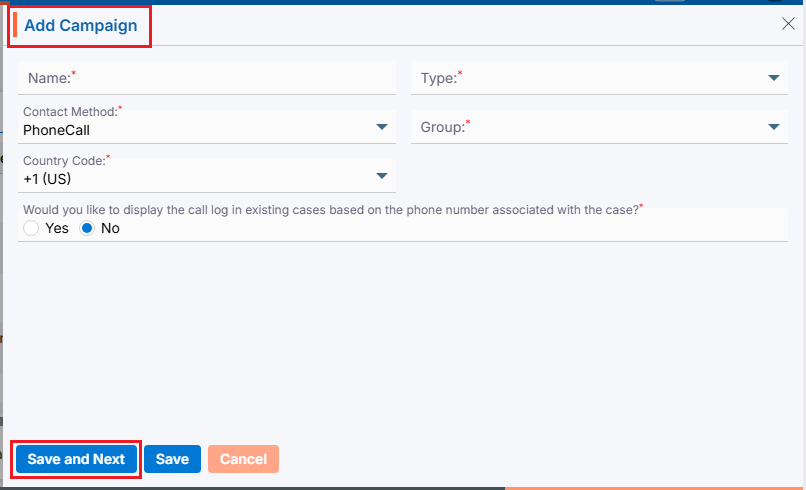
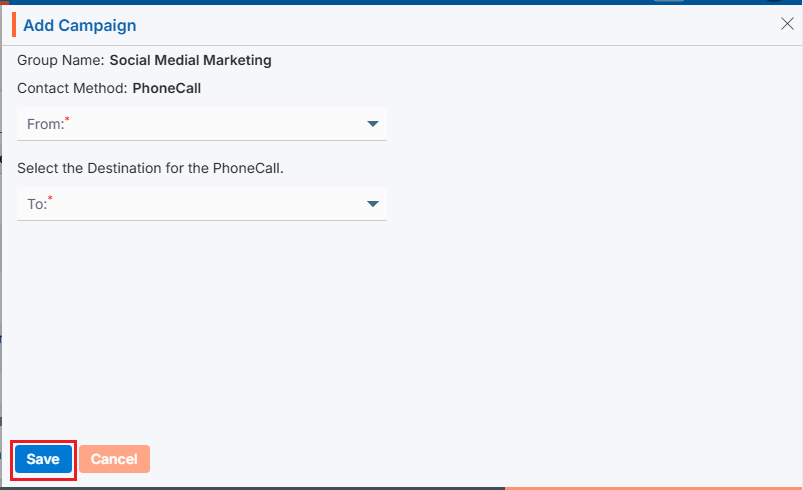
PhoneCall Campaign
To add PhoneCall Campaign, enter the following details:
Name: Enter the clear, descriptive name. This is what users can identify the purpose of the campaign.
Type: Choose option from the Drop-Down. This option is for the purpose for which the campaign needs to be created.
Contact Methods: Choose PhoneCall option from the Drop-Down. This option is for the methods through which this campaign needs to be implemented.
Group: Choose group name from Drop-Down. This drop-down will list the groups created under ‘Campaign’ > ‘Group’. (Contacts must be available for selected group)
Country Code: Choose option from the drop-down list. This field will be enabled if the Contact Method selected is SMS, WhatsApp, or Phone Call. Default option will be +1 (US).
Call Log Question: Would you like to display the call log in existing cases based on the phone number associated with the cases? Select Yes or No. This option is enabled only when ‘Phone Call‘ is selected as the Contact Method. (Default option will be NO)
Click Save and Next.
On the same page next step is for setup of selected Contact Methods. Group Name and Contact Methods will display on the top of the page as per selected on first step.
Select the “From” and “To” contact from the dropdown.
Click “Save” once the setup is complete. The campaign is now listed and ready for use.
View Campaign
Click View Contacts()icon from the Action Column for the group you want to view details of Contact.
Clicking on View() icon, New page will open with all details of Campaign.
Update Campaign
To update the existing campaign from the available list, click on Edit () icon from the Action Column for the campaign you want to edit/change.
Edit () icon will restrict editing if the group is used/implemented.
Clicking the Edit () icon will open the selected Campaign in edit mode with title Edit Campaign if the campaign is not used/implemented.
Update the required details and click Save.
Delete Campaign
To delete the existing campaign from the available list, click on Delete() icon from the Action Column for the campaign you want to delete.
It will ask for confirmation popup, click on Deleted button to delete campaign otherwise click on Close button. Note: If the campaign is referenced elsewhere deletion is restricted until those referenced are removed.