Home   /   Associate   /   Associate Cases

Associate Cases > Associate Cases Display

Case Displays are used to create specific views of listings. Users can set a maximum of 5 saved displays, selecting from the available fields, and apply them to the Cases list as needed.

The following are the steps to use the Display feature:
1. Navigate to the ‘ASSOCIATES’ tab where you will find the ‘All Associates List’.

2. Click on an Associate to proceed.

3. The ‘Dashboard’ will open. Click on the ‘CASES’ option.

4. The ‘Cases’ page will open, showing a list of cases registered under the Associate.

5. Click on the ‘Display’ icon to create a display.

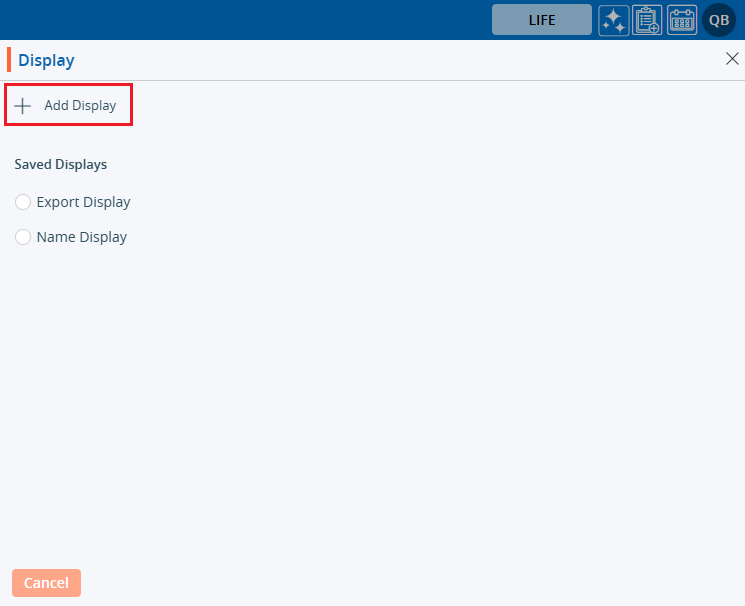
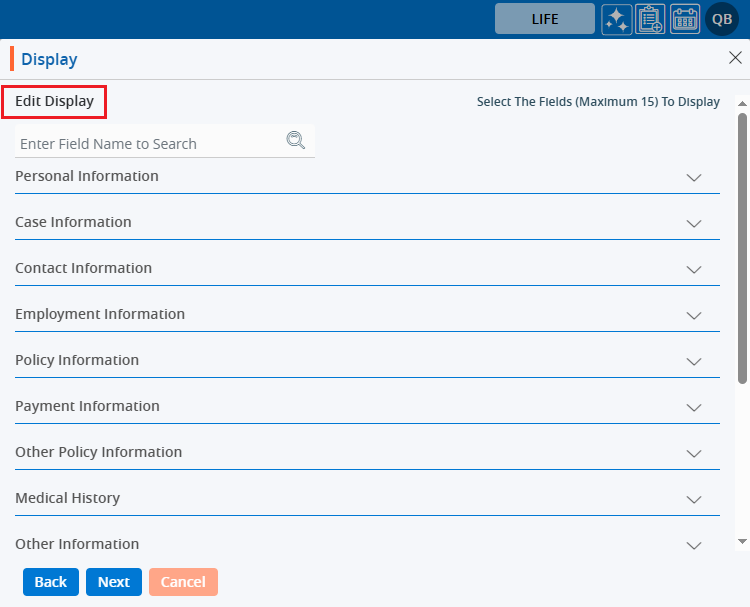
6. A popup page will open  Any existing ‘Displays’ will be listed under ‘Saved Displays’.
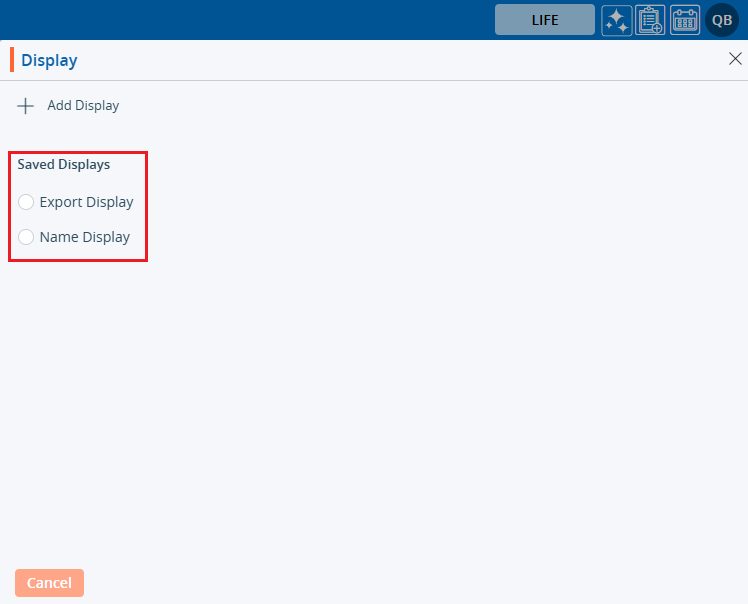
7. Click on ‘Add Display’ to create a new ‘Display’.
8. A window will open.
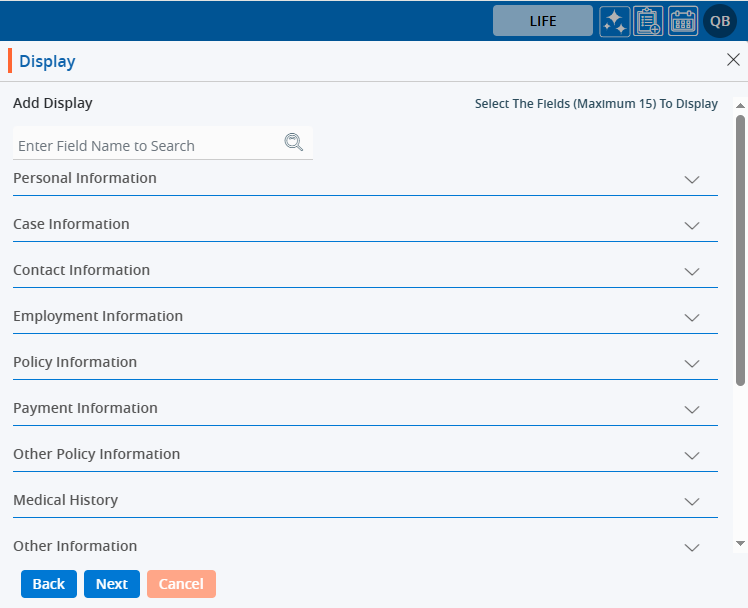
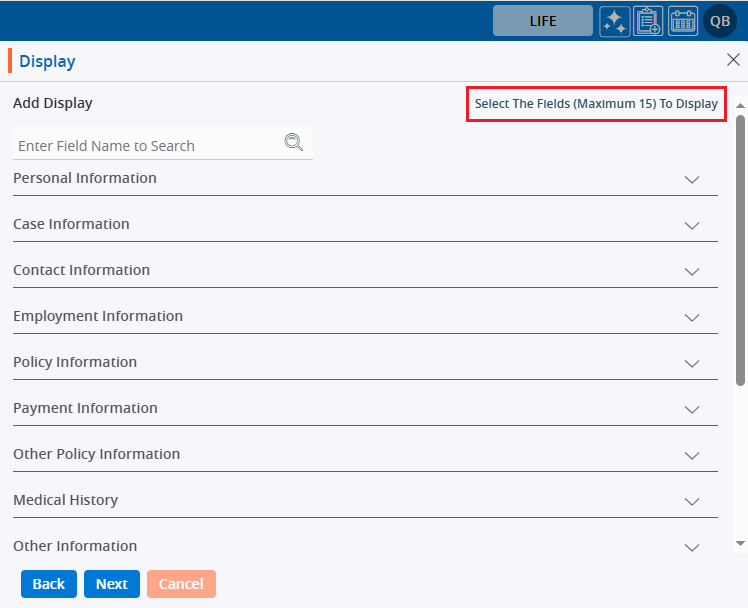
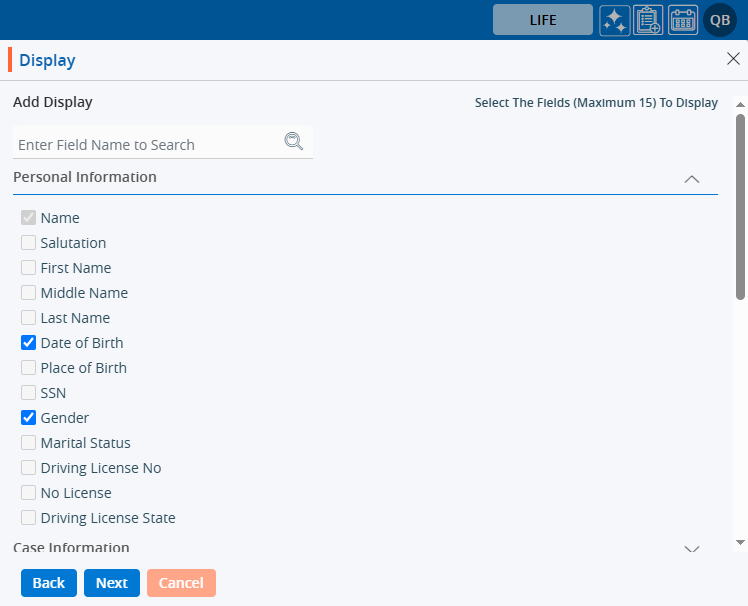
9. The system will allow the selection of a maximum of 15 fields.
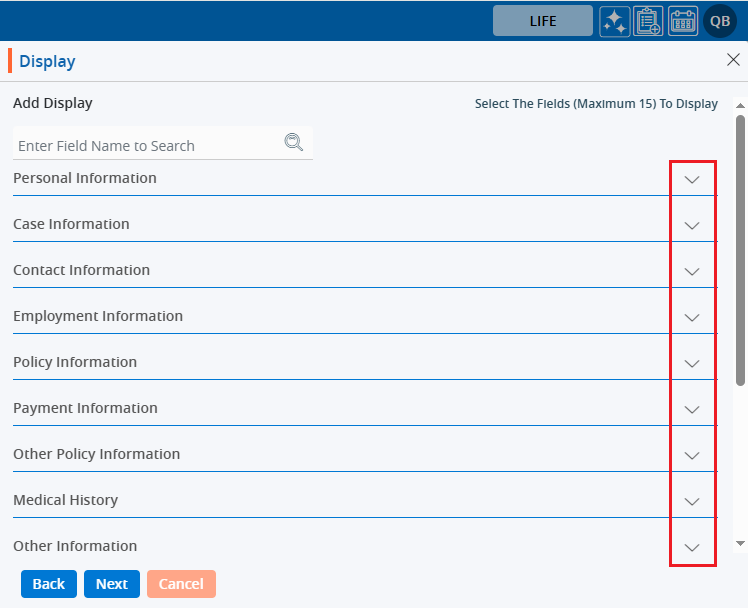
10. The user can view the list of fields by clicking on the down arrow for any field group.
11. Click on the down arrow to reveal the fields for selection.
12. After clicking the down arrow next to ‘Personal Information’, the list of personal information fields will be opened.
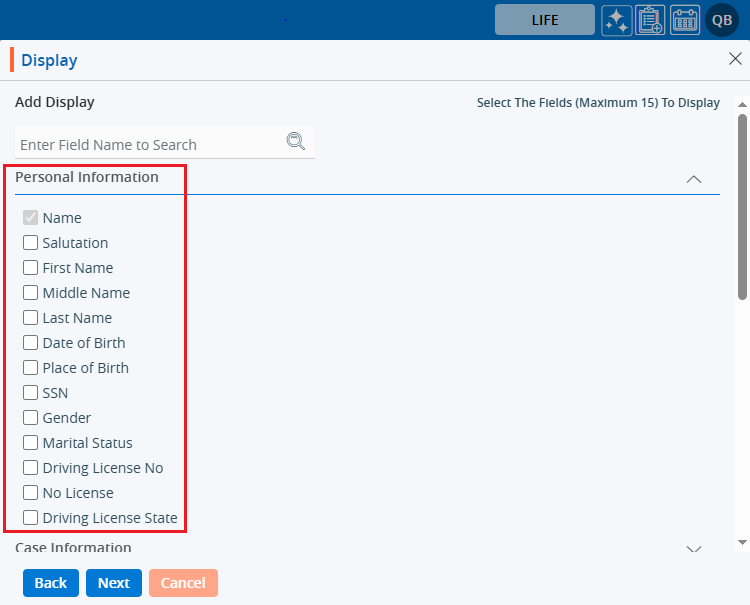
13. Select the necessary fields to configure the ‘Display’ view from the Personal Information fields.
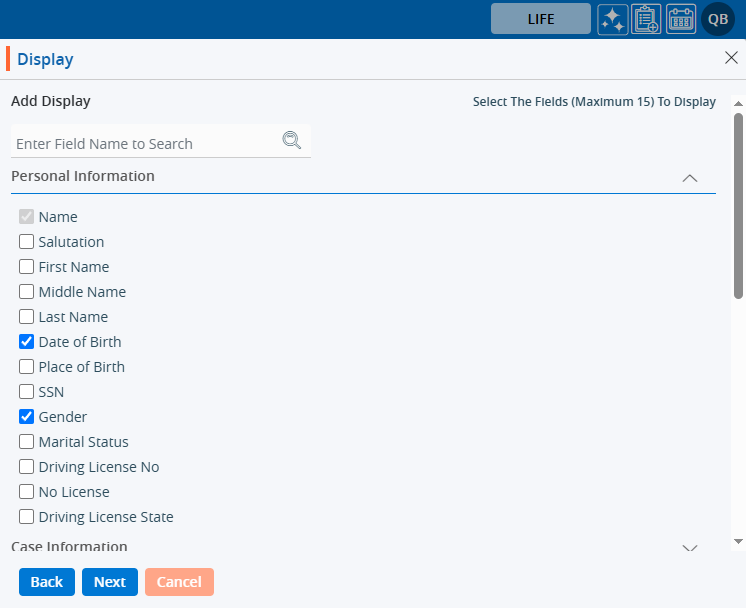
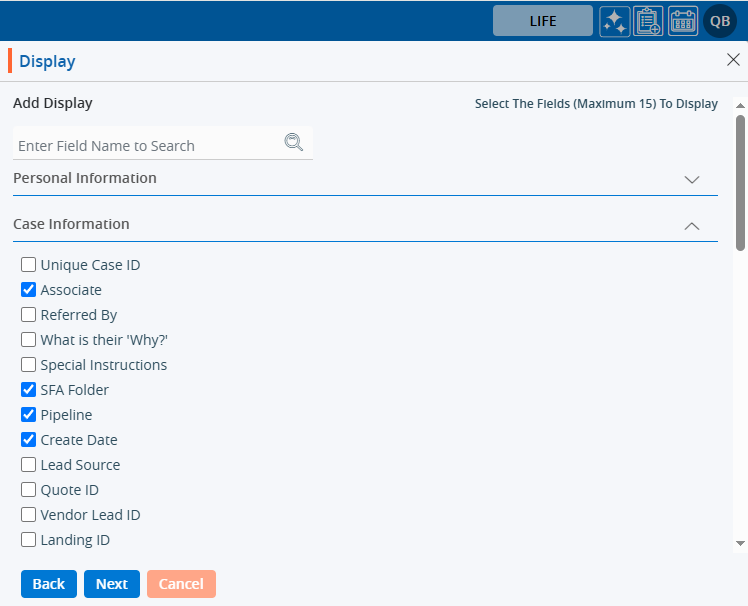
14. Similarly, you can select fields to configure the ‘Display’ view from the ‘Contact Information’ fields.
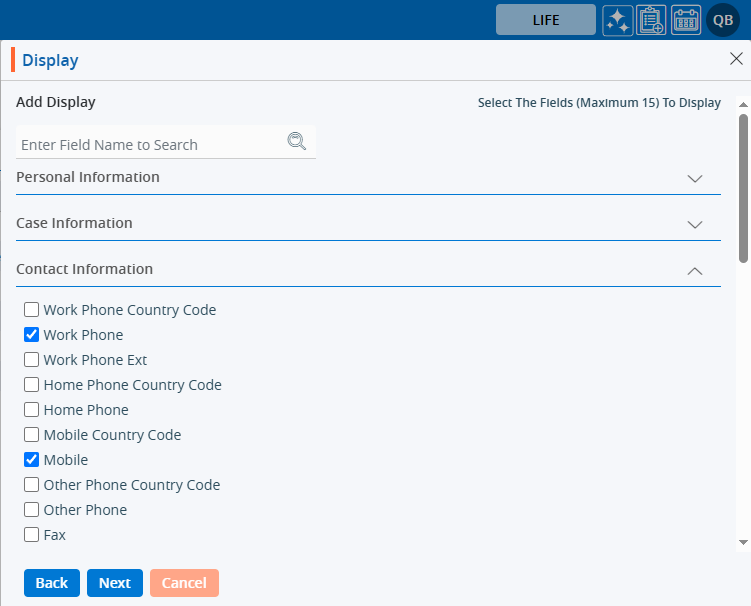
15. Similarly, you can select fields to configure the ‘Display’ view from the ‘RSA Information’ fields.
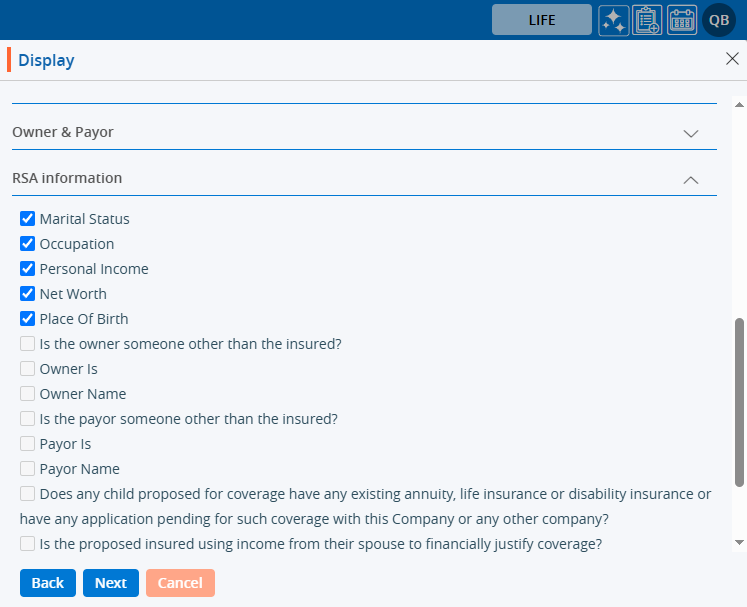
16. After field selection is complete there are three options: Back, Next, and Cancel.
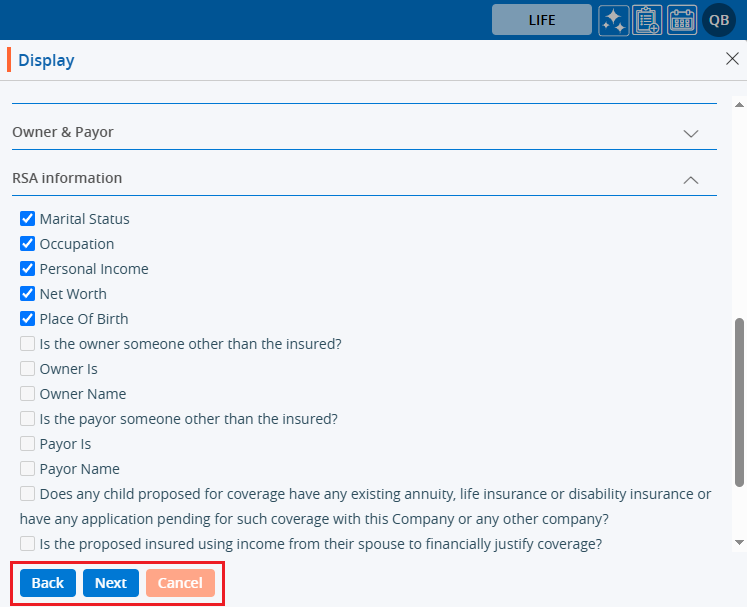
17. Clicking on Cancel will close the window.
18. Clicking on ‘Back’ will redirect to the first page of the ‘Display’.
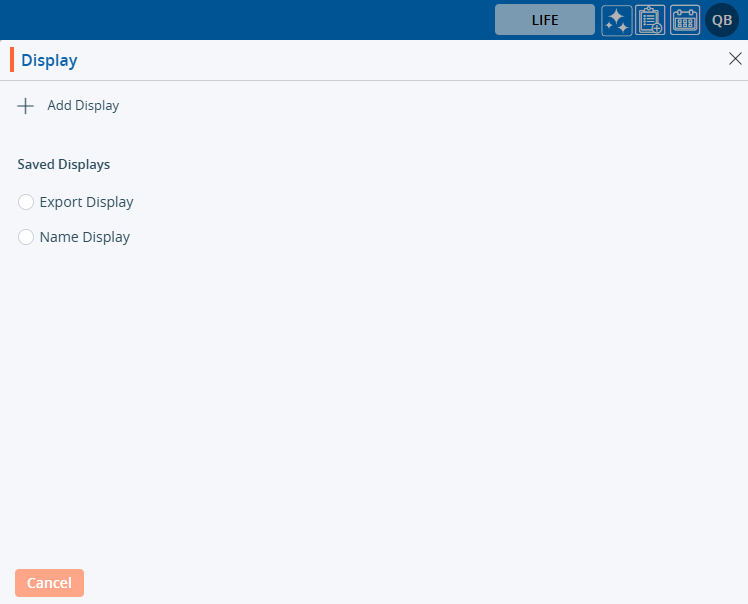
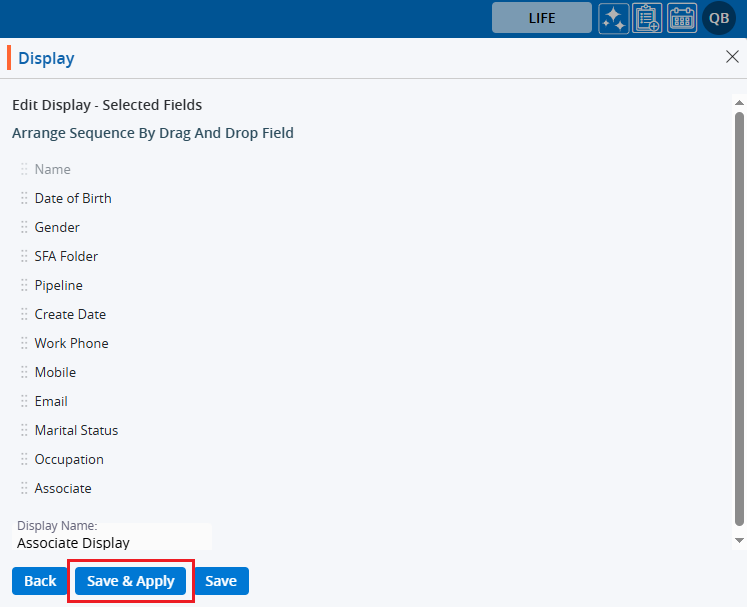
19. Clicking on ‘Next’ will open a new page listing the selected fields.
20. Users can change the sequence of the displayed fields using the six dots.

  • Apart from the ‘Name’ field, all other fields can be changed.
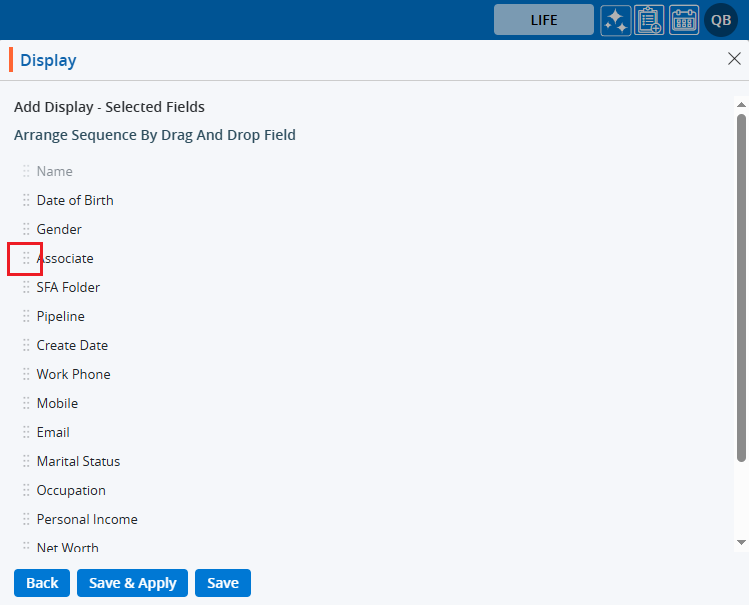
21. Add the ‘Display’ Name at the end.
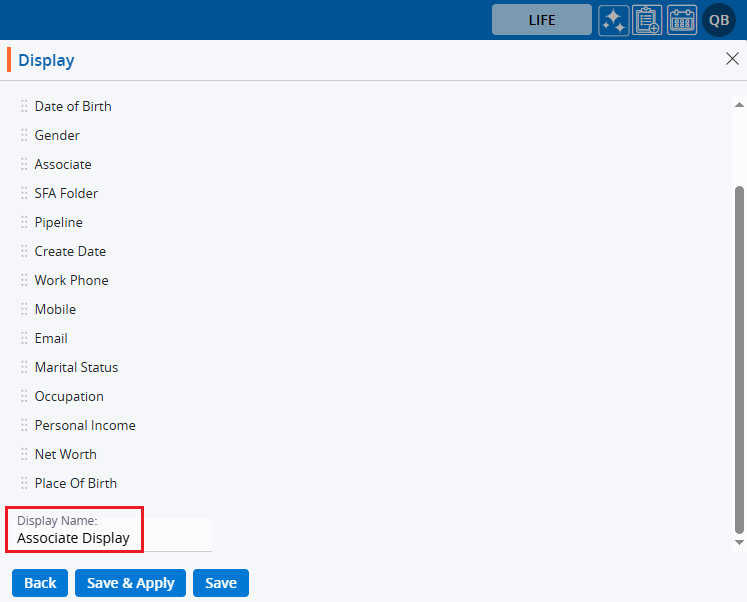
22. On the same page there are three options: Back, Save & Apply, and Save.
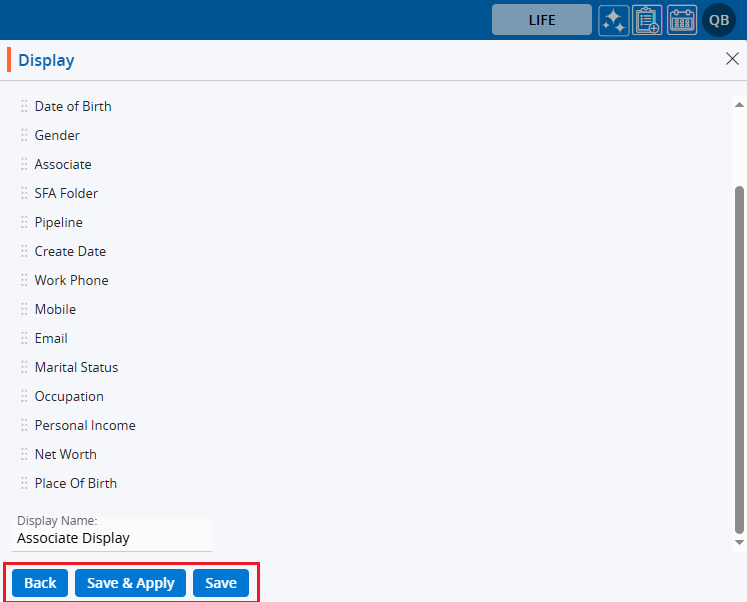
23. Clicking on ‘Back’ will return you to the ‘Add Display’ page.
24. Clicking ‘Save’ will save the ‘Display’, and it will be listed under Saved Displays (it will not be applied to the listing).
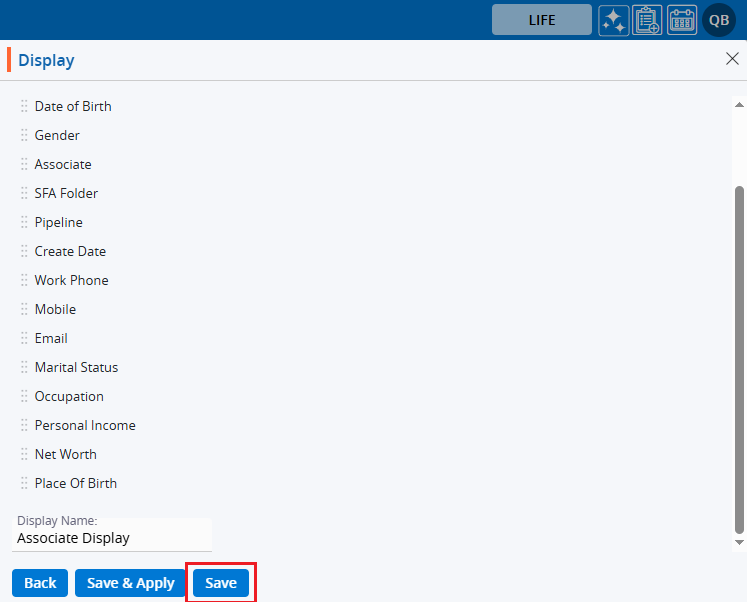
25. The system will generate a message that the ‘Display created successfully’.

26. Clicking on ‘Save & Apply’ will save the ‘Display’ under the ‘Saved Display’ listing and apply it to the ‘ASSOCIATES > Cases’ list.
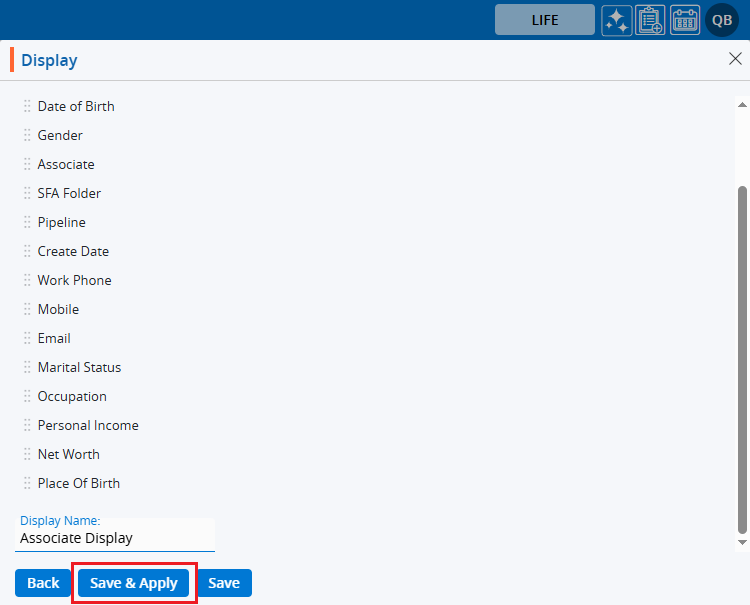
27. The system will generate a confirmation message, and the ‘Display’ will be applied to the ‘Cases’ list.

28. The ‘Cases’ listing will display the list according to the criteria set in the ‘ASSOCIATES > CASES > Display’.
29. Hovering the mouse over the ‘Display’ icon will show the name of the applied display.

30.The user can apply any available Display by clicking on the Display option, selecting the desired display, and then clicking on Apply.
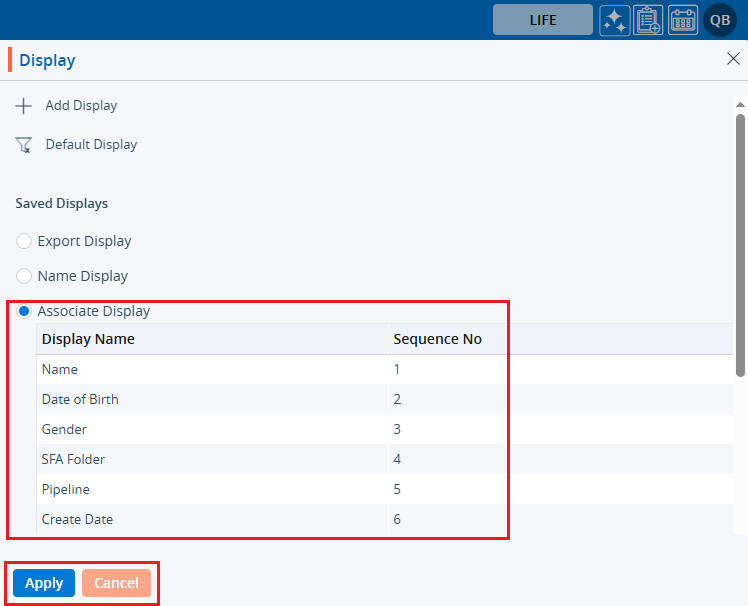
31. Users can view the ‘Display’ criteria by opening the Display popup and clicking on the ‘View Display’ icon.
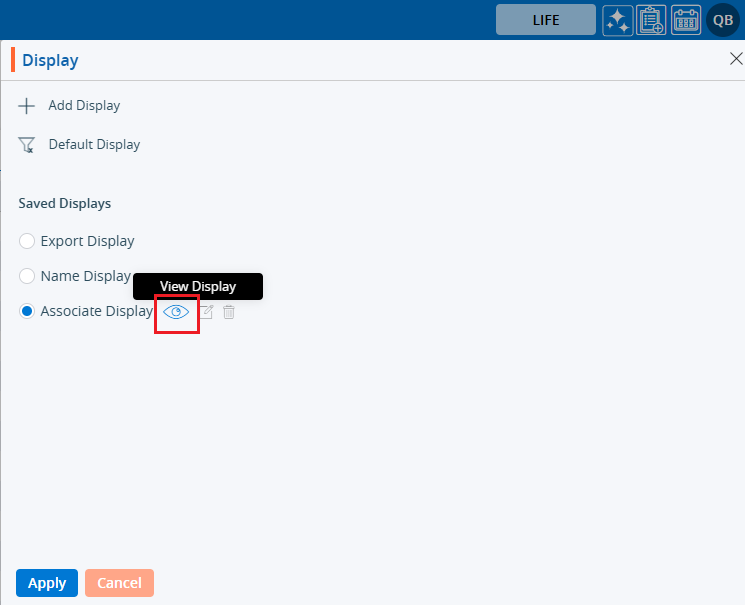
32. The creation criteria will be displayed.
a. Apply and Cancel buttons will be available.
b. Users can apply the ‘Display’ by using the ‘Apply’ option.
33. The user can Edit any available Display by clicking on the Display option, selecting the desired display, and then clicking on the ‘Edit Display’ icon.
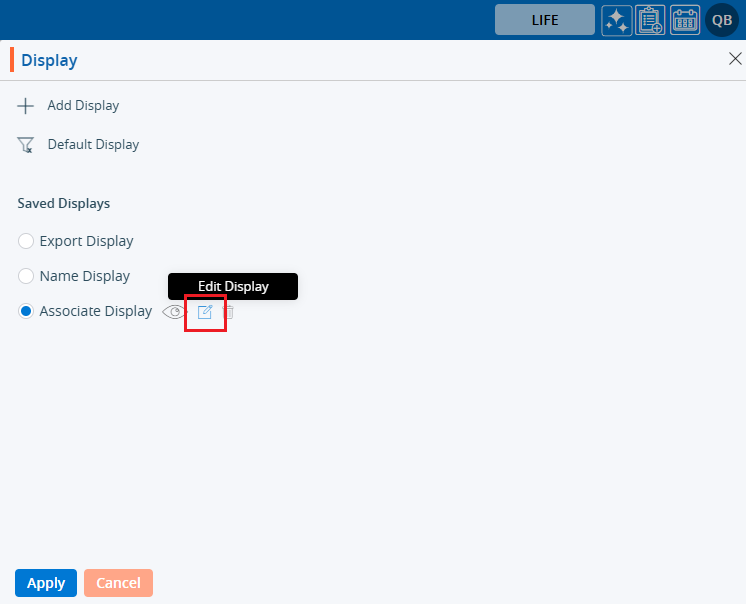
34. The ‘Display’ window will open with the existing criteria, and users can modify the ‘Display’.
35. Users can change the criteria of the ‘Display’ and click on ‘Save & Apply’.
36. An updated ‘Display’ will be applied to the ‘ASSOCIATES > Cases’ listing.

37. The user can delete any available Display by clicking on the Display option, selecting the desired display, and then clicking on the ‘Delete Display’ option.
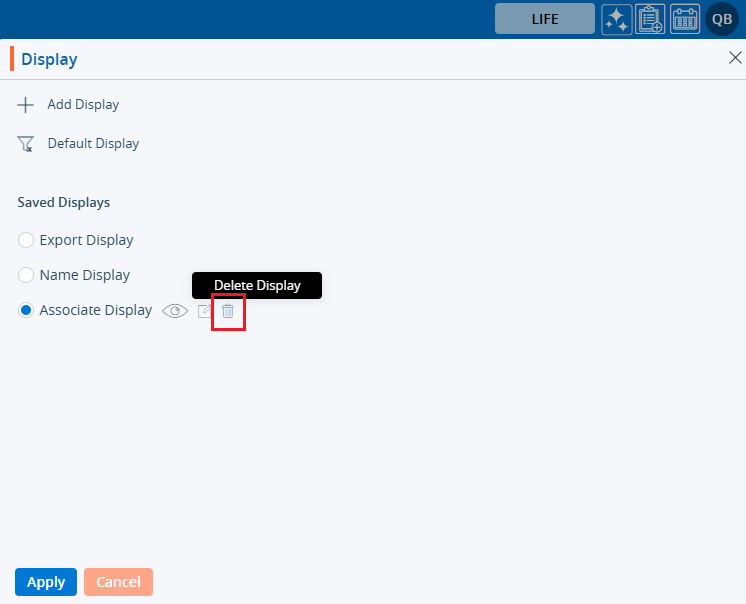
38. The system will ask for confirmation. Click on ‘Delete’.

39. The system will generate a confirmation message and the ‘Display’ will be deleted.

40. Users can verify if the ‘Display’ is deleted or not by opening the Display option and checking the Saved Displays..

0
0

Associate Cases > Associate Cases Filter

The Cases Filter feature allows users to create a customized listing by applying up to 5 filters. Users can choose from the available fields and apply them to refine the data as needed.

The following are the steps to create and apply a customized filter for ASSOCIATES Cases listing:
1. Navigate to the ‘ASSOCIATES’ tab where you’ll find the list of All Associates.

2. Click on an Associate to proceed.

3. After clicking on the Associate, the ‘Dashboard’ of their profile will open. Then, click on the ‘CASES’ option.

4. The ‘Cases’ page will open, showcasing a list of cases registered under this specific Associate.

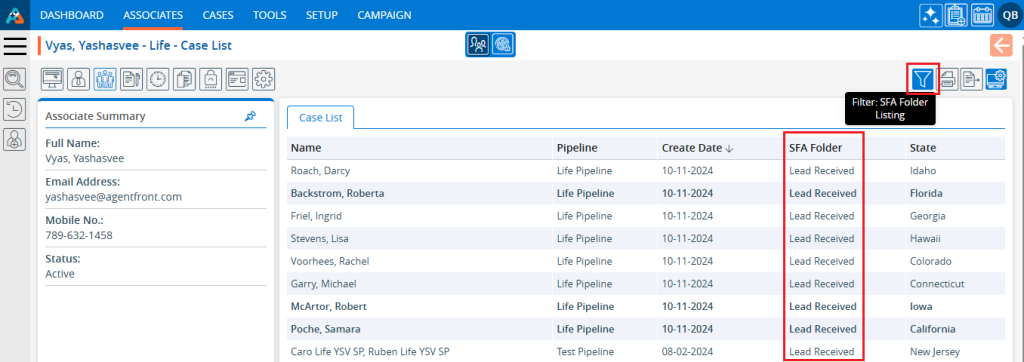
5. Click on ‘Filter’ option.

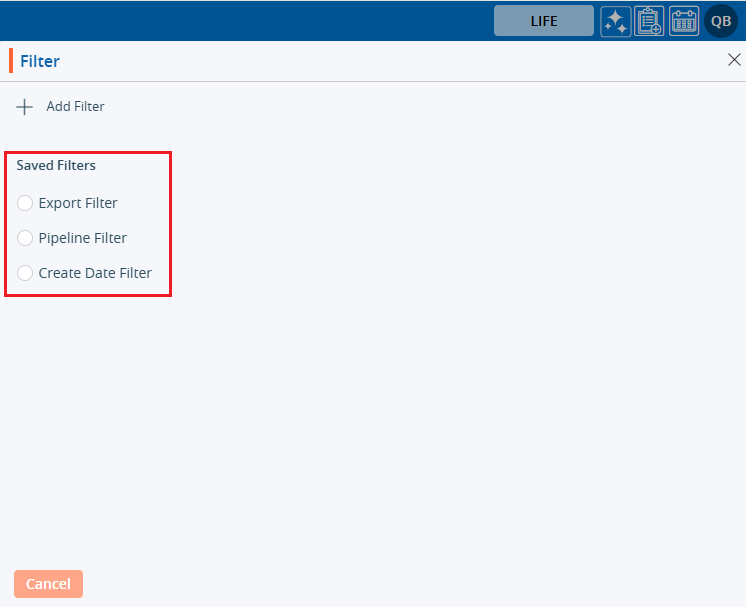
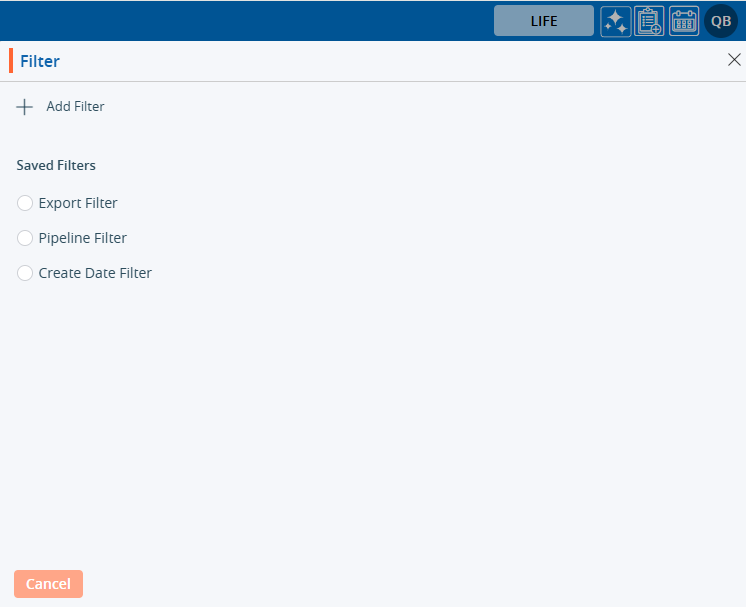
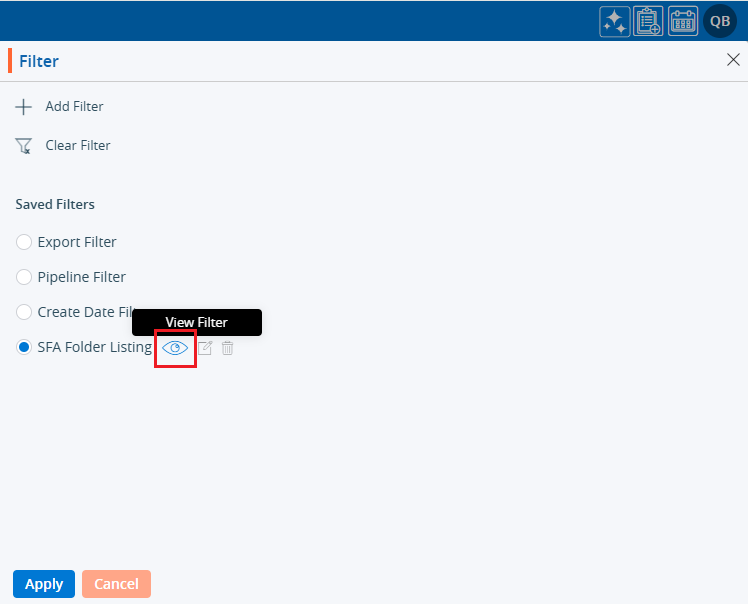
6. By clicking on ‘Filter’, will open a popup page to create a new filter.
a. Existing ‘Filters’ will be listed under ‘Saved Filters’, if available.

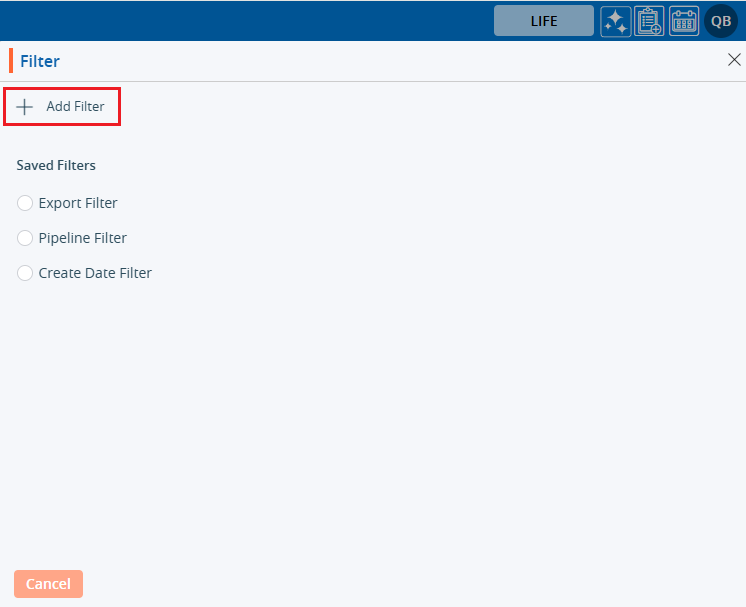
7. Click on the ‘Add Filter’ button within the popup window to create a new filter.

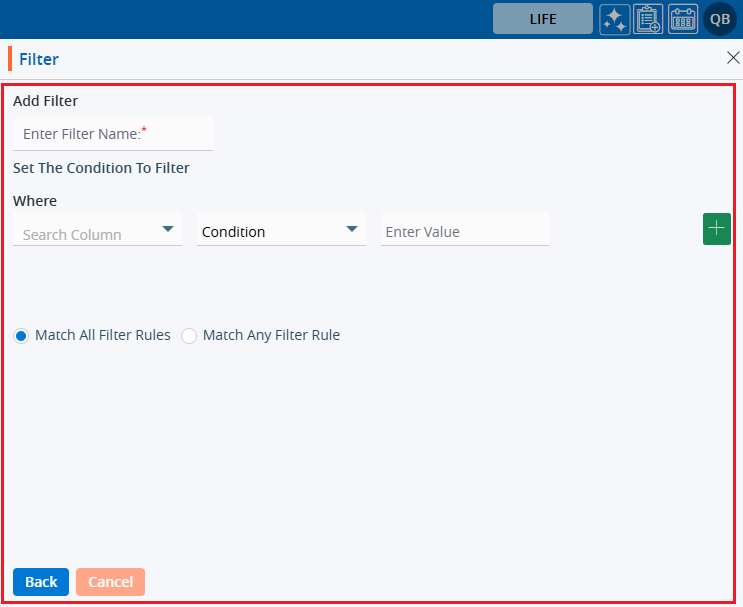
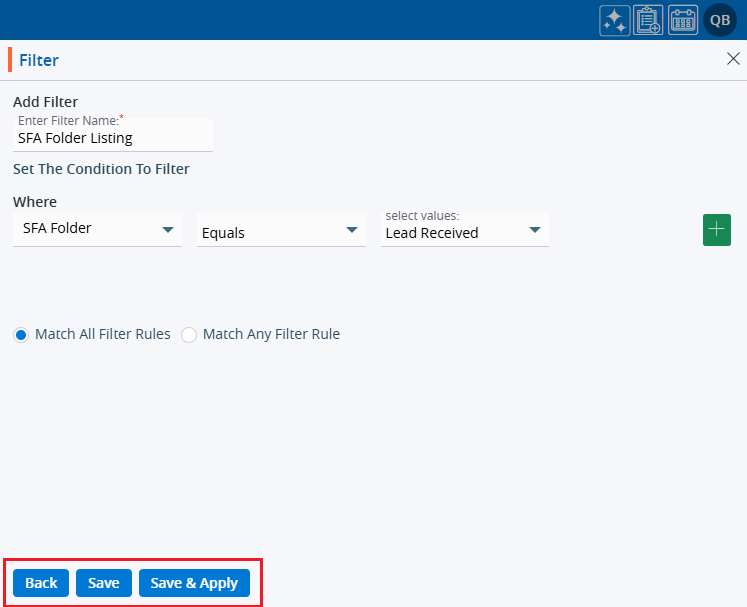
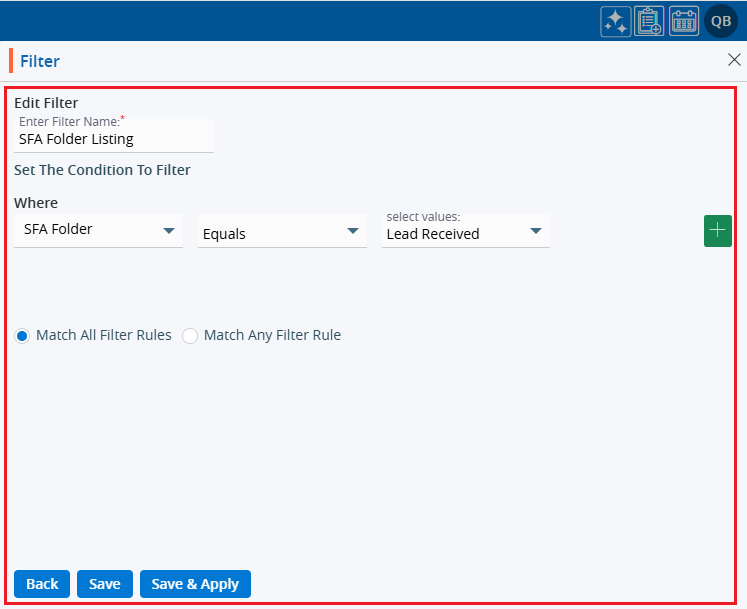
8. By clicking on ‘Add Filter’ will open a popup window where you can set the filter criteria according to your requirements.

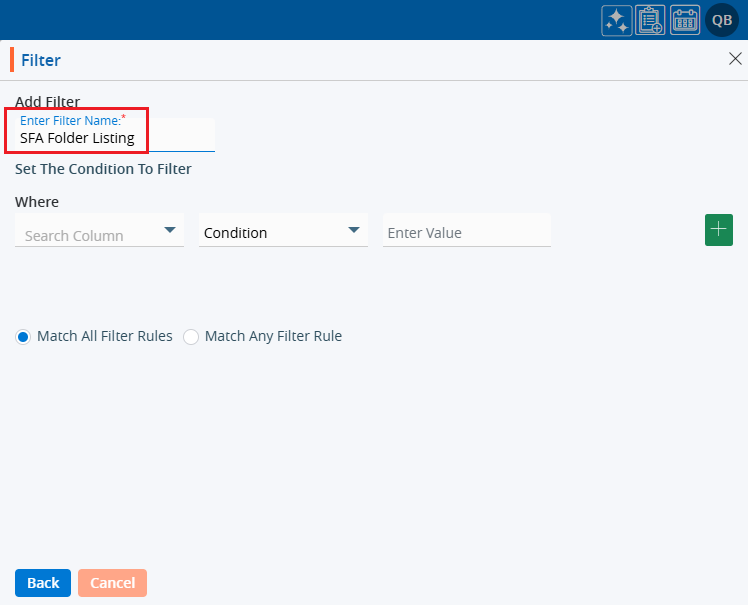
9. Add filter name.

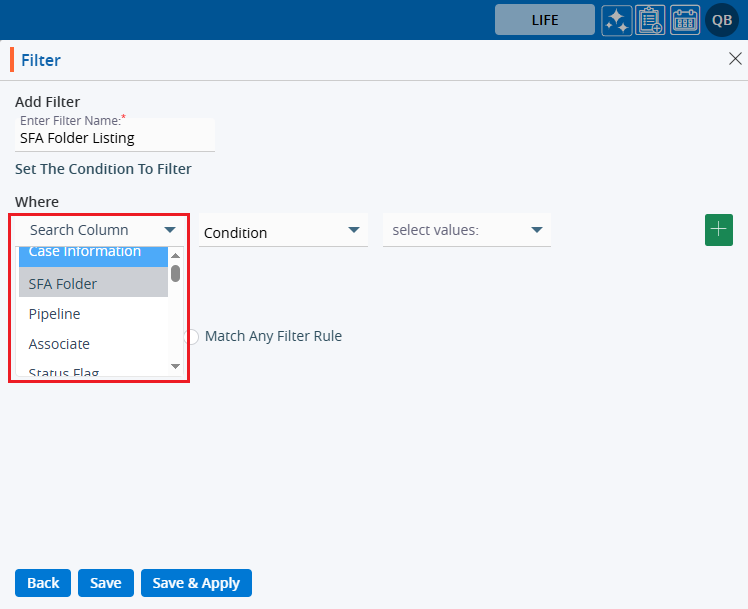
10. Select the field from the dropdown where the ‘Filter’ needs to be applied.

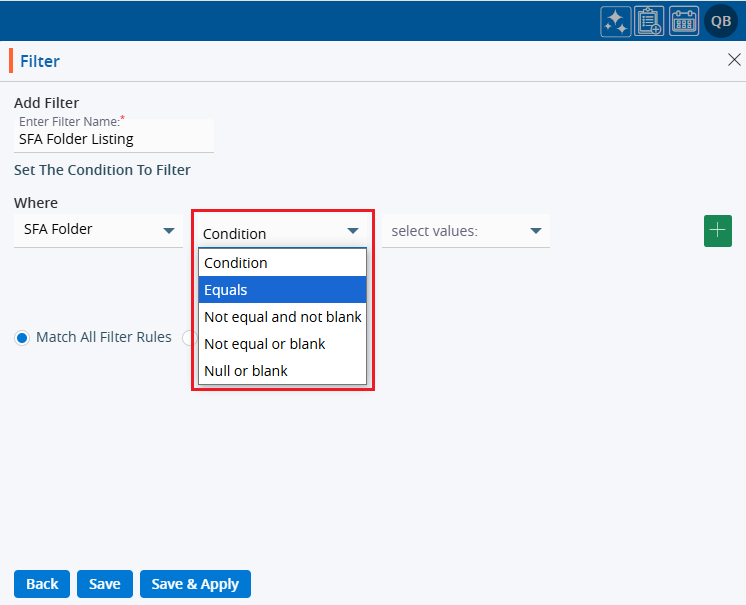
11. Apply the ‘Condition’ to set the ‘Filter’.

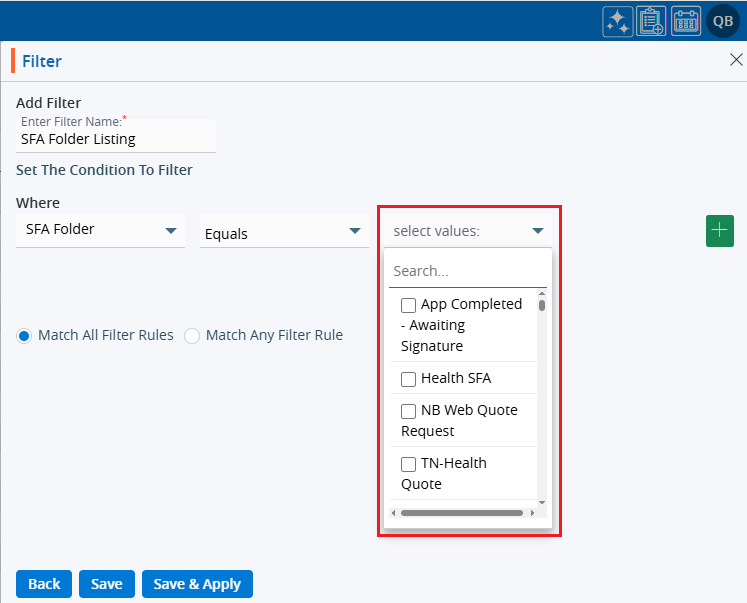
12. Select or enter the ‘Value’ to set the filter.

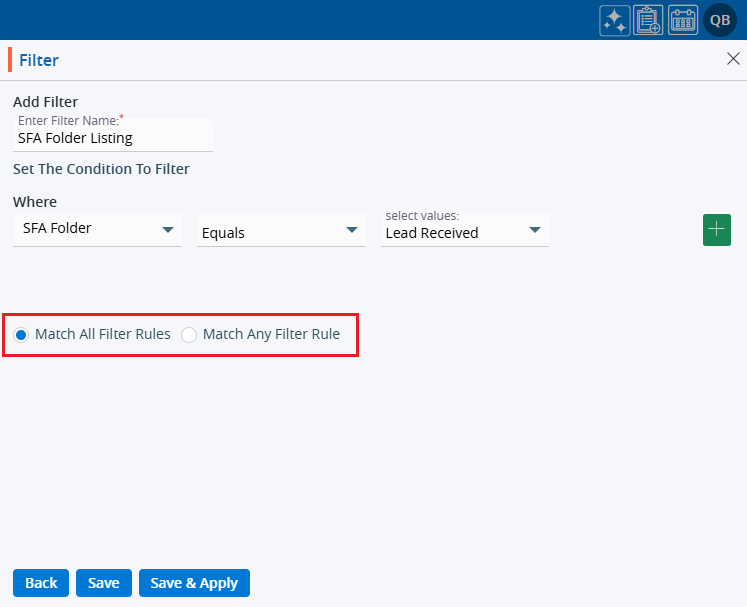
13. Select either the ‘Match All Filter Rules’ or ‘Match Any Filter Rule’ option as per the requirement.

14. There are three options: Back, Save and Save & Apply.

15. By clicking on ‘Back’, it redirects to the first page of the ‘Filter’.

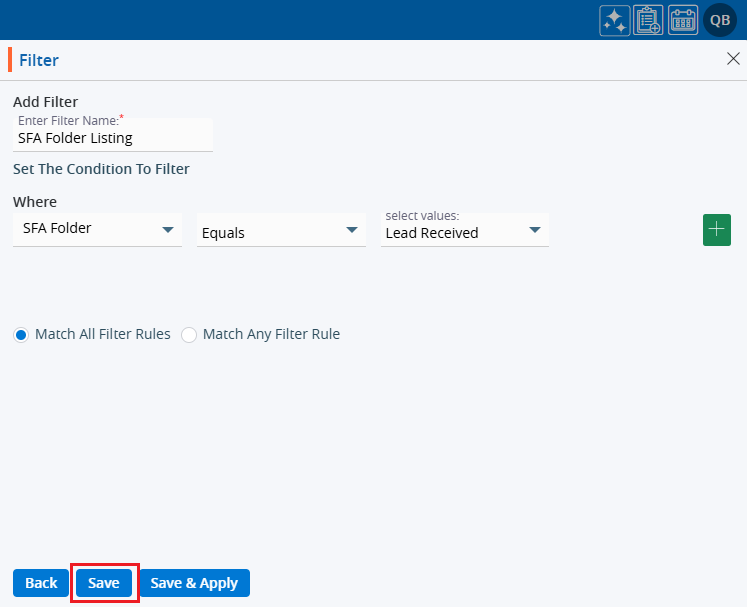
16. By clicking on ‘Save’, only the ‘Filter’ will be saved and displayed in the filter listing. (It will not be applied to the listing.)

17. The system will generate a confirmation message only for the created filter.

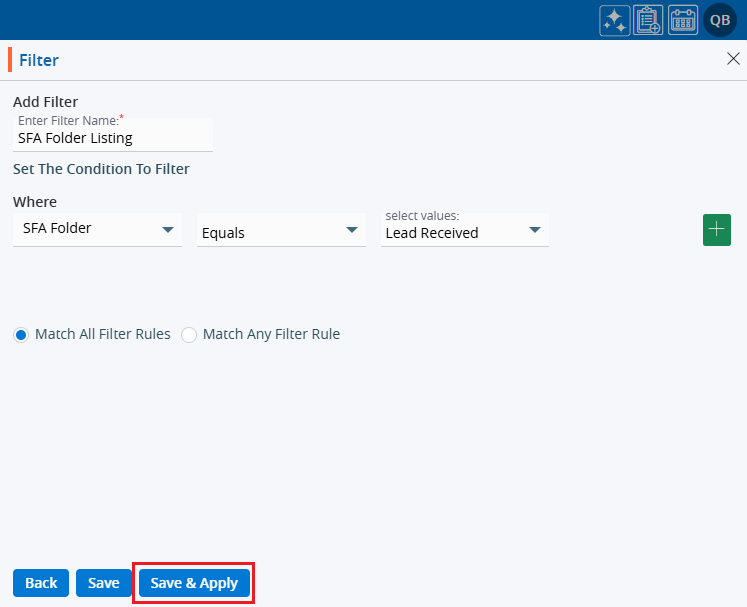
18. Clicking on ‘Save & Apply’ will save the ‘Filter’ under the ‘Filter’ listing and apply it to the ‘ASSOCIATES > Cases List’.

19. The system will generate a message, and the ‘Filter’ will be applied to the ‘ASSOCIATES > Cases List’.

20. Now, the Associates listing will display the list according to the criteria set in the ‘Filter’.
21. Hovering the mouse over the filter icon will display the name of the applied ‘Filter’.

22. The user can apply any available filter by clicking on the filter option, selecting the desired filter, and then clicking on Apply.
23. By clicking on Apply, the selected filter will be applied to the listing.
24. Users can view the filter criteria by:
a. Clicking on the ‘Filter’ again and hovering over the ‘View’ icon.
b. Clicking on the ‘View Filter’ option.

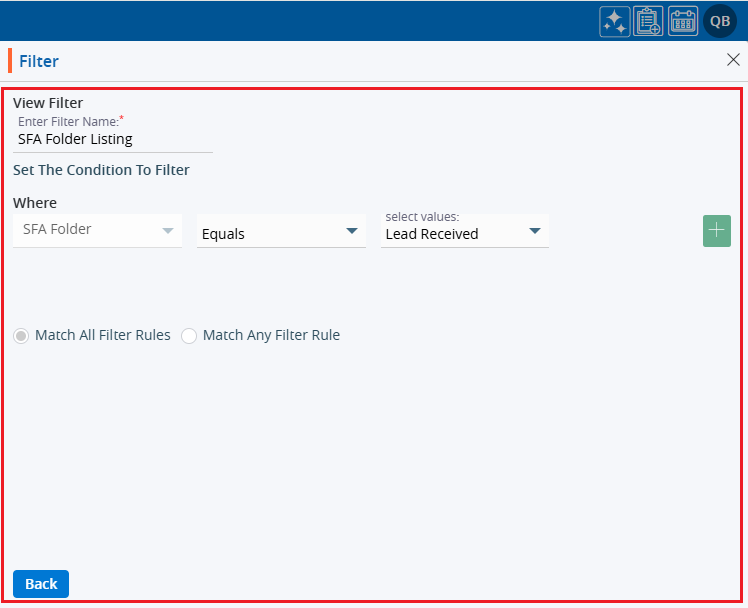
25. The ‘Filter’ criteria will display:
a. Only the ‘Back’ button will be displayed.
b. The selection of fields and criteria will be greyed out and not editable.

26. Users can edit the ‘Filter’ by:
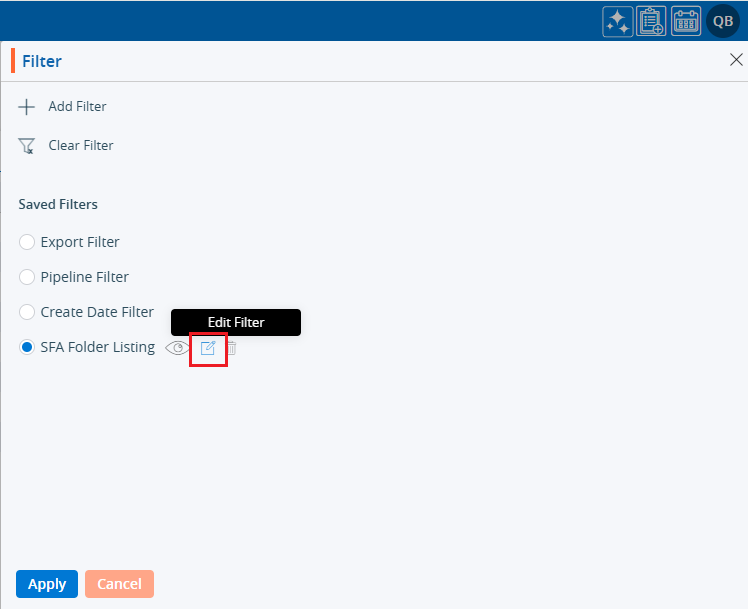
a. Clicking on the ‘Filter’ again and hovering over the ‘Edit’ icon.
b. Clicking on the ‘Edit Filter’ option.

27. The ‘Filter’ window will open with the existing criteria, and users can modify the ‘Filter’.

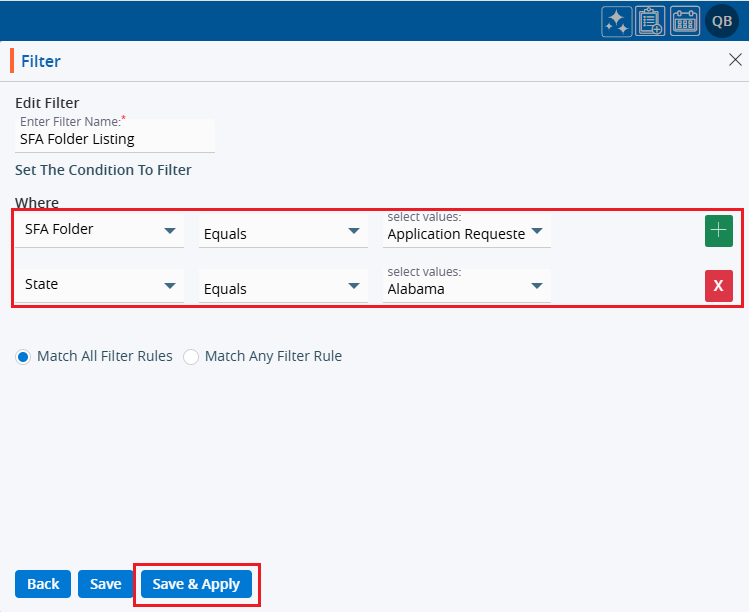
28. Users can apply multiple filter criteria simultaneously by:
a. Applying more filter criteria and then clicking on ‘Save & Apply’.

29. An updated ‘Filter’ will be applied to the ASSOCIATES > ‘Cases List’.

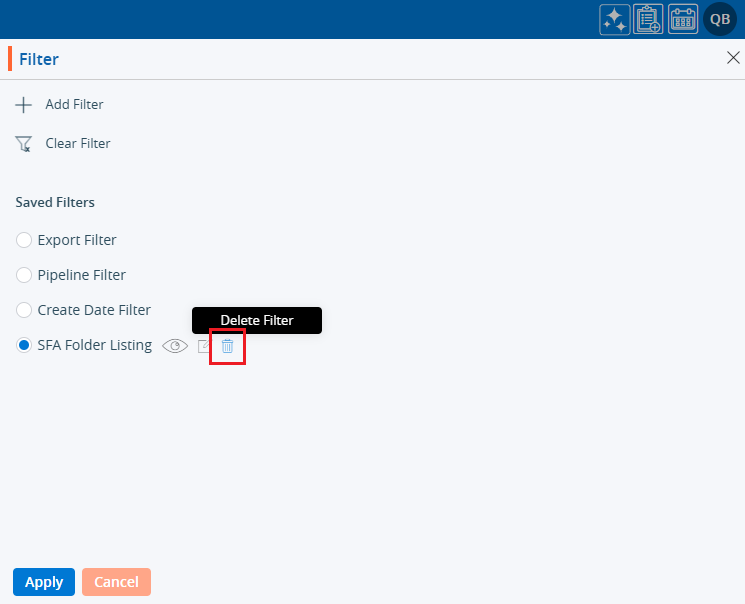
30. Users can ‘Delete’ the ‘Filter’:
a. Clicking on the ‘Filter’ again and mouse over on the ‘Delete’ icon.
b. Click on the ‘Delete Filter’ option.

31. The system will ask for confirmation. Click on ‘Delete’ to proceed.

32. The system will generate a message, and the ‘Filter’ will be ‘Deleted’.

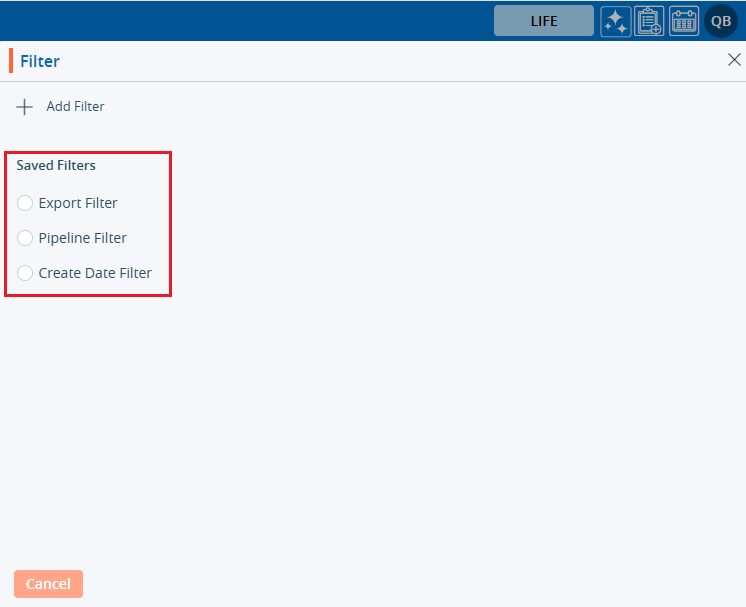
33. Users can check if the filter is deleted by:
a. Clicking on the ‘Filter’ again.
b. Checking the listing: A deleted filter will not be available in the ‘Saved Filters’ section.

0
0

Associate Cases > Associate Cases Export

The Export feature is used to export specific records according to the creation date.

The following are the steps to Export data:
1. Navigate to the ‘ASSOCIATES’ tab where you will find the All-Associate List. Click on an associate to proceed.

2. Click on an associate to proceed.

3. The ‘Dashboard’ will open. Click on the ‘CASES’ option.

4. A list of the associate’s cases will display. Click on the ‘Export’ icon.

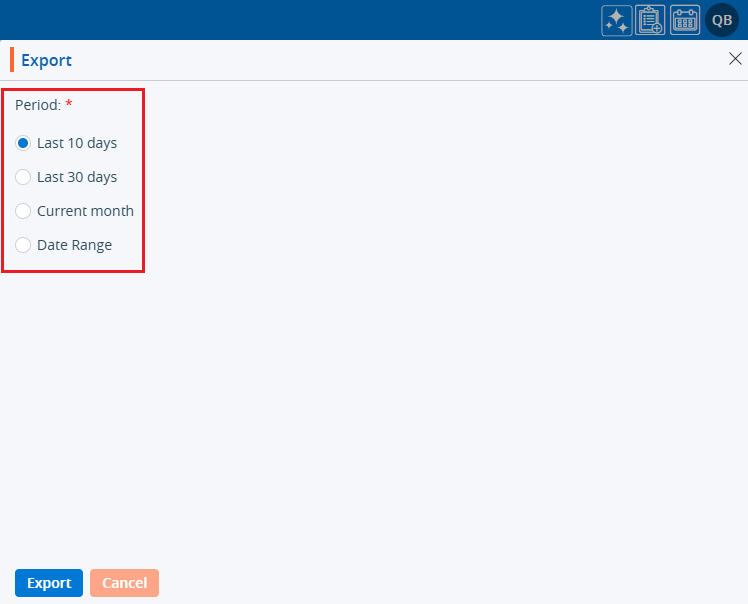
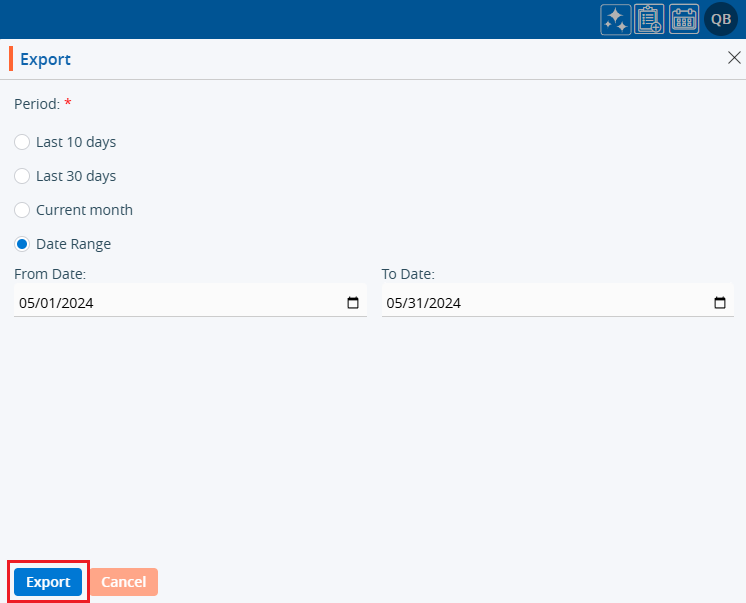
5. A pop-up window will open displaying the selection criteria for ‘Period’:
There are four options available:
a. Last 10 days – This option is used to export records from the last 10 days.
b. Last 30 days – This option is used to export records from the past 30 days.
c. Current month – This option is used to export records for the Current Month.
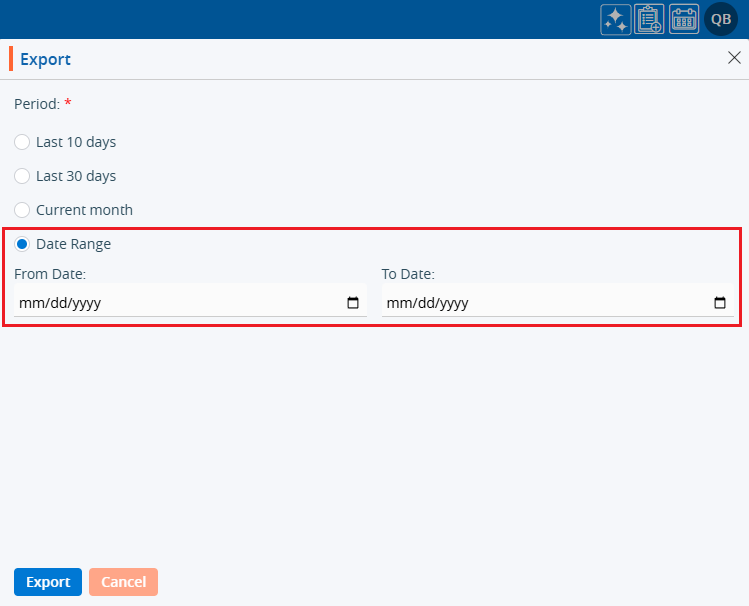
d. Date Range – This option is used to export records for the selected date range within 90 days.

6. For the first three options, select the radio button and click on the ‘Export’ button.
7. Records will be exported according to the selected option, and a CSV file will be saved.
8. For the Date Range option, specific dates will need to be selected.

9. After selecting the dates, click on the ‘Export’ button.

10. The records will be exported and a CSV file will be saved.

0
0

Associate Cases > Associate Cases Print

The Case Print feature is used to print specific data for the current page after applying any filters or search criteria. For example, if you are on the second page, it will only print the data displayed on that page, not all the data in the listing.
The following are the steps to view and update the Associate Cases List:
1. Navigate to the ‘ASSOCIATES’ tab where you’ll find the ‘All Associates List’.

2. Click on an Associate to proceed.

3. After clicking on the Associate, the ‘Dashboard’ of their profile will open. Then, click on the ‘CASES’ option.

4. The ‘Cases’ page will open, showcasing a list of cases registered under this specific Associate.
5. Click on the ‘Print’ option.

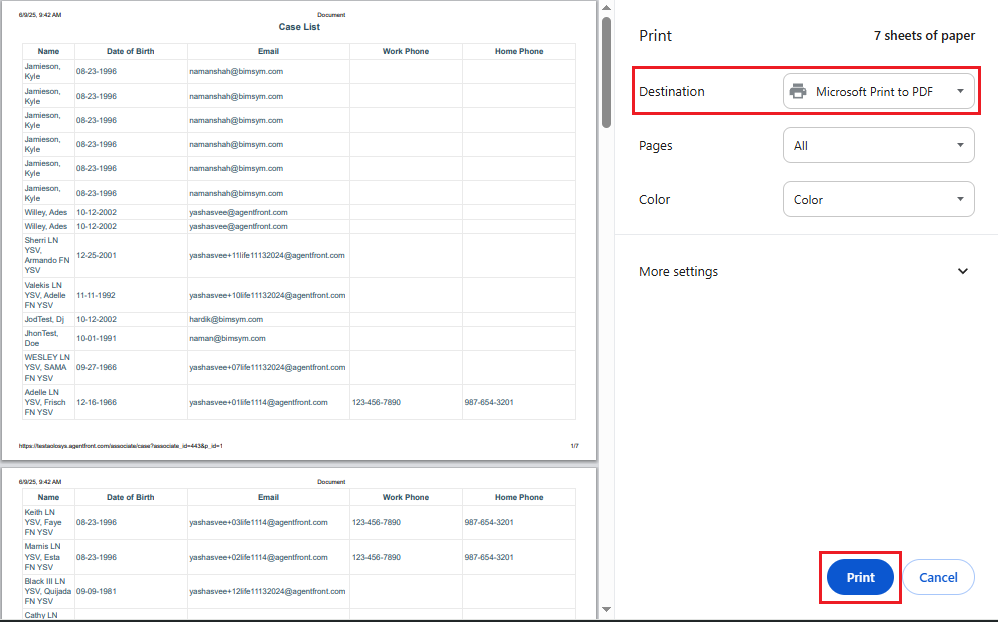
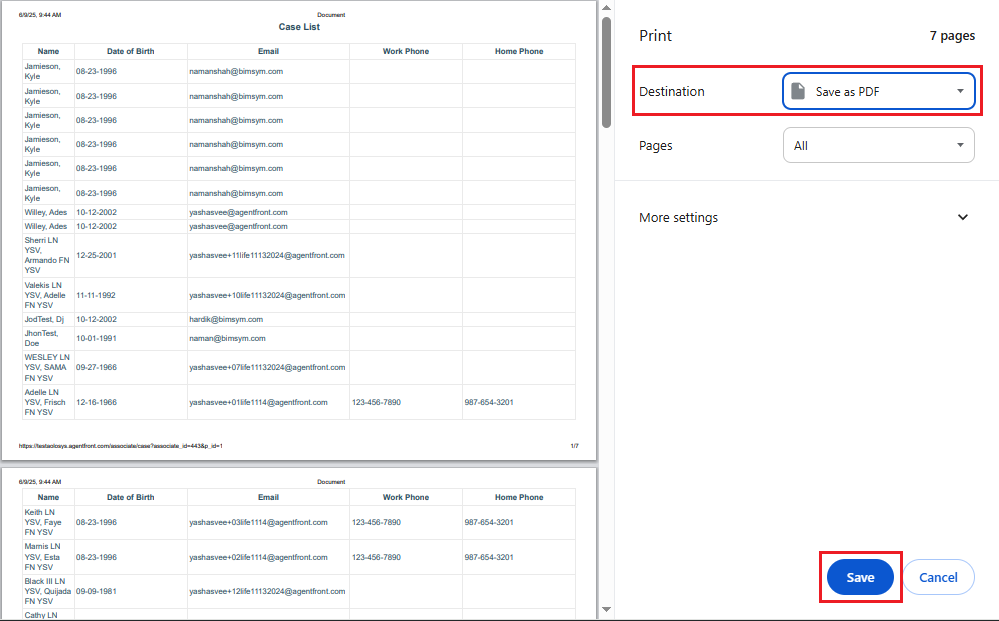
6. After clicking on ‘Print’, a popup page will open displaying the current page data and various print options.

  • Select the print option from the ‘Destination’ field and click on the ‘Print’ button.
    • Select the ‘Save as PDF’ option from the ‘Destination’ field and click on the ‘Save’ button to save the file.
    0
    0

    Associate Cases > Associate Cases

    The CASES option will display all cases registered under a particular Associate, excluding those in the Trash and Archive SFA Folder.

    The following are the steps to view and update an Associate’s Case List:
    1. Navigate to the ‘ASSOCIATES’ tab where you’ll find the list of All Associates.

    2. Click on an Associate to proceed.

    3. The ‘Dashboard’ will open. Click on the ‘CASES’ option.

    4. The ‘Cases’ page will open displaying the list of cases registered under the Associate.

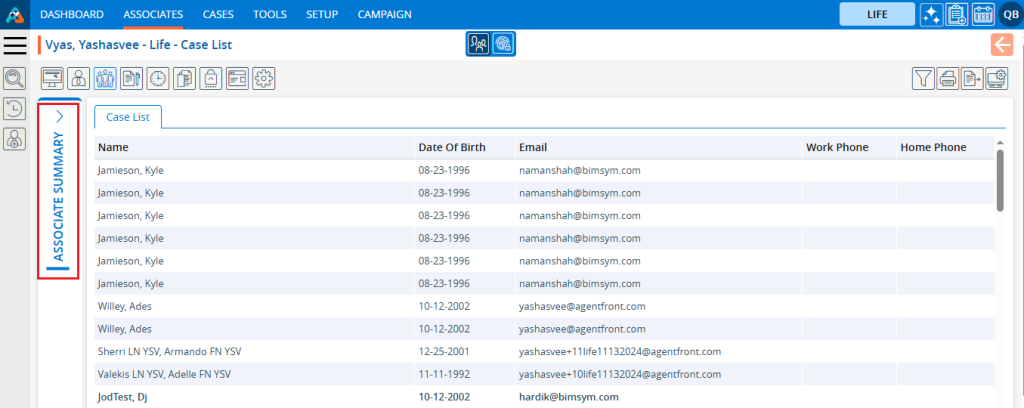
    5.The Associate Summary is displayed in the ‘Cases’ list on the left side. The display of the Associate Summary can be managed from Setup > Quick Profile > Associate.

    6. Deselecting the pin on the Associate Summary will reveal the option to hide the Associate Summary.

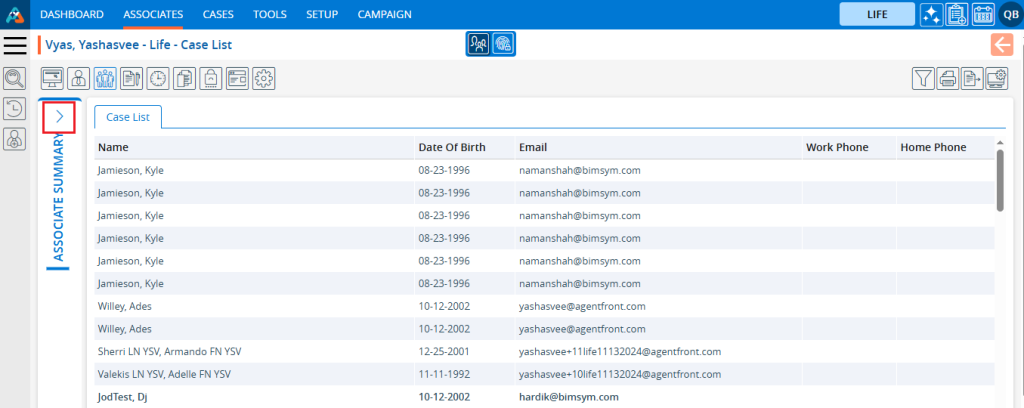
    7. Clicking the arrow ‘<’ will hide the Associate Summary.

    8. Clicking the arrow ‘>’ will display the Associate Summary.

    9.Selecting the pin option will keep the Associate Summary visible.

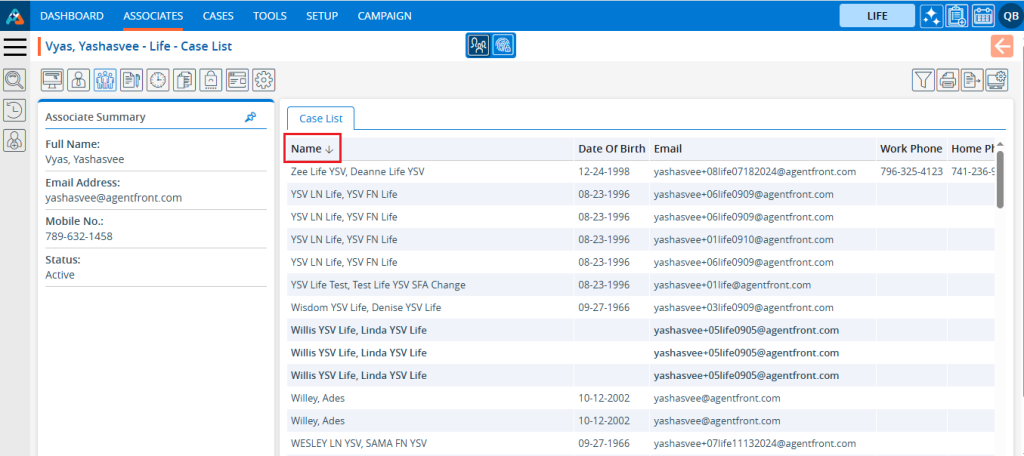
    10. Data can be sorted in ascending or descending order by clicking on the field title. When the user clicks on the field title, the list of the ‘Cases’ will be arranged in descending order.

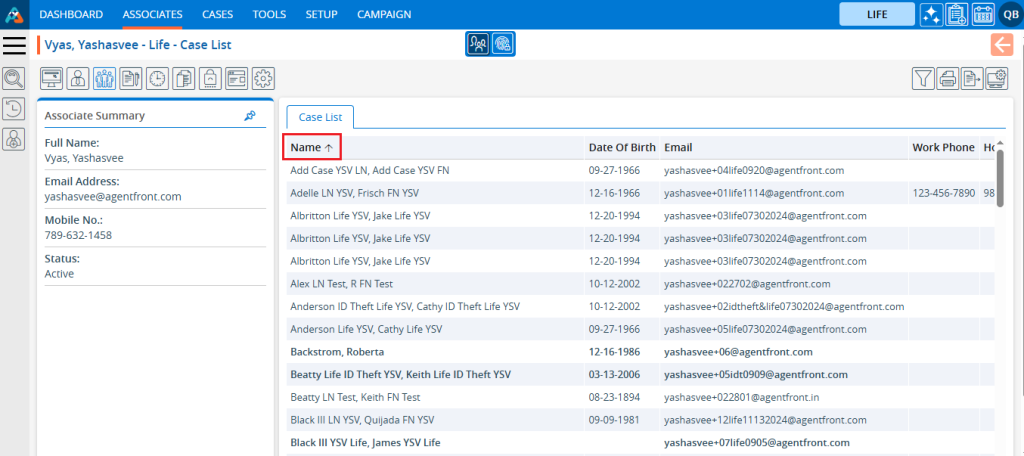
    11. When the user clicks on the title again, the list of the ‘Cases’ will be arranged in ascending order.

    12. On the right side at the top, there is a ‘Display’ feature. Users can customize the fields and arrange the specific display of the page using this option.

    13. On the right side at the top, there is a ‘Filter’ feature. Users can filter information from Associate’s ‘Cases’ using this option.

    14. On the right side at the top, there is an ‘Export’ feature. Users can export specific data from the Associate’s ‘Cases’ using this option. The exported data will be based on the selected date range.

    15. On the right side at the top, there is a ‘Print’ feature. Clicking on ‘Print’ allows users to print the current page. The print feature will print the data according to the selected display settings.

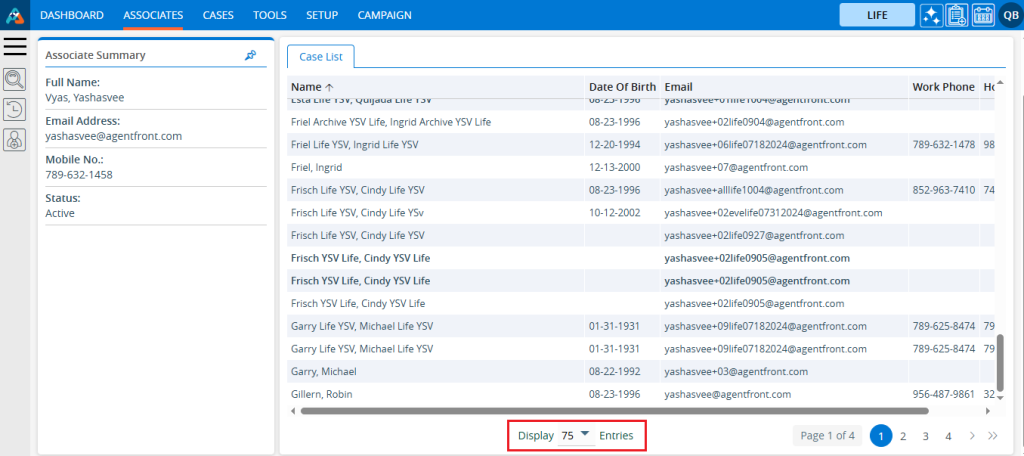
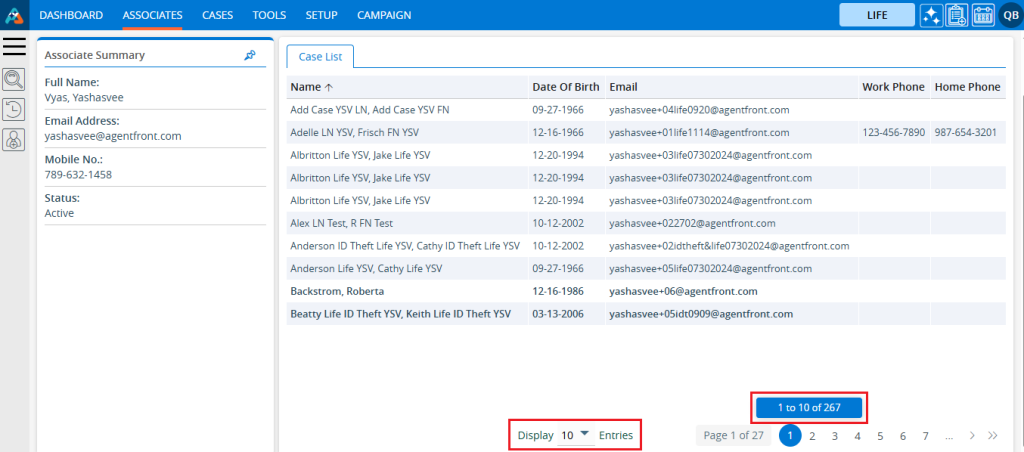
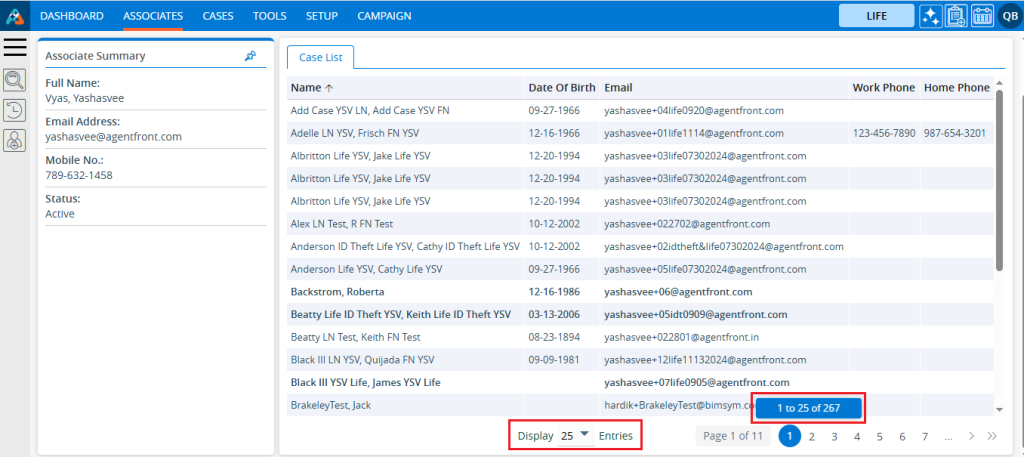
    16. At the bottom of the page, there is a feature to adjust the number of ‘Cases’ displayed per page from the ‘Display’ dropdown menu.

    17. The ‘Display’ dropdown menu offers six options to set the number of entries for the Display List:

    • 10
    • 20
    • 25
    • 50
    • 75
    • 100

    18. After selecting an option from the ‘Display’ dropdown, the system will arrange and display the entries on one page according to the user’s selection.

    19. Additionally, the pagination of the cases list will be adjusted by the system according to the selected option.
    For example,

    • If the user selects 10 entries per page, the system will display 10 entries per page, and the data will be distributed accordingly.
    • If the user selects 25 entries per page, the system will display 25 entries per page, and the data will be distributed accordingly.

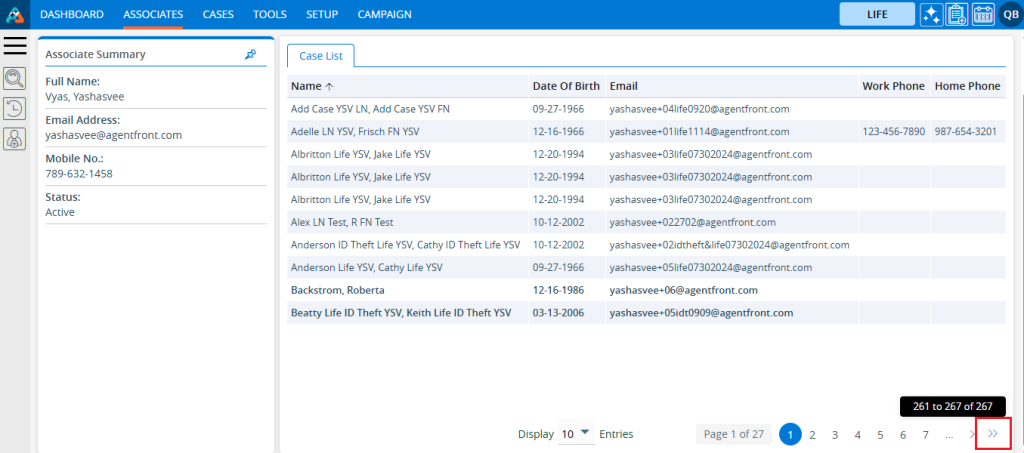
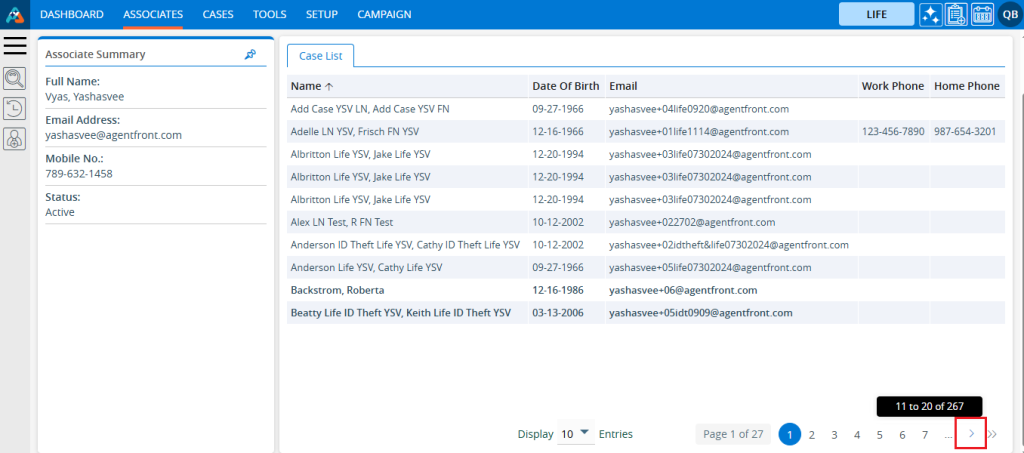
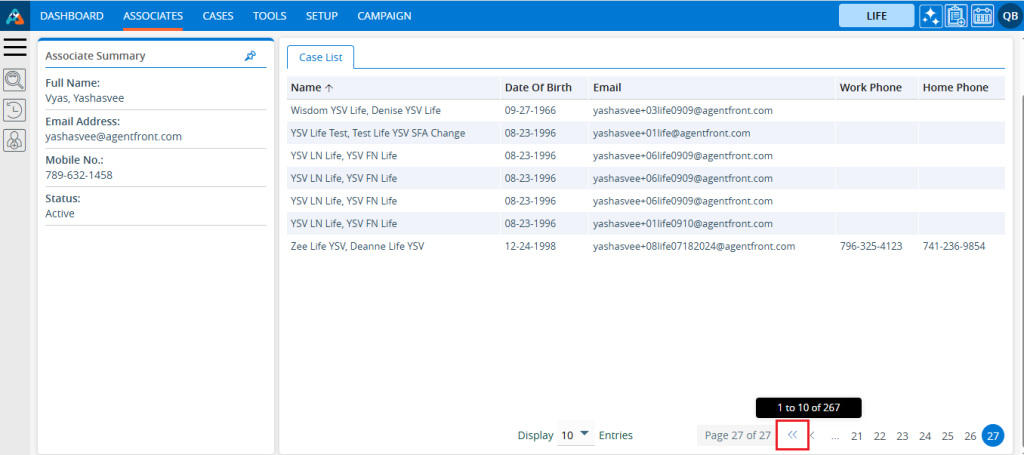
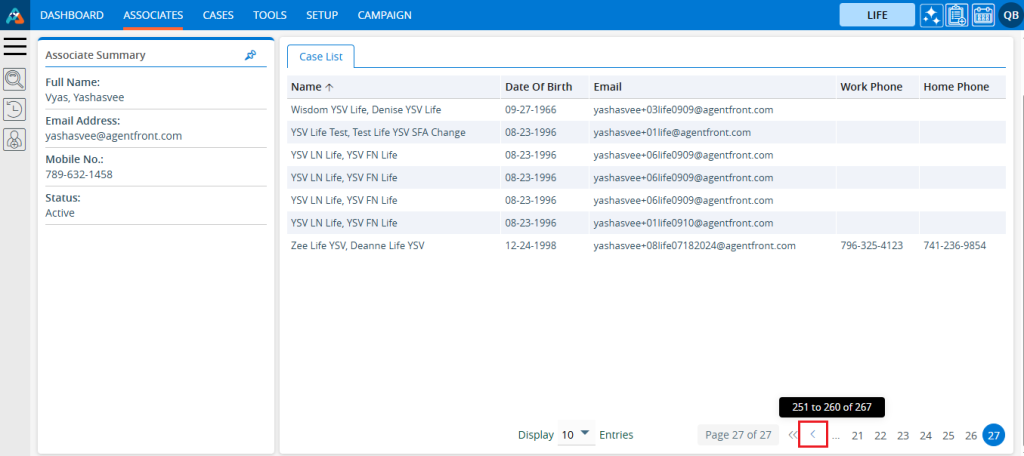
    20. The pagination will function according to the number of entries set, providing options for users to select a specific page or navigate directly to the first, next, previous, or last page.
    21. By clicking on the double arrow ‘>>’ on the right side, users can directly navigate to the last page.

    22. By clicking on the single right arrow ‘>’, users can navigate to the next page.

    23. By clicking on the double arrow ‘<<‘ on the left side, users can directly navigate to the last page.

    24. By clicking on the single left arrow ‘<‘, users can navigate to the previous page.

    0
    0