A Campaign Group allows you to organize multiple contacts into a single, manageable group. Once the group is created and contacts are imported, it can be used to launch multiple campaigns efficiently. Campaign Groups can be created for individual contacts or based on existing cases in the CRM, enabling more targeted and organized campaign management.
Create Campaign Group
- Sign in to AgentFront CRM.
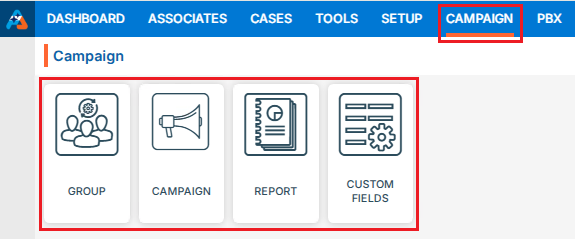
- From the top menu, choose Campaign.
- Campaign dashboard will open with multiple options (Based on the access rights).
- Click on Group.
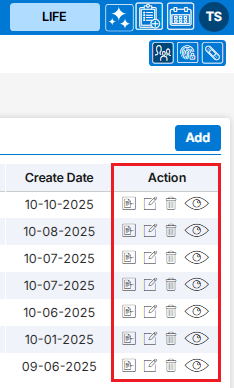
- It displays the list of available/created Groups.
- There is an Add button to add new group above the Action Column on the right pane.
- Also, there are options to Edit (
 ), Delete (
 ), and View (
 ) the existing group and option to Import Contacts to the group under the Action Column on the right pane.
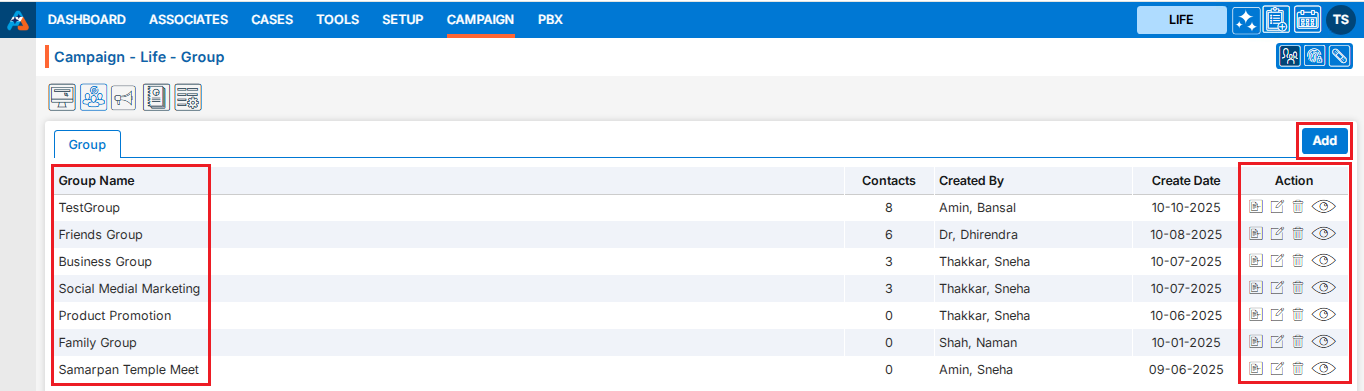
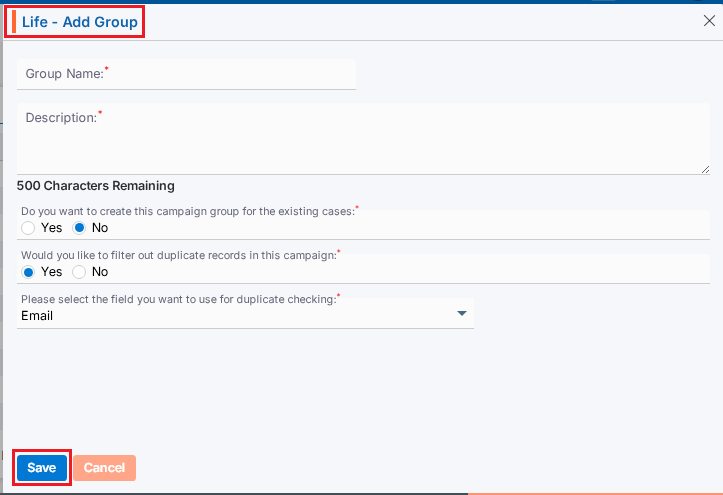
Add Campaign Group
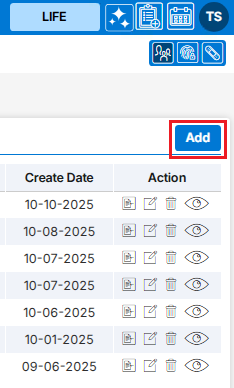
- Click the ‘Add’ button at the top right of the list.
- It will open page to create new Campaign Group with title Add Group.
- To add group, enter the following details:
- Group Name: Enter the clear, descriptive name. This is what users will see when they select a group while creating campaign.
- Description: Optional explanation of the group’s purpose.
- Do you want to create this campaign group for the existing cases:
Select Yes/No. If you want to create a group for the existing cases, select ‘Yes’. When ‘Yes’ is selected, the d and e options will not be available. Default option will be selected as ‘No’. - Would you like to filter out duplicate records in this campaign:
Select Yes/No. When ‘Yes’ is selected, duplicate records will be filtered out while importing contacts into this group. Default option will be selected as ‘Yes’. - Please select the field you want to use for duplicate checking:
Choose from the drop-down list (Default will be Email). Duplicate records will be filtered out based on selected field from drop-down and will remove those duplicate records while importing contacts into this group. - Click Save. The group is now listed and ready for use.
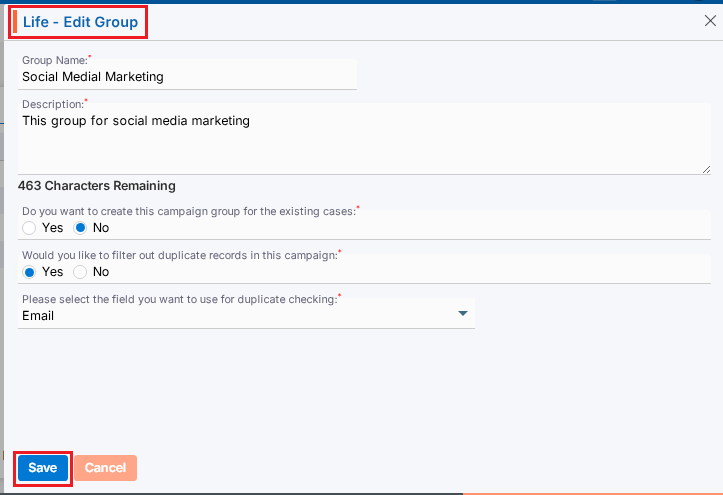
Update Campaign Group
- To update the existing group from the available list, click on Edit () icon from the Action Column for the group you want to edit/change.

- Clicking the Edit () icon will restrict editing if the group is referenced elsewhere (e.g., in a campaign), and the system will display appropriate popup message.
- Clicking the Edit () icon will open the selected Campaign Group in edit mode with title Edit Group if the group is not referenced elsewhere.
- You can make the required editing in the below field’s values of the open group.
- Group Name: Enter the clear, descriptive name. This is what users will see when they select a group while creating campaign.
- Description: Optional explanation of the group’s purpose.
- Do you want to create this campaign group for the existing cases:
Update Yes/No.When ‘Yes’ is selected, the d and e options will be disabled. - Would you like to filter out duplicate records in this campaign:
Update Yes/No. When ‘Yes’ is selected, duplicate records will be filtered out while importing contacts into this group. - Please select the field you want to use for duplicate checking:
Update from the drop-down list. Duplicate records will be filtered out based on selected field from drop-down and will remove those duplicate records while importing contacts into this group. - Click Save. The group is now updated.
Import Contacts in Group:
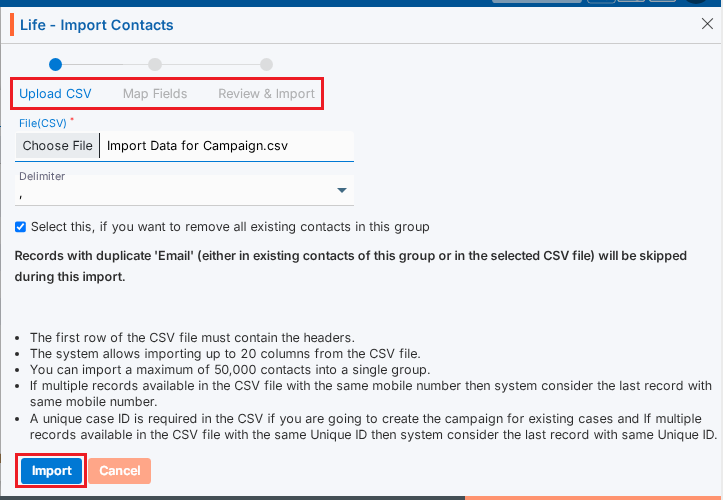
- To import contact to the existing group from the available list, click on Import Contacts icon from the Action Column for the group you want to import contacts.
- It will open the Import Contacts page for selected Campaign Group.
- There will be 3 steps to Import Contacts:
- Upload CSV
- Map Fields
- Review & Import
- Upload CSV:
- Choose File of the contacts which you want to import to this group.
- Select Delimiter option from the drop-down. (The selected file format must match the selected delimiter option.)
- If you want to remove all existing contacts from the Group, select the check box ‘Select this, if you want to remove all existing contacts in this group. Otherwise, new contacts will be added to this group keeping any available contacts.
- You need to read all the bullets on this page to import contacts.
- Click Import to add contacts in this group.
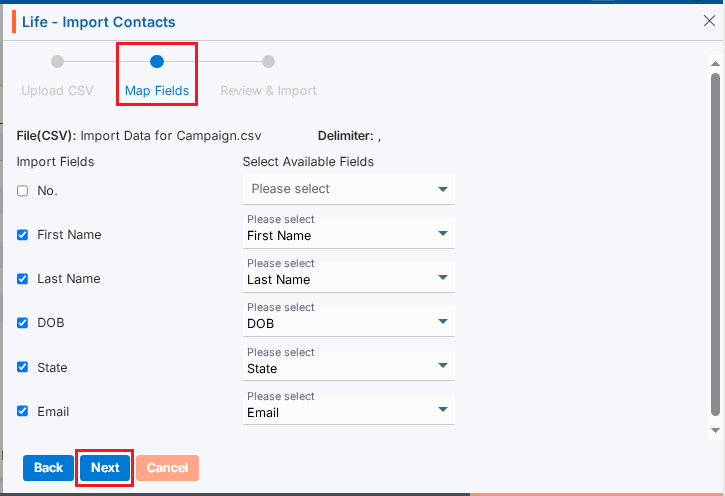
- Map Fields:
- On the same page next step is for Map Fields.
- Under “Import Fields” on the left panel, the system shows the header row from the uploaded CSV file.
- The “Available Fields” section displays all fields defined under Campaign > Custom Fields, including both Custom and Reserved fields.
- You can deselect unwanted fields. (Here, we have deselected fields No.)
- Map the appropriate fields for each field from the dropdown. (Unique Case ID field is required if you selected ‘Yes’ in field ‘Do you want to create this campaign group for the existing cases’ while creating Group)
- Click Next.
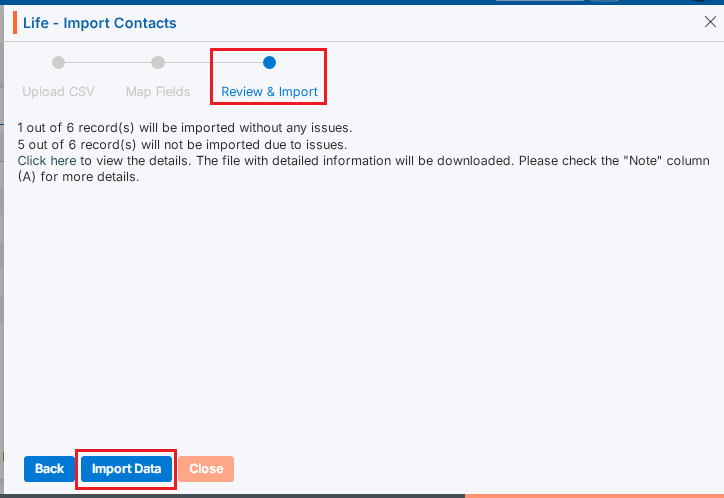
- Review & Import:
- On the same page next step is for Review & Import the contacts.
- Review page will display the counts of contacts with issues and without issues.
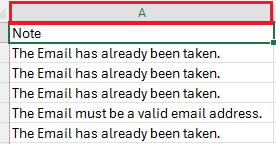
- The system generates a CSV file link containing the records with issues. Click “Click here” to download and review the file.
- System will check contacts with following criteria and display issue message in Column A:
- Validation Check: Validation will be checked based on the settings configured under the Custom Fields tab for each field mapped in Step 2.
- Duplicate Contacts: Duplicate contacts will be checked in the selected group and within the selected csv file and those records will be filtered out as issue. (This will apply only if ‘Yes’ is selected in field ‘Would you like to filter out duplicate records in this campaign’ while creating Group)
- Click Import Data. Contacts without issues will be imported and shown in the selected group.
View Contacts
- Contact counts will be shown for the selected Group in Group list.
- Click View Contacts () icon from the Action Column for the group you want to view details of contacts.

- Clicking on View () icon, New page will open with all contact which were successfully imported.
- Clicking on View () icon system will generate popup message if any contact is not available for selected group.
- Contact can be Add, Viewed, Edited or Deleted from this page.

Delete Campaign Group
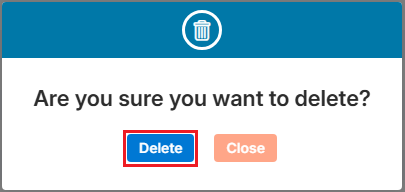
- To delete the existing group from the available list, click on Delete () icon from the Action Column for the group you want to delete.

- It will ask for confirmation popup, click on Deleted button to delete group otherwise click on Close button.
Note: If the group is referenced elsewhere (for example, in a campaign), deletion is restricted until those referenced are removed.